Thank you to everyone that entered by Santa Barbara Chocolate giveaway! Those of you that submitted product ideas they sound fabulous and I can't wait to see if the boys at SBC take some of those suggestions and make them into reality! Also HUGE thank you to Santa Barbara Chocolate for sponsoring this giveaway. They've pretty much ruined my chocolate expectations for life now.
So now you're wondering, who won??
Well, take a look below. They are arranged in order of grand prize winner all the way down to third prize winner. I'll be in touch so Jason and Justin can get you your delicious chocolates. Congratulations Kristen, Jessie S., Tamara A., and Dina J.!!!
If you didn't win, don't fret, don't forget you can still get 10% off your order using my special code chrisseskitchen.
a Rafflecopter giveaway
Showing posts with label dessert. Show all posts
Showing posts with label dessert. Show all posts
Saturday, April 5, 2014
Monday, March 17, 2014
Santa Barbara Chocolate Review/Giveaway and Triple Chocolate Mousse Cake!
Happy Monday, fans! Oh my do I have an absolute TREAT for you today!
About a month ago I was contacted by a cool dude named Justin at Santa Barbara Chocolate Company. He had stumbled across one of my old blog posts featuring this Chocolate Nutella Fudge with Sea Salt and was wondering if I'd like to partner with them. There was the promise of free organically grown, ethically traded chocolates to be had. If you've been following me on facebook at all you'll know that I've been going dairy free for several months now because my little nursling son is sensitive. Chocolate is often off the menu because many brands contain milk or milk ingredients. My heart sunk at first because I thought "Why? Why NOW do these companies find me when I cannot taste their delicious products and want chocolate sooooo badly???". But then I went to their website and found that they offered many dairy free options! Score! So I shot an email back to Jason explaining my situation and asking that they please send at least one dairy-free option for me to personally try (and my husband Chris - the real sweets lover in this family anyway - could call dibs on whatever else they sent).
Let me just say that Justin is a real SoCal guy who was so much fun to "talk" to and Jason their Maitre Chocolatier BLEW ME AWAY with how fast and personalized he made my package. Not only was there a personal hand-written note but they sent me nearly TEN POUNDS of assorted chocolates to try. Each was even labeled "dairy free" where applicable!

So like kids at Christmas time Chris and I tasted each of the samples.

I started with the Hispaniola Rainforest Dark 60%. It was smooth and rich. The perfect balance of dark and a touch of sweet just like you'd expect from a high quality dark chocolate. It's a very classic dark chocolate so would be very versatile for baking, creating candies, or eating straight out of the bag. Having not had any chocolate in quite some time, it was pure bliss to eat and I knew it would be hard to beat...but there were still seven more samples to go!

Going a little bit darker I found myself trying the Peru Rio Tigre Extra Dark Chocolate 75% next. Visually it was a few shades darker than the previous sample and that's to be expected since there's 15% more cacao. My first taste impression was confusion because it was not as smooth as I'm used to and dare I say even a touch gritty. At first I thought perhaps it was just due to the higher cacao content but I have had dark chocolates as much as 90% cacao and not had the textural impact before. So I gave Justin and Jason a shout. It turns out that Jason designed the chocolate to be this way. The cocao solids (fibre in this case) are not ground as long so that they retain a higher percentage of cocao antioxidants. Sounds healthy to me!
Similarly, I'm not sure that I have ever tasted 100% Pure Cacao. Though I love dark and extra dark chocolates, these ultra dark unsweetened chocolate chunks were too bitter for my personal taste. As for Chris? Forget it! That kid LOVES all things sugar. Jason told me that they're wonderful for those on paleo diets or with low glycemic concerns such as diabetics because they contain no added sugar. He even enjoys them as a fondue or with a cup of hot green tea. I might try melting these down and adding dried fruit and nuts to create a chocolate bark. As an aside, Chris said he had a co-worker who gave their kid 100% pure cacao when they asked to try chocolate. As one would expect, it was not very palatable to a child and thus the parent's scheme to get the kid to not like chocolate worked ;).
The Belgian Dark 64% was good and I think would be excellent for candies but when compared to the rest of the dark chocolate samples, not particularly memorable.
The Manjo Rainforest Dark 66% woke my tastebuds right up! There was a subtle fruitiness to it which I wasn't expecting. You could tell that this was high quality stuff! I had to stop myself from eating the medallions straight from the package. I basically have been eating a chocolate medallion...or two...or three...of the Manjo everyday since receiving the package. It contains 100% cocoa butter so it's velvety smooth and ready to eat. I loved just popping them in my mouth and letting them slowly melt. Frankly I was a little bit sad that Jason and Justin only sent me a smaller sample of this variety. But now I know what I'll be buying to get my dairy-free chocolate fix!! It was my favorite sample by a hair (followed by the Hispaniola Rainforest Dark 60%).
The Belgian Milk Chocolate and Belgian White were taste tested by Chris alone since he is the only one in our family that can eat dairy right now. He happily snacked on them but couldn't really give me a detailed analysis other than that the Belgian Milk Chocolate was his favorite. Go figure since it has the least cacao (40%) of the chocolates we sampled and therefore is sweetest! When I used the Belgian White chocolate in my baking application, it was my father-in-law's favorite of the three layers.
After sampling everything I was left with the difficult decision of how to feature the high quality chocolate varieties. With Jason's guidance that the Peru Rio Tigre Extra Dark Chocolate 75% was designed with pastry applications in mind and in particular, flourless chocolate cakes, I knew exactly what I wanted to make because I remembered a cake which I bookmarked from years ago.
This Triple Chocolate Mousse Cake features three of Santa Barbara Chocolate's finest Couverture chocolates. I intentionally chose two different dark chocolates because the texture of the dark layers is different. The cake is more dense and could stand up to the heartier texture of the Peru Rio Tigre whereas I wanted the dark chocolate mousse layer to be silky smooth so used the Manjo Rainforest there.
While you could use any chocolate to create this cake I cannot stress that the quality of the chocolate you choose to use will impact your final product. In this case, why not give Santa Barbara Chocolate's high quality products a try? You won't regret buying from these guys and after trying their chocolates, you'll wonder how you ever thought those waxy, off-tasting chocolate chips and bars qualified as "chocolate". Plus, your conscious will rest easy knowing that many of the products are organically grown, fair-trade, and formulated with over 100 years of chocolate making experience.
Christine's Kitchen Chronicles readers get 10% off your total order by using the code: chrisseskitchen or enter the Rafflecopter contest at the bottom of this post to win up to NINE POUNDS of your own! There are four different winners in this contest so be sure to be in it to win!
Triple Chocolate Mousse Cake

Ingredients
For the bottom layer
a Rafflecopter giveaway
Disclaimer: Santa Barbara Chocolate Company graciously offered to sponsor this giveaway. I received complimentary samples of chocolate to try and review. All words and opinions are my own.
About a month ago I was contacted by a cool dude named Justin at Santa Barbara Chocolate Company. He had stumbled across one of my old blog posts featuring this Chocolate Nutella Fudge with Sea Salt and was wondering if I'd like to partner with them. There was the promise of free organically grown, ethically traded chocolates to be had. If you've been following me on facebook at all you'll know that I've been going dairy free for several months now because my little nursling son is sensitive. Chocolate is often off the menu because many brands contain milk or milk ingredients. My heart sunk at first because I thought "Why? Why NOW do these companies find me when I cannot taste their delicious products and want chocolate sooooo badly???". But then I went to their website and found that they offered many dairy free options! Score! So I shot an email back to Jason explaining my situation and asking that they please send at least one dairy-free option for me to personally try (and my husband Chris - the real sweets lover in this family anyway - could call dibs on whatever else they sent).
Let me just say that Justin is a real SoCal guy who was so much fun to "talk" to and Jason their Maitre Chocolatier BLEW ME AWAY with how fast and personalized he made my package. Not only was there a personal hand-written note but they sent me nearly TEN POUNDS of assorted chocolates to try. Each was even labeled "dairy free" where applicable!
So like kids at Christmas time Chris and I tasted each of the samples.
I started with the Hispaniola Rainforest Dark 60%. It was smooth and rich. The perfect balance of dark and a touch of sweet just like you'd expect from a high quality dark chocolate. It's a very classic dark chocolate so would be very versatile for baking, creating candies, or eating straight out of the bag. Having not had any chocolate in quite some time, it was pure bliss to eat and I knew it would be hard to beat...but there were still seven more samples to go!
Going a little bit darker I found myself trying the Peru Rio Tigre Extra Dark Chocolate 75% next. Visually it was a few shades darker than the previous sample and that's to be expected since there's 15% more cacao. My first taste impression was confusion because it was not as smooth as I'm used to and dare I say even a touch gritty. At first I thought perhaps it was just due to the higher cacao content but I have had dark chocolates as much as 90% cacao and not had the textural impact before. So I gave Justin and Jason a shout. It turns out that Jason designed the chocolate to be this way. The cocao solids (fibre in this case) are not ground as long so that they retain a higher percentage of cocao antioxidants. Sounds healthy to me!
 |
| Santa Barbara Chocolates from Left to Right: Belgian White, Belgian Milk, Manjo Rainforest Dark, Belgian Dark, 100% Pure Cacao, 100% Pure Cacao Organic |
Similarly, I'm not sure that I have ever tasted 100% Pure Cacao. Though I love dark and extra dark chocolates, these ultra dark unsweetened chocolate chunks were too bitter for my personal taste. As for Chris? Forget it! That kid LOVES all things sugar. Jason told me that they're wonderful for those on paleo diets or with low glycemic concerns such as diabetics because they contain no added sugar. He even enjoys them as a fondue or with a cup of hot green tea. I might try melting these down and adding dried fruit and nuts to create a chocolate bark. As an aside, Chris said he had a co-worker who gave their kid 100% pure cacao when they asked to try chocolate. As one would expect, it was not very palatable to a child and thus the parent's scheme to get the kid to not like chocolate worked ;).
The Belgian Dark 64% was good and I think would be excellent for candies but when compared to the rest of the dark chocolate samples, not particularly memorable.
The Manjo Rainforest Dark 66% woke my tastebuds right up! There was a subtle fruitiness to it which I wasn't expecting. You could tell that this was high quality stuff! I had to stop myself from eating the medallions straight from the package. I basically have been eating a chocolate medallion...or two...or three...of the Manjo everyday since receiving the package. It contains 100% cocoa butter so it's velvety smooth and ready to eat. I loved just popping them in my mouth and letting them slowly melt. Frankly I was a little bit sad that Jason and Justin only sent me a smaller sample of this variety. But now I know what I'll be buying to get my dairy-free chocolate fix!! It was my favorite sample by a hair (followed by the Hispaniola Rainforest Dark 60%).
The Belgian Milk Chocolate and Belgian White were taste tested by Chris alone since he is the only one in our family that can eat dairy right now. He happily snacked on them but couldn't really give me a detailed analysis other than that the Belgian Milk Chocolate was his favorite. Go figure since it has the least cacao (40%) of the chocolates we sampled and therefore is sweetest! When I used the Belgian White chocolate in my baking application, it was my father-in-law's favorite of the three layers.
After sampling everything I was left with the difficult decision of how to feature the high quality chocolate varieties. With Jason's guidance that the Peru Rio Tigre Extra Dark Chocolate 75% was designed with pastry applications in mind and in particular, flourless chocolate cakes, I knew exactly what I wanted to make because I remembered a cake which I bookmarked from years ago.
This Triple Chocolate Mousse Cake features three of Santa Barbara Chocolate's finest Couverture chocolates. I intentionally chose two different dark chocolates because the texture of the dark layers is different. The cake is more dense and could stand up to the heartier texture of the Peru Rio Tigre whereas I wanted the dark chocolate mousse layer to be silky smooth so used the Manjo Rainforest there.
While you could use any chocolate to create this cake I cannot stress that the quality of the chocolate you choose to use will impact your final product. In this case, why not give Santa Barbara Chocolate's high quality products a try? You won't regret buying from these guys and after trying their chocolates, you'll wonder how you ever thought those waxy, off-tasting chocolate chips and bars qualified as "chocolate". Plus, your conscious will rest easy knowing that many of the products are organically grown, fair-trade, and formulated with over 100 years of chocolate making experience.
Christine's Kitchen Chronicles readers get 10% off your total order by using the code: chrisseskitchen or enter the Rafflecopter contest at the bottom of this post to win up to NINE POUNDS of your own! There are four different winners in this contest so be sure to be in it to win!
Triple Chocolate Mousse Cake
Ingredients
For the bottom layer
- 6 tbsp. unsalted butter, cut into 6 pieces (plus extra for greasing the pan)
- 7 oz. bittersweet chocolate, finely chopped (recommend Santa Barbara Chocolate Peru Rio Tigre Extra Dark Chocolate 75%)
- ¾ tsp. instant espresso powder
- 1½ tsp. vanilla extract
- 4 large eggs, separated then allow whites to come to room temperature
- Pinch of salt
- 1/3 cup light brown sugar, packed
- 2 tbsp. cocoa powder, preferably Dutch-processed
- 5 tbsp. hot water
- 7 oz. bittersweet chocolate, finely chopped (recommend Santa Barbara Hispaniola Rainforest Dark 60%)
- 1½ cups heavy cream
- 1 tbsp. granulated sugar
- Pinch of salt
- ¾ tsp. powdered gelatin
- 1 tbsp. water
- 6 oz. white chocolate, finely chopped (recommend Santa Barbara Chocolate Belgian White)
- 1½ cups heavy cream
- 1 can of Pirouette chocolate hazelnut rolled wafer cookies, cut into thirds (there will be some leftover)
- 4 oz bittersweet chocolate, finely chopped (recommend Santa Barbara Chocolate Manjo Rainforest Dark 60%)
- 1/3 cup heavy cream
- To make the bottom layer: Butter the bottom and sides of a 9-inch springform pan. Preheat oven to 325˚ F. In a large glass bowl set over simmer water, combine the butter, chocolate, and espresso powder. Stir occasionally until the mixture is smooth. Remove from the heat and let cool slightly, about 5 minutes. Whisk in the vanilla and egg yolks. Set aside.
- In a stand mixer fitted with the whisk attachment, beat the egg whites and salt on medium speed until foamy, about 30 seconds. Add half of the brown sugar and beat until incorporated, about 15 seconds. Add the remaining brown sugar and continue to beat on high speed until stiff peaks form, about 1 minute more. Whisk in one-third of the beaten egg whites to the chocolate mixture to lighten it. Using a rubber spatula, gently fold in the remaining egg whites until no streaks remain. Pour the batter into the prepared springform pan and smooth the top with a spatula.
- Bake until the cake has risen, is firm around the edges and the center has just set but is still soft (should spring back after pressing gently with a finger), about 14-18 minutes. Transfer the cake to a wire rack to cool completely, at least 1 hour. Do not remove the cake from the pan. (If not making the second layer right away, cover with plastic wrap and refrigerate until ready to proceed.)
- To make the second layer, whisk together the cocoa powder and hot water in a small bowl; set aside. Melt the chocolate in a glass bowl set over simmering water, stirring occasionally until smooth. Once melted, remove from the heat and let cool slightly, 2-5 minutes.
- In the clean bowl of a stand mixer fitted with the whisk attachment, whip the cream, sugar and salt on medium speed until the mixture begins to thicken, about 30 seconds. Increase the speed to high and whip until soft peaks form when the whisk is lifted, 30-60 seconds. Whisk in the cocoa powder mixture until smooth. Using a whisk, mix one-third of the whipped cream to the chocolate mixture to lighten it. Fold in the remaining whipped cream gently with a rubber spatula until no streaks remain. Pour the mousse into the springform pan over the cooled cake and tap gently on the counter 3 times to remove air bubbles. Gently smooth the top with a spatula. Wipe the inside edge of the pan to remove any drips. Refrigerate for at least 15 minutes while preparing the top layer.
- To make the top layer, sprinkle the gelatin over the water in a small bowl and let stand at least 5 minutes to soften. Place the white chocolate in a medium bowl. Bring ½ cup of the cream to a boil in a small saucepan. Remove the pan from the heat, add the gelatin mixture and stir until dissolved. Pour the hot cream mixture over the white chocolate and let stand about 1 minute. Whisk until the mixture is smooth. Cool to room temperature, about 5-8 minutes, stirring occasionally.
- In the clean bowl of a stand mixer fitted with the whisk attachment, whip the remaining 1 cup of cream at medium speed until it begins to thicken. Increase the speed to high and whip until soft peaks form when the whisk is lifted, 30-60 seconds. Whisk in one-third of the whipped cream to the white chocolate mixture to lighten it. Using a rubber spatula, gently fold in the remaining whipped cream until no streaks remain. Spoon the white chocolate mousse into the pan over the middle layer. Smooth the top with an offset spatula. Return the cake to the refrigerator (leaving uncovered) and chill until set, at least 2½ hours.
- To decorate, press cut cookie pieces around the edge of the cake. Bring 1/3 cup of cream to a boil in a small sauce pan. Pour hot cream mixture over the chocolate and let stand about 1 minute. Whisk until the mixture is smooth. Allow the ganache to cool until it is spoonable and can hold its texture. Transfer to a piping bag and decorate the top of the cake as desired. I decorated mine with a cornelli lace pattern using a Wilton #2 Round Tip. If desired, garnish top of cake with additional cookies.
a Rafflecopter giveaway
Disclaimer: Santa Barbara Chocolate Company graciously offered to sponsor this giveaway. I received complimentary samples of chocolate to try and review. All words and opinions are my own.
Thursday, February 6, 2014
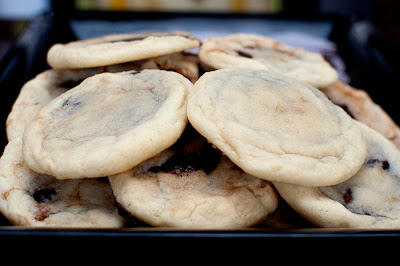
Vanilla Cookies with Nutella Filling
I missed World Nutella Day yesterday. Doh!
I also have had this recipe saved since *2012* specifically to post on the next World Nutella Day. But dang, apparently I need a reminder on my phone or something to help me remember when it comes around each year! So instead of making you wait yet another year for sharing this recipe, I'm sharing it a day late. Because better late than never, right?
Brace yourself for surprise smooth nutella goodness enveloped in a vanilla cookie...yum!
Vanilla Cookies with Nutella Filling
Ingredients
Source: Slightly modified from Inquiring Chef
I also have had this recipe saved since *2012* specifically to post on the next World Nutella Day. But dang, apparently I need a reminder on my phone or something to help me remember when it comes around each year! So instead of making you wait yet another year for sharing this recipe, I'm sharing it a day late. Because better late than never, right?
Brace yourself for surprise smooth nutella goodness enveloped in a vanilla cookie...yum!
Vanilla Cookies with Nutella Filling

Ingredients
- ½ cup (220g) nutella (I used homemade nutella!)
- 10 Tbsp. (140g) unsalted butter, softened
- 1 cup (220g) granulated sugar
- 1 large egg
- ½ tsp. vanilla extract
- 2 cup (250g) all-purpose flour
- ½ tsp. baking soda
- ½ tsp. salt
Directions
- Line a small baking sheet with wax paper or silicone baking mat.
- Transfer the nutella to a small plastic bag. Cut off one corner of the plastic bag and gently squeeze the nutella out onto the wax paper or baking mat into 24 evenly-sized chips. Place the baking sheet in the freezer until the nutella is firm, about 30 minutes.
- Preheat the oven to 350 F. Grease a baking sheet with butter, cooking spray, or line with another silicone baking mat.
- Beat the butter and sugar together until light and fluffy. Add the egg and vanilla and beat well. Add the flour, baking soda, and salt and stir with a spoon until fully incorporated. Divide the dough into 24 even balls and flatten each into a disk.
- Remove the frozen nutella chips from the freezer. Working quickly, press each chip into one ball of dough and roll the dough into a ball around the nutella. Place the cookie dough balls 3 inches apart on the prepared baking sheet.
- Bake, just until the edges start to turn slightly golden, 6-8 minutes (keep an eye on them towards the end – do NOT overbake these). Allow cookies to cool on the baking sheet for 5 minutes before transferring to a cooling rack.
Source: Slightly modified from Inquiring Chef
Monday, January 20, 2014
SRC: S'mores Bites (Dairy-Free/Vegan)
It's a somewhat sad day for me because this is my last Secret Recipe Club. After being a part of this group for a few years now I've decided that I needed to step away from it all. I simply don't have the time to dedicate to creating things on a set schedule and commenting on others' posts like I used to.
For my final assignment I am honored to have my fellow Cincinnati blogging friend Desi of SteakNPotatoesKindaGurl. We "met" through this club. Though we live in the same city, we have never actually met in person. She did, however, contribute a beautiful guest post of Grilled Filet with Bourbon Butter to my blog when I was on vacation. If I learned anything about Desi it's that the girl LOVES bacon. So when I went to choosing a recipe, I thought I'd make something with bacon in it. Then I took a completely different direction when I saw her post for one of her other loves...s'mores. I considered throwing some bacon crumbles in with the chocolate center and/or on top as a garnish as a tribute but tried to stay true to the recipe ;).
Many of you know that I've gone dairy-free for my son who is nursing and I suspect to be sensitive to it. Since I could customized the cookies, I made mine dairy-free while using regular Hershey milk-chocolate for my husband's cookies. I tried to make some substitutions of coconut oil instead of butter and dark chocolate instead of milk to keep it dairy-free (and vegan for that matter!). Finding graham cracker crumbs that were dairy-free was also surprisingly challenging. I usually buy store brand to save a few bucks but the store brand and most national brands for that matter had dairy in them. Boo! The only dairy-free graham crackers I could find were Nabisco Honey Maid.
The taste was awesome. I actually loved the not-so-subtle coconut flavor. It kind of reminded me of my favorite Girl Scout Cookie, samoas...which, I also can't eat right now. Sad face. The only problem was that my cookie crust was too crumbly and totally didn't hold together right on removal. I'm not sure if substituting my coconut oil 1:1 for butter was the issue or if I just didn't bake it long enough. Still experimenting with this whole dairy-free baking thing. The fact that my cookie crumbled didn't stop me from enjoying these little s'mores bites straight out of the pan with a spoon ;). Don't judge.
As I say goodbye to my SRC friends I want to thank you all for being awesome and for helping me to discover your wondering blogs. And of course a special shout out to our hostess, Debbi. I hope that you all will continue to follow me even as I leave the club...and probably post less frequently.
On an unrelated note...have you entered my Wildtree giveaway??
S'mores Bites (Dairy-Free/Vegan)

Ingredients
For my final assignment I am honored to have my fellow Cincinnati blogging friend Desi of SteakNPotatoesKindaGurl. We "met" through this club. Though we live in the same city, we have never actually met in person. She did, however, contribute a beautiful guest post of Grilled Filet with Bourbon Butter to my blog when I was on vacation. If I learned anything about Desi it's that the girl LOVES bacon. So when I went to choosing a recipe, I thought I'd make something with bacon in it. Then I took a completely different direction when I saw her post for one of her other loves...s'mores. I considered throwing some bacon crumbles in with the chocolate center and/or on top as a garnish as a tribute but tried to stay true to the recipe ;).
Many of you know that I've gone dairy-free for my son who is nursing and I suspect to be sensitive to it. Since I could customized the cookies, I made mine dairy-free while using regular Hershey milk-chocolate for my husband's cookies. I tried to make some substitutions of coconut oil instead of butter and dark chocolate instead of milk to keep it dairy-free (and vegan for that matter!). Finding graham cracker crumbs that were dairy-free was also surprisingly challenging. I usually buy store brand to save a few bucks but the store brand and most national brands for that matter had dairy in them. Boo! The only dairy-free graham crackers I could find were Nabisco Honey Maid.
The taste was awesome. I actually loved the not-so-subtle coconut flavor. It kind of reminded me of my favorite Girl Scout Cookie, samoas...which, I also can't eat right now. Sad face. The only problem was that my cookie crust was too crumbly and totally didn't hold together right on removal. I'm not sure if substituting my coconut oil 1:1 for butter was the issue or if I just didn't bake it long enough. Still experimenting with this whole dairy-free baking thing. The fact that my cookie crumbled didn't stop me from enjoying these little s'mores bites straight out of the pan with a spoon ;). Don't judge.
As I say goodbye to my SRC friends I want to thank you all for being awesome and for helping me to discover your wondering blogs. And of course a special shout out to our hostess, Debbi. I hope that you all will continue to follow me even as I leave the club...and probably post less frequently.
On an unrelated note...have you entered my Wildtree giveaway??
S'mores Bites (Dairy-Free/Vegan)
Ingredients
- 7 whole graham crackers or 1 cup graham cracker crumbs (Nabisco Honey Maid are dairy-free)
- 1/4 cup granulated sugar
- 6 tablespoons coconut oil, melted (use butter if you don't care about it being vegan/dairy-free)
- 4 dark chocolate candy bars, divided (I used Lindt Excellence 85% Cacao Bars for my dairy-free ones and regular Hershey's Milk Chocolate Bars for the hubby)
- 12 large marshmallows, cut in half crosswise with kitchen scissors (Dandies brand are vegan)
Directions
- Preheat oven to 350°F.
- If using whole graham crackers, place inside a ziplock bag and then crush with a rolling pin. Combine graham cracker crumbs, sugar, and melted coconut oil into a bowl.
- Divide crumb mixture into each cup of a 24 cup mini muffin pan. Press crumbs to form shallow cups.
- Bake for 4-5 minutes or until edges are bubbling.
- Meanwhile, break two of the candy bars into rectangles. Break the rectangles in half.
- Remove pan from oven; place 2 rectangle halves into each cup. Place one marshmallow half, cut-side down, into each cup. Return to oven for 3 minutes or until marshmallows are just slightly softened. If desired, flip on the broiler to lightly toast the tops. Watch them carefully because they burn quickly!
- Using remaining candy bars, break into rectangles and top each marshmallow with a piece of chocolate.
- Cool on a cooling rack for 15 minutes before carefully removing cups from pan. Cool completely on wire rack.
Source: Modified from SteakNPotatoesKindaGurl
Monday, November 18, 2013
SRC: Pumpkin Pie Yogurt Parfaits
I've got something delicious and nutritious for this month's Secret Recipe Club! I was assigned Serena and Deanna's blog, Teaspoon of Spice. They are both registered dietitians so I was excited to see what healthy yet tasty recipes they had on their blog. The pictures made everything look so delicious! In fact, though I had not visited their blog before my assignment I realized I had seen some of these pictures on pinterest and even re-pinned them myself. That's how you know you've made it big in the blog world is when people find your photos to be so beautiful that they must collect them. Speaking of pinning recipes, did you know you can now hover over my pictures to pin them? So easy!
It didn't take me long to decide on a recipe since I'm still working through my 16 cups of pumpkin puree and this one was staring at me on the homepage. However, I'm not much of a gingersnap fan and wanted to keep this really light and fluffy. Easy enough because I used graham crackers instead of gingersnaps and just sprayed some whip cream in place of the cheesecake layers. If you'd rather use the cheesecake layer (which I'll admit, does sound wonderful!), checkout the original recipe linked below in the source.
It has all the flavor of a pumpkin pie with a light, silky texture making it the perfect easy, no-bake dessert to impress your Thanksgiving guests. Heck, I would even eat this one for breakfast if I added some crumbled granola or maybe some nuts. Since it's made with 0% fat Greek yogurt, it's practically sinless!
One Year Ago: Savory BBQ Pulled Pork Cinnamon Roll and Taco Dip
Two Years Ago: Roast Beef with Onion Gravy
Three Years Ago: Peanut Butter Fudge Cheesecake
Four Years Ago: Sweet Potato Souffle and Peanut Butter Cup Brownies
Pumpkin Pie Yogurt Parfaits

Yields: 6 servings
Ingredients
- 15 oz fresh or canned pumpkin puree (not pumpkin pie filling)
- 1/2 cup brown sugar
- 1 teaspoon ground cinnamon
- 1/2 teaspoon ginger
- 1/4 teaspoon freshly grated nutmeg
- 2 cups nonfat Greek yogurt
- whipped cream or Cool Whip
- 6 graham crackers
Directions
- In a large bowl, stir together pumpkin puree, brown sugar, cinnamon, ginger, nutmeg, and yogurt.
- Place cookies in a ziplock bag. Crush with a rolling pin until you have crumbles.
- Starting with the yogurt on the bottom, divide pumpkin yogurt, whipped cream, and graham cracker crumbs into six tall serving glasses making however may layers you want. Refrigerate until serving.
Source: Modified from Deanna Segrave-Daly, RD of Teaspoon of Spice
Monday, November 4, 2013
Snickers Cupcakes
Who has leftover Halloween candy? Or did you already eat the loot and any personal remnants this weekend...and maybe even went back to the grocery store to buy the clearance candy? It's okay to tell me if you did. I won't judge. We're all friends here :).
With the rain and spooky howling wind on Halloween night, we ended up with maybe half the number of trick-or-treaters that we normally get. Some neighboring communities postponed their trick-or-treating. To that I say "weak sauce!" and we used to go out in the SNOW and it was dark outside because we had daylight savings earlier back then. But I digress. For those that braved the weather we gave out extra candy and yet still had quite a bit remaining.
Snickers are my favorite candy. I love the chewy nougat texture contrasting with the crunchy peanuts and sticky caramel. What's not to love?

The only way that they could be better is by paying homage to them in the form of a cupcake. I made these cupcakes for my son's 2 month birthday but they'd be a great way to use any leftover candy...or just because.

It's essentially doctored up cake mix with a homemade caramel frosting. I love foods that look "fancy" :). Normally I'm adverse to using shortening but it makes the frosting whip up all silky like a dream. I bet it'd be even more awesome with butter flavored shortening. But if the thought of using shortening makes you absolutely gag then by all means feel free to use just all butter instead. Mmm...butter...
One Year Ago: Best Potluck Mac and Cheese and Buca Di Beppo's Spicy Chicken Rigatoni
Two Years Ago: Mini Triple Treat Cupcakes, Peach Whiskey Barbecue Chicken, and Napa Cabbage Salad
Three Years Ago: Chicken and Cheddar Dog Treats
Four Years Ago: Turkey Bean Pumpkin Chili
Snickers Cupcakes

Ingredients
For the Cake
With the rain and spooky howling wind on Halloween night, we ended up with maybe half the number of trick-or-treaters that we normally get. Some neighboring communities postponed their trick-or-treating. To that I say "weak sauce!" and we used to go out in the SNOW and it was dark outside because we had daylight savings earlier back then. But I digress. For those that braved the weather we gave out extra candy and yet still had quite a bit remaining.
Snickers are my favorite candy. I love the chewy nougat texture contrasting with the crunchy peanuts and sticky caramel. What's not to love?
The only way that they could be better is by paying homage to them in the form of a cupcake. I made these cupcakes for my son's 2 month birthday but they'd be a great way to use any leftover candy...or just because.

It's essentially doctored up cake mix with a homemade caramel frosting. I love foods that look "fancy" :). Normally I'm adverse to using shortening but it makes the frosting whip up all silky like a dream. I bet it'd be even more awesome with butter flavored shortening. But if the thought of using shortening makes you absolutely gag then by all means feel free to use just all butter instead. Mmm...butter...
One Year Ago: Best Potluck Mac and Cheese and Buca Di Beppo's Spicy Chicken Rigatoni
Two Years Ago: Mini Triple Treat Cupcakes, Peach Whiskey Barbecue Chicken, and Napa Cabbage Salad
Three Years Ago: Chicken and Cheddar Dog Treats
Four Years Ago: Turkey Bean Pumpkin Chili
Snickers Cupcakes

Ingredients
For the Cake
- Your favorite chocolate cake recipe or boxed chocolate cake mix (Being a new mom, I went boxed. No shame in that!)
- 24 frozen Snickers miniatures
- 2 sticks unsalted butter, room temperature
- 1/2 cup shortening
- 2 teaspoons vanilla extract
- 1 1/2 pounds powdered sugar
- 1/3 cup caramel topping plus more for drizzling
- 1/4 teaspoon salt
For the Decoration
- 12 frozen Snickers miniatures
- Caramel topping
- Chopped peanuts
Directions
- Preheat oven to 350 F. Line two 12-well muffin tins with paper liners.
- To make the cupcakes: In a large mixing bowl, prepare cake according to package directions. Evenly divide the batter among the prepared pans. Gently push a whole frozen Snickers Miniature bar into the center of the batter until the candy is flush with the surface of the batter. Bake for 18-22 minutes, or until top is springy to the touch and a wooden toothpick inserted comes out clean. Cool cupcakes on a wire rack.
- To make the frosting: Cream together the butter and shortening using an electric mixer. Beat in the vanilla extract, salt, and caramel topping. Gradually add the powdered sugar, mixing thoroughly between additions until all of it has been added.
- To decorate: Cut each remaining Snickers bar square on the diagonal so that you have 24 halves. Garnish with chopped Snickers bar halves, chopped peanuts and a drizzle of caramel topping.
Monday, October 21, 2013
SRC: Ginger-Pear Skillet Cake
After a two month baby hiatus I'm back to my monthly Secret Recipe Club! It's crazy to think that the last time I completed an assignment in July I had no baby and now, I have an absolutely adorable two month old baby boy. I shared a picture of him with his "month birthday" cupcake on Saturday and let's just say that this mama has a new favorite photography subject :).
This month I received Kristy's blog, Gastronomical Sovereignty. I'll admit that now that I'm a mommy, I don't always have a ton of time to browse blogs and read the content that goes along with each post but Kristy is gosh darn funny. I truly enjoyed reading through her commentary. Another thing I found in common with her was that we both partake in CSAs (community supported agriculture). If only I had known about her blog when I was still getting my weekly boxes and standing there wondering what to make with my umpteenth bunch of chard...
What's wonderful about a CSA besides supporting a local farmer is that you know you're getting food that's fresh and in season. When food is in season and not shipped from thousands of miles away, it's fresh and at its peak. It's better tasting and full of nutrition...the way that Nature had intended.
This is why I chose a seasonal recipe from Kristy's blog. I went straight for the "Fall" tag and was excited to make a cake in my cast iron skillet. It's something that I've always wanted to try. When I was baking this cake, my house smelled like Autumn. Warm spices that taste like gingerbread and juicy pears. It was heavenly.

Top it with some vanilla ice cream and your life will be complete...

I had to wait until supper time to make it a la mode and enjoy this beauty because I was bringing it to my in-laws' house. I'm always fascinated by how natural light (see the third photo on this post) versus artificial (first two photos) makes a huge difference in the quality of the photo. That's one down side to Fall's arrival is shorter days = less light = uglier food photos. Sorry about that!
One Year Ago: Cinnamon Sugar Baked Pumpkin Doughnuts
Two Years Ago: Apple Pie Cookies
Four Years Ago: Christine's Fried Rice
Ginger-Pear Skillet Cake

Ingredients
For the Cake
- 2 1/3 C Unbleached All-Purpose Flour
- 1 1/2 tsp Ground Ginger
- 1 tsp Kosher Salt
- 1 tsp Ground Cinnamon
- 1/2 tsp Ground Allspice
- 1/4 tsp Ground Cloves (optional)
- 1/4 C Canola, Grapeseed, or Other Neutral Vegetable Oil
- 1/2 C Gently Packed Light Brown Sugar
- 1/2 C Unsulfered Dark Molasses
- 1/2 C Plain Whole Milk Yogurt or Sour Cream
- 1 TBSP Fresh Ginger, finely grated
- 1 Large Egg, at room temperature
- 1 tsp Baking Soda
- 1/2 C Hot, Fresh Brewed Strong Coffee (recommended) or Boiling Water
- 4 Firm-Ripe Pears, peeled, cored, and cut into 1/2 inch thick slices (Bosc or Anjou are good)
- 1 Tbsp Unsalted Butter, cut into small pieces
- 1/4 C Gently Packed Light Brown Sugar
- 1/4 Tsp Kosher Salt
Directions
Source: Farmers' Market Desserts by Jennie Schacht as seen on Gastronomical Sovereignty
- Place rack of oven on the lower third and preheat to 325F. Generously grease a 10 or 11 inch cast-iron skillet.
- In a large bowl, stir together the flour, ground ginger, salt, cinnamon, allspice, and cloves (if using). Set aside. Whisk together the oil, brown sugar, molasses, yogurt, fresh ginger, and egg in a large bowl until well blended and smooth. Using a wooden spoon or spatula, stir in half of the flour mixture. Stir the baking soda into the hot coffee until dissolves, then add to the batter and stir until combined. Stir in the remaining flour. Transfer the batter to the prepared skillet and spread evenly.
- Arrange the longer slices of pear in a circle along the edge of the pan, overlapping them slightly and with the narrow ends pointing toward the center. Arrange the shortest slices in a second circle in the center to cover the batter completely. Dot the pear slices with the butter along the outer circle only. Mix together the brown sugar and salt and sprinkle evenly over the top.
- Bake until the top springs back when you press it lightly in the center and a toothpick inserted in the center comes up clean, about 1 hour. Transfer the skillet to the stove top to cool for at least 20 minutes.
- Cut cake into wedges and serve warm or at room temperature topped with whipped cream or vanilla ice cream, if desired.
Thursday, October 10, 2013
Chewy Butterfinger Cookies
See the giant chunks of Crispity Crunchity Butterfinger Goodness in the photo below? They were apparently too much for my body to handle. These will forever be known as "Labor Cookies" thanks to my friend Scott. Literally the same night that I made and ate (probably too many of) these cookies, I went into labor after going nearly two weeks post-date. My camera went from taking glamour food photos like this...


Yep...he really hated bath time in that infant tub. It caused my husband and I much distress and we dreaded bath days. The only upside was that he was so tired afterward that he would often sleep through the night (7 straight hours!). But as for the bath thing, thankfully some mommies on my local message board suggested using the regular tub and getting in with him. He seems to like this much better.
I digress. You're here for the Labor Cookies. I mean, Chewy Butterfinger Cookies. For those that are currently pregnant, fear not for these cookies will not induce labor. That is, unless you want them to. Then it can't hurt to try. But no, really. There's no medical reason that these will do anything to you other than spike your blood glucose and make your mouth and tummy feel really happy.
This is a quick and delicious way to use up those candy bars that you'll get at Halloween. Or...on clearance after Halloween. Or heck, for those Butterfingers that you have just because they're delicious.
Maybe my son would like some Lactation Cookies, next...
Chewy Butterfinger Cookies

Ingredients
- 1 and 3/4 cups all-purpose flour
- 3/4 teaspoon baking soda
- 1/4 teaspoon salt
- 3/4 cup granulated sugar
- 1/2 cup (1 stick) salted butter, softened
- 1 large egg
- 8 fun sized (or 2 King sized) Butterfinger candy bars, chopped
Directions
- Preheat oven to 375F degrees.
- Combine flour, baking soda, and salt in small bowl and set aside.
- With an electric mixer, beat together sugar and butter until creamy. Beat in egg until just combined. Gradually add in flour mixture. Gently stir in Butterfinger pieces. The dough will be very thick (if it's too dry and crumbly you can add an extra egg). Drop by slightly rounded tablespoonfuls onto ungreased baking sheet (or for a perfect shape use my favorite cookie tool...a Medium OXO Cookie Scoop).
- Bake for 10-12 minutes or until lightly browned. Allow to cool and enjoy!
Wednesday, September 4, 2013
Orange Push-Up Smoothies
Hi! I'm popping in really quickly to share a quick recipe. Who remembers those orange push up pops with the primary colored dots on the outside? They remind me of my Grandparents because they always bought them for us when we visited. It's been years since I've had one and frankly, I'm not sure if they still make them anymore?
When I made this recipe, it reminded me of that long lost orange push-up pop flavor. The only difference was that it was in the form of a smoothie rather than the classic and fun push-up pop. Depending on the brand of orange concentrate you use you may need more or less sugar as there are varying levels of "orange peel" bitterness to each brand.
Bottoms up and here's to our childhoods!
Orange Push-Up Smoothies

Ingredients
When I made this recipe, it reminded me of that long lost orange push-up pop flavor. The only difference was that it was in the form of a smoothie rather than the classic and fun push-up pop. Depending on the brand of orange concentrate you use you may need more or less sugar as there are varying levels of "orange peel" bitterness to each brand.
Bottoms up and here's to our childhoods!
Orange Push-Up Smoothies
Ingredients
- 1 can orange juice concentrate, slightly thawed
- 1 cup milk
- 1/2 cup sugar, or to taste
- 1/2 teaspoon vanilla extract
- 2 cups ice, or to taste
- Combine all ingredients, except for the ice, in a large blender and blend until smooth and creamy, taking care the sugar has dissolved and is well incorporated. If desired, add a splash more water or more milk. Add the ice and blend until smooth. Makes approximately three eight-ounce portions.
Monday, September 2, 2013
Cones for the Cure Kick Off
Free ice cream. Curing cancer. These are both wonderful things! As a Christine's Kitchen Chronicles reader you're getting the inside scoop on how these two things go together.
I'm happy to announce the kickoff of this year's annual Cones for the Cure campaign. The Cure Starts Now and Graeter’s team up once again this September in their annual Cones for the Cure campaign. This two-week long campaign will take place September 4-16 at participating Cincinnati, Dayton, Columbus, Lexington and Louisville Graeter's locations to help spread the word about The Cure Starts Now and its mission to find the “homerun” cure for all cancers by focusing on pediatric brain cancer. It's a delicious way to support a precious cause.
During Cones for the Cure, guests that visit a Graeter’s store during the campaign period have the opportunity to donate a $1 or $5 “Cone for the Cure.” Graeter’s will also offer a $15 savings booklet for every donation of $5 or more to The Cure Starts Now.
Watch this short video to learn more about Cones for the Cure and Elena's Blueberry Pie special ice cream (Note: this video was created in 2011 so the date mentioned for the campaign is incorrect):
Remember how I mentioned free ice cream? All local Graeter's will also be offering free scoops of their Elena's Blueberry Pie Ice Cream from 3-8 PM on Wednesday, September 4th. Elena’s Blueberry Pie is a special flavor that was created in honor of 6-year-old Elena Desserich who was lost to cancer in 2007. Stop into your local Graeter's shop for this delicious treat and while you're there, please don't forget to make a donation. In 2012, nearly 40,000 people participated in the campaign which generated over $42,000 for The Cure Starts Now. With your help, here's to hoping the 2013 campaign is even more successful!
Can't make it on September 4th? Check back between now and September 16th for another free scoop date to be announced! Also, there will be a special online giveaway for one lucky reader.

Monday, July 22, 2013
SRC: Cherry Cake
This is my last Secret Recipe Club entry for at least a month if not two since Baby Boy could be arriving at any moment now. The fact that he could come anytime between today and 5 weeks from now and still be considered "normal term" baffles my mind.
This month I was assigned The Avid Appetite. I love how personal she makes her blog as it's not just about food but also about her family (what a cute little one!) and travels, too. I could have spent hours perusing but with limited time on my hands, focused on the recipes where I debated the Pretzel Crusted Brownies with Fluffy Buttercream Icing (and we all know that it would have become PEANUT BUTTER buttercream in this house!), the Banana Bread Smoothies (because I've been craving frozen treats with this baby!), and a Cherry Cake which was made as a SRC swap.
Ultimately the Cherry Cake won...but only because the sweet allure of cherries in July. I try not to make a swapped recipe because I want to highlight something from the assigned blog but I just *really* love cherries and so it was calling me. I substituted 0% Fage Greek yogurt for the buttermilk. Also, I don't own an 8" springform so used a regular cake pan and just made sure to grease and flour it generously but otherwise stayed true to the recipe.
I brought this sweet little cake over to my friend Emily's house where we three women literally killed this cake. To be fair, we were two nursing and one pregnant ladies :). This is justifiable, right?? To satisfy my frozen treats craving, we served ours a la mode with Cincinnati's best...Graeter's brand vanilla ice cream. Soooo delicious together!
One Year Ago: Cold Avocado Soup with Sweet Corn and Bacon and Pineapple "Ice Cream"
Two Years Ago: Peanut Butter Banana Chocolate Chip Cookies
Three Years Ago: Chocolate Chip Sour Cream Coffee Cake
Four Years Ago: Honey Lime Grilled Chicken
Cherry Cake

Ingredients

This month I was assigned The Avid Appetite. I love how personal she makes her blog as it's not just about food but also about her family (what a cute little one!) and travels, too. I could have spent hours perusing but with limited time on my hands, focused on the recipes where I debated the Pretzel Crusted Brownies with Fluffy Buttercream Icing (and we all know that it would have become PEANUT BUTTER buttercream in this house!), the Banana Bread Smoothies (because I've been craving frozen treats with this baby!), and a Cherry Cake which was made as a SRC swap.
Ultimately the Cherry Cake won...but only because the sweet allure of cherries in July. I try not to make a swapped recipe because I want to highlight something from the assigned blog but I just *really* love cherries and so it was calling me. I substituted 0% Fage Greek yogurt for the buttermilk. Also, I don't own an 8" springform so used a regular cake pan and just made sure to grease and flour it generously but otherwise stayed true to the recipe.
I brought this sweet little cake over to my friend Emily's house where we three women literally killed this cake. To be fair, we were two nursing and one pregnant ladies :). This is justifiable, right?? To satisfy my frozen treats craving, we served ours a la mode with Cincinnati's best...Graeter's brand vanilla ice cream. Soooo delicious together!
One Year Ago: Cold Avocado Soup with Sweet Corn and Bacon and Pineapple "Ice Cream"
Two Years Ago: Peanut Butter Banana Chocolate Chip Cookies
Three Years Ago: Chocolate Chip Sour Cream Coffee Cake
Four Years Ago: Honey Lime Grilled Chicken
Cherry Cake

- 1 c all-purpose flour
- 1/2 tsp baking powder
- 1/2 tsp salt
- 1/8 tsp ground cinnamon
- 3/4 c sugar
- 1/4 c unsalted butter, room temperature
- 1/3 c non-fat Greek yogurt
- 2 large eggs
- 1 tsp vanilla
- 12 oz. frozen whole sweet cherries, pitted
- powdered sugar for dusting
- vanilla ice cream for serving (optional)
- Preheat oven to 350 degrees. Grease an 8" springform pan with butter or generously butter and flour a regular 8" cake pan.
- Whisk together flour, baking powder, salt, and cinnamon. In the bowl of a stand mixer, cream together the butter and sugar. Add Greek yogurt and mix until blended. Add eggs one at a time. Mix in the vanilla. Stir in the dry ingredients until just combined.
- Pour batter into prepared pan. Place cherries on top of the cake batter and then lightly press them into the batter.
- Bake for 40-45 minutes until a toothpick comes out clean.
- Let cool completely. If using a springform pan, remove the sides and then dust with powdered sugar. If using a regular cake pan, simply dust with powdered sugar. Serve at room temperature and with a big scoop of vanilla ice cream, if desired.
Monday, July 1, 2013
Cherry Cheesecake Bites
Today I wanted to share a simple treat that you can make for your 4th of July celebration. It literally took me minutes to put together and is a super cute way to celebrate America's birthday.
I've had these Cherry Cheesecake Bites bookmarked for quite some time but to add to the red, white, and blue festivity, I decided to try to dye my graham cracker crumbs blue. Not wanting them to get too wet I ended up using gel food coloring. If you attempt it with regular food coloring please let me know how it turns out! And of course you could make them with naturally colored graham cracker crumbs, too.
I feel like most Fourth of July desserts feature strawberries and while that would be great as well, I went with cherries. Because is there anything more American than Cherry Pie?
Looking for more ideas Summer recipe ideas for your Independence Day Celebration?

Ingredients
Source: Barely modified from Oh, Bite It!
I've had these Cherry Cheesecake Bites bookmarked for quite some time but to add to the red, white, and blue festivity, I decided to try to dye my graham cracker crumbs blue. Not wanting them to get too wet I ended up using gel food coloring. If you attempt it with regular food coloring please let me know how it turns out! And of course you could make them with naturally colored graham cracker crumbs, too.
I feel like most Fourth of July desserts feature strawberries and while that would be great as well, I went with cherries. Because is there anything more American than Cherry Pie?
Looking for more ideas Summer recipe ideas for your Independence Day Celebration?
- Summer Strawberry Salad with Poppy Seed Vinaigrette (Panera copycat)
- Firecracker Shrimp
- Pork Sandwiches with Cilantro-Jalapeno Slaw
- Loaded Baked Potato Salad
- Herbed Potato Salad
- BLT Corn Salad Wrap
- My Mother-in-law's Broccoli Salad
- My Mother-in-law's Pasta Salad
- Sweet Beginnings Summer Pasta Salad
- Tomato Basil Orzo Salad
- Red, White, and Blue Cupcakes
- Watermelon Slush

Ingredients
- Fresh cherries (or strawberries, raspberries, etc.), washed and dried
- 1/2 block (4 oz) low-fat cream cheese
- 1/2 cup powdered sugar
- Pinch of salt
- Graham cracker crumbs
- Blue gel food coloring (optional)
Directions
- In a small food processor (love my Cuisinart Smart Stick Hand Blender for this!) or bowl with electric mixer, beat together the cream cheese, powdered sugar, and salt. Transfer sweetened cream cheese mixture to a small bowl.
- In a small ziplock bag, add some graham cracker crumbs. If desired, add a few drops of food coloring then seal bag and mix to combine. Repeat until desired shade of color is created. Pour prepared graham cracker crumbs into a bowl.
- Make sure cherries are dry then dip into the cream cheese then graham crackers. Repeat until you've dipped them all.
- Eat and enjoy, taking care not to swallow the cherry pit!
Monday, June 17, 2013
SRC: Brownie Pudding
It's Secret Recipe Club time yet again and this month's assignment comes from Karen at Cinnamon Freud.
The recipe that I chose is a SERIOUS WINNER. Not only is it really easy but it had my husband's entire family going back for seconds and wanting to lick their bowls and spoons clean. Even I finally chose to play the "eating for two" card in order to help myself to a second serving of this decadent fudgey goodness. It's like eating a rich molten liquid chocolate and mixed with ice cream. Omigod!
I didn't have vanilla beans so I used more vanilla extract and took out some of the water from the recipe. I also chose to use all regular cocoa powder instead of a mix of cocoa and dutch process cocoa as Karen suggests. It's pretty amazing nonetheless and makes it such that any novice chef can tackle this recipe easily with items that are commonly stocked in the pantry.
This is one for the recipe box. Thank you Karen so much for sharing!
One Year Ago: Oven Baked Sriracha Chicken and Brat Burgers with Drunken Onions
Two Years Ago: Banana and Sour Cream Pancakes
Four Years Ago: Chicken Gyros with Tzatziki Sauce
Brownie Pudding

Ingredients
Directions
The recipe that I chose is a SERIOUS WINNER. Not only is it really easy but it had my husband's entire family going back for seconds and wanting to lick their bowls and spoons clean. Even I finally chose to play the "eating for two" card in order to help myself to a second serving of this decadent fudgey goodness. It's like eating a rich molten liquid chocolate and mixed with ice cream. Omigod!
I didn't have vanilla beans so I used more vanilla extract and took out some of the water from the recipe. I also chose to use all regular cocoa powder instead of a mix of cocoa and dutch process cocoa as Karen suggests. It's pretty amazing nonetheless and makes it such that any novice chef can tackle this recipe easily with items that are commonly stocked in the pantry.
This is one for the recipe box. Thank you Karen so much for sharing!
One Year Ago: Oven Baked Sriracha Chicken and Brat Burgers with Drunken Onions
Two Years Ago: Banana and Sour Cream Pancakes
Four Years Ago: Chicken Gyros with Tzatziki Sauce
Brownie Pudding
- 1 cup butter, melted
- 2 cups sugar
- 4 eggs, room temperature
- 2 teaspoons vanilla extract
- 1 teaspoon water
- 1/2 cup all purpose flour
- Pinch of salt
- 3/4 cup cocoa powder
Directions
- Preheat oven to 325F. Grease a 7"x12" baking pan or casserole dish.
- In a large bowl, beat together sugar and eggs for 5-10 minutes, until it is thick and light yellow. It's long mix times like these that make me super grateful for my KitchenAid stand mixer! Beat in the vanilla extract and water. Then add the flour, salt, and cocoa powder and beat until just combined. Finally, add the melted butter and beat once more until combined.
- Pour brownie mixture into prepared pan. Place the brownie pan inside a 9"x13" pan. Fill the larger pan halfway up with the hottest tap water.
- Bake for 50-60 minutes being careful not to over bake. The cake is done when a cake tester or toothpick comes out 3/4 of the way done when placed 2" from the border.
- Let cool slightly for 3-5 minutes then serve immediately with ice cream.
Friday, May 24, 2013
Recipe Swap: Peanut Butter Pudding Cookies
Today's What's Cooking Recipe Swap recipe comes from Coleen at The Redhead Baker. While I'm familiar with her blog, I'm not sure that I've actually made anything from it before because I make far more savory recipes than sweet. But, as you'd expect from her blog title, there were more sweet treats than not and so that's where I started with my Blogger's Choice assignment.
Even though it has peanut butter in it, for once IT WASN'T MY HUSBAND THAT PICKED THIS RECIPE! I did. What drew me to this particular recipe was the use of pudding in the cookie. Many many years ago when I was in Girl Scoots (Troop #2180 represent!) I remember one of the mom's brought in a chocolate chip cookie that was the absolute softest and puffiest that I ever had. She shared that the secret ingredient was pudding but I no longer have this recipe. Another draw for me was the Reese's Pieces. Friendly's clown ice cream sundaes, anyone? And unlike Coleen, I peanut M&Ms are one of my favorites so back into the recipe they went.
The name does not do this recipe justice. It really should be called something like Peanut Butter Candy Explosion Pudding Cookies or something because every bite is chock full of goodies. My co-worker asked if I was trying to clear the pantry and I told her nope, just an excuse to BUY all sorts of candy ;).
It was a hit in my house but the peanut butter loving husband said that flavor was not prominent enough. I suggested to him that next time I could use peanut butter pudding mix instead to help boost that flavor profile. I brought some to my birthing class and it has the stamp of approval of pregnant mommies and daddies to be. Everyone loved these so thank you Coleen (and Kate)!
Thank you also to Sarah at A Taste of Home Cooking for hosting. Check out the blog hop to see what everyone else chose as their assignment!
Peanut Butter Pudding Cookies

Yields: About 3 dozen cookies (I got closer to 4 when using my 1.5 Tbsp cookie scoop)
Ingredients

Even though it has peanut butter in it, for once IT WASN'T MY HUSBAND THAT PICKED THIS RECIPE! I did. What drew me to this particular recipe was the use of pudding in the cookie. Many many years ago when I was in Girl Scoots (Troop #2180 represent!) I remember one of the mom's brought in a chocolate chip cookie that was the absolute softest and puffiest that I ever had. She shared that the secret ingredient was pudding but I no longer have this recipe. Another draw for me was the Reese's Pieces. Friendly's clown ice cream sundaes, anyone? And unlike Coleen, I peanut M&Ms are one of my favorites so back into the recipe they went.
The name does not do this recipe justice. It really should be called something like Peanut Butter Candy Explosion Pudding Cookies or something because every bite is chock full of goodies. My co-worker asked if I was trying to clear the pantry and I told her nope, just an excuse to BUY all sorts of candy ;).
It was a hit in my house but the peanut butter loving husband said that flavor was not prominent enough. I suggested to him that next time I could use peanut butter pudding mix instead to help boost that flavor profile. I brought some to my birthing class and it has the stamp of approval of pregnant mommies and daddies to be. Everyone loved these so thank you Coleen (and Kate)!
Thank you also to Sarah at A Taste of Home Cooking for hosting. Check out the blog hop to see what everyone else chose as their assignment!
Peanut Butter Pudding Cookies
Yields: About 3 dozen cookies (I got closer to 4 when using my 1.5 Tbsp cookie scoop)
Ingredients
- ¾ cup butter, softened
- ½ cup creamy peanut butter
- ½ cup sugar
- ½ cup light brown sugar
- 2 large eggs
- 1 tbsp honey
- 1 tsp vanilla extract
- 2 ¼ cups all-purpose flour
- 1 tsp baking soda
- ½ tsp salt
- 1 small box (3.4 ounces) instant vanilla pudding
- 1 cup chocolate chips
- 1 cup Peanut M&Ms
- 1 cup Reese’s Pieces
- Preheat oven to 350 degrees and line two sheet pans with parchment paper (I like to use these reusable silicone baking mats).
- In a stand mixer, cream together the butter, peanut butter, sugar and brown sugar. Add in the eggs, honey and vanilla extract and beat again until incorporated.
- In a separate mixing bowl, stir together the flour, baking soda, salt and pudding mix. Gradually add to the cookie dough, mixing on low speed just until incorporated.
- Stir in the chocolate chips, peanut M&Ms, and Reese’s Pieces.
- Drop by the tablespoonful two inches apart onto the sheet pans. (Make your life easier and cookies more uniform by investing in one of these medium sized Oxo cookie scoops!) Bake for 10 to 12 minutes. Allow the cookies to cool on the pans for 3 to 4 minutes, then remove to a cooling rack to cool completely.
Monday, May 20, 2013
SRC: Strawberry Cheesecake Smoothie
This month's Secret Recipe Club assignment comes from one of my favorite bloggers, Jennifer at Mother Thyme. Jennifer had guest posted for me last year with her very popular Cream Cheese Coffee Cake. It's always fun to get to know a new blog through SRC but sometimes, it's also good to get one you know and follow already because you just know it will be filled with great recipes! I had already bookmarked her Strawberry Cheesecake Smoothies and so it seemed it was destiny that made her my assignment for the month.
What I loved about this recipe was how it tasted just like strawberry cheesecake filling. With strawberries in season and having bought FOUR POUNDS from Costco, I added twice as much in my smoothies for extra strawberry oomph. This made mine a bit thick so I had to add a splash of vanilla almond milk to thin it out. It was awesome and so simple!
Jennifer topped hers with whipped cream and some graham cracker crumbs for the full cheesecake flavor experience. Looks pretty, too!
Do you have any favorite strawberry recipes?
One Year Ago: Creamed Chard and Spring Onion Pasta and Fresh Strawberry Pie
Two Years Ago: Lemon-Rosemary Turkey Meatballs
Strawberry Cheesecake Smoothies

Ingredients
What I loved about this recipe was how it tasted just like strawberry cheesecake filling. With strawberries in season and having bought FOUR POUNDS from Costco, I added twice as much in my smoothies for extra strawberry oomph. This made mine a bit thick so I had to add a splash of vanilla almond milk to thin it out. It was awesome and so simple!
Jennifer topped hers with whipped cream and some graham cracker crumbs for the full cheesecake flavor experience. Looks pretty, too!
Do you have any favorite strawberry recipes?
One Year Ago: Creamed Chard and Spring Onion Pasta and Fresh Strawberry Pie
Two Years Ago: Lemon-Rosemary Turkey Meatballs
Strawberry Cheesecake Smoothies
- 3/4 cup non-fat vanilla yogurt (I used 0% Fage Greek Yogurt and added about 1/2 tsp vanilla)
- 3 ounces light or fat free cream cheese
- 1 cup frozen strawberries
- 1-2 teaspoons agave nectar (I used about a tablespoon of honey)
- Vanilla almond milk or regular milk (optional)
- Add all ingredients except for the milk into a blender. Process until smooth and creamy. If needed, add milk of choice to thin the smoothie out to your desired consistency. Serve immediately.
Friday, May 3, 2013
Chocolate Chip Peanut Butter Cookie Cake
Behold! Another deliciously sinful dessert baked courtesy of my husband and photography courtesy of me (I had to redo the photo shoot as I was not satisfied with his initial photos...).
Every time we go grocery shopping and he passes the bakery section he drools over the cookie cakes. He swore to make one at home. The only problem was that as a family of two (okay..maybe 2.5 right now with Baby Boy on the way!), we really don't need a giant cookie to eat by ourselves. So, when the opportunity finally arose when we had our Restaurant Copy-Cats themed Dinner Club he jumped on it with this IMPROVED cookie cake.
Why is it improved, you ask? Just take a deeper look into this picture...

It starts with not just a regular chocolate chip cookie but rather one in which the cookie dough is infused with peanut butter (of course!). The use of a springform pan results in a thick cookie that is crunchy on the outside and soft and even a bit gooey on the inside. But it doesn't stop there. It's enveloped in a layer of fluffy peanut butter frosting and then finished with peanut butter cups held in place by a rich dark chocolate ganache. Excessive? Probably. Delicious? Yes.
Chris was in a hurry and so he skipped the chilling step of the ganache before piping. This resulted in a sloppier than desired execution of the peanut butter cup decorations which ended up sliding towards the dip in the center of the cake. He deemed it "not good enough to serve for dinner club" and considered keeping it hidden away in the refrigerator. I'm pretty sure had he done that our guests would have revolted.
Happy Friday and have a wonderful weekend!
Two Years Ago: Celebrate Cinco de Mayo with Guacamole, Spicy Lime and Honey Wings, Shrimpo de Gallo, and Tres Leches Cake
Four Years Ago: Blonde Brownies and Avocado, Tomato and Mango Salsa
Chocolate Chip Peanut Butter Cookie Cake
Ingredients
For the Cake
- 1/2 cup (115g) unsalted butter, softened
- 1/2 cup (110g) light brown sugar, packed
- 1/2 cup (100g) sugar
- 1/2 cup creamy peanut butter
- 2 large eggs
- 1 tsp. vanilla extract
- 1 3/4 cup (220g) all-purpose flour
- 1 tsp. baking soda
- 1/2 tsp. salt
- 1 cup milk chocolate chips
For the Peanut Butter Frosting
- 1 cup (225g) unsalted butter, at room temperature
- 3/4 cup creamy peanut butter
- 1 1/4 cups (150g) powdered sugar (plus up to 1/4 cup more, if needed)
For the Dark Chocolate Ganache
- 6 oz. (170g) dark chocolate (50% cocoa), roughly chopped
- 1/3 cup whipping cream
For Topping:
- 12 Mini Reese’s Peanut Butter Cups
- Preheat oven to 350 degrees. F. Grease a 9-inch springform pan with butter.
- In a large mixing bowl using an electric mixer beat together the butter, both sugars, and peanut butter until light and fluffy. Add the eggs and vanilla and beat untilcombined.
- In a small bowl, combine the flour, baking soda, and salt. Add the dry ingredients the wet ones and mix on low until combined. Stir in the chocolate chips. Transfer to the prepared springform pan.
- Bake for about 24-26 minutes or until a knife inserted in the center comes out clean. Allow to cool at room temperature.
- Make the Peanut Butter Frosting: Using a mixer, beat together the butter and peanut butter until light and fluffy. Add 1 1/4 cups powdered sugar to the bowl and mix in by starting on low and then increasing the mixer speed to high as it gradually becomes incorporated. If needed, add up to another 1/4 cup powdered sugar to bring the frosting to a spreadable consistency. Frost the tops and sides of the cooled cookie cake.
- Make the Dark Chocolate Ganache: In a small saucepan over low heat melt the dark chocolate. Remove the pan from the heat and whisk in the whipping cream. Put the ganache in the refrigerator for about 15 minutes to chill so that it will be easier to pipe onto the cake. Transfer ganache to an icing bag fitted with a wide frosting tip (or just use a plastic bag with one corner cut off). Pipe 12 evenly spaced dots of chocolate frosting around the edge of the frosted cake. Top each dot of ganache with one mini peanut butter cup.
- Serve cake immediately or chill until ready to serve.
Monday, April 22, 2013
SRC: Peanut Butter Cup Bars
This month's Secret Recipe Club assignment comes from Mele Cotte which apparently means "Baked Apple" in Italian. I learned something new! And I am so extremely glad to have found Christina's blog. She has the most amazing looking desserts which made it oh-so-hard to pick a recipe this month.
I ended up letting my husband pick the recipe and no surprise that it involved his favorite combination of flavors...peanut butter and chocolate! What made me happy was the fact that this recipe came together ridiculously quickly and easily. All it requires is melting the ingredients on the stove top, pouring it into a pan, and allowing it to set in refrigerator. Perfect for the novice chef or busiest of people looking to impress.
The concept is a peanut butter cup but in bar form. It delivered! My husband originally told me to take the pan of treats to work but after one taste, he changed his mind and hoarded them. My father-in-law said it was the best "fudge" he has ever eaten and happily went for seconds. What set these apart for me was the slightly crunchy texture that came from the graham crackers. Who would've known?
Oddly, I don't have an 8x8 pan in my kitchen so used a 9x9. This works fine but results in a thinner bar and more squares (yah!). The thinner bar I actually enjoyed because any thicker it would be too rich for me to enjoy. However, the increased surface area made my chocolate layer suffer slightly. In the future, I'd increase the amount of chocolate layer and have noted these changes below. In the spirit of being lazy and not wanting to buy a bag of peanut butter chips just for decorating, I used straight-up peanut butter that was melted slightly in the microwave. Delicious and pretty, too!
One Year Ago: Chocolate Chip Cookie Dough Stuffed Cinnamon Rolls (my first Secret Recipe Club reveal...wow time flies!)
Two Years Ago: Churro Bites
Four Years Ago: Grandma B's Spaghetti Meatballs
Peanut Butter Cup Bars

Ingredients
I ended up letting my husband pick the recipe and no surprise that it involved his favorite combination of flavors...peanut butter and chocolate! What made me happy was the fact that this recipe came together ridiculously quickly and easily. All it requires is melting the ingredients on the stove top, pouring it into a pan, and allowing it to set in refrigerator. Perfect for the novice chef or busiest of people looking to impress.
The concept is a peanut butter cup but in bar form. It delivered! My husband originally told me to take the pan of treats to work but after one taste, he changed his mind and hoarded them. My father-in-law said it was the best "fudge" he has ever eaten and happily went for seconds. What set these apart for me was the slightly crunchy texture that came from the graham crackers. Who would've known?
Oddly, I don't have an 8x8 pan in my kitchen so used a 9x9. This works fine but results in a thinner bar and more squares (yah!). The thinner bar I actually enjoyed because any thicker it would be too rich for me to enjoy. However, the increased surface area made my chocolate layer suffer slightly. In the future, I'd increase the amount of chocolate layer and have noted these changes below. In the spirit of being lazy and not wanting to buy a bag of peanut butter chips just for decorating, I used straight-up peanut butter that was melted slightly in the microwave. Delicious and pretty, too!
One Year Ago: Chocolate Chip Cookie Dough Stuffed Cinnamon Rolls (my first Secret Recipe Club reveal...wow time flies!)
Two Years Ago: Churro Bites
Four Years Ago: Grandma B's Spaghetti Meatballs
Peanut Butter Cup Bars
Ingredients
- 3/4 cup unsalted butter
- 1 3/4 cups powdered sugar
- 1 cup smooth peanut butter
- 3/4 cup graham cracker crumbs
- 1/3 cup unsalted butter
- 1 cup bittersweet chocolate chips (or chopped chocolate)
- 2 Tablespoons smooth peanut butter
- Line a 9x9-inch square pan with foil, leaving enough to hang over the sides. Butter the foil and set aside.
- In a medium saucepan, melt the 3/4 cup of butter over low heat. Once melted, remove from heat and stir in the powdered sugar. Add 1 cup peanut butter and graham cracker crumbs and stir until combined and smooth. Transfer the peanut butter mixture into the prepared pan, even out and smooth the top with a rubber spatula or by tapping it gently on the counter top.
- In the saucepan, melt the 1/3 cup unsalted butter. Add the chocolate and stir until almost completely melted, remove from heat, and continue stirring until completely smooth. Pour over the peanut butter layer and smooth into an even layer using a rubber spatula.
- Put the remaining 2 Tablespoons of peanut butter to a zip lock bag. Microwave for about 30 seconds. Snip the corner of the bag and drizzle in a decorative pattern on top of the chocolate layer.
- Refrigerate the Peanut Butter Cup Bars at least 30 minutes to set. Remove from the pan by lifting the foil and place on a cutting board. Cut into 25 bars (5 rows by 5 columns). Store in an airtight container.
Subscribe to:
Posts (Atom)