Showing posts with label sides. Show all posts

Tuesday, September 17, 2013

Cones for the Cure Winner and Grilled Zucchini, Yellow Summer Squash and Red Onion with Lemon-Basil Vinaigrette

Hi fans!  I'm here to announce the Cones for the Cure Giveaway Winner and while I'm at it, I wanted to share a recipe for Summer's last hurrah as Fall seems to be rapidly upon us!  Oh, and in other news, we finally took the plunge and bought one of those fancy dSLR cameras so we could take lots of great pictures of our little cutie.  This also means better (hopefully!) food photography coming your way.  What do you think??

First thing's first, congratulations Kesha G. for winning the prize pack.  I've sent you an email with details on how to claim your prize.  I hope you enjoy the goodness!

Now for this recipe.  I loved grilled veggies but it never fails that when I send my husband out to grill em up, many of them end up as grill casualties when they slide down between the grates during transfer and/or flipping.  With this recipe, I skewered the vegetables for him so that they'd stay intact.  Good thing too because while the recipe said it served 4-6, I doubled it and it still only seemed to serve 4-6 which was a bummer considering I was trying to serve 10.  I made changes to the below so that you can get sufficient quantities and not be disappointed with your yield.  The flavor was wonderful so it was too bad we had to ration it...loved that caramelized flavor with the brightness of the lemon!  You can use whatever veggies you have on hand.  The farm had sent us zucchini and yellow squash so that's what I used.  I would have loved to add eggplant if we had it.  Yum!

One Year Ago: Chicken Fajita Lettuce Wraps
Two Years Ago: Foil-Baked Fish with Black Beans and Corn
Three Years Ago: Pineapple Teriyaki Chicken
Four Years Ago: Sausage, Pepper, Onion, and Green Pepper Fra Diavolo

Grilled Zucchini, Yellow Summer Squash and Red Onion with Lemon-Basil Vinaigrette 


Grilled Zucchini, Yellow Summer Squash and Red Onion with Lemon-Basil Vinaigrette

Ingredients
  • 1 lb zucchini, sliced into 1/3-inch rounds 
  • 1 lb yellow summer squash, sliced into 1/3-inch rounds
  • 1 red onion, sliced into 1/2-inch rounds 
  • 1/2 cup + 3 Tbsp olive oil 
  • Salt and pepper, to taste
  • 2 cloves garlic, minced 
  • Zest and juice from 1 lemon (preferably organic)
  • 2 tsp spicy brown mustard 
  • 6-8 large basil leaves, chopped
Directions

  1. Heat grill to medium and prepare skewers by soaking in water per the instructions on your package.
  2. Carefully thread the onion rounds onto prepared skewers, taking care to ensure the skewer goes through every onion ring.  If desired, thread the remaining vegetables onto skewers as well.  
  3. Brush onions, zucchini, and yellow summer squash rounds with 1/2 cup olive oil and season liberally with salt and pepper. 
  4. Grill vegetables 9-10 minutes each side, until nicely caramelized. 
  5. In a small bowl, whisk garlic, lemon juice, zest, mustard, remaining 3 tablespons oil, and a pinch of salt and pepper together.
  6. Place cooked vegetables on a platter, drizzle with dressing, and top with chopped basil leaves.

Source: Barely modified from Confections of a Foodie Bride

Friday, April 5, 2013

Asparagus and Ham Stuffed Potatoes

Have you ever cooked a meal using just your microwave?  No, I'm not talking about TV dinners here.  I'm talking about a home-cooked from scratch meal.

Today's recipe was the perfect way to use up my remaining Easter ham meat and it was sooooo easy because it was made (almost) entirely in the microwave.  If you don't have leftover ham, you could easily use lunch meat, ham steak, or buy some of that pre-diced ham.  The whole meal is on the table in about 30 minutes and has a good mix of carbs, veggies, meat, and dairy.  Talk about getting in the entire food pyramid!

Honestly I was surprised by how much I loved these.  Just like these potatoes looked visually bursting at the seams, they were also bursting with powerful flavor bits.  I can only imagine the possibilities of this base recipe with other fillings - cheddar, broccoli and chicken; steak, caramelized onions, and blue cheese?  Oh the possibilities of quick, wholesome meals are endless!

I made a few modifications.  The biggest being substituting Greek yogurt for the sour cream.  The nutritional swap is awesome and your tastebuds won't know the difference.  I added more of it and the cheese because I love a creamy potato. For an extra punch, I added parmesan to the topping.  Divine!

Two Years Ago: Spaghetti and Meatballs
Three Years Ago: It was a breakfast themed dinner club with Country Fried Steak and a Belgian Waffle Bar with Strawberry Topping, Pancake Syrup, and more then rounded out with easy Bacon Egg and Toast Cups.

Asparagus and Ham Stuffed Potatoes

Asparagus and Ham Stuffed Potatoes
 Ingredients
  • 4 medium russet potatoes (about 8 ounces each) 
  • 1/2 bunch asparagus, trimmed of woody stems and cut into 1/2-inch pieces 
  • 1 cup diced ham 
  • 3/4 cup fat-free Greek yogurt
  • 1 cup shredded Swiss cheese, divided
  • 4 Tablespoons shredded parmesan cheese
  • 1/2 cup chopped fresh chives or green onions, divided 
  • 1/4 teaspoon salt 
  • 1/4 teaspoon white or black pepper 
Directions
  1. Use a fork to pierce potatoes all over. Microwave on MEDIUM, turning the potatoes once or twice, until soft, about 20 minutes. 
  2. Meanwhile,steam asparagus in a steamer basket on the stove until just tender, 2 to 3 minutes. 
  3. Combine the steamed asparagus with ham, Greek yogurt, 3/4 cup Swiss cheese, 6 tablespoons chives or green onions, salt and pepper in a bowl. 
  4. When the potatoes are cool enough to handle, cut off the top third then gently scoop out the flesh, leaving enough to keep the sides intact; Combine with the ham mixture.
  5. Place the potato shells in a microwave-safe dish and evenly divide the ham mixture among them. (They will be very well stuffed.) Top each stuffed potato with 1 tablespoon of the remaining Swiss cheese and 1 tablespoon of the Parmesan.
  6. Microwave on HIGH until the filling is hot and the cheese is melted, 2 to 4 minutes. Garnish with the remaining chives or green onions.  If desired
Source: Modified from Eating Well

Monday, March 25, 2013

Easy Spicy Garlic Bread in a Pot

It's supposed to be Spring right now...I think.  But the snow outside my window tells me otherwise.  I'm hoping that it's warmer where you're living...

There's something about cold weather that makes me want to bake.  Enter this gorgeous artisan bread.  It looks like something straight out of a fancy bakery and yet I made it in my own home.  In a pot.  Free of preservatives.  And it was easy!  All it takes is a bit of patience to wait for the magic to happen.  You're rewarded with a crispy crust (how does it do that??) and fluffy interior.

Enjoy!

Three Years Ago: Creme Brulee, Chicken Bruschetta, and The Easiest White Bean Chicken Chili

Easy Spicy Garlic Bread in a Pot


Easy Spicy Garlic Bread in a Pot

Ingredients

  • 1 cup (8 ounces) of warm water (between 110 and 115 degrees F) 
  • 2 1/4 teaspoons active dry yeast 
  • Pinch of granulated sugar 
  • 4 ounces unsalted butter, melted 
  • 2 Tablespoons chopped fresh herbs such as thyme, chives, rosemary, or basil (I used rosemary and basil)
  • 3/4 teaspoon dried red chili flakes 
  • 2 or 3 cloves of garlic, peeled and sliced 
  • About 4 cups (20 ounces) bread flour, plus more for dusting the work surface 
  • A few big pinches of coarse ground black pepper 
  • 2 teaspoons salt 
  • Olive oil, coarse sea salt, and chili flakes for topping 
Directions
  1. Sprinkle yeast over warm water, add pinch of sugar and stir gently. Allow yeast and warm water to rest, foam and froth for about 5 minutes. If yeast does not foam and froth after 5 minutes, toss it and start over again with new yeast. 
  2. Melt butter in a small saucepan. When butter is melted, remove from heat and add herbs, chili flake, and garlic. Set aside. 
  3. Place flour in the bowl of an electric stand mixer, fitted with a bread hook. Add salt and pepper. Pour in activated yeast mixture, and butter mixture. Stir on low speed, with the dough hook, for about 10 to 12 minutes. The dough ball should clean the sides of the bowl and not stick to the bottom of the mixing bowl. The dough will be relatively smooth and supple.  
  4. Place dough in a large greased bowl. Cover with plastic wrap and allow to rest in a warm place until double in size, about 1 hour. 
  5. Preheat oven to 450 degrees F. 
  6. When dough has doubled in size, place on a lightly floured surface and knead by hand for about 2 minutes. 
  7. In a large Dutch oven, add about 2 tablespoons olive oil, to coat the bottom of the pot. Place dough in pot and use a large knife to slice a fairly deep cross into the dough. Drizzle about 3 more tablespoons of olive oil atop the bread. Sprinkle generously with coarse sea salt and pepper flakes. 
  8. Cover with tight fitting lid and bake for 30 minutes. Reduce oven heat to 400 degrees F, remove lid, and allow to make for about 15-20 minutes more. Remove from oven and allow to cool until easily removed from the pan. Bread will last, well wrapped at room temperature, for up to 3 days.
Source: Joy the Baker

Monday, December 10, 2012

Mac and Cheese Entry #6: Spinach and Bacon Macaroni & Cheese

We're getting towards the end of the contest.  Can you believe it?

Today's mac and cheese was submitted by Mandy.  She told me it's the BEST mac but technically cheating since it starts from a bag mix.  However she swore it was delicious and a must try, even if I'd never admit to liking it publicly.  Guess she kind of forgot the fact that I sorta kinda need to share the recipes with the entire world so now you all know our dirty little secret *gasp*!

As we already discovered earlier in our Mac and Cheese journey, sometimes the simplest macaroni and cheese recipes (like Bonnie's Grammy's Mac and Cheese which only has four ingredients, one of which is Kraft Singles!), can be surprisingly delicious.  Then, if you dress it up with ingredients like bacon, can you really go wrong?  I think not.

All in all, this is a great quick meal solution.  This was the first (and only) recipe submitted in the contest which included bacon and Chris approved of that addition.  If you hide and throw away the bag, you could impress your family as long as your conscience doesn't eat away at you ;).

Have you been remembering to enter for your chance to win either Mac & Cheese by Ellen Brown or Mac and Cheese, Please! by Laura Werlin!  As always, see this page for full contest details :).

Three Years Ago: Chinese Chicken Corn Soup and Banana Pancakes

Spinach and Bacon Macaroni & Cheese


Ingredients
Directions
  1. Prepare mac & cheese in large saucepan as directed on package except do not top with bread crumb topping.
  2. Stir in spinach and red pepper flakes; cook and stir 2 min. or just until spinach is wilted.
  3. Stir in bacon. Sprinkle with crumb topping.
Source: Kraft as submitted by Mandy N.

Monday, November 26, 2012

Mac and Cheese Contest Entry #4: Creamy Stove Top Mac 'n' Cheese

Are you ready for the smoothest, creamiest, cheesiest macaroni that ever existed??  This is it without a doubt.  My in-laws and not-actually-a-huge-mac-and-cheese-fan of a husband named this the best mac and cheese yet.  But I'm not ready to declare a winner because we're only halfway through and each recipe has had its strengths...

So why was this one so well loved, you ask?  Looking at the ingredients, you'll note that this one contains eggs for richness.  It also uses evaporated milk.  Many mac and cheese experts have studied the use of milk, cream, and evaporated milk and generally, the latter is the key to ultra creamy, ultra smooth cheese sauce.  It's also the most forgiving when you need to reheat it (but, I guarantee that with this particular recipe, you won't have leftovers!).  As for the cheese factor, there is a whopping 3 CUPS of pure cheddar coating just 2 relatively meager cups (1/2 box) of macaroni.  When you compare the ratio versus previous recipes, there is usually about a 1:1 ratio of pasta to cheese versus this one is 1.5:1.  Even the vivid orange color told you how cheesy it would be.  Yes.  Cheese pleaseee!

As I was preparing this one on the stove I thought it was a bit too soupy again but the cheese sauce does thicken on standing and clings to every little noodle.  Plus as we just discussed, the cheese to pasta ratio is part of what makes it great.  I think it would still be okay if you tried to stretch the recipe by adding up to another 1/2 to 1 cup of macaroni, though.  Brenda says to add crushed Ritz crackers if desired.  I gave it a go but personally like it better without.  They get mushy pretty quickly which kind of defeats the purpose of adding them for an oven-like crunch factor.

Thank you so much Brenda for sharing this awesome recipe.  It was the quintessential no frills, creamy stove top classic cheddar mac recipe.

And for you, dear readers, another mac and cheese recipe means another chance to WIN!  Please as you share each entry, come back and comment on the blog post because that's the only way I can track and enter you into the contest to win either Mac & Cheese by Ellen Brown or Mac and Cheese, Please! by Laura Werlin!  As always, see this page for full contest details :).

Three Years Ago: Loaded Baked Potato Soup

Creamy Stove Top Mac 'n' Cheese

Ingredients
  • 8 oz (2 cups) macaroni
  • salt
  • 2 large eggs
  • 1 (12 oz) can evaporated milk
  • 1 tsp dry mustard, dissolved in 1 tsp water
  • 1/4 tsp Tabasco
  • Pepper
  • 4 T (1/2 stick) unsalted butter
  • 12 oz (3 cups) cheddar cheese, shredded (I used 8 oz mild and 4 oz sharp cheddar)
  • Ritz crackers, crushed (optional)
Directions
  1. Bring 2 quarts water to a boil in a large pot for the macaroni. Stir in 1 1/2 tsp salt and macaroni. Cook until almost tender but still a little firm to the bite.
  2. Mix together the eggs, half of the evaporated milk, the mustard mixture, Tabasco, 1/2 tsp salt, and 1/4 tsp pepper.
  3. Drain the pasta and return it to the pot. Set the pot over low heat and stir in the butter until melted.
  4. Stir in the egg mixture and half of the cheddar. Continue to cook over low heat, gradually stirring in the remaining milk and cheddar, until mixture is hot and creamy, about 5 minutes. Season with salt and pepper.  Top with crushed Ritz crackers if desired.
Source: The America's Test Kitchen Family Cookbook, page 234 as submitted by Brenda F.

Monday, November 12, 2012

Mac and Cheese Contest Entry #2: Smoked Macaroni and Cheese

"Smoked" is the perfect description of the predominant flavor in this macaroni and cheese.  My in-laws swore it was the smell of bacon but really, it was all just smoked gouda.  I'm a sucker for smoked gouda.  In fact, it's my favorite cheese.

The seasonings were also interesting.  Most mac and cheese use either hot sauce, mustard, and/or cayenne pepper as is the case of this recipe to make the flavors pop.  But, I've never seen tomato paste in a macaroni and cheese recipe before. It added a welcome depth to this classic dish.  As it only calls for one tablespoon, I was very glad to have a handy stock of frozen tomato paste cubes in just that size.  If you haven't tried it yet, next time you open a can, just measure them into tablespoon sized portions and freeze.  When you need them, pop them out and add to your dish.  No more waste!

As I was combining the noodles with the sauce I was seriously salivating from the smell.  So, I decided to "cheat" and sneak a bite (anyone else do this?) before I put it into the oven to finish.  This is when I got *really* excited.  It tasted even better than it smelled!  I was tempted to stop right then and there but alas, I had to continue to be true to the recipe that was submitted.  And I'm glad I did that because the crunchy topping on this macaroni was really good (and pretty!), too!

Smoked Mac and Cheese

My verdict?  Definitely worthy of an upcoming Thanksgiving side dish slot or just for the next time you're craving the comforts of macaroni and cheese.  Thank you so much Stacey for sharing!

I hope you've been sharing and then commenting on each of my Mac and Cheese Mondays posts so you can enter to win one of two great cookbooks: Mac & Cheese by Ellen Brown or Mac and Cheese, Please! by Laura Werlin!  See this page for full contest details.

One Year Ago: Cheesy Italian Meatballs with Marinara Sauce
Three Years Ago: Home Fries and Beach Shrimp

Smoked Macaroni and Cheese


Yields: 8-10 servings

Ingredients
  • 4 Tbsp (1/2 stick) unsalted butter
  • 1/4 cup all-purpose flour
  • 3 1/2 cups milk
  • 1 Tbsp tomato paste
  • 2 cups shredded sharp cheddar cheese, divided
  • 2 cups shredded smoked gouda cheese, divided
  • Salt and freshly ground pepper, to taste
  • Pinch of cayenne pepper
  • 4 oz country-style bread
  • 2 Tbsp unsalted butter, melted
  • 1 lb rigatoni, cooked slightly under al dente and drained
Directions

  1. Preheat an oven to 375 degrees F.  Butter a large rectangular baking dish.
  2. In a saucepan over medium heat, melt the 4 tablespoons butter.  Add the flour and cook, stirring frequently, about 3 minutes.  Whisk in the milk and cook, stirring frequently, until thickened, about 5 minutes.  Whisk in the tomato paste.  Add 1 1/2 cups of each cheese and stir until melted.  Season with salt, black pepper, and cayenne.
  3. Tear the bread into crumbs.  In a small bowl, stir together the bread crumbs and 2 tablespoons melted butter and season with salt.
  4. In a large bowl, combine the pasta and cheese sauce then pour into the prepared baking dish.  Top with the remaining cheese and the buttered bread crumbs.  Bake until the cheeses are golden and bubbly, about 40 minutes.  If the top becomes too dark, cover with aluminum foil.  Let stand for 10 minutes before serving.
Source: Slightly adapted from William's Sonoma as submitted by Stacey

Monday, November 5, 2012

Mac and Cheese Contest Entry #1: Best Potluck Mac and Cheese

Here is the first installation of what I'll call Mac and Cheese Mondays.  I will be sharing the contest entries that I received each Monday and giving my reviews.

Remember, each time you SHARE MY MAC AND CHEESE POST using your favorite social media (such as your own blog, facebook, twitter, google+, pintrest, etc.) and leave a comment with your email address and the link showing me that you shared is a chance for you, my reader, to win!  You can do this once per recipe for a total of seven (7) entries.  There are two great Mac and Cheese cookbooks at stake: Mac & Cheese by Ellen Brown and Mac and Cheese, Please! by Laura Werlin.

The first entry that I'm sharing was submitted by Sarah at A Taste of Home Cooking.  She modified it slightly from Cook's Country and per her blog post, uses it as a quick freezer meal when accompanied by a healthy side salad to balance the meal.

This mac and cheese was pretty classic for those that like the baked type of mac and cheese.  Everyone knows that a great mac and cheese has to incorporate good quality cheese that's freshly grated from the block for the smoothest texture so that's where I began with this recipe.  But I was surprised by the lack of cheesy flavor given the nice mix of 3 different cheeses in the sauce.  Perhaps I just didn't add enough salt "to taste" but the cheese flavor was quite subdued.  Instead, the onion flavor was most prominent to me.  It was unexpected, but still nice.   My favorite part about this recipe was the nice toasted crunch topping which was studded with Parmesan cheese.  Not only does it provided a great texture and flavor contrast but it makes the mac and cheese look pretty, too!  However, I personally find that the crunch topping comes at the expense of a less creamy mac and cheese and that's just not something I'm willing to trade off.  I'm hoping through this contest I'll be able to find that perfect balance but this isn't it for me.

Thank you Sarah for your entry and looking forward to trying the six others still yet to be made!

Edited to add: I actually enjoyed the leftovers of this more than the fresh dish!  It seemed to get creamier and more balanced in flavor with time.  The cheese flavor was still quite mild but it seemed creamier when reheated in the microwave!  That said, perhaps this is indeed a good freezer meal candidate :).

Best Potluck Mac and Cheese


Best Potluck Mac and Cheese

Ingredients

  • 3-4 slices hearty white sandwich bread, torn into large pieces
  • 8 Tbsp unsalted butter, 4 Tbsps of which are melted
  • 1/4 cup grated Parmesan cheese
  • 1 lb elbow macaroni (Sarah likes to use cavatappi)
  • 5 Tbsp all purpose flour
  • 4 cups milk
  • 1 small onion, finely chopped
  • 1/8 tsp ground nutmet
  • 1/4 tsp paprika
  • 2 dried bay leaves
  • Salt and pepper to taste
  • 2 cups shredded extra-sharp cheddar cheese
  • 1 1/4 cups shredded American cheese (use block American cheese from the deli countery.  Prewrapped slices will result in a drier sauce)
  • 3/4 cup shredded Monterey Jack cheese
Directions
  1. Preheat oven to 350 degrees F.  Lightly grease a 9x13 baking dish.
  2. Pulse bread, melted butter, and Parmesan in a food processor until ground into a coarse crumb.  Transfer to a bowl.
  3. Cook pasta in bowling salted water until al dente.  Drain and set aside.
  4. In the now-empty pasta pot over medium heat, melt remaining 4 tablespoons of butter until foaming.  Stir in flour and cook, stirring constantly until mixture turns light brown, about 1 minute.  Slowly whisk in milk, onion, bay leaves, nutmet, and salt and pepper.  Cook until mixture, stirring occasionally, until it begins to simmer and is slightly thickened, about 15 minutes.  Remove the pot off the heat and then slowly whisk in cheeses, stirring until the cheese fully melts.  Stir in cooked macaroni until coated.
  5. Transfer macaroni and cheese mixture to the prepared baking dish and top with the bread crumb mixture.  Bake until cheese is bubbling around the edges and the top is golden brown, 20-25 minutes. Allow to sit for 5-10 minutes before serving.
Source: Slightly modified from Cook's Country as submitted by Sarah of A Taste of Home Cooking

Wednesday, August 29, 2012

Loaded Baked Potato Salad

This week I wanted to feature recipes that remind me of Summer.  The Tomato and Corn Pie that I shared on Monday definitely did that.  This one is one that reminds me of picnics and Summer BBQs and hence it was my contribution for our BBQ Themed Dinner Club.

It has all the flavors of loaded baked potatoes but is lightened up a bit by my substitution of Greek yogurt for the sour cream.  Nobody could tell I did this and upon being told it was "healthier", some went for seconds.  I like the way it looks, too.  All those delicious bits of bacon, cheese, and green onions really gives this potato salad a pop of color compared to their rather anemic looking white or yellow run-of-the-mill potato salad.

Make this for Labor Day as Summer brings on its last hurrah!

One Year Ago: Grilled Maple Chili Salmon

Loaded Baked Potato Salad


Loaded Baked Potato Salad
Photo Credit: Emily H.
Yields: 4-6 Servings

Ingredients
  • 1.5 pounds red potatoes (or 4 large Russet or Yukon Gold potatoes)
  • 1/4 cup ranch dressing
  • 1/2 cup plain Greek yogurt
  • 1/2 cup shredded cheddar cheese
  • 1/4 cup freshly chopped chives or green onions, divided
  • 6 strips of bacon (4 for the salad and 1 for topping), cooked and crumbled
  • 1 tsp black pepper
  • Salt, to taste
  • Hot sauce, to taste
Directions
  1. In a small bowl, mix together the ranch dressing and Greek yogurt.  Add half of the chives, cheese, and pepper, stirring until well combined.  Season with salt and hot sauce, to taste.  Let chill in the refrigerator.
  2. Meanwhile, peel and cube potatoes into bite size pieces.  Put in a large pot, cover with water, and boil until fork tender, about 15-20 minutes.  Drain and set aside to steam dry and cool.
  3. Put potatoes in a large bowl or dish and combine with dressing and yogurt mixture.  Top with remaining chives and crumbled bacon.  Chill before serving.
Source: Modified from Dishing with Leslie

Monday, August 27, 2012

Tomato and Corn Pie

So what did you think of last week?  It got a bit weird around here as I shared 3 different sweet recipes in a row.  I don't think that's every happened before outside of an Emily baking Extravaganza (see Apples or Summer Fruits and Veggies themes) or holiday time.  But now back to regular old food around here...my waistline really can't handle anymore desserts for a little while!

It's sad but true, summer is officially coming to an end soon.  Kids are returning or have already returned to school, pools are on their last week of being open, and summer's fruit and vegetable bounty will soon be gone.  But before that all happens, I highly encourage you to capture all the splendor of summer by making this savory pie.

This recipe is not especially difficult to make but it is a bit time consuming.  But the moment that you bite into it, you are rewarded for your hard work.  This was simply put, the freshest, most delicious dish I'd eaten all summer.  It was bursting with amazing flavors and I was so glad that I made it.

One Year Ago: Mushroom Bolognese
Two Years Ago: Blueberry Almond Cake with Lemon Drizzle

Tomato and Corn Pie


I'm sorry for this really awful photo.  I got a late start and it was quite dark by the time I had the pie done and snapped this shot.  It tastes infinitely better than I make it look.  The flavor truly took me by surprise!
Ingredients

For the Crust:
  • 2 cups all-purpose flour
  • 1 Tbsp baking powder
  • 3/4 tsp salt
  • 6 Tbsp cold unsalted butter, cut into 1/2 inch cubes
  • 3/4 cup buttermilk
  • 2 Tbsp butter, melted
For the Pie
  • 1 3/4 lb tomatoes
  • salt
  • 2/3 cup mayonnaise (light is fine) or Greek yogurt
  • 2 cups (8 oz) shredded sharp cheddar cheese
  • 1/2 cup shredded parmesan cheese
  • 2 cloves garlic, minced
  • 1/4 cup fresh basil, chopped
  • 1 Tbsp fresh chives or green onions, sliced
  • 2 Tbsp fresh lemon juice
  • Freshly ground black pepper
  • 1 1/2 cups fresh corn (from 2-3 ears)
Directions
  1. To make the crust: Whisk together flour, baking powder, and salt in a bowl.  Blend in cold butter with your fingertips, pastry blender, or two forks until it resembles coarse meal.  Add the buttermilk and stir until the mixture forms a dough.  Gather into a ball.
  2. Divide the dough in half and on a well-floured counter, roll out once piece into a 12-inch round.  Roll the dough around the rolling pin and transfer to the pie plate.  Pat the dough in with your fingers and trim any overhang.  Put the pie plate into the refrigerator to chill while preparing the filling.  Flatten the second dough bough into a disc then wrap in plastic wrap and chill as well.
  3. Bring a large pot of water to a boil.  Prepare a large bowl of ice water.  Add the tomatoes to the boiling water and cook for about 10 seconds before transferring tomatoes with a slotted spoon to the ice water.  When cool enough to handle, peel the skins from the tomatoes.
  4. Line a baking sheet with a double-layer of paper towels.  Cut the tomatoes into 1/4-inch thick slices and arrange in a single layer on the paper towels.  Sprinkle generously with salt and allow to stand at room temperature for 20-30 minutes.  Blot the tomatoes with more paper towels to remove excess moisture.
  5. Meanwhile, preheat the oven to 400F.
  6. Mix together the mayonnaise (or Greek yogurt), cheese, garlic, and lemon juice.  Season with salt and pepper to taste.
  7. Remove the pie crusts from the refrigerator.  Layer half of the tomatoes on the bottom of the pie and gently remove extra seeds from about 1/2 to 2/3 of the tomatoes (leave some for flavor!).  Scatter half of the corn on top of the tomatoes then drop spoonfuls of the cheese mixture over the top.  Sprinkle with half of the basil and chives.  Repeat the layers: tomatoes, corn, cheese, herbs.
  8. On a well-floured surface, roll the second pie crust into a 12-inch circle.  Fit it over the filling and pinch the edges of the two crusts together to form a fluted edge or use the tines of a fork to seal together.  Use a small knife to cut 4 slits on the top of the crust then brush with melted butter.
  9. Place a cookie sheet on the rack below where you will place the pie to catch any filling that may boil over.  Bake pie until crust is golden and the filling is bubbling, about 30-35 minutes.
  10. Allow to cool 10-15 minutes before cutting into slices and serving.
Source: Originally from Christ Church Cooks and Gourmet as seen on Pink Parsley

Wednesday, August 8, 2012

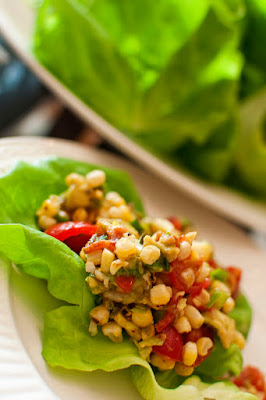
BLT Corn Salad Wrap

And so continues Emily and my Summer Seasonal Fruit and Veggies Extravaganza.  We followed our refreshing Watermelon Slush mocktails with another refreshing, barely cooked dish.  

Emily and I must have been on the same wavelength because this recipe was on both of our radars.  I like how we often think alike when it comes to food  :).  Summer tomatoes and corn are no brainers to include in this theme and having the boys give the corn some charred flavor on the grill keeps things cool in the kitchen.  Add avocado and bacon then serve it in a lettuce leaf and you have yourself a deliciously fresh finger food!

On Thursday you get a bonus post for the week- another product review+giveaway!  Then, on Friday you get the main course from Emily and my Summer Seasonal Fruit and Veggie Extravaganza before we finish off with two desserts next week.

Can't get enough lettuce wraps?  Try this Chorizo and Sweet Potato Lettuce Wrap or Asian Lettuce Wrap!


BLT Corn Salad Wrap

BLT Corn Salad Wrap
Photo Credit: Emily H.

Yields: 5 cups of corn mixture

Ingredients
  • 3 ears of corn, shucked of their husks and silk
  • 1 cup cherry tomatoes, sliced in half
  • 1/2 cup chopped green onions
  • 1 avocado, diced
  • 3 sliced crisp cooked bacon, diced
  • juice of 1 lime
  • about 1 tablespoon olive oil
  • salt and pepper to taste
  • a good sprinkling of chili powder and smokey paprika
  • butter lettuce or iceberg lettuce leaves
  • hot sauce and sour cream for topping
Directions
  1. Over a gas burner or grill, char raw shucked corn.  Rotate corn until cob is charred on all sides.  Allow corn to cool before slicing corn kernels from the cob.
  2. Add corn kernels to a medium bowl.  Add sliced cherry tomatoes, green onion, diced avocado, and diced bacon.  Squeeze in lime juice.  Add olive oil, salt, pepper, and slices.  Stir to combine.  Taste and adjust seasoning as needed.
  3. Rinse and clean individual lettuce leaves.  Serve alongside a bowl of corn salad.  To serve, scoop corn salad into lettuce leaves, top with hot sauce, sour cream, fold up like a taco and enjoy!
Source: Joy the Baker

Photobucket
This recipe was a Tasty Treasure at Fantastical Sharing of Recipes!

Wednesday, August 1, 2012

Creamed Corn

This. Is. Bliss.  And, there's not much more that screams "summer" to me than sweet corn.  I'm saddened by the corn crop shortage this year and thus higher-than-normal pricing but if you can manage to get some good corn this year, you should give this recipe a try.

I used to eat and love the type of creamed corn that was swimming in butter or *gasp* even the stuff that comes from a can.  It wasn't until I tried this recipe that I realized creamed corn could be so much more.  This recipe opened my eyes to how creamed corn should taste.  And it was worth risking the possibility of running into an icky worm in the tip of my organically grown CSA corn to access its freshness at its very peak.

The sweet corn flavor shines through and the cream and butter play supporting roles.  It's not thick with creamy texture but rather, a subtle creamy flavor.  Fresh basil kicks it up a notch to gourmet territory.  Even if you have an aversion for the canned stuff, you just might fall in love with this fresh, homemade version.

One Year Ago: Bob's Mexican Stuffed Chicken

Creamed Corn


Ingredients

  • 8 ears of corn, husked
  • 2 Tbs butter, divided
  • 1/2 cup finely chopped Vidalia onion
  • 3/4 cup heavy cream
  • 1 tsp sugar
  • 2 Tbs minced fresh chives
  • 1 Tbs minced fresh basil
  • kosher salt and freshly ground black pepper
Directions

  1. Cut the tip off of each cob of corn, and stand in a shallow bowl.  Use a knife to remove the kernels by slicing downward.
  2. Over another bowl, use the back of a spoon scrape the kernels clean of the pulp.
  3. In a large skillet, melt 1 tablespoon of the butter.  Add the onion and cook until just softened, 3-4 minutes.  Add the corn kernels, pulp, and 3/4 cup water.  Bring to a boil.  Reduce the heat, cover, and simmer until the corn is tender, 10 to 15 minutes.  Add the cream and sugar, and bring to a simmer.  Cook until the cream has thickened, 4 to 6 minutes.  Use an immersion blender to puree part of the corn - just pick 5-6 spots in the pan to puree.  Add the remaining tablespoon of butter, the chives, and the basil.  Season with salt and pepper to taste, and serve.

Source: Adapted by and as seen on Pink Parsley from Martha Stewart

Monday, June 25, 2012

Panera Mac and Cheese

I already have a favorite mac and cheese recipe.  But this one is right up there with it and if you're a fan of Panera, you'll probably love this version because it comes from their own website!

Oddly enough, I've never had the mac and cheese at Panera but I do love everything else there.  When I think of Panera, I'm reminded of my cousin Jen who lives in Arizona where the chain does not exist.  So, anytime she visits somewhere that has one, it's usually at the top of her list to visit.

This mac and cheese was served at my Father's Day lunch this year to accompany AB's Who Loves Ya Baby Back Ribs.  It was picked especially for my father-in-law and he approved.  Eating firsts, seconds, and THIRDS.  It was very saucy and creamy, just the way I like my mac to be.  The only reason I still think the other mac edges this one out is because I think that one is a bit more creamy and uses a sharper cheese, which I prefer.

One Year Ago: Summer Strawberry Salad with Poppy Seed Vinaigrette (Another Panera inspired recipe!)
Two Years Ago: Firecracker Shrimp
Three Years Ago: Pasta Salad


Panera Mac and Cheese


Ingredients
  • 1 lb. pasta shapes, such as shells
  • 4 tbsp. unsalted butter
  • 1/3 cup all-purpose flour
  • 2½ cups milk or half-and-half
  • 1 tsp. salt
  • 1½-2 tsp. Dijon mustard
  • ¼ tsp. hot sauce
  • 4 oz. white American cheese, finely chopped (available at the deli counter of most grocery stores)
  • 8 oz. white cheddar cheese, shredded
Directions
  1. Bring a large pot of water to boil.  Cook the pasta according to package directions until al dente.  Drain well.  Return to the pot off the heat.
  2. Meanwhile, in a medium saucepan, melt the butter over medium-high heat.  Stir in the flour and cook until light golden brown, whisking constantly, about 1½-2  minutes.  Slowly whisk in the milk until no lumps remain.  Stir in the salt, mustard, and hot sauce.  Lower the heat to medium and continue to cook the sauce, stirring frequently, until it bubbles and thickens, about 6-8 minutes.
  3. Remove the sauce from the heat.  Stir in the cheese a handful at a time, mixing until fully melted before adding more.  Once all the cheese has been added and the sauce is smooth, pour the sauce over the pasta in the stockpot.  Mix well until the pasta is fully coated in the sauce.  Serve immediately.
Source: As adapted by and seen on Annie's Eats from Panera Bread

Monday, April 30, 2012

Southwestern Stuffed Sweet Potatoes

Look what I have for you today...ANOTHER "stuffed" recipe!  You'd think I have a slight obsession but oddly enough, I had this recipe chosen for our Cinco de Mayo themed Dinner Club well before any of the other stuffed recipes were planned for my blog postings.

I've seen this recipe called several things: Healthy Mexican Stuffed Sweet Potatoes, Mexican-Inspired Stuffed Sweet Potatoes, and Southwestern Stuffed Sweet Potatoes.  It's a mouthful to type or say.  So, let's just put aside our differences and as in the age old potAYto versus potAHto argument we'll just call them "delicious".

You will have leftover filling.  That is, unless you're like me and start eating it by the spoonful.  But, if you do happen to have some left, I hear they make an awesome quesadilla filling!

Look for my other Cinco de Mayo Dinner Club dish later this week!

One Year Ago: Guacamole
Two Years Ago: Summer Corn and Vegetable Soup

Southwestern Stuffed Sweet Potatoes

Photo Credit: Emily H.

Ingredients
  • 3 medium sweet potatoes
  • 1 (15 oz) can corn, or 1.5 cups frozen corn, rinsed and patted dry
  • Salt, to taste
  • 2 tsp ground cumin
  • 1 tsp chili powder
  • 1/2 tsp Mexican oregano (optional)
  • 1 Tbsp olive oil
  • 1/2 yellow onion, diced
  • 1 (15 oz) can black beans, rinsed and drained
  • 1/2 c cilantro, chopped
  • 1 oz cream cheese (light is fine)
  • 1/4 c sour cream (light is fine), plus more for serving
  • 1 to 3 chipotle peppers in adobo sauce, minced or pureed (adjust to your spice tolerance)
  • 6 Tbsp shredded Mexican cheese (or other preferred flavor)
Directions
  1. Preheat oven to 350 degrees F. Place sweet potatoes on a baking sheet and bake for 50 to 60 minutes, or until fork tender. Remove from the oven and allow to set until cool enough to handle.
  2. While the sweet potatoes are cooling, saute the corn in a dry heavy skillet over medium high heat. Sprinkle with salt, cumin, chili powder and Mexican oregano. Cook until the corn is roasted and browned (about 7 to 10 minutes). Transfer to a small bowl; set aside.
  3. Wipe the skillet clean and heat the olive oil. Add the onions and cook until just translucent and tender. Transfer to the bowl with the corn. Add the black beans and cilantro to the onion and corn. Gently stir to mix.
  4. Cut the cooled sweet potatoes in half, lengthwise. Scoop the flesh into a large mixing bowl, leaving the skins intact (leaving a thin layer of potato helps to hold the skin together.) Add the cream cheese, sour cream, chipotle pepper(s) and salt to the mixing bowl with the sweet potatoes. Mash with a potato masher or blender to desired texture. Gently stir in the roasted corn, onions, black beans and cilantro mix.
  5. Preheat the broiler. Fill each potato skin with the mashed potato mixture, topping each with 1 Tablespoon of cheese. Broil for 5 minutes, or until cheese is melted and hot. Serve immediately with a dollop of sour cream, if desired.
Source: As seen on and adapted by Pennies on a Platter from Pinch of Yum

Wednesday, November 9, 2011

Caramelized Onion Mashed Potatoes

Do not let this mundane looking photo fool you.  These are no ordinary mashed potatoes.  In fact, these mashed potatoes are SO FULL OF FLAVOR that they don't even need gravy.  Everybody (especially my now blog-famous friend Emily) knows that caramelized onions make any dish irresistible.  And that, my friends, is what sets this mashed potato recipe apart from any other.  Those craving more flavor can add a hit of garlic (roasted for more mellow flavor or raw for a bite) and parmesan cheese.

Caramelized Onion Mashed Potatoes


Yields: 4 Servings

Ingredients
  • 2 pounds potatoes, washed, peeled, cubed
  • 1 large onion, thinly sliced
  • 2/3 cup hot milk
  • 2 Tbsp parsley, finely minced
  • 3 Tbsp butter
  • Garlic (optional, roasted or raw)
  • Grated parmesan cheese (optional)
  • Salt and pepper, to taste
Directions
  1. Put prepared raw potatoes into a large pot and submerge in water.  Bring to a boil and cook until tender, about 20 to 25 minutes.  Drain and allow to steam dry.
  2. Meanwhile, in a large saute pan, heat butter until it begins to bubble.  Add sliced onions and season with a pinch of salt and pepper.  Reduce heat to low and cook for 20-30 minutes, stirring occasionally, until soft and browned.
  3. Transfer half of the onions and all of the milk to a blender and blend until smooth.
  4. Mash the potatoes and stir in the hot onion milk.  Add a little extra butter and check the seasoning.  Stir in the remaining caramelized onions and the minced parsley.  If desired add garlic and parmesan cheese for a boost of flavor.

Sunday, November 6, 2011

Recipe Swap: Strip House Potatoes Romanoff

These potatoes were, in the name sake of my recipe swap partner for the week, DeLish!  My husband went in for second servings (shhh, nobody tell him that there's a good helping of sour cream in this dish!) and we easily cleaned out half of the casserole dish (supposedly 6 servings) between the two of us.

It's a bit time consuming to make with the pre-baking of the potatoes prior to the final casserole assembly and bake but cheesy flavor is amazingly comforting.  I'm sure in a rush you could substitute hash brown potatoes and go straight for the final bake.  I may try that in the future but if someone else gets to it first please let me know how it goes.

I baked my potatoes and assembled the casserole in the same day (still allowing to cool to room temperature first).  My potatoes were on the small side since they came from my farm share and probably could have benefited from a reduced pre-baking time to shred more easily.  I did not have white cheddar so used a combination of sharp cheddar and some leftover three cheddar cheese (which, I guess technically has *some* white cheddar in it).  In lieu of shallots which I forgot to buy I just used a medium onion and 2 garlic cloves.  Also, I cut back the salt to 1.5 tsp but still found it to be a little too salty.  Might scale it back to a single teaspoon in the future.  I used fat free sour cream with success to trim some calories.  I'm sure hubby will be asking for this dish again!

Please visit A Taste of Home Cooking for the swap roundup and check out the equally cheesy and comforting Stovetop Mac and Cheese recipe (my go-to!) that I submitted and Hezzi D's Books and Cooks recieved in this week's swap.

Strip House Potatoes Romanoff


Yields: 6 Servings


Ingredients

  • 3 large russet potatoes, about 2 lb. total, unpeeled and scrubbed  
  • 3/4 cup minced shallots  (I used a medium onion and 2 cloves garlic, which I grated on the small side of the grater)
  • 2 1/2 cups grated white cheddar cheese (I used 1 & 1/2 cups sharp and three cheese cheddar)
  • 2 tsp. kosher salt (I used 1.5 tsp but would recommend trying 1 tsp)
  • 1/4 tsp. freshly ground white pepper 
  • 1 1/2 cups sour cream (I used fat free)


Directions

  1. Wrap each potato in aluminum foil and pierce several times with a fork. Place the potatoes directly on the oven rack and bake until tender, about 1 hour. Remove the foil and let the potatoes cool to room temperature. Place the potatoes on a plate, wrap with plastic wrap and refrigerate overnight.
  2. The next day, preheat the oven to 350ºF. 
  3. Using the large holes of a box grater, grate the potatoes, including the skins. Transfer to a bowl and sprinkle the shallots, 1 3/4 cups of the cheese, the salt and white pepper on top. Using your hands, gently toss the mixture together to combine, then fold in the sour cream in 2 additions. 
  4. Transfer the potato mixture to a 1 1/2-quart gratin dish; do not compress. Sprinkle the remaining 3/4 cup cheese on top. Bake until the potatoes are hot and the cheese is golden brown, about 30 minutes. 

Source: Originally from Strip House as seen on DeLish

Friday, October 14, 2011

Pan-Fried Okra

Brace yourself.  I have a confession to make.  I have never had fried okra before.

If you've been a long-time reader of mine you'll recall that I have a deep disdain for frying food.  It's greasy, it's messy, and it's just plain unhealthy.  When I do get the urge to fry my food, I'll go halfway and do pan-fried.  This way, I can better control the amount of oil that I use and it doesn't generally smell up the house like a McDonald's nearly as much as deep-frying does.

I loved the way this pan-fried okra turned out and can understand why after I bookmarked this recipe on my Pinterest board why they got repinned over and over again. They were like little golden nuggets of crunchy goodness.  Very addicting.


Pan-Fried Okra


Ingredients:
  • 3 cups okra, cut into 1/2 inch rounds
  • 1/3 cup buttermilk
  • 1/2 cup cornmeal
  • 1/4 cup extra virgin olive oil (may need a bit more)
  • Salt, to taste
  • Pepper, to taste
Directions:
  1. If using frozen okra, just lightly rinse and do not let thaw. Trim off ends of okra and cut into 1/2 inch rounds. Place okra in a gallon zippered bag and add buttermilk. Seal bag and toss to coat okra. If okra is not well covered, add more buttermilk 1 tbsp. at a time until okra is well coated.
  2. In a separate clean gallon bag add cornmeal and then add the okra to the bag, seal and toss until okra is well coated with the cornmeal. If needed add an additional tbsp. of cornmeal.
  3. Meanwhile, in a large skillet add olive oil (need enough to cover the bottom of the skillet). Heat over medium high heat until oil is hot. Add the coated okra to the skillet and reduce heat to medium. Cook on one side for 5 minutes allowing okra to begin to brown. After five minutes, turn okra and sprinkle with salt. Turn okra every 5 minutes, sprinkling with salt each time until okra is golden brown in color. This should take approximately 20-25 minutes. Taste okra and salt more if needed.
Source: Barely modified from Macaroni and Cheesecake

Wednesday, October 12, 2011

Green Bean Ham Potato Casserole

Fair warning.  This picture doesn't look like much and in real life, it's not exactly breath taking either.  It is, after all, a casserole.  But, it is a tasty dish and is something I wouldn't hesitate to serve with say, Thanksgiving or Christmas dinner because it has that homey comforting goodness to it.  What this casserole has going for it is that it doesn't use cream of ___ condensed soup so fear not!


Green Bean Ham Potato Casserole


Ingredients
  • 3/8 cup of butter
  • 3/8 cup of flour
  • 3 cups milk
  • 1 1/2 cup grated Cheddar or American cheese
  • 4 cups of cooked green beans
  • 4 medium, diced, cooked potatoes
  • 3 cups diced cooked ham
  • Bread crumbs (optional)
Directions
  1. Melt butter and stir in flour.  Add milk, stirring constantly, until thickened.  Remove from heat, add cheese and stir until melted.  
  2. Arrange potatoes in a buttered casserole dish and cover with green beans,  Pour half of cheese sauce over the green beans.  Add ham and remaining cheese sauce.  Top with buttered bread crumbs if desired.  
  3. Bake at 350 degrees for approximately 30 minutes.
Source: Cedarmore CSA Newsletter

Tuesday, September 20, 2011

Potato and Tomato Gratin

Summer's coming to an end which means that local red fresh tomatoes are, too :(.  If you make one more dish with your fresh tomatoes this summer I highly suggest this one.  The time needed to caramelize the onions and bake the dish are a bit long for a weeknight (unless you prep and assemble in advance) but it's definitely worth it.  This was a great departure from traditional potato gratin.  Really fresh and lighter in taste and texture.  I'll make it again when tomatoes are at their best again next year.

Two Years Ago: Finn Nisu Bread - A tribute to my husband's heritage

Potato and Tomato Gratin
Printer-Friendly Version


Ingredients
  • 5 tablespoons extra-virgin olive oil
  • 6 cups thinly sliced onions (about 1 1/2 pounds)
  • 1 tablespoon thyme leaves, divided
  • 1 tablespoon unsalted butter
  • 1 1/4 pound Yukon Gold potatoes, peeled or not...whichever you prefer
  • 1/2 cup heavy cream
  • 2 1/4 pound ripe tomatoes, cut into 1/4" thick slices
  • 1/4 cup sliced basil
  • kosher salt and freshly ground black pepper
Directions
  1. Heat a large saute pan or Dutch oven over high heat until hot, then add 3 tablespoons olive oil, the onions, 1 teaspoon thyme, 1 teaspoon salt, and some pepper. Cook for 6 minutes, stirring often, then turn down the heat to medium and add the butter. Cook an additional 10-15 minutes, scraping with a spoon or spatula until the onions start to caramelize. Turn the heat down to low and continue cooking until the onions are a deep golden brown, another 5-10 minutes. Turn the heat off and set aside.
  2. Preheat the oven to 350 degrees F.
  3. Thinly slice the potatoes (using a mandoline or a sharp chef’s knife) into 1/8-inch-thick rounds. Toss them in a bowl with the cream, 1 teaspoon thyme, 1 teaspoon salt, and some freshly ground black pepper.  Arrange sliced tomatoes on a plate and season with 1 teaspoon salt and some pepper.
  4. To layer the gratin, first spread half the caramelized onions in an even layer in a 9×9 inch baking dish. Top the onions with one layer of alternating potatoes and tomatoes (using about half of each), then drizzle with 2 tablespoons cream (from the potato bowl) and 1 tablespoon olive oil. Season with 1/4 teaspoon salt, a healthy pinch of black pepper, 1/2 teaspoon thyme and half the basil.
  5. Repeat the layers, making the top potato/tomato layer pretty since this is the top presentation layer of the gratin. Pour the remaining cream (from the potato bowl) and remaining tablespoon olive oil over the gratin and season with 1/4 salt, a pinch of pepper, the remaining 1/4 teaspoon thyme and the remaining basil. Press all the vegetables down with your fingers; the cream will come up through the layers and coat the vegetables evenly.
  6. Cover the baking dish tightly with aluminum foil and bake for 1 1/2 to 2 hours, until the potatoes are tender when pierced. Turn the oven temperature up to 450 degrees F, uncover the gratin, and bake an additional 25-30 minutes until the top is bubbly and golden brown. Let cool slightly before serving.
Source: Originally from Sunday Suppers at Lucques by Suzanne Goin as seen on Eggs on Sunday