I'm a fan of French Dip Sandwiches but this juice and the balsamic-honey glaze brings this particular version to a whole new freaking level. I mean it is phenomenal! I literally inhaled my dinner and had to refrain from eating a second sandwich. Then, I rushed to my computer to blog about it because keeping this recipe from you would be a crime.
The au jus dip juice is full of yummy beefy and slightly acidic flavor (from the balsamic vinegar). The beef is incredibly tender and sopping in the flavored juices. The cheese is perfectly melty and the glaze just puts everything over the top with its syrupy sweet sour perfection. I used rye hoagie rolls as my bread and wish I had used something a little more substantial because the tender bread wanted to fall apart under the weight of the beefy goodness as I drenched it with dip juices. The cheese acted a bit like glue as it precariously held the sandwich together!
Yep. My mouth is still watering a bit as I write this post. I cannot wait to eat the leftovers for lunch tomorrow!
PS: Happy Birthday, Mom! I love you!
Two Years Ago: Cheddar Cauliflower Soup
Three Years Ago: Sushi, Zuppa Toscana, and Sun-Dried Tomato, Basil, and Parmesan Muffins
Ingredients
For the Sandwiches
Source: Barely adapted from Culinary Concoctions by Peabody as modified from Add a Pinch
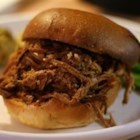
Balsamic-Honey Glazed Roast Beef Sandwiches with French Dip
 |
| I was so eager to eat this sandwich that I smooshed my two halves together before I realized the photo would look way better if I kept it open... hence the onions and some beef stuck to the cheesy side. Oops! |
For the Sandwiches
- 6 sub rolls (I love rye!)
- 1 recipe Balsamic Slow Cooker Beef with Onions (recipe below)
- 6 slices provolone cheese
- Mayonnaise (optional)
- Balsamic Honey Glaze (recipe below)
For the Balsamic Slow Cooker Roast Beef
- 1 3-4 pound boneless roast beef (chuck or round roast)
- 1 cup beef broth
- 1/2 cup balsamic vinegar
- 1 Tbsp Worcestershire sauce
- 1 Tbsp soy sauce
- 1 Tbsp honey
- 1 Tbsp brown sugar
- 4 cloves garlic, minced
- 1 large sweet onion, thinly sliced
For the Balsamic Honey Glaze
- 2 cups balsamic vinegar
- 4 Tbsp honey
Directions
- Place onions in the bottom of your slow cooker. Then add the roast beef.
- In a large bowl, mix together the remaining roast beef ingredients. Pour over the beef and cook on high for 4 hours or low for 6-8 hours. (I'd recommend the latter for the most tender beef! Cook it low and slow!)
- Once the roast beef has cooked, remove it from your slow cooker and transfer to a serving dish. Shred the beef lightly with two forks.
- Transfer the juice and onions to a fat separator (I have and recommend this one from Oxo). Put the strained onions into a bowl and set aside. Then pour about 1/4 to 1/2 cup of the juice over the roast beef. Reserve the rest of the au jus juice for dipping. Throw out the fat.
- Make the glaze by combining the ingredients in a non-reactive saucepan. Bring to a boil then lower heat to low and allow to simmer while stirring constantly. The glaze is done when it is thick enough to coat your spoon.
- Turn on your oven broiler. Open a bun on a baking sheet and if desired, smear a bit of mayonnaise on the top half then add a slice of cheese. Place meat and some onions on the other half of the bun. Put the baking sheet under the broiler and heat until the cheese begins to bubble and get slightly browned. Remove the sandwiches from the oven then drizzle with balsamic-honey glaze. It's strong so start light and add more as desired.
- Serve sandwich with au jus for dipping. Close your eyes and be amazed by how delicious it is. Try not to eat more than one!


.jpg)