Showing posts with label shrimp. Show all posts

Friday, July 26, 2013

Recipe Swap: Shrimp, Black Bean, and Pineapple Foil Packets

Okay.  I need to GET ON THE BALL.  This pregnancy brain thing really sucks.  It's about 10:50PM on Thursday and this post is supposed to be going live at 7AM on Friday.  And I have had an ENTIRE MONTH to make and schedule it.  In all fairness, I did actually make my swap recipe a couple weeks ago.  It was the whole blog posting part that I've been putting off.  Sometimes, it just seems like so much work...but enough whining for now.  I'm just being a cranky 38 week pregnant lady :P.

Anyway, this is the What's Cooking recipe swap hosted by Sarah at A Taste of Home Cooking.  The theme is Grilled Foods and I received a recipe from Jenna at Jenna's Cooking Journey.  You may recognize her as the guest blogger that brought you these yummy Oatmeal Carmelitas awhile back.

As for this recipe, I've actually made it before but it didn't make it onto the blog.  The reason for that was that unlike the similar Foil Baked Fish with Black Beans and Corn recipe which I adore, this one just lacked flavor to me.  I only share recipes which I and/or my husband enjoy.  But as it was a swap recipe, I dutifully made it again.  And unfortunately, it fell flat for me, again.  I love pineapples and jalapeno peppers and shrimp.  It really should be a winner in theory but you can't win them all.  I don't know what's wrong with me...it seems to get such rave reviews by other bloggers!  Thanks anyway Jenna for having me give it another shot.  And dear readers, since so many others like it, you should probably give it a try for yourself  even if I didn't care for it :).

One Year Ago: Pasta with Grilled Plum Tomato Sauce and Magic in the Middles (peanut butter stuffed chocolate sugar cookies!)
Two Years Ago: Bob's Mexican Stuffed Chicken

Shrimp, Black Bean, and Pineapple Foil Packets


Shrimp, Black Bean, and Pineapple Foil Packets

Ingredients
  • 8 oz raw, medium sized shrimp (peeled, deveined) 
  • 1 15-oz can black beans, drained and rinsed 
  • 1 cup pineapple, finely chopped 
  • 1/3 cup red onion, finely chopped 
  • 1/2-1 jalapeno pepper, minced (depending on the amount of spice you want) 
  • 2 tablespoons pineapple juice, divided 
  • 1/2 teaspoon ground coriander 
  • 1 teaspoon ground cumin, divided 
  • pinch of salt 
  • freshly ground black pepper 
  • 2 tablespoons chopped cilantro 
  • 1/2 avocado, diced
Directions
  1. Preheat grill to medium. 
  2. Rinse the shrimp and pat dry. Sprinkle with 1/4 teaspoon cumin, chili powder, salt and pepper. Toss to coat. Set aside. 
  3. In a medium bowl, combine the black beans, pineapple, red onion, and jalapeno. Stir in 1 tablespoon pineapple juice, coriander, and remaining 1/2 teaspoon cumin. 
  4. Spray two large pieces of aluminum foil with cooking spray. Spoon half of the black bean mixture into the center of each and top with half of the shrimp. Pour the remaining pineapple juice over the shrimp. Bring the edges of the foil together and fold down, sealing well. 
  5. Place the foil packets on the grill, cover, and cook for 10-12 minutes, until shrimp are opaque. Carefully open the foil packets and stir the contents. Top with the diced avocado and sprinkle with cilantro. 
Source: Jenna's Cooking Journey as modified from PreventionRD

PS: It's now going on 11:10PM.  See, these posts don't just write themselves, ya know!  Ah this blog is a labor of love :P.

Wednesday, March 6, 2013

Bravo's Lemon Shrimp Florentine Pasta

It's no secret that BRAVO! Cucina Italiana is one of our favorite Italian restaurants.  Imagine my delight when I found Bravo recipes direct from the source so that I could make it at home!  And, it's designed as 2 servings so it's perfect for my husband and I to have "date night in" :).

One of my recent favorite dishes to order is their Lemon Shrimp Florentine Pasta.  The menu describes it as "sauteed shrimp tossed with tomatoes, Boursin, spinach, Feta, and linguine in a creamy lemon sauce".  I just call it delicious.  It's slightly tart and tangy, a bit creamy, and a treat for the taste buds.  Perfect for Lent or any other time you want restaurant quality pasta at home!

Looking for other Christine's Kitchen Chronicles tested Bravo copycat recipes?  Try:
Any other reader copycat recipe requests, Bravo or otherwise?

Three Years Ago: Jalapeno Cornbread Whoopie Pies, Awesome Slow Cooker Pot Roast, and Peanut-Butter Oatmeal Chocolate Chip Cookies

Bravo's Lemon Shrimp Florentine Pasta


Ingredients
  • 1/4 lb Linguine (I felt it was a bit saucy and would recommend at least 1/3 lb)
  • 2 Tbsp olive oil
  • 1/2 lb shrimp, peeled and deveined
  • 1 tsp garlic, chopped
  • 1/4 cup grape tomatoes, halved
  • 1/2 cup vegetable stock
  • 2 tsp freshly squeezed lemon juice
  • 2 Tbsp roasted garlic, pureed with oil (I roasted my own homemade roasted garlic and then mashed it up.  There wasn't a lot of oil)
  • 4 Tbsp crumbled Feta cheese, divided
  • 2 Tbsp Boursin cheese (I used cream cheese)
  • Salt and pepper to taste
  • 2 Tbsp butter
  • 1 cup fresh spinach leaves
  • 2 Tbsp toasted bread crumbs
Directions
  1. Cook pasta to al dente according to package directions.  Set aside and keep warm.
  2. Heat oil in a large saute pan on medium heat.  Add shrimp and cook slowly for 2 minutes.  Add chopped garlic and tomatoes and cook for 30 seconds more.  Add vegetable stock, lemon juice, roasted garlic, and 2 Tablespoons each of Feta and Boursin cheese.  Bring to a simmer.  Season with salt and pepper to taste.  Add butter and cook to a sauce consistency.  Add spinach and cooked pasta to pan.  Stir to combine.
  3. Divide into two serving plates.  Garnish each plate with 1 Tablespoon of Feta cheese and 1 Tablespoon of toasted bread crumbs.
Source: BRAVO! Cucina Italiana

Wednesday, October 26, 2011

Shrimp with Green Apple Chipotle Salsa

All of the recipes that Emily and I made during our apple extravaganza were sweet with the exception of this one.  I have had this particular recipe bookmarked in my Google Reader forever and had suggested this as a savory option for our collection.  To be honest, I'd take savory over sweet any day, anyway!  When it came time to pick the final recipes I actually didn't end up picking this one but it was Emily's husband Scott that chose it to be made.  Yep, we gave the boys a say.  They were going to be eating everything, after all, so it only seemed fair.

I really liked the bold slightly spicy flavor of the shrimp in this recipe and overall it was quite a delicious dish.  It certainly gave our sweet tastebuds a break.  What we all agreed was disappointing was the fact that the apple was completely overwhelmed by the red onion and cilantro.  It really isn't all that surprising given how strong those particular flavors are and if it weren't for the whole "apple" theme it wouldn't matter at all.  Eh...who am I kidding...to me, it still didn't matter at all.  I happily gobbled up this savory treat and was so glad that Scott added it back into the mix :).

Only two more recipes left to share!  Tomorrow I'll be sharing Emily's favorite recipe from the batch.  Hint: It's a Paula Deen so get ready to get your butter on.

Shrimp with Green Apple Chipotle Salsa

Photo Credit: My friend Emily

Ingredients

For the salsa

  • 1/2 c. diced Granny Smith apple
  • 1/4 c. diced red onion
  • 1/4 c. diced red bell pepper
  • 2 TBSP chopped fresh cilantro
  • 2 TBSP apple cider vinegar
  • 1/4 tsp. chipotle chile powder
  • 1/8 tsp. Cayenne pepper
  • salt and black pepper, to taste 
For the shrimp
  • 1 TBSP olive oil
  • 1 lb. shrimp, peeled and deveined
  • 1/2 tsp. paprika
  • 1/2 tsp. ground cumin
  • 1/4 tsp. black pepper
  • 1/4 tsp. salt
  • 1/2 tsp. chili powder
  • 1/2 tsp. ground ginger
  • 1 tsp. light brown sugar
Directions
  1. Combine all ingredients for salsa in a medium bowl and mix well.  Cover and refrigerate at least one hour before serving.
  2. To cook the shrimp, heat the oil in a large saute pan over medium heat.  Meanwhile, combine shrimp and all spices in a large bowl.  Toss to coat.  Place shrimp in the saute pan and cook one to two minutes per side, depending on size of shrimp.
  3. Serve shrimp over a bed of salsa. Serves four.

Source: Scoot Uehlein, Canyon Ranch Cooks as adapted by and seen on Apple a Day

Sunday, June 19, 2011

Singapore Mei Fun

Remember my 23 Things in 2011 list?  Yeah...totally not on track for completing that right now since April and May were totally non-productive.  Up until that point though I had been very good about making roughly 2 items off the list per month but (as usual) not as good about blogging about them in a timely manner.  The only reason I'm blogging about this particular recipe now is because my facebook fans voted on it to be my next blog post!

Singapore Mei Fun made my list of things I wanted to make this year because it is one of my favorite dishes that my mom makes.  Interestingly enough, I recently learned from an Asian Heritage Month work event that this dish isn't even authentic Sinaporean food.  Oh well.  It's delicious.  And it's easy!  I think the real secret to making a good Singapore Mei Fun (Rice Noodle) dish is the fact that the noodles are "cooked" by soaking them in water instead of boiling like your typical noodle.  A quick stir fry is all it takes to finish it off!

My mom gave me a "recipe" but as with all of our family's "recipes" they are more loose guidelines of what ingredients and generally how to make the dish.  There's not any specifics of how much or how long so that's where my Google research helped.  Thank goodness for Google to help fill in the gaps.  This was just like Mom's!

One Year Ago: Firecracker Shrimp


Singapore Mei Fun (Curry Noodles)

Singapore Mei Fun (Curry Noodles)

Yields: 4-6 servings

Ingredients

  • 8 ounces rice vermicelli (mei fun - check your Asian aisle at the local grocer)
  • 2 tablespoons rice cooking wine 
  • 2 teaspoons reduced sodium soy sauce
  • 1 1/2 teaspoons sugar 
  • 1/2 teaspoon salt 
  • 4 tablespoons vegetable oil 
  • 4 ounces small shrimp, shelled and deveined 
  • 1/2 cup finely shredded scallions 
  • 1 small onions, sliced
  • 1 green bell pepper, sliced
  • 1 Tablespoon yellow curry powder 
  • 3/4 cup Chicken Broth 
  • 4 ounces other meat such as Chicken, Beef, or Chinese Barbecued Pork, cut into julienne
  • 1 egg, scrambled, fried, and cut into julienne (optional)
Directions
  1. In a large bowl, soak the rice noodles in enough cold water to cover overnight, or until noodles are limp and softened. Drain in a colander and set aside. In a small bowl, combine the soy sauce, rice wine, sugar, and salt. Set aside.
  2. Heat a 14-inch flat-bottomed wok or skillet over high heat until hot but not smoking. Add 1 tablespoon vegetable oil and stir fry the chicken and/or beef until nearly cooked through.  Remove and set aside on a plate.  Add additional 1 tablespoon oil and shrimp, and stir-fry 10 seconds. Add the scallions and stir-fry 30 seconds, or until shrimp have just turned orange but are not cooked through. Transfer the shrimp mixture to a plate and set aside.
  3. Add the remaining 2 tablespoon vegetable oil, onions and green pepper, and stir-fry 30 seconds. Add the curry powder and stir-fry 10 seconds, or until fragrant. Restir soy sauce mixture and swirl it into the wok. Add the chicken broth, and 1/3 cup cold water, and bring to a boil over high heat.
  4. Add the drained rice noodles and return to a boil, stirring noodles to completely coat in curry mixture (chopsticks work best for this!). Add the meat mixture, and cook, stirring, 1 to 2 minutes, or until shrimp are just cooked through and liquid has been absorbed by the noodles. Add the cooked egg, if desired.  Serve immediately.
Source: Inspired by my Mom and The Wisdom of the Chinese Recipe. Published by Scribner, 1999.  As seen in an Cooking Light message board.

Tuesday, May 3, 2011

Shrimpo de Gallo

It's recipe numero quatro of the Cinco Recipes for Cinco de Mayo series.  We're nearly done but don't worry, the fiesta has yet to begin!  The title of this particular recipe makes me laugh...as does Ree's (AKA Pioneer Woman) struggle to determine what it should be named... 

Shrimp Pico de Gallo
Shrimpy Pico de Gallo
Pico de Shrimpo
Shrimpo de Gallo
Shrimp Salsa


No matter what the name, this dip is a nice change from the traditional salsa and will win your heart over.  (And then give you some heartburn if you can't take the heat and/or you over-fiesta!).  It can be thrown together quickly for those last minute fiestas if you get your slicing and dicing on.

This recipe is Tapas Themed Dinner Club approved and once again, I suck and forgot to take a picture so thank you Emily for the photo!  The dip is in the center and NO, you don't dip the churros into the Shrimpo de Gallo.  Use tortilla chips, silly!  (The items were plated this way for ease of transport.)

One Year Ago: Hm yeah seriously...apparently I took the entire month of May off so...nothing.  I blame being on vacation and then trying to catch up from vacation.  Sorry!
Two Years Ago: Blonde Brownies...because blondes have more fun?

Shrimpo de Gallo
Printer-Friendly Version


Prep Time: 15 minutes
Yields: 12 servings 

Ingredients
  • 1 pound Cooked Cocktail Shrimp (tails removed), Chopped
  • ½ whole Red Onion, Diced Finely
  • ½ cups Green Or Black Olives, Chopped (I omitted...I hate olives, yuck!)
  • 2 whole Tomatoes, Diced
  • 2 whole Fresh Jalapeno Peppers, Minced (I used about 15 slices from a jar)
  • 2 whole Avocados, Chopped
  • 2 whole Limes, Juiced
  • Kosher Salt To Taste
  • 2 cups Cilantro, Chopped

Instructions
  1. Combine shrimp, red onion, olives, tomatoes, and jalapenos in a large bowl. Add lime juice to taste, then a dash of kosher salt. Add cilantro. Stir gently with a spoon, then taste on a tortilla chip so you’ll have an accurate gauge of the salt content. Add more salt and/or lemon juice if needed.
  2. Chill until serving. Note that the avocado will brown if too much time passes, so if you want to make this ahead of time, leave out the avocado until just before serving.
  3. Serve with tortilla chips!

Source: Pioneer Woman

Sunday, January 2, 2011

2010 Recap Part 2: Personal Favorites

Day 2 of the New Year and here I am with another post!  2 posts yesterday and another today, I'm on a roll :).  Woo hoo!  And, since yesterday's posts I realized that I have 1 new blogger and 1 new Google Reader subscriber (or could be the same person for all I know).  Either way, welcome new readers!  And, welcome back to my loyal readers, too!

You know what else has happened since yesterday?  I made a quiche! (and it was so very delicious - recipe and pictures to come.)  Check that one off of the 23 things to make in 2011.  Man, I'm on fire!

Okay so yesterday in Part 1 of my 2010 Recap we reviewed your favorites.  While I agree that those were great picks there are some other gems on this blog that I love and also feel deserve their time in the spotlight, too.  Now, a lot of blogs that I follow break it down by favorite posted each month but as I look at the history I realized some months I literally posted ONE TIME (d'oh!) and I don't know that they're necessarily worthy of a "best of" tag.  What's also sad is the fact that some of the favorite things I made this year I realized I didn't even blog about yet...a true tragedy and disservice to my readers!  (No worries, this just means they'll go in the 2011 Recap!).  So instead, I'll compromise and just go with Top 12 over the whole year.  It's a tough job to narrow them down but someone's got to do it.

January: Baked Sausage Ziti

Photo credit: The Piggly Wiggly

It's a bit labor intensive with its two sauces but for the flavor it is totally worth it and your guests will thank you.  I think my sister and her friends who ate this for their Junior Prom dinner would definitely agree.  Those boys were eating Tums afterward like they were candy...I might be a little heavy handed on my red pepper.  My bad.  By the way, the fresh mozzerella melts so much better than that pre-shredded stuff so definitely don't scrimp there.


February: Grandma B's Chicken a la King


This is Chris' favorite meal of all time so I can't let this blog entry pass without putting it in the best of recap.  His grandma used to make it for him and then his mom and now me (with my slightly tweaked version to help thicken the gravy more).


February Part Deux:  Ham, Cheese, and Green Pepper Pretzel Bites


There's something about bite-sized treats that make them extra irresistable.  I served these with a homemade honey mustard dipping sauce and my family gobbled them right up.  This post is also special because it marked my 100th one!


February Part Trois: Chocolate Chip Cookie Dough Truffles


Everytime I make these things it makes people go gaga over them.  Perhaps it is the bite-sized nature of them that we talked about above?  Chris practically begs me to make them and many ladies at the Cincinnati Nest/Bump Cookie Exchange this year felt they were the best of the bunch which was quite flattering.  The best part?  They're eggless.  Cookie dough lovers rejoice and have no fear of samonella!


March: Peanut Butter-Oatmeal Chocolate Chip Cookies


Do I really need to explain this one because the title really says it all.  Three classically delicious cookies rolled into one and it has stolen my heart.


April: Berry Buttermilk Cake


I know it doesn't look like much in this picture but this one was so good that I made it two weeks in a row.  And, my co-worker Beth told me she made it about five times.  Bonus: Great way to use up the ubiquitous leftover buttermilk!  (Psst, need more leftover buttermilk recipe ideas?  Checkout my buttermilk tag.)


June: Firecracker Shrimp


Why I only made this once I am not sure.  This was so easy and so delicious!  Can't wait for grilling season to begin again.  Either that or I'm about to invest in a cast iron grill pan...


July: Fajitas


If you need to add a good fajita recipe to your arsenal look no further than this one.  Hasta la vista Don Pablo's (or [insert the name of your favorite local Mexican restaurant here]).


July Part Deux: Cinnamon Chocolate Chip Sour Cream Coffee Cake


A contender for my favorite coffee cake of all time.  (The other one would be one that my Mom used to make called Walnut Wonder Cake...mmm).


October: Who Loves Ya Babyback?


First - whoa did you see that jump from July to October?  I call that the lost quarter of blogging.  Sorry about that...

Back to this recipe.  Not your standard ribs slathered in BBQ sauce nor a dry rub.  It's something even more impressive and delicious.  Better yet, it's easier than I imagined ribs could be.


December: Island Spice Pork (Tender)loin


Add this to your "good enough for compnay" list.  Bursting with flavor like you've been slaving in the kitchen all day but only you'll know how simple it truly is to prepare.


December Part Deux: Linguine with Clam Sauce


Maybe it's just because this is one of the last things of 2010 that I made or it could be the fact that this was so simple to make.  I will for sure be making this lots in the future and sorry Maggiano's but this is yet one more thing that I can now make at home.


Alright so technically we're done reviewing 12 Personal Favorites from 2010.  But, because I love my readers so much I'm throwing in a couple bonuses.  One to represent each of the men in my life.

Chris' Pick - Peanut Butter-Fudge Cheesecake


No big surprise that this is his favorite dish from 2010.  And this is exactly why I chose this recipe for his birthday.  Chris has requested that this be his birthday cake each and every year from here on out.

Toby's Pick - Chicken and Cheddar Dog Treats


OK so Toby didn't *really* pick this recipe but it is the only one that I posted in 2010 that was especially for him and I think this picture is just precious.  Say it with me now...awwww!  This year maybe I'll make him more treats.  Anyone have any good dog-friendly recipes to share?


And that's a wrap.  Over and out!

Monday, June 21, 2010

Firecracker Shrimp

Quick.  Run!  Make this for your graduation party, your Fourth of July party, your random summer grill-out parties, and (*sniff*) your end of summer Labor Day party, too.  But wait, why am I talking about the END of Summer when today it has officially just begun?!  They're sure to be the hit of the party.  This recipe is SO AWESOME that even though I am backlogged on posting recipes from May (finally got through April with that last Orange Berry Muffin recipe!) I just had to share this one with you.

Watch out, they're fiery little guys.  A mini explosion of fire inside of your mouth!  The beauty of this recipe is it is ridiculously easy to make.  Very few ingredients involved and fast cooking.  Watch the shrimp carefully so that they're not overdone.  You want them pink, opaque, and slightly charred but a couple of minutes on the grill is all it takes.  Good thing, too, because you'll be downing these shrimps like snacks.  Oh, and don't forget the water to quench your thirst!

Oh, and another thing.  Use the Sriracha hot sauce.  It really is THE BEST hot sauce in the world.  It's commonly used in Asian cooking and so you can usually find it in the Asian section of your local grocery store.  It's a clear bottle with red chili sauce inside and a green cap.  The easiest identifier is the rooster depicted on the front.  If you don't already have some, go buy some!  You won't regret it and it's totally versatile.  I put that s*** on everything!  Oh wait...that's supposed to be Frank's Red Hot.  But really, this is better...and I do put it on pretty much everything (lo mein, pizza, chili, etc.!).  It's sweet AND spicy.  Winning combination!

I served this one as a side dish for our Father's Day meal.  Kudos to Chris for grilling this one up all nice and yummy!  All I did was marinate them :).  Lots more delicious recipes on that one to come.  I was excited that there wasn't a single bad dish in that meal.  But this one, this is a keeper for sure.  Enjoy!

One Year Ago: Chicken Gyros with Tzatziki Sauce and Pasta Salad

Firecracker Shrimp

Firecracker Shrimp


Ingredients
  • 1 pound large (16 to 20 count) shrimp, peeled and deveined.
  • 2 tablespoons hot chili sauce (Sriracha is the best!)
  • 2 tablespoons olive oil
  • 1/4 teaspoon salt
  • 2 teaspoons sugar
  • 4 to 5 cloves garlic, pressed
Directions
  1. Combine all ingredients in a large Ziploc bag, then add shrimp and marinate for 20 minutes to 2 hours.
  2. Skewer shrimp and grill until opaque and with black bits (couple minutes ought to do it!).
  3. Serve hot with lots of cold drinks handy!
Source: The Pioneer Woman

Monday, January 18, 2010

Amazingly Creamy Pumpkin Penne

As you may have heard around Thanksgiving 2009 there was a shortage of canned pumpkin due to moldy crop loss.  I didn't really think it was a big deal and found pumpkin when I needed it for my dishes...except for the one week where I SPECIFICALLY planned TWO meals that needed it.  Chris and I searched high and we searched low on the shelves of our local Kroger but there was absolutely NO PUMPKIN to be found!  I considered making my own pumpkin puree from a whole pumpkin but alas, there was no real pumpkin in January, either.

My Nest Message Board ladies suggested various places where I could look.  Some of them even offered to let me have a can from their stockpile (they were smart and stocked up!)...bless them and their kind hearts!  But it was the week of the dreaded snow storm and I did not want to deal with the crazies at the groceries and I didn't really want to take a can from someone unless I really needed to.  So, the pumpkin recipes were put on hold.

Thankfully the following week I found canned pumpkin...at the same Kroger that during the previous week had none.  I bought myself a couple cans...just in case.  I must say that it really is still hit or miss with the pumpkin at that store because when I went out today there was none...again.  So, if you haven't already and you want to use pumpkin for the rest of the year, you may just want to stock up when you can find some!

Anyway, I had this recipe bookmarked forever and it kept showing up in lots of blogs that I follow.  I used shrimp instead of sausage because that's what I had onhand.  The use of cottage cheese is clever and I like the creaminess it lends while still being low fat.  I just might need to try using it in other cream sauces.  The flavor of the sauce itself was not bad, but just not really Chris and my taste.  It's healthy, for sure...so if you think it might be your thing, definitely give it a try as most people give it rave reviews.

Look for the other pumpkin recipe, coming soon!

Amazingly Creamy Pumpkin Penne
Printer-Friendly Version


Ingredients
  • 4 oz penne pasta (used rotini)
  • 2 tsp olive oil
  • 1 small onion, thinly sliced
  • 2 cloves of garlic, minced
  • about 2T chopped fresh sage
  • 2 links cooked chicken sausage, sliced (used shrimp cocktail with tails removed)
  • 1/2 cup low fat cottage cheese
  • 1/2 cup pumpkin puree
  • 1/2 cup milk
  • pinch of nutmeg
  • 5oz torn spinach, thick stems removed (used some frozen spinach)
  • grated parmesan or pecorino romano cheese, optional
Directions

  1. Heat olive oil in a skillet over medium-low heat. Add onions and cook gently for about 10-15minutes, until softened and beginning to caramelize. Add garlic, sage, and chicken sausage; continue to saute.
  2. Meanwhile, cook pasta according to package directions.
  3. In a blender, combine combine pumpkin, cottage cheese, and milk. Blend until no lumps are present. Add to sausage mixture in skillet and continue to cook over low heat. Season to taste with salt and freshly ground pepper, and a pinch of nutmeg.
  4. Drain pasta and return to pot over low heat. Add sausage mixture and baby spinach, and toss together. Cover for a few minutes to let the spinach wilt. Serve with parmesan cheese, if desired.
Note: Since I used shrimp instead of sausage, I added the shrimp at the very end since it was already fully cooked.  I just wanted to heat it and avoid overcooking.


Source: Cara's Cravings

Sunday, January 17, 2010

Shrimp Scampi Bake

One of my favorite things to get at Red Lobster is their shrimp scampi.  There's something about shrimp swimming around in garlicy butter that is irresistable!  I had to make a mini-batch for Chris due to the use and extreme disdain of mustard in the recipe.  I was surprised by the use of this ingredient but it really gave the scampi a delicious zip!  Very easy and very good!  I served mine over angel hair pasta to make a complete meal.  I think in the future I'd add some halved cherry (or grape) tomatoes and some sliced steamed asparagus for color and inclusion of veggies.

This entree was part of the birthday dinner that I made for my mom.  The other items from this dinner menu can be found at their respective blog posts:
Shrimp Scampi Bake
Printer-Friendly Version


Prep Time: 15 Mins
Cook Time: 15 Mins
Ready In: 30 Mins
Yields: 6 Servings

Ingredients
  • 1/2 cup butter
  • 2 Tablespoons prepared Dijon mustard
  • 1 Tablespoon lemon juice
  • 1 Tablespoon garlic, minced
  • 1 Tablespoon fresh parsley, chopped
  • 2 pounds raw medium shrimp, shelled and deveined with tails attached*
*Note: Used medium fully cooked frozen cocktail shrimp with tails removed since I was serving it over pasta and making it easier to eat.  I watched the baking time until the shrimps curled slightly and the butter was melted.  I'd guess it was bout 8 minutes at 350 degrees.

Directions
  1. Preheat oven to 450 degrees
  2. In a small saucepan over medium heat, combine all ingredients except for shrimp.  When butter has melted and ingredients are fully combined, remove from heat.
  3. Arrange shrimp in a shallow baking dish then pour the butter sauce over the shrimp.
  4. Bake in preheated oven 12-15 minutes or until the shrimp are pink and opaque.
Source: Slightly modified from All Recipes

Sushi

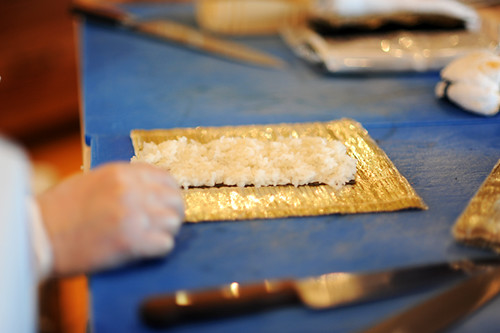
Below are the basic ingredients for sushi.  You can then buy fillings of your choice to make various delicious rolls.  This was my first attempt at making rolls so they're not the prettiest but they held together for the most part and were very tasty :).

As I wasn't sure how adventures our group of Dinner Clubbers would be, I opted for all cooked (and inside out so you can't see the nori (seaweed) - out of sight, out of mind right?) maki rolls.  For my rolls, I made the standard California Roll and then did some Spicy Crab Rolls and just a few Shrimp Rolls.  If you do decide to go raw,  make sure you're buying sushi grade fish!

I highly suggest Sushi Day for inspiration and recipes...there's even some rolls with BACON! (Bacon Crunchy Shrimp Roll and Kristen Maki). 

Pioneer Woman has an awesome tutorial with really good pictures (very helpful if you're a visual person like I am!) on how to create your rolls.  There's also a few good recipes on there as well.


Mmmm...good thing Emily took pictures of my rolls because I forgot to!

Sushi Rice
Printer-Friendly Version


Prep Time: 30 minutes
Cook Time: 20 minutes
Yields: 8 cups cooked rice or about 16 rolls

Ingredients
  • 4 cups Short Grain/sushi Rice, uncooked
  • 1 cup Rice Wine Vinegar
  • ½ cups Sugar
  • ¼ cups Sake Or Mirin (a Japanese Rice Wine)
Note: Used seasoned rice wine vinegar instead of sushi su (vinegar + sugar + sake).

Instructions

“Rice Prep”
  1. Use short or medium-grain rice. It’s more starchy and round than the long-grain variety, which just won’t hold together well enough to support ingredients in sushi. Many stores now sell specifically-labeled “sushi rice”.
  2. Before you cook it, wash/rinse the rice until the water runs totally clear—about five or six times. If you don’t thoroughly rinse the rice, it’ll end up in a big, sticky ball. There’s enough internal starch in the rice for it to sufficiently hold together for sushi, so get all the stuff on the outside off by rinsing well.
  3. Use a rice cooker/steamer. Rice made on the stovetop will not work for sushi; it won’t be the right consistency. Rice cookers are widely available for as low as $12.
  4. Add the rinsed rice to the rice cooker with equal parts water, and follow the directions for the rice cooker. After it’s done, transfer the cooked rice to a large mixing bowl.
You’ll need 1 part sushi su for every 4 parts rice.

Sushi Su/Sushi Rice:
  1. Heat vinegar, sugar, and sake or mirin in a saucepan just to dissolve and combine. Allow to cool to room temperature. (Note: skipped this step as I just subbed pre-made seasoned rice wine vinegar)
  2. Cook rice according to rice cooker directions. Transfer to large mixing bowl.
  3. Pour su (vinegar mixture) over the rice, gently folding to incorporate.
  4. Let rice stand for 10 minutes, then fold again.
Rice should be shiny, not mushy and have a slightly tart/sweet taste. Cover with a warm, wet towel and keep warm.

Source: Cody the Sushi Chef as seen on Pioneer Woman

Spicy Mayonnaise
Printer-Friendly Version


Ingredients
  • ½ cup (low-fat) mayonnaise
  • 2 Tbsp Sriracha hot sauce
  • ¼ tsp roasted sesame oil
Directions
  1. Whisk the ingredients together until well blended.
  2. Store in fridge until ready to use.  Use in rolls or as a dipping/drizzled sauce.
 Source: Group Recipes
California Rolls
Printer-Friendly Version


Ingredients and Supplies
  • 1 piece Makisu (bamboo Rolling Mat)
  • Dark Green Nori (dried Seaweed)
  • Sushi Rice (recipe above)
  • Imitation Crab (round leg style)
  • Avocado, Thinly Sliced
  • Cucumber (Japanese, If Available), Thinly Sliced
  • Toasted Sesame Seeds
  • Soy sauce, for dipping
  • Wasabi, if desired (used prepared Wasabi in a tube that I bought at Kroger)
  • Ginger, if desired
Instructions

  1. First, in order to keep your rice from sticking to the Makisu and making a terrible mess, carefully wrap the Makisu in plastic cling wrap.
  2. To begin, fold the pieces of nori in half to split them. Nori is very delicate, so as soon as you press along the seam, it easily breaks in two. Next, lay the half-sheets of nori on the work surface and grab a handful (about a ½ cup) of sushi rice and cover one side of a half-sheet of nori with it. To do so, first set the rice on the end of the nori sheet closest to you. Then, working with your fingertips and/or knuckles, gently spread the rice over the surface of the nori.
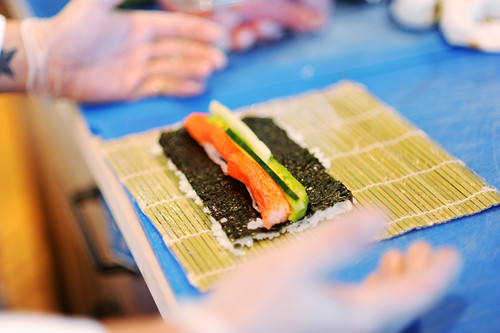
  3. On California Rolls, the rice is typically on the outside – not the inside – so to begin, quickly flip the rice-coated sheet of nori so that the rice side is down. Carefully position it horizontally so it will roll lengthwise. Next, place a single row of the crab across the middle of the nori. Next, place slices of avocado end to end right against the crab. It’s best to use an avocado that’s ripe but still quite firm. Lastly, lay the very thin (slightly thicker than a matchstick) cucumber slices end-to-end right alongside the crab and avocado.
  4. To roll the sushi, carefully lift the edge of the mat closest to you, begin rolling the mat away from you, pressing it lightly to keep it firm. At this point, the end of the roll has been rolled upward, and your very light pressure is ensuring that they roll will remain nice and tight. Next, lift up the end of the rolling mat and pull it away from you, allowing the roll to roll the rest of the mat. Then carefully remove the roll from the mat and place it on a cutting board. Lay the mat over the top of the roll and exert gentle pressure once more to make sure it’s all secure.
  5. Next, hold the roll on the mat and sprinkle the top with toasted sesame seeds. Slice using a very sharp knife, first running the knife through a damp dishtowel with the blade facing away from you. Begin by slicing the roll exactly in half. Then set the two halves side-by-side to slice into individual pieces. This ensures that each piece will be a uniform size.
  6. Wrap in plastic cling and store in refrigerator until ready to serve.  Serve with soy sauce, wasabi, and pickled ginger, if desired.
Source: Pioneer Woman

For the Spicy Crab Rolls I just shredded some imitation crab and then mixed with the spicy mayonnaise.  Added some avocado and cucumber.  For the Shrimp Rolls I used cocktail shrimp (cut in half lengthwise), a dab of spicy mayo, carrots, and avocado.

Wednesday, November 11, 2009

Beach Shrimp

Okay yes Summer is over and there isn't a beach within hundreds of miles from here but I had this recipe bookmarked and wanted to deviate from chicken and ground beef.  The real reason that it's called "beach shrimp" is that the directions are made for making on the beach in a disposable roasting pan for easy cleanup.  I'm glad I gave this one a try because it was very yummy!  I used fat free italian and cut the butter in half to make it healther.  Served it over vermicelli noodles and topped it with some shredded italian style cheese.  So simple and tasty!

Beach Shrimp
Printer-Friendly Version


Prep time: 10 minutes
Cook time: 25 minutes
Serves 6-8

Ingredients
  • 3 pounds unpeeled, large raw shrimp*
  • 1 (16-oz.) bottle Italian dressing
  • 1 1/2 tablespoons freshly ground pepper*
  • 2 garlic cloves, pressed
  • 2 lemons, halved
  • 1/4 cup chopped fresh parsley
  • 1/2 cup butter, cut up
*3 lb. frozen peeled, large raw shrimp, thawed according to package directions, may be substituted. Prepare recipe as directed, reducing pepper to 1/2 tsp.

Preparation

  1. Place first 4 ingredients in a 13- x 9-inch baking dish, tossing to coat. Squeeze juice from lemons over shrimp mixture, and stir. Add lemon halves to pan. Sprinkle evenly with parsley; dot with butter.
  2. Bake at 375° for 25 minutes, stirring after 15 minutes. Serve in pan.
Source: Southern Living, June 2007 as seen on The Piggly-Wiggly

Sunday, October 18, 2009

Christine's Fried Rice

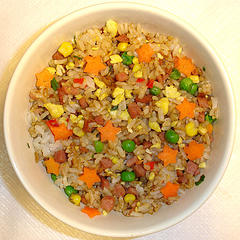
I found another use for that leftover turkey.  I must admit (and hang my head in shame) that until this past week I have NEVER made fried rice before!  I know...what kind of Chinese person am I?!  But, I had tons of leftover refrigerated rice from our dinner party and also leftover turkey from another night's dinner and so a creative solution was born!  Everybody in the know knows that they key to great fried rice is that it's nice and cold/refrigerated so this was a perfect use!  I would have loved to use Momma L's recipe for fried rice but alas, most things like this (and most family Chinese food recipes in general) do not have written recipes.  And so I searched the internet for a point to begin and then found the inspiration from the inner Momma Louie in myself to create this original recipe.  I thought it turned out very good for my first attempt and I hope you enjoy it

Christine's Fried Rice
Printer-Friendly Version


INGREDIENTS
  • 2 c. white rice (uncooked)
  • 1/2 small onion, diced
  • 1 1/2 c. frozen mixed vegetables
  • 1 c. various cooked meat (ham, chicken, turkey, shrimp, etc.), diced 
  • 2 Tbsp. vegetable oil
  • 2 eggs (optional)
  • Oyster sauce, to taste (start with about 1 tsp.) 
  • Reduced sodium soy sauce, to taste
  • Seasoning salt, to taste
  • Garlic powder, to taste
  • Pepper, to taste 
  • Drizzle of sesame oil (optional)
DIRECTIONS
  1. Make rice in a rice cooker per your unit's directions then put in refrigerator until well cooled.  Day old rice works best! 
  2. In a small bowl, thaw frozen vegetables by adding some water.  Drain and set aside.
  3. Heat wok over high heat. Pour in oil, then stir in onions, mixed vegetables, and meat; cook until onions are translucent and meat is heated.
  4. If desired, crack in eggs, stirring quickly to scramble eggs with vegetables and meat.
  5. Stir in cooked cooled rice. Shake in oyster sauce, soy sauce, and seasonings tossing rice to coat.  Heat until rice is warmed.  Taste and adjust seasonings as necessary. 
  6. Drizzle with sesame oil if desired and toss again.  Serve hot.
Source: A Christine's Kitchen Chronicles original inspired by Momma L. and the internet