Showing posts with label chicken. Show all posts

Tuesday, December 10, 2013

Baked Honey Sriracha Chicken Tenders

Hi everybody.  I'm sorry I've been absent lately.  Alex has been going through a 5 WEEK "Wonder Week" and it's been challenging to say the least.  Add to that the fact that I think he's sensitive to dairy and now we have food challenges that make menu planning even harder.  No more milk, cream, yogurt, ice cream, froyo, or my beloved cheeses :(.  The things we do for our babies.  Am I right?

This is a recipe that's a total keeper AND Alex-friendly!  Who knew that something so simple could taste so good?  It's spicy and sweet with a wonderful crunch.  And get this.  ZERO oil!  The secret to achieving this is by using light, airy panko bread crumbs and baking on a wire rack so that both sides get nice and crisp.

We made them last night and I literally had to make a quick blog post to share with you all.  That's how much we loved this meal!  I apologize for the horrible lighting in the photo but that's what happens when you eat in the dark.  Boo Winter!

Baked Honey Sriracha Chicken Tenders


Ingredients
  • 1/4 cup honey
  • 1/4 cup Sriracha hot chili sauce
  • 14 oz uncooked chicken tenders without breading (or use boneless skinless chicken breast and slice into tender-sized pieces)
  • 1 cup Panko bread crumbs

Directions
  1. Preheat oven to 400F.  Place a wire baking rack on a large cookie sheet and spray with cooking spray.
  2. In a small bowl or large ziplock bag, mix together honey and Sriracha sauce.  Add chicken tenders and toss or squish to coat.
  3. Add bread crumbs in a separate large ziplock bag.  Transfer chicken tenders into bag.  Seal and shake to coat.  Place chicken on wire rack.
  4. Bake for 15 to 20 minutes, until chicken is no longer pink in center and bread crumbs are golden brown.  If desired, serve with additional honey Sriracha sauce for dipping.
Source: Barely modified from Betty Crocker

Friday, June 28, 2013

Chicken Parmesan Pasta

By request of Facebook fans Danielle and Ava, here's a fast and easy chicken recipe for you on this lovely Friday.

It's a meal that  your whole family will enjoy and comes together in a pinch.  To make it even easier, I used popcorn chicken rather than slicing chicken tenders.  How's that for lazy?

Coming up next week: something for 4th of July!  Some other festive recipes from years past are already listed below, too.

One Year Ago: Chorizo and Sweet Potato Lettuce Wraps, Panera Mac and Cheese, Summer Corn Fettuccine, and Pulled Hawaiian Chicken Sandwiches
Two Years Ago: Summer Strawberry Salad with Poppy Seed Vinaigrette and Herbed Potato Salad
Three Years Ago: Orange Berry Muffins and Firecracker Shrimp
Four Years Ago: Pasta Salad

Chicken Parmesan Pasta


Chicken Parmesan Pasta

Ingredients

  • 1/2 pound breaded popcorn chicken, heated 
  • 1/2 tbsp olive oil 
  • 1/2 medium onion, diced 
  • Salt and pepper to taste 
  • 4 cloves garlic, minced 
  • 1/2 jar of your favorite sauce, or equivalent of homemade 
  • Italian seasoning to taste 
  • Crushed red pepper flakes to taste
  • 4 ounces mozzarella cheese, shredded 
  • 1/2 pound penne or other short pasta

Directions

  1. Cook pasta to al dente according to packaging directions and then set aside. 
  2. Meanwhile in a large covered skillet, heat oil. Add onion and season with salt and pepper and cook until the onion is translucent and tender. Add garlic; cook and stir 30 seconds, then stir in the spaghetti sauce. Add Italian seasoning and additional salt and pepper to taste.
  3. Combine pasta, chicken pieces, sauce, and stir until everything is evenly heated. Top with mozzarella cheese, cover, and let sit over a low flame until it melts. Serve hot. 
Source: Barely Adapted from Stephanie Cooks

Monday, June 3, 2013

Mascarpone Pasta with Chicken, Bacon, and Kale

I apologize for being absent lately.  May/June is always a crazy time for me between our anniversary (our 5th was this year!), my birthday, and general Summer craziness.  Add to the mix the impending arrival of our Baby Boy this year and my blogging is unpredictable to say the least.

What makes things extra interesting is that I'm still participating in a CSA share so that means fresh veggies are waiting for me to whip them into something delicious each week.  Spring is greens time and it's always a surprise as to just what kind will come in our box week to week.

I had some leftover mascarpone cheese and so I tweaked a recipe that I found on All Recipes to include some of the gorgeous green kale that we received.  My husband isn't really a fun but when you add bacon, and chicken, and creamy cheesey pasta, he can't really complain.  Of course, if you don't have kale, you could always use spinach as in the original recipe.  This one reminded me somewhat of Macaroni Grill's Pasta Milano.

Two Years Ago: SweetFire Chicken (A Panda Express copycat and one of my husband's favorite) and Sweet Beginning's Summer Pasta Salad
Three Years Ago: Buckeyes
Four Years Ago: Quick and Easy Alfredo Sauce

Mascarpone Pasta with Chicken, Bacon, and Kale

Mascarpone Pasta with Chicken, Bacon, and Kale

Ingredients
  • 3 slices bacon 
  • 1 tablespoon olive oil 
  • 1/2 cup minced onion 
  • 1-1/2 pounds skinless, boneless chicken breast halves, cubed 
  • 1/4 teaspoon garlic powder 
  • Salt and ground black pepper to taste 
  • 2 tablespoons drained and chopped sun-dried tomatoes packed in oil 
  • 1 tablespoon prepared pesto sauce 
  • 1/4 pound fresh kale (or you can also use spinach)
  • 4 ounces mascarpone cheese 
  • 1 clove garlic, minced 
  • 1-1/2 teaspoons Dijon mustard, or more to taste 
  • 1/2 lemon, juiced 
  • 1/4 cup milk 
  • 1/4 cup grated Parmesan cheese plus additional for topping if desired 
  • 8 ounces shaped pasta such as penne, rigatoni, or farfalle. 
Directions

  1. Bring a large pot of lightly salted water to a boil. Cook pasta according to package directions to al dente.  Drain and set aside.
  2. In a large skillet over medium-high heat, cook bacon, turning occasionally, until evenly browned, about 10 minutes. Alternatively, follow the directions on the package for microwave cooking.  Drain the bacon on paper towels and crumble when cooled.
  3. In the same skillet, heat olive oil over medium heat.  Add crumbled bacon and onion and cook until the onion is translucent, about 5 minutes. Add chicken and season with garlic powder, salt, and black pepper. Cook and stir until chicken is no longer pink inside and lightly browned outside, about 10 minutes. Add sun-dried tomatoes and pesto; stir in kale and cook until wilted, stirring constantly. 
  4. In a saucepan over medium heat, mix together mascarpone cheese, 2 cloves of garlic, Dijon mustard, lemon juice, and milk. Cook until smooth and bubbling, stirring constantly, about 5 minutes; stir in 1/2 cup Parmesan cheese until cheese has melted, 2 to 3 more minutes. Pour sauce over chicken and bacon mixture. Season with additional salt and/or pepper if needed.
  5. Gently fold pasta into chicken mixture and transfer to a serving bowl. Sprinkle with additional Parmesan cheese if desired.

Source: Slightly modified from All Recipes

Monday, April 29, 2013

Buffalo Chicken Grilled Cheese Sandwiches

Someone please tell me where the time has gone.  Here we are at the end of April, already!  This freaks me out a little bit as I also realized this week, I'll hit the double digits until Baby Boy is estimated to make his entrance.  Whoa!  Good thing we already bought his infant carseat, crib (needs to be built still), and painted his nursery this past weekend.  If he decides to make an early entrance (please don't!!) at least we're somewhat prepared.  Still a million and a half things to do, though.

Anyway, with April being National Grilled Cheese Sandwich Month, I wanted to share one more grilled cheese recipe after already having shared my unorthodox Grilled Cheese Donut.

This one is still not traditional but at least all in the savory camp.  If you're a buffalo chicken lover, this recipe is for you.  The sauce is surprisingly sweet and has just enough spice to call it "buffalo".  I had some leftover day old bread from Jimmy John's so my sandwiches were tinyyy and took me longer than I'd like to butter and put the (yummy!) white sauce.  Still, the finger sandwich size made them extra fun to eat and would be good for tiny children hands :).  If you follow the recipe as written, you'll get 2 regular-sized sandwiches.

One Year Ago: Southwestern Stuffed Sweet Potatoes
Three Years Ago: Summer Corn and Vegetable Soup

Buffalo Chicken Grilled Cheese Sandwiches

Buffalo Chicken Grilled Cheese Sandwiches

Ingredients

For the White Sauce
  • 2 tablespoons non-fat Greek yogurt
  • pinch of sugar
  • pinch of garlic powder
For the Buffalo Sauce
  • 1 tablespoon unsalted butter
  • 1/4 cup Frank’s hot sauce
  • 1/2 teaspoon packed brown sugar
  • 1 teaspoon apple cider vinegar
For the Sandwiches
  • 3/4 cup cooked and shredded chicken (from about 1 small chicken breast)
  • 2 tablespoons minced red onion
  • 2 tablespoons minced celery
  • 4 1/2-inch thick slices Italian bread
  • 1 tablespoon unsalted butter, at room temperature
  • 4 slices cheddar cheese
Directions
  1. To make the white sauce: In a small bowl, stir together the yogurt, sugar, garlic powder and a pinch each of salt and pepper.  This can be made ahead if desired and refrigerated.  
  2. To make the buffalo sauce: Melt the butter in a small saucepan set over medium-low heat. Add the hot sauce, brown sugar and vinegar and stir until combined. Add the shredded chicken, red onion, and celery and toss to coat. If the chicken was cold, keep the pan over low heat and let it warm through a bit.
  3. Lightly butter one side of two slices of the bread. Flip the slices over and lay them butter side down on your work surface. Spread half of the white sauce the remaining non-buttered side of the bread. Top each slice with a slice of cheese and half of the chicken mixture and then place the remaining cheese slices over the chicken. Lightly butter one side of the two remaining slices of bread, then flip them over and use the other half of the white sauce to coat the unbuttered side. Top each sandwich with a slice of this bread to finish it (buttered side facing out).
  4. Heat a heavy-bottomed skillet or grill pan over medium heat. Place the sandwiches butter side down in the pan and cook until the bread is golden brown and toasted. Flip the sandwiches using a spatula and continue to cook on the other side until the bread is golden brown. Use the spatula to compress the sandwich as it cooks on the second side. Remove the sandwiches from the pan and let them rest for a minute or two, then slice in half (if desired) and serve.
Source: Barely modified from Tracey's Culinary Adventures

Friday, March 29, 2013

Recipe Swap: Open-Faced Chicken Feta Gyros

There have been a few things that I've been craving during pregnancy: spicy tuna rolls (and sushi in general), reubens, frozen Greek yogurt, and gyros.  So when I received A Seasoned Greeting's blog for the swap, I was super excited to find these gyros.  Even better was that it used only 1/2 a pita since I'm trying to limit my carb intake right now in the event that I have gestational diabetes.

Because it's still (literally) freezing out, I was excited to use my new grill pan that my husband got me for Christmas.  It worked like a charm and created these gorgeous grill lines on the chicken.  The only thing I'm not so sure about is how to clean it.  I really should have oiled the pan first because I got some nice charred bits stuck to my now not-so-new and now extra-seasoned grill pan.

Now, it wasn't until I was sitting down to blog about this recipe that I made a *really* similar one many years ago. No matter, it didn't make this version any less delicious and it certainly fulfilled one of my cravings so thank you, Catherine!

Thank you to Sarah at A Taste of Home Cooking for being our awesome What's Cooking swap hostess and be sure to check out the rest of the group's collection in the blog hop, below.  You never know what great recipes you'll find!

Two Years Ago: Swedish Meatballs

Open-Faced Chicken Feta Gyros


Ingredients

For the Tzatziki sauce
  • 1 cup plain Greek yogurt
  • 1 regular cucumber, peeled and seeded
  • 1 teaspoon minced garlic
  • Salt and pepper
  • Squeeze of fresh lemon juice
For the Chicken
  • 2 chicken breasts, cut into slices
  • 2 teaspoons minced garlic
  • 2 tablespoons lemon juice
  • 2 tablespoons extra virgin olive oil
  • 1 teaspoon Greek seasoning
  • 2 teaspoons dried oregano
  • Salt and pepper to taste
For Assembling
  • Whole wheat pita bread
  • Fresh tomatoes, seeded and diced
  • Red onion, sliced thin
  • 1/4 cup crumbled feta cheese (I like the cracked pepper variety!)
Directions
  1. Shred the cucumber. Wrap in a towel or cheesecloth and squeeze to remove as much water as possible. Mix together the yogurt, shredded cucumber, garlic, salt and pepper to taste, and lemon juice. For best flavor, allow the flavors to meld overnight.
  2. In a gallon sized zipper bag, mix together the garlic, lemon juice, olive oil, Greek seasoning, oregano, salt and pepper.  Add chicken slices and set aside.  For best flavor, marinate overnight.
  3. Cut the chicken breast into slices and cook in a grill or fry pan over medium heat until cooked through.
  4. To assemble, place 1/2 of the whole wheat pita bread on the plate. Top with chicken, tzatziki sauce, feta cheese, diced tomatoes and sliced onions.
Source: Slightly modified from A Seasoned Greeting


Monday, March 11, 2013

Spicy Tofu Hotpot

Winter is a time for steamy soups and one popular Asian version of this is called "hotpot".  It's essentially the equivalent of fondue.  Thin cuts of meat, dumplings, vegetables, and noodles are boiled in a soup that's placed in the center of a special cook-top table or portable propane stove.  Honestly, as much as I enjoy this meal, I'm too lazy to do it myself because it requires a lot of prep and patience.  Generally this is a social affair and so it's a very prolonged meal that can easily last a couple hours.  Plus, if you try to rush things and  put too much food in at once, the soup gets overloaded and it takes even longer to cook!

That's why I was so excited to find this recipe for hotpot.  It's all the hotpot flavor that I love with a more immediate satisfaction.  Sure, you lose the fun and socialization aspect but when there's just the two of us at home, I can deal with that.

The original recipe would have made an excellent Meatless Monday meal but since my husband is a carnivore, I added some shredded chicken and frozen dumplings.  If I had fish, shrimp, or beef balls those would have likely made an appearance, too.  Udon noodles are my favorite soup noodles but honestly, all I had on-hand was linguine so that's what we used this time.  It's such a versatile recipe with a great base to get you started!

One Year Ago: Korean Style Short Ribs (Crockpot)
Three Years Ago: Chicken Palava (African Peanut Stew), Ragu a la Bolognese, and Look Alike Hostess Cupcakes

Spicy Tofu Hotpot


Ingredients

  • 14 ounces firm tofu, preferably water-packed 
  • 2 teaspoons canola oil 
  • 2 tablespoons grated fresh ginger 
  • 6 cloves garlic, minced 
  • 4 ounces fresh shiitake mushrooms, stemmed and sliced (about 2 cups) (I used regular white mushrooms)
  • 1 1/2 Tablespoons brown sugar 
  • 4 cups vegetable broth, or reduced-sodium chicken broth 
  • 2 cups water
  • 1/4 cup reduced-sodium soy sauce 
  • 1 1/2 teaspoons sriracha sauce, or to taste 
  • 1 teaspoon sugar
  • 4 cups thinly sliced tender bok choy greens 
  • 1 cup shredded chicken
  • 12-18 frozen Asian-style dumplings
  • 8 ounces fresh cooked noodles such as lo mein, udon, or mei fun (I used linguine)
  • 1/2 cup chopped fresh cilantro
Directions

  1. Drain and rinse tofu; pat dry. Cut the block into 1-inch cubes. 
  2. Heat oil in a Dutch oven over medium heat. Add ginger and garlic; cook, stirring, until fragrant, about 1 minute. Add mushrooms and cook until slightly soft, 2 to 3 minutes. Stir in sugar, broth, water, soy sauce and sriracha sauce; cover and bring to a boil. Add the dumplings and cook for about 3 minutes. Add bok choy, chicken, and tofu, cover and simmer until greens are wilted, about 2 minutes. Add the cooked noodles remove from the heat and stir in cilantro. 
Source: Modified from Eating Well

Friday, March 1, 2013

Recipe Swap: Copycat Chick-Fil-A Sandwiches

Any Chick-Fil-A fans in the house?  I for one am a huge fan of their chicken, especially the spicy versions!  I have seen many copycat recipes floating around the internet but have always been intimidated by them because 1) how close could they really taste? and 2) frying things and I...we don't get along.

Often times for recipe swaps I will find something to challenge me and so when I found this at Melissa's blog I was Born to Cook, I knew it was time to surrender and beat my fears.

Looking at the ingredient list there were some items that weren't surprising and then others that made me go "huh?".  Take the pickle juice marinade for example.  I don't even like pickles and well...that's an awful lot of juice!  The powdered sugar was another interesting one...I was skeptical.

So how did it turn out?  Surprisingly, it tasted eerily similar to the real Chick-Fil-A sandwiches!  It didn't taste too pickle-y.  Instead, it gave that great tang and saltiness that is characteristic of their chicken.  The sugar also added just enough sweetness to offset it.  Since I like the spicy sandwiches I added Tobasco to the pickle juice and cayenne to the spice blend.  I think I would actually add more in the future because it wasn't quite to the spiciness of the real version.  But overall, yep, it was good!

My only lament is I still can't fry things to save my life.  Mine ended up a little more toasty than I would have desired.  Still have to work on that one...

Thank you Melissa for the recipe and Sarah at Taste of Home Cooking for organizing the swap!

Copycat Chick-Fil-A Sandwiches


Ingredients
  • 4 boneless chicken breasts 
  • 1 cup pickle juice 
  • 1-2 tsp Tobasco sauce (optional to create the spicy version)
  • 3 eggs 
  • 2/3 cup milk 
  • 1 1/2 cups all purpose flour 
  • 3 tablespoons powdered sugar 
  • 2 teaspoons paprika 
  • 2 teaspoons salt 
  • 1 teaspoon black pepper 
  • 1 teaspoon garlic powder 
  • 1 teaspoon dried basil 
  • 1 teaspoon cayenne pepper (optional to create the spicy version)
  • vegetable oil for frying (peanut oil is supposedly better, but I didn’t have any) 
  • 4 buns, buttered and toasted 
  • pickle slices
Directions
  1. Pound out chicken to 1/2 inch thickness. Marinate in pickle juice and Tobasco (if using) for 1 hour. 
  2. Beat egg and milk together in a bowl. Combine flour, sugar and spices in another bowl. Dip chicken on both sides in egg first, then flour mixture. 
  3. Heat oil in a deep skillet. Fry each piece for a few minutes on each side, or until golden and cooked through. Place on paper towel lined plate and blot top side. 
  4. Serve on buns with pickles 
Source: Slightly modified from I Was Born to Cook


Friday, February 8, 2013

Bourbon Street Chicken

Originally today I was going to share the most authentic and coveted recipe of all...a Chinese Sponge Cake recipe from my Grandmother.  It is one of the few recipes that actually is written down and well documented.  But, as I discovered when I tried to make it, there aren't enough details to get it right without some experimentation first.  So, allow me to play with it a bit more and then get back to you on sharing that one...

Instead, I'm going to share a really tasty but not-so-authentic stir fry recipe so there's a little something for everybody.  This is a dish that you often find at the mall food court where little Asians try to shove chicken samples on a toothpick in your face.  Oddly enough, I never find myself taking those samples nor ordering this dish but I got a hankering to eat it at home recently.

The sauce is sweet and sticky with a good amount of spice that can be adjusted to your liking.  And despite its name (and my love for drunken foods)...contains no bourbon.  Either way, it's really really good.  Good enough that my husband actually agreed to take leftovers to work the next day for lunch.  He NEVER does that!

I happened to use about half as much chicken and then threw in some leftover broccoli that I needed to use up.  I think steamed broccoli a common side dish for this anyway but I wanted mine to be nice and saucy.

Two Years Ago: Chicken Cacciatore

Bourbon Street Chicken


Yields: 4 Servings

Ingredients
  • 2 lb boneless chicken breasts, cut into bite-sized pieces
  • 1 Tbsp olive oil
  • 1 garlic clove, crushed
  • 1/4 tsp ginger
  • 3/4 tsp crushed red pepper flakes (For added heat, add a squirt of Sriracha!)
  • 1/4 c apple juice (I use no sugar added)
  • 1/3 cup light brown sugar
  • 2 Tbsp ketchup
  • 1 Tbsp cider vinegar
  • 1/2 c water
  • 1/3 c low sodium soy sauce
  • 1 Tbsp cornstarch dissolved in a bit of water
Directions
  1. Heat oil in a large skillet.  Add chicken pieces and cook until lightly browned.  Remove and set aside on a plate.
  2. Add remaining ingredients and heat until well blended and dissolved.  Add the chicken back in then bring to a hard boil.
  3. Reduce heat and simmer for 20 minutes uncovered.  Add the cornstarch mixture and continue to cook until thickened.
  4. Serve over hot rice.
Source: Big Oven

Wednesday, February 6, 2013

Ginger Chicken Jook (Chinese Rice Porridge)

Jook, congee, or rice porridge.  No matter what you call this authentic Asian soup, it is downright delicious and comforting.  Many people compare it to the Chicken Noodle Soup of the Asian world.

When I was healing from my miscarriage, my Mom made me a big pot of jook.  When the Thanksgiving turkey carcass or Christmas ham bone are picked through, we make jook.  In fact, Turkey jook is the most coveted of all because the turkey bones provide an extra sweet base flavor and it's a rarity enjoyed just once a year.

Sometimes, jook in its cheapest and simplest form is just rice and water.  That also brings back childhood memories of when my Grandma and Mom would make a pot of rice in the rice cooker and then using the hard bits at the bottom, add some water and allow it to become a magical soup.  I was somewhat addicted to this and steamed rice mixed with ice water growing up.  It's a wonder that I didn't become malnourished.

In this case, the inspiration for making this recipe was a roasted chicken carcass that was given to me by my in-laws after our weekly Sunday dinner together.  Anytime they have bones they know I'll take it home because I love making homemade broths and soups out of them.  Why let it go to waste?  That's what the Asian in my is thinking, anyway.  The frugal person in me is thinking of the cost savings that comes from making my own broth (which is SO EASY) at home without any added salt.

This was my first time making jook on my own.  I'd watched family members do it many times before but as usual, there's no recipe and no measurements.  The only measurements used were based on "bowls" (of the Chinese soup variety).  After some searching, I found a good starting recipe and put my own family spin on it so that it was closer to the way that Mom would do it.

I don't know why I was so intimidated to try this before.  Perhaps it is because I had witnessed too many times where the bottom of the jook ends up burning by accident and thus tainting the entire pot with the unwanted burnt flavor.  But my Mom taught me the trick to avoiding that.  She always told me to NEVER stir your jook or else you'd have to keep stirring it.  As long as you have a vigorous simmer going on, that will be enough to move the rice around and prevent it from burning.

With my first bite I was pleasantly surprised.  In fact, don't tell Mom but I think it might have been the best (non-turkey) jook that I've ever eaten.  This recipe used chicken broth versus my family uses just water.  Needless to say, the broth added a boost of flavor that I had not yet known.  It also integrates ginger directly into the soup.  While ginger is a common garnish that is served with jook, I usually skip it because I hate chomping on a big piece of it.  But, I enjoy the subtle flavor it lends so cooking it directly in the jook was perfect to me.  I ate this for 4 days straight and can't wait to get some more bones to make more!

I hope you give it a try and discover this Asian staple for yourself!

Ginger Chicken Jook (Chinese Rice Porridge)


Ingredients

  • 6 cups water
  • 4 cups low-sodium chicken broth
  • 1 leftover chicken carcass, with some meat intact and skin removed and trimmed of excess fat
  • 1 cup long-grain white rice
  • 1 tsp ginger, finely minced
  • Salt and white pepper, to taste
  • Chopped fresh cilantro, for garnish
  • Thinly sliced scallions, for garnish
  • Thousand year old eggs, for garnish (optional)
  • White pepper, sesame oil and soy sauce, for personal seasoning
Directions
  1. Place all ingredients except the garnishes in a large heavy-bottomed saucepan and bring to a boil over medium-high heat.  Reduce the meat to medium low and cook at a lively simmer.  Do not stir!  Continue to cook until the rice has completely broken down and the mixture is creamy, about 1 hour.  The soup will continue to thicken as it stands but it will get watery if you stir it too much after cooking.
  2. Turn off the heat and remove the carcass to a cutting board.  When it's cool enough to handle, pull off the meat in bite-sized pieces, discarding the cartilage and bones.  Return the chicken pieces to the jook.  Stir to combine and season with salt and pepper as needed.
  3. Ladle into bowls.  If desired, season with more white pepper, sesame oil, and/or soy sauce then top with cilantro and scallions.  If you like thousand year old eggs, throw those on top, too.
Source: Slightly modified from Christine Gallary's recipe on Chow.com

Friday, November 9, 2012

Spicy Garlic and Ginger Chicken with Green Beans

Happy Friday!

I knew this recipe had potential when I looked at the ingredients.  But, I tweaked it a bit knowing that sesame oil isn't meant for cooking (too unstable) but rather drizzled as a finishing garnish.  And, following the tried and true method for all good Asian stir fries.  I watched my mom do it as I grew up and the general formula for a good stir fry is simple.  You get the vegetable oil nice and hot in the pan, add aromatics (like garlic, ginger, and onions) to start your base flavor if you're using them.  Add the meat.  Add the veggies.  Finish with sauce.  Easy peasy, right?

Perhaps the best loved thing about stirfy is the fact that it's so quick to pull a meal together.  Equally easy is the ability to customize it to your liking or use up whatever lonely leftover ingredients you might have.  You can mix and match your meats (like I substituted chicken for the shrimp in this recipe) and veggies.  The real deciding factor in determining a good and bad stir fry meal is the sauce.  And this sauce is a flavorful winner! One of the best I've ever had.

One Year AgoCaramelized Onion Mashed Potatoes
Three Years Ago: Chicken Parmesan

PS: Have you shared and commented on last week's Mac and Cheese Monday #1 post?  Only 2 entries to date so the chance to win is great!  Also, sharing entry #2 on Monday so check back to see what I made and to enter again!

Spicy Garlic and Ginger Chicken with Green Beans


Spicy Garlic and Ginger Chicken with Green Beans

Ingredients
  • 3 Tbsp reduced sodium soy sauce
  • 1 Tbsp rice wine vinegar
  • 2 tsp sugar
  • 3 cloves garlic, minced
  • 2 Tbsp fresh grated ginger
  • 1.5 Tbsp vegetable oil, divided
  • 2 tsp chili sauce (recommend Sriracha!)
  • 2 tsp cornstarch, dissolved in 4 tsp cold water
  • 1 lb chicken breast, cut into 1/2 inch pieces
  • 3-4 cups green beans, steamed
  • Sesame oil
  • Sesame seeds
Directions
  1. Combine the soy sauce, vinegar  sugar, garlic, ginger, 1/2 tablespoon of vegetable oil, and chili sauce in a bowl.  Whisk to combine and then set aside.
  2. In a large non-stick skillet, add remaining 1 tablespoon of vegetable oil and heat until shimmering.  Add the chicken and cook until white and nearly cooked through, about 5 minutes.  Add the steamed green beans to the skillet.  Pour in sauce mixture and allow to simmer for 2 minutes.  Add the cornstarch slurry.  Return to a simmer and cool until thickened (it should coat a spoon).
  3. Drizzle with sesame oil and sprinkle with sesame seeds.  Serve over rice.
Source: Modified from Stephanie Cooks

Wednesday, October 31, 2012

Buca di Beppo's Spicy Chicken Rigatoni

Did you know that October was National Pasta Month?  Me neither and so here I am sneaking in this pasta dish just in the nick of time!

Pasta would have to be one of my favorite foods EVER.  I mean, what's not to love about this versatile dish?    It can be dressed up Italian or Asian or even with a Mexican flair.  You can make it in your oven like this Pierogi and Kielbasa Bake  or on your stovetop like this Stovetop Mac and Cheese.  I could eat pasta EVERY SINGLE DAY and not get bored.  When I was growing up I told my mom I preferred pasta to rice and she basically made me feel like the worst Asian person ever.  It's blasphemy to dislike rice!

I enjoy finding copy-cat recipes of restaurant favorites and this one comes from the family-style Italian chain, Buca di Beppo.  I had this dish at a recent work lunch and found it a nice remake of a previous dish that I got there, the Penne Rosa (pink sauce).  This new-to-me version, Spicy Chicken Rigatoni, was much improved by the addition of many flecks of crushed red pepper!  If you can't handle spicy foods, this probably isn't the dish for you...unless perhaps if you decrease the crushed red pepper in the dish but then it'd just be Chicken Rigatoni!  However, if you like spice and you like garlic, you'll love this dish.

It's so easy to make at home (Hello jarred sauces! And, if you're feeling extra lazy, hello pre-cooked chicken strips or rotisserie chicken, too!) and tastes just like the real thing so impress your date and save some money, too!

One Year Ago: Caramel Apple Cheesecake Bars, Apple Cinnamon Truffles, and Mini Triple Treat Cupcakes (A simple Halloween treat!)
Three Years Ago: Pumpkin Whoopie Pies

Buca di Beppo's Spicy Chicken Rigatoni


Ingredients

  • 1 lb rigatoni pasta, cooked
  • 2 chicken breasts, cooked and sliced
  • 1 tsp olive oil
  • 2 tsp butter
  • 1 Tbsp garlic, minced
  • 1/2 Tbsp crushed red pepper
  • 1/8 tsp salt
  • 1/8 tsp ground black pepper
  • 3/4 cup marinara sauce
  • 1/2 cup Alfredo sauce
  • 1/2 cup frozen peas
To garnish: 1/2 tsp crushed red pepper

Directions
  1. In a large skillet over medium-high heat, heat olive oil and butter.  Add garlic and crushed red pepper cooking until fragrant, about a minute.
  2. Add marinara and Alfredo sauces and peas. Then season with salt and pepper.  Heat until warmed.
  3. Stir in the cooked pasta and chicken breast slices.  If desired, garnish with additional crushed red pepper.
Source: Slightly modified from Bucca di Beppo at Home

Wednesday, October 24, 2012

Buffalo Chicken Shepherd's Pie

I love traditional foods with a twist such as Chicken Parmesan Meatloaf and Chicken Marsala Risotto.  They make classic favorites into something new and exciting without completely offending those that enjoy routine. Here's another one of those types of recipes.

I knew the moment I saw it that it would be a winner.  And I was actually in so much of a hurry to dig into this dish that the only photo I got of it was on my iPhone!  Clearly you can see  where my priorities lie haha.  The cheesy mashed potatoes scream creamy comfort while the filling is flavored with tangy and spicy hot sauce.  It was even one of those dishes that tasted better the next day after it had been reheated.  I didn't have enough to freeze but I'm willing to bet it would do well as a freezer meal, too.

Since my husband is anti-blue cheese, I made his half with cheddar in both the mashed potatoes and topping.  Feel free to do the same or go all one type of cheese based on your family's preferences.

One Year Ago: Apple Cider Beignets with Butter-Rum Caramel Sauce
Two Years Ago: Who Loves Ya Baby Back?

Buffalo Chicken Shepherd's Pie


Ingredients

  • 1 Tbsp olive oil
  • 1 lb ground chicken
  • 4 celery ribs, diced
  • 4 carrots, peeled and diced
  • 1 onion, diced
  • 4 garlic cloves, minced
  • 1 pint cherry tomatoes, halved
  • 2 tsp smoked paprika
  • 1/4 cup chicken stock
  • 1 Tbsp tomato paste
  • 1/4 cup hot sauce (suggest Frank's Red Hot)
  • 4 cups mashed potatoes
  • 4 oz blue cheese, crumbled and divided (alternatively you can use cheddar or both)
  • Chives, chopped for garnishng
Directions
  1. Preheat oven to 375 degrees F.
  2. Heat oil over medium high heat in a large skillet.  Add the chicken and cook until browned.  Add the celery, onions and garlic.  Continue to cook, stirring occasionally until the vegetables are soft, about 8-10 minutes.  Add the tomatoes and paprika.  Deglaze the pan with the stock and add the tomato paste and hot sauce.  Stir to combine.  Allow to simmer for 10 minutes.
  3. Add half (2 oz) of the cheese and a few dashes of hot sauce to the mashed potatoes and mix well.
  4. Prepare a 9-inch pie plate (I found I had too much filling so used a large rectangular pyrex baking dish) by spraying with cooking spray.  Pour the chicken mixture into the prepared pan.  Spoon potatoes on top and sprinkle with remaining cheese.
  5. Bake for 25-30 minutes or until potatoes are golden and chicken mixture is bubbly.  Sprinkle with additional paprika and chopped chives.  Allow to cool for 5 minutes before serving.
Source: as seen on Fried Ice and Donut Holes from The Jey of Cooking

Monday, October 8, 2012

Chicken Marsala Risotto

Hello, my name is Christine and I'm a food alcoholic.  I said it in my Southern Comfort (Drunken) Apple Pie post yesterday and I'll say it again.  I love booze in my food!

I also told my facebook fans on Friday when I made it that this meal that I'm about to share was easily one of the best I'd had in a long time.  And surprise surprise...it has booze in it!  I promised Jené and Whitney that I'd post it today so here I am taking their request.

Risotto is kind of a pain to make because you have to stir it constantly but the results always seem worth it to me.  My only other complaint is that it's usually doused in cream, cheese, and butter.  This recipe is different.  It carries nearly all of its fine flavor in the Marsala wine and uses only one tablespoon of butter (if you grill your chicken like I did), 1/4 cup cheese, and zero cream!  I told you alcohol makes food pack a flavor punch ;).

Nicole of Prevention RD says it yields 3 servings (4 if you serve with a salad and stretch it) but I found that it easily makes 4 servings all on its own.  Especially if you cut up your chicken breast into slices.  Since the meat is spread out, it tricks your mind into thinking you're eating more of it than you really are allowing you to stretch out the servings.  It's kind of similar to the trick of serving your meals on smaller plates.

Three Years Ago: (Sugary Sweet) Chili - My mother-in-law's recipe and how appropriate timing since this particular recipe won Nicole's 2nd Annual Chili Contest last year!  Check out her blog as she goes through eight chili entries in the 3rd annual contest.  Yep, I entered another recipe this year, too.

Chicken Marsala Risotto


Ingredients
  • 4 cups low-sodium chicken broth
  • 1 Tbsp unsalted butter*
  • 1 medium shallot, minced
  • 2 cloves garlic, minced
  • 1 Tbsp tomato paste
  • 1 cup Arborio rice
  • 1 cup Marsala wine, divided
  • 3 (4 oz) boneless, skinless chicken breasts
  • 2 cups mushrooms, sliced
  • 1/4 tsp kosher salt and fresh ground pepper
  • 1/4 cup (1 oz) Parmesan cheese, grated
  • 2 Tbsp fresh basil, cut chiffonade
*Note: I had my husband grill our chicken because it was still nice out but if you would like to prepare everything indoors and in a skillet, you'll want an additional 1 Tbsp of butter to cook the chicken.  The skillet method is also recommended for those that are cooking alone since you really can't leave risotto unattended!

Directions
  1. Heat the chicken broth in a medium saucepan until it simmers.  
  2. Melt 1 Tablespoon of butter in a large heavy-bottomed skillet or dutch oven over medium heat.  Add shallots and cook until soft, 2-3 minutes.  Add garlic and tomato paste and cook until fragrant, about 1 minute longer.  Add the Arborio rice and toast until opaque around the edges, 2-3 minutes.  Add 3/4 cup of Marsala wine and cook, stirring often, until absorbed, about 2-3 minutes.
  3. Stir in 1 cup of chicken broth and stir occasionally until almost absorbed, 5-8 minutes.  Working 1 ladle of broth at a time, continue to add broth and stirring often so that the rice doesn't stick to the bottom of the pan.  Add another ladle when the broth is almost completely absorbed.  After you have been cooking the risotto for 10 minutes, stir in the mushrooms.  At this time, have your significant other or cooking partner in crime preheat your grill to medium-high. Continue cooking the risotto, stirring constantly, until all of the broth is absorbed for a total of 20-25 minutes.
  4. Meanwhile, pound chicken breasts to desired thickness, about 1/2 inch.  Season with salt and pepper.
    To Grill: Grill until cooked through, about 12-15 minutes or until thermometer inserted into center of the meat registers 170 degrees. Remove to a plate and cover with foil until ready to serve.
    To Cook in Skillet: Heat additional Tablespoon of butter in a large skillet.  Pan fry the chicken until lightly browned on each side, about 3-4 minutes per side. Remove to a plate and cover with foil until ready to serve.
  5. Remove risotto from heat and stir in remaining 1/4 cup of Marsala wine, Parmesan cheese, and basil.  Cut chicken breasts into slices and top each risotto portion with the slices or if desired, serve topped with whole chicken breasts.  Serve immediately.
Source: Slightly adapted from Prevention RD

 
This recipe was shared on This Week's Cravings.  The hostess for this linky arty are: Tina from MOMS CRAZY COOKINGNicole from The Daily Dish and Kristi from Veggie Converter

Wednesday, September 19, 2012

Guest Post by The Barbee Housewife: Chicken Bacon Ranch Taquitos

So what did you think of my latest Secret Recipe Club post on Monday?  It was nice to be back and "talking" with you again, even if it was scheduled in advance.  By now, I've now jetted off to my second Asian destination...but still a few days yet before I get to come home.

And so continues the series of guest posters.  We're on #3 of 6 so the fun is still just beginning!  Caroline of The Barbee Housewife is another What's Cooking message board member.

For her post, she chose to share a taquito recipe.  Now, I have tried the Baked Creamy Chicken Taquitos that have been floating around the blogosphere before and enjoyed them (freeze well, too!).  I can't wait to try this version as well because can you really go wrong with the addition of bacon?  No, you cannot.  Plus, it gives me another reason to use my Homemade Hidden Valley Ranch Seasoning!

Other things that caught my eye on Caroline's blog?  Pig Candy (Candied Bacon), Orange and Rosemary Pork Tenderloin, and S'mores Popcorn!  Looks like I'll have quite a bit of cooking to do once I return home!

One Year Ago: Potato and Tomato Gratin and Foil-Baked Fish with Black Beans and Corn (featured on Once a Month Mom's freezer cooking May 2012 Diet Menu!)

-----------------------------------------------------------------------------


Hi, I am Caroline, of The Barbee Housewife, and I have the great honor of featuring on Christine's Kitchen Chronicles today, and I am so excited! My blog is a way for me to share my love for cooking with the world, because otherwise it would only be for my husband and myself, which seemed like a shame to me. We love to entertain at the Barbee household so on my blog you will find a lot of delicious appetizers that will impress others and the ease of the preparation will be just our secret!

Today, I am going to share one of our very favorite appetizers, chicken bacon ranch taquitos. The ingredients in the name say it all, who couldn't like these? It is perfect for a crowd, they are delicious and I think even your pickiest eaters will love them. These are a win-win situation because you can prep them before hand and just throw in the oven minutes before your guests arrive so you will have your house smelling amazing. Did I just say throw in the oven and taquitos? That is right, a good, ole' fashioned favorite baked instead of fried, and you will not miss the fried one bit, I can promise you that.  This recipe is for a party appetizer so it makes twenty, however,  it can easily be halved!

Chicken Bacon Ranch Taquitos
Source: Carrie's Sweet Life, via Six Sisters' Stuff

Ingredients:
  • 1 package of Cream Cheese, 8 oz. softened
  • 12 slices of Bacon, cooked and crumbled
  • 4 cups of Chicken, cooked and shredded, Rotisserie Chicken is perfect for this
  • 1 packet of Ranch Dressing Mix
  • 2 cups of Monterrey Jack Cheese, shredded
  • 3-4 tablespoons of Green Onions, chopped
  • 20 Flour Tortillas, 6-inch size
  • Salt
  • Non-Stick Cooking Spray
Directions:
  1. First, pre-heat your oven to 425 degrees.
  2. Next, get out a large baking sheet and line it with aluminum foil. Spray it with your non-stick cooking spray.
  3. Now, get out a large bowl. Mix together the cream cheese, bacon, chicken, ranch dressing mix, cheese, and green onions. Make sure all of these ingredients are combined well so you get some in each bite.
  4. Now, you are going to roll these taquitos one at a time so get ready. Have one tortilla and place 2-3 tablespoons of the mixture in each taquito and roll it up. Place it seam-side down on the cooking sheet. Repeat until all of your tortillas are made and no mixture is left to spare.
  5. Next, spray the tops of the taquitos with your non-stick cooking spray and sprinkle with a little bit of salt.
  6. Finally, place in the oven and bake for 15-20 minutes for the last 30 seconds-1 minute change the temperature on your oven from bake to broil so these taquitos will get a nice browning on top.
  7. When you pull them out of the oven, let cool and then slice in half diagonally and serve with ranch dressing for dipping.
Enjoy!

Happy Cooking,
The Barbee Housewife

Monday, September 17, 2012

SRC: Chicken Fajita Lettuce Wraps

How's it going friends?  Miss me yet?  Unfortunately I'm not back quite yet but I do hope that you're enjoying all my wonderful guest posters so far (2 down, 4 more to go!).  I can't say it enough but they are making my life infinitely easier this month as I'm busily globetrotting in Asia for work.  They really are a great bunch of ladies with drool-worthy blogs, aren't they?

Anyway, it's time for another edition of Secret Recipe Club.  Has it really been a month already?  It seems what goes around, comes around because this month I received my fellow Jazzercising friend Joanna's blog, Cairns Manor.  For those who are facebook fans or that follow me on twitter, you might recognize her name because last month I gave her a shout out for being my SRC swap partner and making my Watermelon Slush.

As I perused her blog, I also considered Sriracha Macaroni Salad which I would have brought to our annual family Labor Day picnic...except it rained so there was none.  Another one that I'd like to try when I have more time is her Char Siu Bao.  If you've followed my blog for any period of time you'll know that this was my FAVORITE growing up and I was left with my Grandpa's original recipe on an old scrap of paper.  But when I made it, it just wasn't right to me.  So, I vowed that it would be the first trial of many in order to tweak the recipe and get it just right...but...I haven't done it any more trials yet.  D'oh!  Of course, I digress so back to this post.

Ultimately I ended up choosing these chicken fajita lettuce wraps.  Not only am I a fan of trying people's original recipes but I might just be obsessed with lettuce wraps lately what with my BLT Corn Salad Wraps, Chorizo and Sweet Potato Lettuce Wraps, Asian Lettuce Wraps, and not-yet-posted California Roll Up Lettuce Wraps!  Fajitas are one of my favorite Mexican foods so this was an awesome way for me to keep the Summery lettuce wrap theme going AND cut some carbs.  The flavor was very good and came together quickly though in the future, I'd probably only use a single lime instead of two.  It was a bit too limey (is that a word?) and tart for me.  Also, I didn't have any chipotle peppers on-hand so substituted 1/4 tsp of chipotle chili powder in the dry rub and added a few slices of minced jarred jalapenos.  Perfect level of spiciness and added smoky flavor!

As usual a special thank you to April of the blog Angel's Homestead, SRC ring leader and Debbi of the blog Debbi Does Dinner, our new Group C Hostess!

Chicken Fajita Lettuce Wraps


Ingredients
  • 2 boneless, skinless chicken breasts, diced into bite sized pieces
  • 2 tsp onion powder
  • 1 tsp garlic powder
  • 1 tsp coriander
  • 1/4 tsp chipotle chili powder
  • 1 tsp salt
  • 1/2 tsp pepper
  • 2 Tbsp olive oil, divided
  • 1 red onion, diced
  • 1 bell pepper, diced
  • Several slices of jalapeno pepper, sliced (optional for added heat)
  • 1 Tbsp honey
  • Juice of 1 lime
  • Lettuce leaves
  • Toppings as desired: diced tomatoes, avocados, cheese, sour cream, etc.
Directions
  1. In a plastic ziplock bag, add the onion powder, garlic powder, coriander, chipotle powder, salt, and pepper.  Add the diced chicken then seal and shake and squish the bag to combine.  Allow chicken to  marinate in the dry rub for about 30 minutes.
  2. Heat 1 tablespoon of oil in a large skillet over medium high heat.  Add chicken and cook, stirring occasionally until chicken is cooked through.  Transfer to a plate and set aside.
  3. Add the remaining tablespoon of oil to the pan.  Add the onion and bell pepper and saute until just starting to get soft, about 5 minutes.  Add the jalapeno peppers, honey, and lime juice stirring to combine.  Bring to a light simmer and add back in the chicken, cooking until warmed.  Taste and season with salt and pepper to taste.
  4. Serve with lettuce and whatever toppings you like.
Source: Slightly modified from Cairns Manor

Wednesday, September 5, 2012

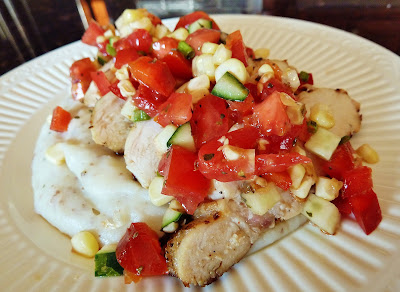
Buttermilk-Grilled Chicken with Garden Vegetable Salsa

Are you always looking for ways to use up your leftover buttermilk like I am?  Lucky for you I have a buttermilk tag on my blog just for this exact purpose!  Of course, you could always "cheat" and make fake buttermilk by adding 1 tablespoon of vinegar or lemon juice to a regular cup of milk and letting it sit for 5 minutes.  This makes it get a bit curdled and sour just like buttermilk.  It works in a pinch but for me, I like the real thing so I buy the jug of buttermilk at the store.

My CSA continues to churn out lots of wonderful garden-fresh veggies and so when I saw this on Josie's blog, I knew it would make the menu sometime this Summer.  Finally the stars aligned and the farm supplied all of the vegetables that I needed to make this recipe (even the mashed potatoes which I made as a "bed" for the chicken and veggies to rest upon).  I gathered some fresh herbs from our work garden and happened to have some buttermilk leftover from when I had made Tomato and Corn Pie (still easily the best dish from the Summer!) and Strawberry Buttermilk Ice Cream.  Perfect.

I've heard of using buttermilk for fried chicken before but never grilled so the concept was intriguing to me.  I found that allowing the chicken to marinate overnight in the buttermilk mixture resulted in meat so juicy and tender after grilling that I about died of happiness.

As a side note, this is my last month of my CSA subscription :(.  But, to preserve some of the fresh flavors of summer, I took on canning 60 POUNDS of tomatoes with my mother-in-law.  I'll post soon about that adventure so stay tuned!

One Year Ago: Oven Baked Sweet Potato Chips

Buttermilk-Grilled Chicken with Garden Vegetable Salsa


Ingredients

For the Chicken
  • 4 boneless, skinless chicken breast halves, trimmed
  • 2 cups low-fat buttermilk
  • 3 cloves garlic, peeled and crushed
  • 1/2 tsp paprika
  • 1/8 tsp crushed red pepper flakes
  • 1 tsp kosher salt
  • 1/2 tsp freshly ground pepper
For the Garden Salsa
  • 1/2 cup finely diced cucumber
  • 1/2 cup finely diced bell pepper
  • 1/2 cup minced scallions
  • 3/4 cup corn, cut from the cob (about 1-2 ears)
  • 2 medium tomatoes, cored, seeded, and diced
  • 1/4 cup minced fresh herbs (such as basil, chives, oregano, and parsley)
  • 2 Tbsp olive oil
  • 2 Tbsp red wine vinegar
  • Juice of 1/2 lemon
  • Salt and pepper, to taste
Directions
  1. In a gallon-sized ziplock bag or shallow baking dish, combine the chicken with the buttermilk, garlic, and spices.  Cover and refrigerate for at least 1 hour or up to overnight.
  2. When ready to cook, preheat the grill to medium-high heat.  Oil the grates and cook the chicken about 7 minutes per side, turning once, or until the internal temperature reaches 165F.  Remove from the heat and cover loosely with foil.  Allow to rest at room temperature about 10 minutes before serving.
  3. While the chicken is cooking, combine the ingredients for the salsa in a medium bowl.  Taste and season with salt and pepper before serving on top of chicken.

Source: Pink Parsley

Monday, August 13, 2012

Recipe Swap: Hawaiian Chicken Sandwiches

Are you feeling too hot to cook?  If so, this edition of A Taste of Home Cooking Recipe Swap will be perfect for you.  I submitted the Korean Style Short Ribs which create melt-in-your-mouth amazingness in the crockpot without heating up the kitchen.

This month, I had the hostess herself, Sarah of A Taste of Home Cooking.  If I didn't know better I'd say that there was a recent obsession with Hawaiian Chicken Sandwiches in the blogging world.  I found it a little ironic that a recent June Recipe Swap recipe was very similar and yet each had their own distinct tastes to them.  It's as if we were to take the famous Shakespeare quote and say "What's in a name?  That which we call a Hawaiian Chicken Sandwich.  By any other name would taste just as delicious." :)

Bloggers LOVE this recipe.  And I can see why.  It's ridiculously simple and utilizes ingredients that you probably have on hand.  Oddly, I realized this is the first chicken "patty" sandwich that we'd ever made and I can assure you it won't be our last.  It really is a nice departure from beef/turkey burgers all summer.  I wasn't sure from the directions which way to halve my chicken.  I ended up cutting it horizontally so that my chicken was really skinny.  I hate trying to wrap my mouth around gigantic sandwiches so this worked to our advantage lol.  We omitted the cheese and mayo to save on calories and added some rings of grilled onion to amp up the flavor.

But which of the Hawaiian Chicken Sandwiches did I like better, you ask?  The Pulled Hawaiian Chicken Sandwich from last time or this Hawaiian Chicken Sandwich?  Well, as I'm a sucker for saucy things, I'd say the Pulled version for its flavor but this one wins for ease.  You can't go wrong with either one!

Don't forget to enter my Beer Flats giveaway and check back later this week for the two-part dessert finale of Emily and my Seasonal Summer Fruit and Veggie Extravaganza!

One Year Ago: Baked Squash and Baked Green Bean Fries

Hawaiian Chicken Sandwiches

Hawaiian Chicken Sandwiches

Yields: 4 Sandwiches

Ingredients
  • 2 large boneless skinless chicken breasts
  • 1 large can pineapple rings (8 rings)
  • 2 Tablespoons soy sauce
  • 2 Tablespoons brown sugar
  • 2 teaspoons Dijon mustard
  • 4 slices provolone cheese (optional)
  • Red onion rings (optional)
  • 4 hamburger buns or kaiser rolls
  • Smear of mayonnaise (optional)
Directions
  1. Pound out the chicken breasts until they are a uniform thickness.  Slice each into two pieces (It wasn't clear which way to cut but I did mine horizontally so that the chicken was nice and thin).
  2. Combine the juice from the pineapple can, soy sauce, brown sugar, and mustard.  Marinate the chicken overnight in the juice mixture.
  3. Prepare your grill.  Grill the chicken for about 15 minutes, flipping once halfway through.  If desired, add the cheese with 3 minutes left.  While the chicken is grilling, add the pineapple rings and onions, turning once.  If desired, smear some mayonnaise on the buns then top with a piece of chicken and two pineapple rings each.
Source: Originally from So Tasty, So Yummy as seen on and submitted by A Taste of Home Cooking

Friday, June 29, 2012

Recipe Swap: Pulled Hawaiian Chicken Sandwiches

I'm on a roll, folks!  This week's recipe swap theme was Burgers/Sandwiches.  As usual, visit A Taste of Home Cooking for the full round-up!

I submitted Pork Sandwiches with Cilantro-Jalapeno Slaw and received these awesome Pulled Hawaiian Chicken Sandwiches from one of my favorite bloggers, Nicole at Prevention RD.  Seriously, if you haven't already checked out her site yet, you should.  It's one of my go-to blogs for when I want something a bit healthier and I LOVE that she calculates all the nutrition stats for you.  Oh, and I should also mention that Nicole deemed my (Sugary Sweet) Chili entry the champion of her 2nd Annual Chili Contest which I am completely honored by :).

As for this recipe, it totally met and exceeded my husband and my expectations.  At first I grumbled a bit at the fact that it used grilled chicken (I, like Nicole, assumed the pulled chicken would be a la crockpot like all other pulled meat recipes) and considered slow cooking it instead.  But don't do it.  The grilling adds a wonderful char-grilled smokey flavor that makes this sandwich unique and it's worth the extra effort.  It made a lot so we had the leftovers for lunch in wraps.  This would be a perfect addition to your 4th of July or other summer BBQ.  Classic enough for a traditional BBQ but different enough to surprise and delight.  Great stuff!

Heads up to my readers - by the end of next week, look for my first official product review and a sponsored BLOG GIVEAWAY!  If you're not already, follow me on Facebook or Twitter for an early hint of what it could be ;).

One Year Ago: Red, White, and Blue Cupcakes
Two Years Ago: Firecracker Shrimp (mmm...Sriracha!!)
Pulled Hawaiian Chicken Sandwiches


Ingredients:
  • 1/3 cup Heinz 57 sauce
  • 1 20-ounce can pineapple rings in natural juices
  • 2 Tbsp agave nectar or honey
  • Tabasco sauce, to taste (I used my favorite Asian condiment, Sriracha!)
  • 4 5-ounce boneless, skinless chicken breasts
  • non-stick cooking spray
  • Fresh ground black pepper, to taste
  • 5 whole wheat buns or sandwich rolls
Directions:
  1. Heat grill to medium heat. Place one ring of pineapple into a food processor or blender and process until smooth. Add the Heinz 57, honey, and a couple of dashes of 
  2. hot sauce to the blender/food processor and combine. Remove 3 tablespoons of sauce to use for basting and reserve the rest for serving.
  3. Spray the pineapple rings with non-stick spray and place on the grill. Cook for 5-7 minutes on each side, until the sugars start to caramelize and nice grill marks have developed.
  4. Pound chicken breasts lightly to reach an even thickness. Brush the Hawaiian sauce on one side of the chicken breast. Place on the grill sauce side down and cook until internal temperature reaches 170F (about 6-8 minutes), flipping halfway through. Before flipping the chicken, baste with the remaining Hawaiian sauce.
  5. Remove chicken and pineapple rings from the grill when done. Let chicken stand for 5-10 minutes before shredding with two forks. Add the chicken to a bowl and toss with the remaining Hawaiian sauce. Divide the pineapple rings and Hawaiian chicken between the 5 buns/sandwich rolls and serve warm.
Source: Originally from Confections of a Foodie Bride as submitted by Prevention RD

Friday, June 15, 2012

Recipe Swap: Oven Baked Sriracha Chicken

I'm back at the biweekly recipe swap thing!  I couldn't be happier to re-join for the very popular Blogger's Choice theme.  I was excited to receive the blog So Tasty, So Yummy for this swap.  A lot of the recipes she blogs are things that usually end up on my Google Reader, anyway so this was a win.

I chose this particular recipe because it includes some of my favorite condiments - Hoisin sauce (the equivalent of barbecue sauce in the Asian world and famously used to accompany Peking Duck) and Sriracha (the ever popular Thai hot sauce with a rooster on the bottle).  If you don't have these sauces, don't fret.  They're easily found in the Asian section of your grocery store since they're staples of every good Asian kitchen :).

Overall I was pleased with the flavor that this gave to the chicken and the nice carmelized look that the skin had coming out of the oven.  But, even after I chose to add an overnight marination step, I desired a more intense flavor to the meat itself.  Don't get grossed out but I actually sucked on the chicken skin to savor the flavors more deeply lol.  In the future, I would probably just do boneless, skinless chicken breast (or better yet, kebabs on the grill!) to better suit my husband's and my tastes.  Maybe even serve some extra sauce on the side for dipping.  Yum!

Checkout the roundup at A Taste of Home Cooking to see what everyone else cooked up this week!

Oven Baked Sriracha Chicken


Oven Baked Sriracha Chicken

Ingredients
  • 1 bunch green onions, thinly sliced greens and minced whites
  • ¼ cup Hoisin sauce
  • 1 tablespoon fresh ginger, minced 
  • 2-3 garlic cloves, minced 
  • 2 tablespoons fresh lime juice
  • 1 tablespoon olive oil
  • 1/2 tsp sesame oil
  • 1 tablespoon Sriracha sauce 
  • 4 chicken thighs
  • 1 tablespoon toasted sesame seeds
Directions
  1. Preheat oven to 400 degrees. Spray a 13 x 9 baking dish with cooking spray and set aside. 
  2. In a large bowl, whisk together the minced whites of the green onions, Hoisin sauce, ginger, garlic, lime juice, oils, and the Sriracha. Toss each thigh in the sauce, coating thoroughly.  If desired, marinate in the mixture overnight.  Before baking, spoon the remaining sauce underneath the chicken skin.
  3. Bake for 40 to 45 minutes, turning halfway through baking. Serve topped with green onions and sesame seeds.
Source: Slightly modified from So Tasty, So Yummy

Wednesday, November 30, 2011

Guest Post: General Tso's Chicken

Today I've invited my friend Emily to guest post for me.  You'll probably recognize her drool worthy photography from some of my Dinner Club posts as well as our recent Apple Extravaganza from October.  I'm always envious of her skills both in the kitchen and behind the lens.  She's an amazing person and I'm so glad to have her as a friend.  Hopefully this won't be the last that you see of Emily on this blog ;).

If you'd like to guest post, please leave a comment!

 This officially marks my first food blog post. Ever. Seriously. I’ve taken hundreds of photos of food I’ve cooked…and baked….and grilled….and, sometimes, when I’m feeling rebellious, even fried. But, never once written a blog post. So, as you can imagine I was a bit reluctant to take Christine up on her offer for a guest post, but I’m not one to turn down trying new things. Especially those food-related.

The recipe I’m sharing with you all today is quite the standard: General Tso’s Chicken. I’m sure this one has been done a hundred thousand times over, across blogs, recipe sites and the like. Heck, I would argue that this dish has been over done. However, the reasons I wanted to post this are two-fold:

First, I’m generally anti-fry. I’m more or less a border-line health nut about 80% of the week (the other 20%? Well, that’s what weekends are for!), making this recipe fall squarely outside of my comfort zone. I confess, we own a Fry Daddy (I blame the husband!), but require it never be used inside. There are few things that will make my stomach turn, but waking up to a kitchen with the lingering odor of a McDonald’s only results in my being overcome by the urge to shower. Or exercise. A lot.

Good news! This recipe does NOT require a Fry Daddy. Seriously, nothing ever should. And, yet….
Second, I was quite frankly blown away by the end result. It was border-line restaurant comparable. I’m not kidding. Let’s just say the husband put this recipe in his Top 5, and mandated it have a regular appearance in “The Rotation.” On one condition: that I continue to keep his plate broccoli-free (you see what I have to deal with?). 

And now, for the main event….

General Tso’s Chicken
General Tso’s Chicken

Ingredients
FOR THE CHICKEN
  • 1-½ teaspoon Toasted Sesame Oil
  • 1 Tablespoon Soy Sauce
  • 1 whole Large Egg White
  • ¼ cups Plus 2 Tablespoons Cornstarch
  • 1 pound Boneless, Skinless Chicken Thighs
  • Canola, Peanut, Or Vegetable Oil For Frying
  • Flour to coat the chicken (1/2 - 1 cup, depending on desired coating)
FOR THE SAUCE:
  • 1 Tablespoon Peanut, Canola Or Vegetable Oil
  • 2 cloves Garlic, Peeled And Minced
  • 2 Tablespoons Finely Chopped Fresh Ginger Root
  • 1 cup Chicken Broth Or Stock
  •  ¼ cups Soy Sauce
  • 1 Tablespoon Cornstarch
  • 1 teaspoon Chinese Chile-garlic Sauce
  • 3 Tablespoons sugar. (The original recipe calls for Raw (turbinado Or Demerara) Sugar, but I’m not sure it matters either way)
FOR SERVING:
  •  4 whole Scallions, Thinly Sliced
  • Steamed Rice (we’re partial to sushi rice, but I’m sure this would taste phenomenal with sawdust, so it matters not!)
  • Steamed Broccoli
Preparation Instructions

  1. Prep your chicken: In a mixing bowl, stir together the sesame oil, soy sauce, egg white, and 1/4 cup plus 2 tablespoons of cornstarch until a thick slurry forms. It will look gummy but smooth. Add the chicken pieces and stir until all are evenly coated. At first it may appear that it will not come together but it does! Set chicken aside, covered lightly with plastic wrap, at room temperature for 20 minutes, stirring occasionally.
  2. Begin the sauce: Add the tablespoon of oil to a large, heavy-bottomed saucepan over high heat. Stir the garlic and ginger into the oil and cook, stirring constantly, until fragrant, about 1 minute. In a separate bowl, whisk together the remaining sauce ingredients until smooth. Pour into the garlic and ginger, stirring, until the sauce becomes thick and shiny. Once the sauce thickens, lower heat and keep the saucepan over a low burner partially covered to stay warm.
  3. To fry the chicken: Heat 1/2-inches of oil in a heavy-bottomed, high-sided frying pan or skillet over high heat. In the meantime, add the flour to your coated chicken, mixing everything together. When the oil is shimmering, add one piece of chicken at a time, taking care not to crowd the pan. Cook chicken for 4 minutes on each side, or until deep golden brown and crisp on both sides.
  4. Transfer the fried chicken to a paper towel lined plate and repeat the process until you’ve cooked all the chicken. Then slide all of the fried chicken into the prepared sauce and toss to coat. (If desired, add some steamed broccoli to coat with the sauce also.) Increase the heat to medium, stir and cook just until hot all the way through.
  5. Sprinkle with sliced scallions and serve immediately over white rice. Or brown rice. Or sushi rice. You get the idea.
Source: Adapted from Rebecca at on Tasty Kitchen (Original Recipe)