Showing posts with label bacon. Show all posts

Monday, June 3, 2013

Mascarpone Pasta with Chicken, Bacon, and Kale

I apologize for being absent lately.  May/June is always a crazy time for me between our anniversary (our 5th was this year!), my birthday, and general Summer craziness.  Add to the mix the impending arrival of our Baby Boy this year and my blogging is unpredictable to say the least.

What makes things extra interesting is that I'm still participating in a CSA share so that means fresh veggies are waiting for me to whip them into something delicious each week.  Spring is greens time and it's always a surprise as to just what kind will come in our box week to week.

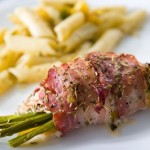
I had some leftover mascarpone cheese and so I tweaked a recipe that I found on All Recipes to include some of the gorgeous green kale that we received.  My husband isn't really a fun but when you add bacon, and chicken, and creamy cheesey pasta, he can't really complain.  Of course, if you don't have kale, you could always use spinach as in the original recipe.  This one reminded me somewhat of Macaroni Grill's Pasta Milano.

Two Years Ago: SweetFire Chicken (A Panda Express copycat and one of my husband's favorite) and Sweet Beginning's Summer Pasta Salad
Three Years Ago: Buckeyes
Four Years Ago: Quick and Easy Alfredo Sauce

Mascarpone Pasta with Chicken, Bacon, and Kale

Mascarpone Pasta with Chicken, Bacon, and Kale

Ingredients
  • 3 slices bacon 
  • 1 tablespoon olive oil 
  • 1/2 cup minced onion 
  • 1-1/2 pounds skinless, boneless chicken breast halves, cubed 
  • 1/4 teaspoon garlic powder 
  • Salt and ground black pepper to taste 
  • 2 tablespoons drained and chopped sun-dried tomatoes packed in oil 
  • 1 tablespoon prepared pesto sauce 
  • 1/4 pound fresh kale (or you can also use spinach)
  • 4 ounces mascarpone cheese 
  • 1 clove garlic, minced 
  • 1-1/2 teaspoons Dijon mustard, or more to taste 
  • 1/2 lemon, juiced 
  • 1/4 cup milk 
  • 1/4 cup grated Parmesan cheese plus additional for topping if desired 
  • 8 ounces shaped pasta such as penne, rigatoni, or farfalle. 
Directions

  1. Bring a large pot of lightly salted water to a boil. Cook pasta according to package directions to al dente.  Drain and set aside.
  2. In a large skillet over medium-high heat, cook bacon, turning occasionally, until evenly browned, about 10 minutes. Alternatively, follow the directions on the package for microwave cooking.  Drain the bacon on paper towels and crumble when cooled.
  3. In the same skillet, heat olive oil over medium heat.  Add crumbled bacon and onion and cook until the onion is translucent, about 5 minutes. Add chicken and season with garlic powder, salt, and black pepper. Cook and stir until chicken is no longer pink inside and lightly browned outside, about 10 minutes. Add sun-dried tomatoes and pesto; stir in kale and cook until wilted, stirring constantly. 
  4. In a saucepan over medium heat, mix together mascarpone cheese, 2 cloves of garlic, Dijon mustard, lemon juice, and milk. Cook until smooth and bubbling, stirring constantly, about 5 minutes; stir in 1/2 cup Parmesan cheese until cheese has melted, 2 to 3 more minutes. Pour sauce over chicken and bacon mixture. Season with additional salt and/or pepper if needed.
  5. Gently fold pasta into chicken mixture and transfer to a serving bowl. Sprinkle with additional Parmesan cheese if desired.

Source: Slightly modified from All Recipes

Monday, October 22, 2012

SRC: Gruyere and Bacon Stuffed French Toast

Breakfast continues to be the theme here on my blog today.  On Friday I shared a recipe for Cinnamon Sugar Baked Pumpkin Doughnuts.  Today, I'm sharing something with everyone's favorite breakfast meat treat...bacon!!!

But this isn't your run-of-the-mill side of bacon.  This bacon is coupled with smooth, melty Gruyere cheese.  And then they're both stuffed inside of thick french toast and topped with sweet sweet maple syrup.  Mmm.  Anyone else a sucker for the sweet and savory combination?  I'd never think to make a savory French toast but it worked and was AMAZING.  Seriously one of the best things I've eaten in a long time and was so simple!  I was in a rush that morning so I used pre-cooked bacon to speed things along.  Would have loved to have the bacon crispier as I bet the contrast of texture would only add more to this already delightful experience.


This wonderful creation comes from Lisa's blog, Authentic Suburban Gourmet.  She is so talented and I'm jealous that she lives in my favorite US city, San Francisco.  I envy her food photography and I went a little bookmark crazy when trying to decide what to make for this month's Secret Recipe Club because everything looked SO GOOD.  

To name a few other contenders:
As usual a special thank you to April of the blog Angel's Homestead, SRC ring leader and Debbi of the blog Debbi Does Dinner, our Group C Hostess!

One Year Ago: Apple Pie Cookies

Gruyere and Bacon Stuffed French Toast

Gruyere and Bacon Stuffed French Toast

Yields: 4 slices stuffed French toast

Ingredients
  • 4 slices good sourdough bread (cut about 1 1/4 inch thick)
  • 8 slices bacon, cooked until crispy and then crumbled
  • 1 cup Gruyere Cheese, grated
  • Cinnamon
  • 2 Tbsp butter
  • 2 eggs
  • 1 cup half & half (or whole or 2% milk)
  • 1 tsp Vanilla extract
  • Maple syrup
Directions
  1. Use a sharp knife to cut into the bottom of each slice of sourdough.  Slice to almost the end of the top and sides to create a pocket to stuff each slice.
  2. Once the bacon has cooled, combine it with the Gruyere cheese in a bowl.  Divide evenly among the four slices of bread and gently stuff each one.  Gently press each stuffed bread piece together to prevent the inside ingredients from escaping.
  3. Add the eggs, half & half, and vanilla together and whisk until gently combined.
  4. Use a large griddle to cook all of the French toast at the same time.  Heat griddle on medium and spread butter evenly across the surface.  
  5. Meanwhile, dip each stuffed bread into the egg mixture and place on the heated griddle.  Sprinkle with cinnamon.  Let cook over medium heat for about 5 minutes per side.  If necessary, reduce heat to prevent burning.
  6. Serve hot with your favorite maple syrup.  Take a bite, close your eyes and be amazed by all the contrasting flavors and textures!

Wednesday, August 29, 2012

Loaded Baked Potato Salad

This week I wanted to feature recipes that remind me of Summer.  The Tomato and Corn Pie that I shared on Monday definitely did that.  This one is one that reminds me of picnics and Summer BBQs and hence it was my contribution for our BBQ Themed Dinner Club.

It has all the flavors of loaded baked potatoes but is lightened up a bit by my substitution of Greek yogurt for the sour cream.  Nobody could tell I did this and upon being told it was "healthier", some went for seconds.  I like the way it looks, too.  All those delicious bits of bacon, cheese, and green onions really gives this potato salad a pop of color compared to their rather anemic looking white or yellow run-of-the-mill potato salad.

Make this for Labor Day as Summer brings on its last hurrah!

One Year Ago: Grilled Maple Chili Salmon

Loaded Baked Potato Salad


Loaded Baked Potato Salad
Photo Credit: Emily H.
Yields: 4-6 Servings

Ingredients
  • 1.5 pounds red potatoes (or 4 large Russet or Yukon Gold potatoes)
  • 1/4 cup ranch dressing
  • 1/2 cup plain Greek yogurt
  • 1/2 cup shredded cheddar cheese
  • 1/4 cup freshly chopped chives or green onions, divided
  • 6 strips of bacon (4 for the salad and 1 for topping), cooked and crumbled
  • 1 tsp black pepper
  • Salt, to taste
  • Hot sauce, to taste
Directions
  1. In a small bowl, mix together the ranch dressing and Greek yogurt.  Add half of the chives, cheese, and pepper, stirring until well combined.  Season with salt and hot sauce, to taste.  Let chill in the refrigerator.
  2. Meanwhile, peel and cube potatoes into bite size pieces.  Put in a large pot, cover with water, and boil until fork tender, about 15-20 minutes.  Drain and set aside to steam dry and cool.
  3. Put potatoes in a large bowl or dish and combine with dressing and yogurt mixture.  Top with remaining chives and crumbled bacon.  Chill before serving.
Source: Modified from Dishing with Leslie

Wednesday, August 8, 2012

BLT Corn Salad Wrap

And so continues Emily and my Summer Seasonal Fruit and Veggies Extravaganza.  We followed our refreshing Watermelon Slush mocktails with another refreshing, barely cooked dish.  

Emily and I must have been on the same wavelength because this recipe was on both of our radars.  I like how we often think alike when it comes to food  :).  Summer tomatoes and corn are no brainers to include in this theme and having the boys give the corn some charred flavor on the grill keeps things cool in the kitchen.  Add avocado and bacon then serve it in a lettuce leaf and you have yourself a deliciously fresh finger food!

On Thursday you get a bonus post for the week- another product review+giveaway!  Then, on Friday you get the main course from Emily and my Summer Seasonal Fruit and Veggie Extravaganza before we finish off with two desserts next week.

Can't get enough lettuce wraps?  Try this Chorizo and Sweet Potato Lettuce Wrap or Asian Lettuce Wrap!


BLT Corn Salad Wrap

BLT Corn Salad Wrap
Photo Credit: Emily H.

Yields: 5 cups of corn mixture

Ingredients
  • 3 ears of corn, shucked of their husks and silk
  • 1 cup cherry tomatoes, sliced in half
  • 1/2 cup chopped green onions
  • 1 avocado, diced
  • 3 sliced crisp cooked bacon, diced
  • juice of 1 lime
  • about 1 tablespoon olive oil
  • salt and pepper to taste
  • a good sprinkling of chili powder and smokey paprika
  • butter lettuce or iceberg lettuce leaves
  • hot sauce and sour cream for topping
Directions
  1. Over a gas burner or grill, char raw shucked corn.  Rotate corn until cob is charred on all sides.  Allow corn to cool before slicing corn kernels from the cob.
  2. Add corn kernels to a medium bowl.  Add sliced cherry tomatoes, green onion, diced avocado, and diced bacon.  Squeeze in lime juice.  Add olive oil, salt, pepper, and slices.  Stir to combine.  Taste and adjust seasoning as needed.
  3. Rinse and clean individual lettuce leaves.  Serve alongside a bowl of corn salad.  To serve, scoop corn salad into lettuce leaves, top with hot sauce, sour cream, fold up like a taco and enjoy!
Source: Joy the Baker

Photobucket
This recipe was a Tasty Treasure at Fantastical Sharing of Recipes!

Thursday, July 19, 2012

Cold Avocado Soup with Sweet Corn and Bacon

I don't know about you but for us in Ohio, it's been hot hot HOT outside.  Generally this summer it's been over 90 degrees most days.


When I saw this recipe, I kept going back and forth on whether or not to make it.  I love avocados but have never made a cold soup before and knew my husband would reject it because well...it's green.  But, I went with it and am so glad that I did.  This soup is plain addicting.  I loved the creamy texture and light avocado flavor.  The corn and bacon topping just brings it to a whole new level.  I mean really.  How can you go wrong with bacon?  Don't skip the topping because it gives the soup life but I personally enjoyed it more when that too was chilled vs. warm.  This soup was so refreshing to eat after a hot day and stayed good in the fridge for a few days afterward making a wonderful post-workout meal.


This post was bumped up by request of Whitney and I hope you all enjoy it!  If there are recipes you'd wish to see on my blog or want to help me prioritize what's posted next, come join the discussion on my facebook fan page.


Cold Avocado Soup with Sweet Corn and Bacon


Ingredients
For the Soup:
  • 2 ripe Haas avocados
  • 1 cup vegetable broth
  • 1 tablespoon lime juice
  • 2 tablespoons sour cream, creme fraiche, Greek yogurt, or milk (optional if you’re vegan)
  • 3/4 teaspoon salt
  • Dash of cayenne pepper
  • Pepper, to taste
  • 1 1/4 to 1 1/2 cups water
For the Topping:
  • 1 tablespoon olive oil
  • 1 small yellow onion, diced
  • 2 ears fresh corn, sliced from the cob
  • 1/2 jalapeno pepper, de-seeded and diced
  • 4 slices cooked bacon, chopped (optional if you’re vegan)
  • small handful fresh parsley leaves, chopped
  • salt and pepper to taste
Directions
  1. To make the soup, place avocado flesh in a blender along with vegetable broth, lime juice, sour cream (if using), cayenne, and salt.  Blend until the avocados are creamy.  Remove the center from your blender lid, and while blending, slowly add the water.  Soup will be done when smooth, with your desired consistency.  Feel free to add a touch more water if you prefer a thinner soup.  Taste and add salt and pepper as necessary.  Place in a container in the fridge while you make the topping.
  2. To make the topping, heat olive oil in a skillet over medium heat.  Add onion and cook until translucent and browned, about 5 minutes.  Add corn and jalapeno and cook for 3 minutes more.  Add sliced bacon and parsley.  Cook until everything is warmed and just browned.  Add salt and pepper to taste.  If desired, chill the topping before serving.
  3. Pile about 1/2 cup of warm topping into a bowl.  Pour cold soup around the topping.  Serve and enjoy.  Soup lasts up to three days in and airtight container in the fridge. 
Source: Joy the Baker

Wednesday, June 27, 2012

Summer Corn Fettuccine

Apparently this is one of those recipes that you either love or hate.  Chris found it to be very strange and I'll admit that at first, I wasn't really a fan either.  But, by the time I was reaching the end of my plate, I found myself yearning for more and wanting to lick the plate.

The contrast between the sweet corn and the salty bacon with accents of parmesan and fresh basil kind of blows your mind once you temper it into accept something other than the expected pasta sauces.  This must be why this particular recipe took the blogging world by storm and fueled a great debate.

Love it or not?  Leave your comments below!


One Year Ago: Herbed Potato Salad (Look ma!  No mayo so perfect for your 4th of July/Summer BBQ!)


Summer Corn Fettucine


Ingredients
  • 1 pound fettuccine
  • 6 slices bacon, chopped
  • 6 ears corn on the cob, shucked
  • 1 onion, finely chopped
  • 12-oz mushrooms, sliced 
  • Freshly ground black pepper
  • 1 cup half-and-half
  • 1/2 cup chicken stock
  • 2 tablespoons fresh thyme leaves, chopped
  • A few dashes of hot sauce
  • 1 cup grated parmesan cheese, divided
  • 1/2 cup sweet basil leaves, cut in a chiffonade
Directions
  1. Cook pasta according to package directions. Drain and set aside. 
  2. Meanwhile, heat a large skillet over medium-high heat. Add the bacon and cook for a few minutes until rendered and crisp. 
  3. Put a small bowl inverted into a large bowl, steady the corn cobs on the smaller bowl and cut the kernels off the ears. Add three-quarters of the scraped corn and any corn liquid to the pan with the bacon. Add the onions and mushrooms and liberally season with salt and pepper to taste. Cook until the vegetables are tender, 5 to 6 minutes.
  4. dd the remaining corn and half-and-half to a food processor or blender and puree until smooth. Pour the stock into the corn and vegetables and simmer over low heat for a minute to reduce. Stir in the thyme and corn-cream mixture and cook for 3 to 4 minutes, stirring frequently, to thicken. Add the hot sauce and season with salt and pepper to taste.
  5. Add the pasta to the sauce just before serving and toss with Parmesan cheese. Top with basil and serve.
Source: Originally from Cassie Craves and Evil Chef Mom as seen on and adapted by A Taste of Home Cooking

Wednesday, May 25, 2011

Recipe Swap Rewind: Roasted Sweet Potato Coins with Pancetta and Chives

I think I've figured out why May is like a recipe desert (yes, desert, not dessert...which has 2 s because you always want seconds of those!) around here.  May historically is a time of madness in my household:
  • For the past few years we've gone to Europe for 2 weeks in May
  • My Sister and Father-in-Law's birthdays are in May
  • Our Anniversary is in May (today is our 3rd Anniversary, actually!)
  • We "adopted" our dog Toby in May, AND 
  • My birthday is at the beginning of June so the preparation is in...you guessed it, MAY.
It's no wonder that I've kept with previous years' trends and sort of dropped off the face of the Earth and not blogged much.  

I'm still trying to keep up with the recipe swaps and my last one was another from Jey of Cooking.  With the theme being Vegetarian I knew it'd be a gamble but I went for it anyway.  She sent me her Pineapple Fried Quinoa with Honey Ginger Soy Marinated Tofu.  I felt horrible because when I read the ingredients, I knew there was no way in heck that my husband would eat it as written and I had already skipped a recipe from her blog last time due to lack of time to cook..  He doesn't eat tofu (or "estrogen cakes" as he calls them), eggs (that look/small like eggs), and would have no idea what quinoa is.  I thought about modifying it to meet our needs but then it would in no way resemble her original recipe.  So, I simply just did not participate this round.  If that recipe sounds like your thing, feel free to try it thought and let me know what you thought!

To help my conscience feel better, today, I'd do a recipe rewind for you.  Since I missed making Jey's Sweet Potato Coins with Pancetta and Chives before vacation in April, I got the opportunity to do so when we got home and am sharing it now.  They were really delicious but honestly, I would have preferred to skip the sour cream (which, I did on some in order to make them Chris-consumable...are you noticing a trend here?).  Of course, then I'm not sure that the other delicious toppings would really stay on...minor detail.  The real star was the roasted sweet potatoes anyway.  I loved the way they tasted and should roast them more often!

One Year Ago: Buckeyes
Two Years Ago: Garlic Cheddar Chicken

Sweet Potato Coins with Pancetta and Chives
Printer-Friendly Version

 
Ingredients
  • 2 Sweet Potatoes
  • 6 Clementines, juiced (or other citrus juice equivalent to about 1 cup)
  • 2 Tbsp. Brown Sugar
  • 2 Slices Pancetta (I used bacon)
  • 1/2 to 3/4 Cup Sour Cream
  • 4-5 Chives, snipped (I used green onions)
Directions
  1. Preheat oven to 350 F.
  2. Cut sweet potatoes into thick rounds.  Toss with clementine juice and brown sugar. Transfer potato coins to a parchment lined baking sheet.  Bake for one hour, flipping once halfway through.
  3. Meanwhile, cook the pancetta over medium low heat until cooked.  Crumble and set aside.
  4. Remove potatoes from oven and let cool 5 minutes.  Transfer to a serving platter.
  5. Put sour cream into a piping bag with a decorative tip (or a plastic baggie with a corner snipped.)  Pipe onto coins and top with pancetta and chives.
Source: Jey of Cooking

Wednesday, March 16, 2011

Handheld Breakfast Two Ways

And the award for Worst Blogger Award goes to...me.

Has it really been a month since I updated?  Shoot.  There goes my New Year's Resolution to try to update more frequently.  Somehow anytime I get a break in life (in this case going to New York City for a week long business trip) and/or begin intensely planning a vacation (c'mon, I'm going to Europe next month...don't tell me blogging would be at the top of your mind!) my blogging just goes by the wayside.  Don't get me wrong, I've still been cooking when I'm around...just not sharing the results with the world.  I've noticed that my web traffic and viewership have suffered as a result.  Drat!  How do the hard core bloggers do this so consistently?  Please share your tips!

So, as an apology, I am giving you a recipe two-for-one!  Honestly, it kind of works out in my favor because these two recipes were photographed together :D.  Remember that Quiche Lorraine that I made as part of my 23 Things in 2011 List?  These little handheld treats were also part of that same New Years Family Brunch.

The French Toast Cups with Sausage and Apples was definitely generally preferred over the Savory Muffins.  I mean what's not to love about sweet and salty combined into a single hand-held treat?  And for the cook, it's easy to increase the number of servings because the incremental work is minimal.  If I were to make that one again, though, I think I'd reduce the amount of butter in the apple and sausage mixture.  And, I found it made wayyyy more filling than was needed to fill my French toast cups so maybe reduce that by about half.  These changes are reflected below by simply doubling the french toast amounts and keeping the filling the same.  I also envision this as being a great concept for French Toast stuffed with more traditional cream cheese and fruit filling.  Yummo!

Our beagle Toby I think preferred the Muffins, though.  Of course, he kind of didn't have a choice.  One just kind of fell off of the cupcake tree (look, another purpose for those things!  Oh and thanks Mandy for buying this from my Secret Santa list!) when Mom was getting her serving.  Toby grabbed it in his mouth as soon as it hit the floor.  Thankfully he's good about giving up food when I tell him to so no damage done.

Do you like handheld breakfast treats?  These Bacon Egg and Toast Cups are sure to rock your world!

One Year Ago: Grasshopper Cookie Bars (perfectly green for St. Patty's Day!) and Peanut Butter Oatmeal Chocolate Chip Cookies (a trifecta of cookie classic goodness!)


French Toast Cups with Sausage and Apples
Yields: 12 Servings


Ingredients
For the French Toast Cups:
  • 12 slices of whole wheat bread
  • 6 eggs
  • 2 Tbs brown sugar
  • 1 tsp cinnamon
  • pinch nutmeg
For the Apple and Sausage Filling:
  • 1 cup diced apples
  • 1 cup (8 oz) breakfast sausage
  • 1/2 cup butter
  • 3 Tbs brown sugar
  • 1 tsp cinnamon
  • pinch nutmeg
  • 1/2 tsp vanilla extract
Directions
  1. Preheat oven to 400 degrees and butter a muffin pan. 
  2. Using a cookie cutter or wide rimmed glass, cut circles out of bread slices about 3 inches in diameter.  Whisk eggs and spices together.  Dredge bread circles in egg mixture and remove any excess egg
  3. Press bread circles into the muffin pan, bake in the oven for 12 - 15 minutes, until brown
  4. While bread is in the oven prepare breakfast sausage.  In another hot skillet melt butter, stir in brown sugar, cinnamon, nutmeg and vanilla.  Add apples to brown sugar mixture and cook until apples begin to soften and sugar mixture caramelizes.   Combine sausage and dripping with apples, stir.
  5. When french toast cups are done, allow to cool for a few mintues, remove from pan using a knife to separate from the pan.  Fill french toast cups with apple and sausage mixture, drizzle with maple syrup and serve.
Source: The Noshery 

Savory Breakfast Muffins
Printer-Friendly Version
Yields: 12 Muffins

Ingredients
  • 2 cups whole-wheat flour
  • 1 cup all-purpose flour
  • 1 tablespoon baking powder
  • 1/2 teaspoon baking soda
  • 1/2 teaspoon freshly ground pepper
  • 1/4 teaspoon salt
  • 2 eggs
  • 1 1/3 cups buttermilk
  • 3 tablespoons extra-virgin olive oil
  • 2 tablespoons butter, melted
  • 1 cup thinly sliced scallions, (about 1 bunch)
  • 3/4 cup diced Canadian bacon, (3 ounces)
  • 1/2 cup grated Cheddar cheese
  • 1/2 cup finely diced red bell pepper
Directions
  1. Preheat oven to 400°F. Coat 12 muffin cups with cooking spray.
  2. Combine whole-wheat flour, all-purpose flour, baking powder, baking soda, pepper and salt in a large bowl.
  3. Whisk eggs, buttermilk, oil and butter in a medium bowl. Fold in scallions, bacon, cheese and bell pepper. Make a well in the center of the dry ingredients. Add the wet ingredients and mix with a rubber spatula until just moistened. Scoop the batter into the prepared pan (the cups will be very full).
  4. Bake the muffins until the tops are golden brown, 20 to 22 minutes. Let cool in the pan for 5 minutes. Loosen the edges and turn the muffins out onto a wire rack to cool slightly before serving.
Make Ahead Tip:  Individually wrap in plastic and refrigerate for up to 3 days or freeze for up to 1 month. To reheat, remove plastic, wrap in a paper towel and microwave on High for 30 to 60 seconds.

Nutritional Information: (per muffin) 217 calories; 9 g fat ( 3 g sat , 4 g mono ); 50 mg cholesterol; 24 g carbohydrates; 9 g protein; 3 g fiber; 339 mg sodium; 113 mg potassium; Vitamin C (25% daily value), Fiber (13% dv).
  
Source: Eating Well, April/May 2005

Monday, April 5, 2010

Bacon Egg and Toast Cups

In my mind, this recipe was the surprise favorite from my personal menu contributions for our Breakfast Themed Dinner Club.  Funny how that works since this one had such simple ingredients and was the easiest to make in bulk!  Or, maybe it's because this was a blog recipe (vs. All Recipes) and I generally have better luck with those.  You can bake up to 2 muffin tins (24 bacon egg and toast cups) at the same time so it's a great recipe to serve for to a crowd.  They're great snacking and finger foods which are generally popular in our dinner club crowd.  And, they can be saved and re-heated in the oven or toaster oven for later.  These made an awesome lazy breakfast the morning following our gorge fest.  Yum!

I'll say that I've always been slightly afraid of eating my eggs any way except for scrambled, hard boiled, or in an omelette because there's something about liquidy egg yolks that just gross me out...that and a fear of contracting samonella.  The eggs in this recipe when cooked as directed are still runny but you can cook them longer (watchout, this could result in a rubbery egg white though).  Since I did make this recipe, I gave the recipe a try...runny yolks and all.  I'm happy to report that I did not get sick and I actually enjoyed it!  This recipe has converted me..at least in this application.  I'm still not a sunny-side up girl and will stick to my fully cooked yolks, if at all, for other egg applications!

I can also see this recipe with a variet of twists - added ham bits, peppers, onions, mushrooms, different types of cheese and/or bread.  The possibilities are endless!

The Noshery, the blog from which I found this recipe, also has a version that is french toast cups stuffed with sausage and apples that I'd like to try sometime.  I think I'd have more luck with Chris eating that one over this one which is clearly eggy.  Of course, with all the other stuff I was making for this round of dinner club, that recipe will have to wait for me to make it another time!

My personal contributions for this dinner club consisted of:
Check out our Dinner Club blog for some additional yummies from my friends!

Bacon Egg and Toast Cups
Printer-Friendly Version


Yields: 6 cups (can easily be doubled, tripled, or even quadrupled for a crowd!)

Ingredients
  • 6 slices of bread (I used wheat)
  • 6 slices of bacon
  • 6 eggs
  • 1/2 cup of shredded cheese
  • salt and pepper, to taste
Directions
  1. Preheat oven to 400 degrees. Spray muffin pan with butter non-stick spray.
  2. Using a cookie cutter or a wide-mouthed glass, cut circles out of bread slices about 3 inches in diameter.  Take bread circles and press them into the muffin pan, set aside.
  3. Heat a large skillet on medium-high. Cook bacon on the skillet until partially cooked but still pliable, about 3 minutes. 
  4. Shape bacon strips into the toast cups, fill with 1 Tablespoon of shredded cheese. Place in the oven for 5 minutes, allowing the bacon to toast just a little more. Remove from oven.
  5. Crack an egg and drop a whole egg into the cup, sprinkle with salt and pepper to taste. Repeat for remaining cups. Place back in the oven and cook until white begins to set, about another 8 – 10 minutes. The yolk should be creamy. If a more fully cooked yolk is desired, continue cooking until desired done-ness is achieved.
  6. Remove from oven when done and pop out using a spoon, serve warm.
Source: The Noshery

Sunday, March 7, 2010

Ragu a la Bolognese

This was good again for a change of pace but I still prefer the Marinara Magnifica recipe and just adding some browned beef or sausage for when I want a meat sauce.  That sauce recipe I think is just going to be very hard to top!  I did get a pretty good photo of this sauce this time.  I think the fresh basil leaves gave it that real gourmet look and contrasted beautifully with the redness of the sauce :).

To be honest, I didn't even realize that Bolognese sauce isn't even meant to be a tomato based sauce!  Guess it's been way Americanized from its original intent.  I couldn't tell you how authentic this recipe is because I guess I've never had a true Bolognese sauce until this, perhaps.  As far as I can tell from doing some research on Google, it seems to be authentic as very little tomato is actually used in the recipe, it uses the multiple in-between cook times which are needed to help build the complex flavors, and milk is used to tenderize the meat.

The original recipe says to let the sauce simmer for 2 hours in an oven heated to 350 degrees but since I wasn't sure that I had a large enough oven-proof vessel to handle this, I did my simmering on the stove and am showing my modified cooking method below.  Speaking of, I really should invest in a dutch oven given all the cooking I do.  What brand do you recommend?  You can click on the source link to see the original method if you'd like to try that.

Like almost every Italian sauce that I've ever made, this recipe makes a lot (I'd estimate that it makes a good 4-5 meals for 2 people as a sauce over noodles).  But, given the long simmering time, you might as well just make a big pot and let it go then freeze the leftovers in small portions for the future. 

I don't think it'll be going into my personal rotation because I prefer more tomato flavor.  If anything it almost reminded Chris and me of Cincinnati-Style Chili!  I think it might be because it consisted of a beef sauce simmered for a long time and maybe the nutmeg in the sauce that made it a little similar.  Either that or it's because I love that chili so much my mind was being tricked into thinking it was eating it.  Strange, huh?

Ragu a la Bolognese
Printer-Friendly Version


Ingredients
  • 1 pound ground beef
  • 1 pound mixed ground pork/beef (Used mild italian sausage)
  • 7 oz bacon or pancetta, sliced (Used turkey bacon)
  • 1 large onion, diced
  • 2 celery stalks, sliced
  • 1 medium carrot, diced
  • 2 garlic cloves, minced
  • 2 14 oz cans diced tomatoes
  • 2 1/2 tbsp tomato paste
  • 2 cups milk
  • 1 tsp salt
  • 1/4 tsp ground nutmeg
  • 1/4 tsp pepper
  • 3 1/2 cups beef broth*
  • 2 1/2 tbsp fresh basil, chopped
  • pinch of dried basil
  • 1 bay leaf
  • 2 tbsp butter
  • 2 tbsp olive oil
*Note: A dry red wine can be substituted for the beef broth.  I ended up using 2 cups (1 can) broth and then 1 1/2 cups of red Shiraz wine.

Directions 
  1. In a large stockpot or dutch oven over medium-high heat, melt butter and oil.  Add the bacon and cook for 4 minutes.  Add the vegetables and garlic then cook an additional 5 minutes.  Crumble the ground meat into the pot and cook for 8-10 minutes, until browned.
  2. Pour in milk and nutmeg.  Bring mixture to a boil then reduce heat and simmer uncovered for 10 minutes.  Stir in tomato paste and simmer for an additional 10 minutes.
  3. Add the diced tomatoes, broth (and/or wine), fresh and dry basil, bay leaves, pepper, and salt.  Bring the sauce back to a boil and then reduce heat and simmer for 2 hours, stirring occasionally.
  4. After sauce as rested for a little while, skim the grease off the top of the sauce.  Adjust seasonings as needed and serve over hot pasta. 
  5. If desired, divide leftover portions into containers and freeze.  To re-used, put frozen sauce container in fridge the evening before you plan on serving it.  This will allow it time to thaw before you re-heat it on the stove or in the microwave.
Source: Delicious Magazine, June 2009 as seen on Kayotic Kitchen

Thursday, March 4, 2010

Jalapeno Cornbread Whoopie Pies

Mmm this was the perfect accompaniment to my mother in law, Mary Lynn's, Chili.  Once I saw this recipe, I knew it was a match made in heaven.  Chris ate the bread plain because he won't touch cream cheese with a 10 foot pole and I made the filling with all neufchatel cheese (reduced fat cream cheese) instead of a blend because I didn't want to spend the extra money on goat cheese.  I bet it would have been even more awesome with the goat cheese...

Anyway, I've experimented quite a bit now in the sweet-type whoopie pies so this was a nice change from the ordinary.  Since it was just the two of us, I halved the recipe and it was just enough for 2 meals of chili and jalapeno cornbread whoopie pie accompaniments.  For simplicity, I used about 2 Tablespoons of canned diced jalapeno peppers.  In the future, I'd add more peppers or a splash of Tabasco for more kick.  You know I like it spicy!

Rather go with the traditional sweet whoopie pies?  Try one of these - one for every season!:
Or, try this regular Buttermilk Cornbread recipe if you want a no-frills cornbread.

Jalapeno Cornbread Whoopie Pies
Printer-Friendly Version


Yields: 10-12 assembled pies

Ingredients

For the Cornbread

  • 1 1/4 cups all-purpose flour
  • 1 cup cornmeal
  • 1/4 cup packed brown sugar
  • 2 teaspoons baking powder
  • 1 teaspoon salt
  • 1 cup buttermilk, at room temperature
  • 4 tablespoons unsalted butter , at room temperature (used 2 Tbsp salted, 2 Tbsp unsalted)
  • 1 large egg, at room temperature
  • 2 jalapeño chiles, seeded and finely chopped (used about 2 Tbsp canned diced jalapenos)
For the Cheese Filling

  • 6 slices bacon
  • 4 ounces soft fresh goat cheese, at room temperature (omitted)
  • 4 ounces cream cheese, at room temperature (used neufchatel cheese and doubled it to accomodate lack of goat cheese)
  • 2 tablespoons milk
  • 1 tablespoon chopped fresh scallions
Directions

To Make the Jalepeno Cornbread
  1. Position a rack in the center of the oven and preheat the oven to 375 degrees. Line two baking sheets with parchment paper.
  2. In a medium bowl, stir together the flour, cornmeal, brown sugar , baking powder, and salt. In the work bowl of a stand mixer fitted with the paddle attachment, beat together the buttermilk, butter, and egg on low speed until just combined. Increase the speed to medium and beat until thoroughly combined, about 3 minutes. Add the flour mixture and the chopped jalapeno to the batter and beat on low until just combined.
  3. Using a spoon, drop about 2 tablespoons of batter onto one of the prepared baking sheets and repeat, spacing them at least 2 inches apart. Bake one sheet at a time for about 12 minutes each or until the cornbread begin to brown around the edges. While the cornbread is cooking, prepare the cheese filling using the instructions below.  After the cornbread is cooked, remove from the oven and let the them cool in the pan for about 5 minutes before transferring them to a rack to cool completely.
To Make the Cheese Filling
  1. While the cornbread is baking, in a medium skillet, cook the bacon over medium heat until crisp. Using a slotted spoon, transfer to a paper-towel-lined plate to drain and cool. When cool, crumble into small pieces.
  2. In the work bowl of a stand mixer fitted with the paddle attachment, beat together goat cheese (if using), cream cheese and milk on low speed until just combined. Increase the speed to medium and beat until smooth and creamy, about 3 minutes. Add the crumbled bacon and the scallions and beat on low until combined.
To assemble
  1. Spread filling onto the flat side of one cake using a knife or spoon. Top it with another cake, flat-side down. Repeat with the rest of the cakes and filling. You can also use a pastry bag with a round tip to pipe the filling onto the cakes, which will give you a smoother, neater presentation.
Source: Modified from the Star Telegram newspaper, as modified and seen on Sing for Your Supper

Friday, January 15, 2010

Mmmm...BACON!!!

This isn't one recipe but OVER ONE HUNDRED recipes on how to use bacon in all things savory or sweet.  I saw this shared on my brother's friend's facebook and had to cross-share it with my Dinner Club friends.  We do a different theme every month and we often joke that one day, we should have a bacon themed dinner.  I'm pretty sure this blogpost is driving us one step closer to that...

Here's a little photo teaser...


Check out all the delicious recipes and photos for 100 Ways to Use a Strip of Bacon at the Endless Simmer.  Just try not to drool on your keyboard, okay?

PS: Taking requests on something to make with bacon.  Leave a comment!

Friday, November 27, 2009

Sweet Bacon Wrapped Pork Loin

Sorry, a little behind on posting recipes this past week with all the Holiday preparations ahead.  I  had bought a nice pork loin on sale at Kroger this week and had some bacon leftover from when I made the Loaded Baked Potato Soup so this is what my search yielded.  I thought it was really tasty but was annoyed that it took wayyy longer than anticipated to cook.  I used a 1lb roast and in theory it should have been ready in like 20-30 mins but it took at least a good hour.  I kept all of the sauce ingredients the same ratio as the original recipe despite my smaller cut of meat and marinated it overnight instead of just pouring the sauce over the meat before cooking.  Anyway, yummy goodness  either way.

Sweet Bacon Wrapped Pork Loin
Printer-Friendly Version


Prep Time: 20 Min
Cook Time: 60 Min
Ready In: 1 Hr 20 Min
Yields: 8 Servings

Ingredients
  • 1 (3 pound) boneless pork loin
  • salt and pepper to taste
  • 8 slices bacon
  • 2 tablespoons honey
  • 2 tablespoons balsamic vinegar
  • 2 tablespoons dry red wine
  • 1 sweet onion, minced (used a generous sprinkle dried)
  • 1 tablespoon chopped fresh rosemary (used 1/3 Tablespoon dried)
  • 2 tablespoons golden raisins (omitted)
Directions
  1. Combine honey, balsamic vinegar, wine, onion, rosemary, salt, and pepper.  Add pork loin and marinate overnight.
  2. Preheat oven to 375 degrees F (190 degrees C). Line a shallow roasting pan with aluminum foil.
  3. Remove pork loin from marindade and wrap the bacon slices around the pork loin and secure with toothpicks.
  4. Preheat a large skillet over medium-high heat, then add the pork loin. Cook until golden brown on all sides, about 10 minutes, then place onto roasting pan. Pour sauce over pork loin.
  5. Roast the pork loin in preheated oven for 15 minutes, then sprinkle with raisins. Continue cooking until the internal temperature of the pork loin reaches 160 degrees F (70 degrees C), about 40 minutes more (20-30 minutes per pound). Remove from the oven, and allow to rest for 5 minutes before removing toothpicks and slicing.
Source: modified from All Recipes

Sunday, November 22, 2009

Loaded Baked Potato Soup

I was torn on what soup to make next so I posed a poll on a local message board that I frequent.  For awhile, Zuppa Toscana was winning but in the end, Loaded Potato Soup edged out for the win.  I'm glad it did because this was fabulous.  Definitely worth keeping in the soup files :).  It made for a quick lunch (I'm pretty sure peeling the potatoes was what took the longest!  I'm a slow peeler!) and some leftovers for the week.  Mmm mmm good...and  much better than Campbell's hehe!

Loaded Baked Potato Soup
Printer-Friendly Version


Prep Time: 10 mins
Cook Time: 20 mins
Ready In: 30 mins
Yields: 4 Servings

Ingredients

  • 5 bacon strips, diced
  • 1 small onion, chopped
  • 2 cloves garlic, minced
  • 4 tablespoons all-purpose flour
  • 1 teaspoon dried basil
  • 1/2 teaspoon pepper
  • 4 cups (2 cans) chicken broth
  • 2-3 large baked potatoes, peeled and cubed
  • 1 cup half-and-half cream (used 1 cup evaporated 2% milk; regular milk would also work)
  • 1/2 teaspoon hot sauce
  • 1 cup shredded cheddar cheese
  • Salt, to taste
  • Green onions or chives, sliced
  • Sour cream (optional)
Directions

  1. In a large saucepan, cook bacon until crisp. Drain, reserving about 1 tablespoon of drippings. Set bacon aside on papertowel covered plate to drain.
  2. Saute onion and garlic in the drippings until tender, taking care so  that garlic does not burn. 
  3. Stir in flour, salt, basil and pepper; mix well.
  4. Gradually add broth. Bring to boil; boil and stir for 2 minutes.
  5. Add most of the potatoes (reserve some in case mixture is too thin), cream or milk, cheese, and hot pepper sauce; heat through but DO NOT BOIL, stir continuously.  If mixture is too thin, mash some of the potatoes and add to broth or add some potato flakes.  If mixture is too thick, add more liquid (broth, cream, milk, or water).
  6. Garnish with bacon, sour cream, green onions, and additional cheese, if desired.
Source: modified from All Recipes