Showing posts with label dinner club. Show all posts

Friday, May 3, 2013

Chocolate Chip Peanut Butter Cookie Cake

Behold!  Another deliciously sinful dessert baked courtesy of my husband and photography courtesy of me (I had to redo the photo shoot as I was not satisfied with his initial photos...).

Every time we go grocery shopping and he passes the bakery section he drools over the cookie cakes.  He swore to make one at home.  The only problem was that as a family of two (okay..maybe 2.5 right now with Baby Boy on the way!), we really don't need a giant cookie to eat by ourselves.  So, when the opportunity finally arose when we had our Restaurant Copy-Cats themed Dinner Club he jumped on it with this IMPROVED cookie cake.

Why is it improved, you ask?  Just take a deeper look into this picture...

Chocolate-Chip Peanut Butter Cookie Cake Slice

It starts with not just a regular chocolate chip cookie but rather one in which the cookie dough is infused with peanut butter (of course!).  The use of a springform pan results in a thick cookie that is crunchy on the outside and soft and even a bit gooey on the inside.  But it doesn't stop there.  It's enveloped in a layer of fluffy peanut butter frosting and then finished with peanut butter cups held in place by a rich dark chocolate ganache.  Excessive?  Probably.  Delicious?  Yes.

Chris was in a hurry and so he skipped the chilling step of the ganache before piping.  This resulted in a sloppier than desired execution of the peanut butter cup decorations which ended up sliding towards the dip in the center of the cake.  He deemed it "not good enough to serve for dinner club" and considered keeping it hidden away in the refrigerator.  I'm pretty sure had he done that our guests would have revolted.

Happy Friday and have a wonderful weekend!

Two Years Ago: Celebrate Cinco de Mayo with Guacamole, Spicy Lime and Honey Wings, Shrimpo de Gallo, and Tres Leches Cake
Four Years Ago:  Blonde Brownies and Avocado, Tomato and Mango Salsa

Chocolate Chip Peanut Butter Cookie Cake

Chocolate-Chip Peanut Butter Cookie Cake
Ingredients
For the Cake
  • 1/2 cup (115g) unsalted butter, softened
  • 1/2 cup (110g) light brown sugar, packed
  • 1/2 cup (100g) sugar
  • 1/2 cup creamy peanut butter
  • 2 large eggs
  • 1 tsp. vanilla extract
  • 1 3/4 cup (220g) all-purpose flour
  • 1 tsp. baking soda
  • 1/2 tsp. salt
  • 1 cup milk chocolate chips
For the Peanut Butter Frosting
  • 1 cup (225g) unsalted butter, at room temperature
  • 3/4 cup creamy peanut butter
  • 1 1/4 cups (150g) powdered sugar (plus up to 1/4 cup more, if needed)
For the Dark Chocolate Ganache
  • 6 oz. (170g) dark chocolate (50% cocoa), roughly chopped
  • 1/3 cup whipping cream
For Topping:
  • 12 Mini Reese’s Peanut Butter Cups
Directions
  1. Preheat oven to 350 degrees. F. Grease a 9-inch springform pan with butter.
  2. In a large mixing bowl using an electric mixer beat together the butter, both sugars, and peanut butter until light and fluffy. Add the eggs and vanilla and beat untilcombined. 
  3. In a small bowl, combine the flour, baking soda, and salt. Add the dry ingredients the wet ones and mix on low until combined. Stir in the chocolate chips. Transfer to the prepared springform pan.
  4. Bake for about 24-26 minutes or until a knife inserted in the center comes out clean. Allow to cool at room temperature.
  5. Make the Peanut Butter Frosting: Using a mixer, beat together the butter and peanut butter until light and fluffy. Add 1 1/4 cups powdered sugar to the bowl and mix in by starting on low and then increasing the mixer speed to high as it gradually becomes incorporated. If needed, add up to another 1/4 cup powdered sugar to bring the frosting to a spreadable consistency. Frost the tops and sides of the cooled cookie cake.
  6. Make the Dark Chocolate Ganache: In a small saucepan over low heat melt the dark chocolate. Remove the pan from the heat and whisk in the whipping cream.  Put the ganache in the refrigerator for about 15 minutes to chill so that it will be easier to pipe onto the cake.  Transfer ganache to an icing bag fitted with a wide frosting tip (or just use a plastic bag with one corner cut off). Pipe 12 evenly spaced dots of chocolate frosting around the edge of the frosted cake.  Top each dot of ganache with one mini peanut butter cup. 
  7. Serve cake immediately or chill until ready to serve.
Source: Barely modified from Inquiring Chef

Friday, April 12, 2013

Grilled Cheese Donut

Happy National Grilled Cheese Day!

Today I'm sharing a sight to behold.  It's no ordinary grilled cheese.  It's an entree...no...it's a dessert.  It's a grilled cheese DONUT!

Instead of bread, the cheddar cheese is sandwiched between two Krispy Kreme doughnuts.  It's sweet, it's savory, it's one of the most amazing inventions ever.  I like to use Krispy Kremes because they have the softest and fluffiest melt-in-your-mouth texture but any yeasted glazed doughnut will work.  I'll admit I was pretty grossed out when I realized I was buttering a glazed doughnut but how else are you supposed to get that signature grilled bread texture?

The credit for the concept goes to Tom+Chee, a local Cincinnati joint that specializes in a menu of just grilled cheese and tomato soup!  It's now nationally known after being featured on Man v. Food and Amazing Eats.

What's your favorite grilled cheese?

Also, have you entered my 4th blogiversary giveaway?  4 prizes at stake and the rafflecopter ends soon!

Two Years Ago: Banana Split Cupcakes and Chinese Steamed Fish
Three Years Ago: Blueberry Citrus Cake
Four Years Ago: Crockpot Turkey and Cake Balls (Truffles)

Grilled Cheese Donut

 
Ingredients
  • Glazed doughnut (I prefer Krispy Kreme brand)
  • Unsalted butter
  • Sliced sharp cheddar cheese
  • Salt
Directions
  1. Heat a large skillet or griddle on the stove.
  2. Cut doughnut in half and lightly butter each side on the non-glazed surface.  Place one doughnut half butter side down then top with a slice of cheese (on the glazed side) and then sprinkle with a crank of freshly ground sea salt (a small pink of regular salt will also work).  Place the other doughnut half on top.  The buttered sides should both be facing outward.
  3. Grill on heated skillet or griddle. Flipping and removing when desired doneness is achieved and cheese is melted.
  4. Enjoy hot!
Source: Inspired by Tom + Chee

Monday, April 8, 2013

Chicago-Style Deep Dish Pizza

It was our turn to host dinner club and we chose to bring back an oldie but goodie theme...Restaurant Copycats!  Last time we contributed Outback's Blooming Onion with Dipping Sauce and as a bonus I made some Clone of Cinnabon cinnamon rolls.  Our friends made Carraba's Chicken Bryan, P.F. Chang's Chicken Lettuce Wraps among others and it was by far one of the best dinner clubs because it was like having the best of what every restaurant had to offer.

Oddly enough, when it came time to pick the main dish that I was going to serve, I was at a loss as to what to make!  So I asked my wonderful facebook fans for advice.  Fans suggested everything from Cheesecake Factory's Cajun Chicken Pasta to Olive Garden's Chicken Scampi to Outback's Alice Springs Chicken and more.  All excellent ideas and then it dawned on me that there was one recipe I had bookmarked long long ago that I kept seeing on multiple websites and that would fit the bill.

Chicago-Style Deep Dish Pizza made famous by restaurants like Uno's Chicago Grill and Giordano's and Lou Manalti's.  There's even local takes such as Chi-nnati's Chicago-Style Pizza in Cincinnati.  Now, I won't get into an argument on whose pizza is best, whether Chicago-style means just deep dish or stuffed, or whether corn meal goes IN the crust or not because in the end, all that matters is that this particular recipe is pretty awesome!

I created one cheese pie and another with pepperoni.  There are a number of pizza aficionados in the group (with my husband and our friends Daniel and Scott).  The boys agreed this was pass-along-the-recipe-please worthy pizza and better than some of those that we bought in restaurants.

First of all, I LOVE that it uses a plain 9-inch round cake pan to make this.  No fancy equipment needed!  The crust is thick, buttery, and full of airy pockets from the laminating process (don't let it scare you and check out step-by-step photos in Brown Eyed Baker's post; it's easier than it seems!).  The simple homemade sauce is chunky and full of flavor.  And the cheese, well, you cannot go wrong with cheese and I was told this was just the right ratio of crust to cheese to sauce for a deep dish pizza.

Tomorrow is my 4th blogiversary so come back for a sweet (literally!) recipe and giveaway in celebration.  Then on Friday, I pay homage to National Grilled Cheese Day with another recipe copycat that is so radical you won't want to miss it!

In the meantime, if you can't get enough copycat recipes, be sure to check out my copycat label!  I make sure each post is tagged with key words to make it easier for you to find recipes with similar ingredients and/or themes.  You can find these tags at the bottom of each post or the full list can be found on the right side bar below the Archive section.


Chicago-Style Deep Dish Pizza

Chicago-Style Deep Dish Pizza

Ingredients

For the Dough:
  • 3 1/4 cups all-purpose flour
  • 1/2 cup yellow cornmeal
  • 1 1/2 teaspoons salt
  • 2 teaspoons sugar
  • 2 1/4 teaspoons instant yeast
  • 1 1/4 cups water, room temperature
  • 3 tablespoons unsalted butter, melted
  • 4 tablespoons unsalted butter, softened
  • 1 teaspoon + 4 tablespoons olive oil, divided
For the Sauce:
  • 2 tablespoons unsalted butter
  • 1/4 cup grated onion
  • 1/4 teaspoon dried oregano
  • 1/2 teaspoon salt
  • 2 garlic cloves, minced
  • 1 (28-ounce) can crushed tomatoes
  • 1/4 teaspoon sugar
  • 2 tablespoons coarsely chopped fresh basil
  • 1 tablespoon olive oil
  • Freshly ground black pepper, to taste
  • Crushed red pepper, to taste (optional)
For the Toppings:
  • 1 pound (4 cups) mozzarella cheese, shredded
  • Pepperoni, Italian sausage, mushrooms, onions, green peppers...whatever you want to add inside if you like to load your pizza with toppings.  Personally, I'm a purist!
  • 1/4 cup grated Parmesan cheese 
Direction
  1. To Make the Dough: In a large bowl, whisk together the flour, cornmeal, salt, sugar, and yeast. Add water and melted butter.  Using a dough hook, mix on low speed until fully combined, 1 to 2 minutes.  Scrape down the sides and bottom of the bowl occasionally if needed.  Increase speed to medium and knead until dough is glossy and smooth and pulls away from sides of bowl, 4 to 5 minutes. If you do not have a mixer, you could use a food processor or knead by hand. Coat a large bowl with 1 teaspoon olive oil. Transfer dough to bowl and turn to coat in oil. Cover tightly with plastic wrap and let rise at room temperature until nearly doubled in volume, 45 to 60 minutes.
  2. To Make the Sauce: While dough rises, melt butter in a medium saucepan over medium heat. Add onion, oregano, and salt; cook, stirring occasionally, until liquid has evaporated and onion is golden brown, about 5 minutes. Add garlic and cook until fragrant, about 30 seconds. Stir in tomatoes, sugar, and crushed red pepper flakes if desired.  Increase heat to high and bring to a simmer then lower heat to medium-low and simmer until reduced to about 2½ cups, 25 to 30 minutes. Remove the pan from the heat then stir in the basil and olive oil.  Season with salt and pepper.
  3. To Laminate the Dough.  Turn the dough out onto a clean dry work surface and roll into a 15x12-inch rectangle. Spread the softened butter over the surface leaving a ½-inch border along the edges. Starting at the short end, roll the dough into a tight cylinder. With seam side down, flatten the cylinder into an 18x4-inch rectangle. Cut rectangle in half crosswise. Working with one half, fold into thirds like a business letter; pinch seams together to form ball. Repeat with remaining half. Return balls to oiled bowl, cover tightly with plastic wrap, and let rise in refrigerator until nearly doubled in volume, 40 to 50 minutes. Meanwhile, adjust oven rack to lower position and preheat oven to 425 degrees F.
  4. To Bake the Pizzas: Coat two 9-inch round cake pans with 2 tablespoons olive oil each. Transfer 1 dough ball to work surface and roll out into a 13-inch circle. Transfer dough to the pan by rolling the dough loosely around a rolling pin and unrolling into pan. Lightly press dough into pan, working into corners and 1 inch up sides. If dough resists stretching, let it relax for 5 minutes before trying again. Repeat with remaining dough ball.
  5. For each pizza, sprinkle 2 cups mozzarella evenly over surface of dough. If you're using any toppings, layer them now on top of the cheese. Spread 1¼ cups tomato sauce over the cheese (or toppings) and sprinkle 2 tablespoons Parmesan over sauce. 
  6. Bake until crust is golden brown, 20 to 30 minutes. Remove pizza from oven and let rest 10 minutes before slicing and serving.

Source: Cook's Illustrated, January-February 2010 as seen on and adapted by Brown Eyed Baker

Wednesday, November 7, 2012

Pumpkin Coffee Cake with Brown Sugar Glaze

In honor of the US Elections on Tuesday I offered my facebook fans the option of voting on the recipe that I would share on Wednesday.  The results were unanimous.  As I'm typing this blog post, I'm watching the results of the election come in.  No matter what side you're on, I think we can all agree that this recipe is delicious.  And that's something we can all unite around :).

I apologize in advance for the less than stellar photo.  I brought this dish to Thanksgiving themed Dinner Club as a last minute dessert when Emily and Scott could no longer make it.  You see, they were in charge of our only planned dessert for the evening and also our regular "event" photographers.  But they had a great excuse for missing their first dinner club since we started about 3 years ago.  Emily and Scott are the proud new parents of twin girls - Paige and Claire!  They came much earlier than expected but everyone's healthy and well.

As for the cake?  It was amazing!  Moist and full of Fall flavors.  But the best part has to be the fact that it's just dressed up boxed cake mix.  You heard me!  And Shhhh!  Don't give away this little secret because no one would suspect ;).

PS: Have you shared my Macaroni and Cheese Mondays post yet and left a comment letting me know you've shared?  Nobody has yet which makes me really sad.  Remember, prizes are at stake here!  And while I wouldn't mind keeping one of these great cookbooks for myself, they're really meant for one of my wonderful readers!

One Year Ago: Strip House Potatoes Romanoff and Chicken and Roasted Root Vegetable Pot Pie
Three Years Ago: Pumpkin Pie Fudge and Marinara Magnifica

Pumpkin Coffee Cake with Brown Sugar Glaze


Pumpkin Coffee Cake with Brown Sugar Glaze

Ingredients

For the cake
  • 1/3 cup water
  • 1 can (15 oz) pureed pumpkin
  • 2 eggs
  • 1 Tbsp vanilla extract
  • 2 tsp pumpkin pie spice
  • 1 box (18 oz) yellow cake mix
  • 1 tsp baking soda
For the topping
  • 1/2 cup brown sugar
  • 1/2 cup flour
  • 1/3 cup walnuts, chopped (optional)
  • 4 Tbsp butter, melted
For the glaze
  • 1/2 cup brown sugar
  • 1/4 cup sugar
  • 1 tsp vanilla extract
  • 1/4 cup heavy whipping cream
Directions
  1. Preheat the oven to 350 degrees F.
  2. In a large bowl, mix together the water, pumpkin, eggs, 1 tablespoon vanilla, and pumpkin pie spice until well combined.  Add the cake mix and baking soda and mix until just combined.
  3. Grease a 9x13 pan with butter and pour the batter into the pan.
  4. In a small bowl, mix together ingredients for the topping.  Sprinkle over the top of the cake using your fingers.  Bake at 350 degrees for about 30 minutes or until a toothpick inserted into the center of the cake comes out clean.
  5. Combine the glaze ingredients in a saucepan and bring to a simmer.  Remove from heat and continue to stir until all the sugar dissolves.
  6. When the cake is finished baking, poke holes over the entire cake surface using a fork or a skewer.  Pour the glaze all over the cake.  Serve warm or at room temperature.

Source: Heather's Dish as seen on Pretty. Good. Food.

Wednesday, October 10, 2012

Toad in a Hole

Sharing of this recipe is long overdue since it was made at our Olympic themed dinner club back in October but I was waiting for the weather to turn cold and for people to start craving comfort foods again.

Why it is called "Toad in a Hole" was elusive to me but as I read about it, the best explanation that I could find was that the sausages look like little toads popping their heads/bodies out of a hole.  Perhaps with some stretch of the imagination that could be true...or perhaps the Brits were drinking a wee bit too much when they named this common British dish.

It incorporates pork sausages (aka bangers due to the popping sound that they make in the pan as they cook) in a crispy Yorkshire Pudding.  But how do you make it even better?  By wrapping the sausages in prosciutto and then topping the whole dish with deliciously rich, caramelized onion gravy.  Yikes, coronary material in the making and no wonder it tastes amazing!

I personally thought this made way too much gravy so would perhaps recommend halving the recipe for that.  Maybe you're supposed to have your Toads in a Hole swimming in gravy but I prefer just a light drizzle.

One Year Ago: Roasted Butternut Squash Soup

Toad in a Hole


Photo Credit: Emily H.

Yields: 6 servings

Ingredients

  • 4 Tbsp unsalted butter
  • 2 large yellow onions, sliced
  • 1 1/2 cups plus 1 Tbsp flour
  • 2 cups beef stock
  • 1/2 cup madeira wine
  • 1/2 tsp Worcestershire sauce
  • Kosher salt and freshly ground black pepper, to taste
  • 2 tsp dry mustard
  • 1 1/4 cups milk
  • 3 eggs, lightly beaten
  • 8 Tbsp rendered bacon fat (I didn't have enough bacon fat handy so used a combination of about 4 Tbsp bacon fat for flavor + 2 Tbsp vegetable oil + 2 Tbsp vegetable shortening)
  • 6 slices prosciutto
  • 6 large pork sausages (Bangers are best but I couldn't find them so would recommend something mild such as bratwurst)
Directions
  1. Make onion gravy: Heat butter in a 4-qt. saucepan over medium-low heat.  Add onions and cook until golden brown, about 40 minutes.  Stir in 1 Tbsp flour.  Add stock, wine, and Worcestershire.  Bring to a boil and then cook for 5 minutes.  Season with salt and pepper.  Set gravy aside.
  2. Heat oven to 425 degrees F.  Whisk remaining flour, mustard, and pepper together in a bowl.  Whisk in milk and eggs.  Let mixture rest for 15 minutes.  Pour 6 Tbsp bacon fat into a 9"x11" baking dish.  Heat in oven for 10 minutes.  (This heating of the fat in the pan is the key to getting a good puff to your pudding!)  In a 12" skillet over medium heat, heat up the remaining bacon fat.  Wrap 1 slice prosciutto around each sausage then place in skillet and brown all over, about 8 minutes.  Pour batter into the hot baking dish then arrange the wrapped sausages in the dish.  Bake until golden, about 25-30 minutes.  Serve with onion gravy.
Source: Saveur

Wednesday, August 29, 2012

Loaded Baked Potato Salad

This week I wanted to feature recipes that remind me of Summer.  The Tomato and Corn Pie that I shared on Monday definitely did that.  This one is one that reminds me of picnics and Summer BBQs and hence it was my contribution for our BBQ Themed Dinner Club.

It has all the flavors of loaded baked potatoes but is lightened up a bit by my substitution of Greek yogurt for the sour cream.  Nobody could tell I did this and upon being told it was "healthier", some went for seconds.  I like the way it looks, too.  All those delicious bits of bacon, cheese, and green onions really gives this potato salad a pop of color compared to their rather anemic looking white or yellow run-of-the-mill potato salad.

Make this for Labor Day as Summer brings on its last hurrah!

One Year Ago: Grilled Maple Chili Salmon

Loaded Baked Potato Salad


Loaded Baked Potato Salad
Photo Credit: Emily H.
Yields: 4-6 Servings

Ingredients
  • 1.5 pounds red potatoes (or 4 large Russet or Yukon Gold potatoes)
  • 1/4 cup ranch dressing
  • 1/2 cup plain Greek yogurt
  • 1/2 cup shredded cheddar cheese
  • 1/4 cup freshly chopped chives or green onions, divided
  • 6 strips of bacon (4 for the salad and 1 for topping), cooked and crumbled
  • 1 tsp black pepper
  • Salt, to taste
  • Hot sauce, to taste
Directions
  1. In a small bowl, mix together the ranch dressing and Greek yogurt.  Add half of the chives, cheese, and pepper, stirring until well combined.  Season with salt and hot sauce, to taste.  Let chill in the refrigerator.
  2. Meanwhile, peel and cube potatoes into bite size pieces.  Put in a large pot, cover with water, and boil until fork tender, about 15-20 minutes.  Drain and set aside to steam dry and cool.
  3. Put potatoes in a large bowl or dish and combine with dressing and yogurt mixture.  Top with remaining chives and crumbled bacon.  Chill before serving.
Source: Modified from Dishing with Leslie

Friday, August 17, 2012

White Chocolate Layer Cake with Blueberry Curd Filling

Okay I'm slacking, I'm sorry.  Normally I write these posts in advance and schedule them to go live in the mornings but when I got into work today I realized that not only did I not schedule this post but I hadn't even written it yet!  Yikes!  I guess that's what happens when you're busily trying to can 21 pounds of tomatoes or buy 1/16th of a cow (more on both of those at a later date).

So here we are, the grand finale of Emily and my Summer Seasonal Fruits and Veggies Extravaganza.  So far we've already shared the following:
And now, without further delay than I've already caused today, here's the final course, a layer cake filled with  vibrant blueberry curd!

For those of you that follow me on facebook or twitter you probably saw me post something a few weeks ago when this was all happening about my little butter mishap.  Somehow I had completely managed to misread the instructions and put just 1/2 stick of butter in the frosting instead of 1/2 POUND.  Yep...that's only 1/4 of what was necessary and would totally explain why the texture of my frosting was marshmallow fluffy and a bit weird.  All in all, it didn't affect the overall flavor of the cake but apologize for the presentation since the frosting was a shapeless goop!

Flavorwise, this was really good.  I loved the flavor of the blueberry curd, especially.  And the petite 6" cake size was the perfect way to end our Extravaganza evening!  Looking at the directions is daunting (and I'm sure you can see how I easily misread the butter content!) but no step is particularly difficult.

I hope you enjoyed this series (also check out our last one on Apples!).  Emily and I really look forward to doing them so if you have suggestions for themes or even recipes you'd like to see made in the future, please let us know.  She might be quite busy soon with the pending arrival of twins and all but we'll do our best!  After all, a girl has still got to eat!

PS: Last day to enter the Beer Flats giveaway!  Ends tonight.  Commenting takes just a few seconds and your chances to win are just 1 (or more if you do additional entries)  in 14 right now!

White Chocolate Layer Cake with Blueberry Curd Filling

White Chocolate Layer Cake with Blueberry Curd Filling
Photo Credit: Emily H.
Ingredients

For the Cake
  • 4 oz white baking chocolate, chopped
  • 1 cup + 2 Tbsp flour
  • 1 tsp baking powder
  • 1/8 tsp salt
  • 5 Tbsp butter, softened
  • 1/2 cup + 2 Tbsp sugar
  • 2 eggs
  • 3/4 tsp vanilla
  • 1/2 cup + 2 Tbsp milk
For the Swiss meringue buttercream
  • 2 oz egg whites (1-2 large egg whites or about 1/4 cup)
  • 1/2 cup granulated sugar
  • 1/2 lb unsalted butter, room temperature (see, it DOES say pound, NOT stick...oops!)
  • 2 tsp lemon extract, almond extract, orange extract, or vanilla extract
For the Blueberry curd
  • 1 cup blueberries
  • 1 Tbsp water
  • 1 cup sugar
  • 1/4 cup butter
  • 3 eggs, lightly beaten
For decorating
  • Swiss meringue buttercream
  • 1 cup blueberry curd
  • 2 oz white chocolate shavings/curls for garnish
  • Blueberries for garnish
Instructions

To Make the Cake
  1. Preheat oven to 350 F.  Grease and lightly flour two 6-inch round cake pans.  Line bottoms of pans with parchment paper.
  2. In a medium saucepan, cook and stir the white chocolate over low heat until melted.
  3. In a medium bowl, combine flour, baking powder, and salt and set aside.
  4. In a large bowl, beat the butter with mixer on medium to high speed for 30 seconds.  Gradually add the sugar, beating until combined.  Add eggs one at a time, beating after each addition.  Beat in the vanilla.  Alternately add flour mixture and milk to butter mixture, beating on low speed after each addition until just combined.  Beat in melted white chocolate just until combined.
  5. Spread batter into the prepared cake pans.  Bake 30 minutes of until a toothpick inserted into the centers comes out clean.  Meanwhile, prepare the blueberry curd and buttercream.  Cool the cake layers in the pans on wire racks for 10 minutes.  Remove layers from pans and peel off parchment paper.  Cool completely on the wire racks.
To Make the Blueberry Curd
  1. Put blueberries and water in saucepan and cook over low heat until blueberries are very soft, about 10 minutes.
  2. Press the mixture through a fine mesh sieve and put the resulting liquid back into the saucepan off of the heat.  Stir everything together and cook on medium-low heat, stirring constantly until mixture is thickened, about 5 minutes.  The curd will continue to thicken as it cools.
To Make the Swiss Meringue Buttercream
  1. Lightly whisk egg whites and sugar together over simmering water until egg white mixture is hot to touch or candy thermometer reads 140F (60C)
  2. Pour hot whites into a room temperature bowl and whip with whisk attachment of electric mixer on medium-high speed until double in volume.  The meringue should not move around in the bowl.  Meanwhile, cut up butter into 2-inch pieces.  (The butter should be slightly moist on the outside but cold inside.)
  3. Attach the paddle attachment to your mixer.  Add half the butter into the bowl and pulse the mixer until the meringue has covered the butter completely, forcing the butter to the bottom of the bowl.  Add the remaining butter and pulse several more times.  Slowly increase the mixer's speed, starting with the lowest speed and continuing to increase the speed every 10 seconds until you read medium-high speed.
  4. Continue to beat until the mixture looks light and fluffy.  Stop the mixer and scrape the bowl.  Reduce speed to low.  Add flavoring and continue to beat on low speed for 45 seconds.  Then beat on medium-high speed for an additional 45-60 seconds.
To Assemble the Cake
  1. Use a long serrated knife to cut each layer in half horizontally.  Place one layer, cut side up, on a serving plate.
  2. Spread 1/3 of the filling on the first layer.  Top with second layer; spread with 1/3 of the filling.  Top with the third layer and spread with the remaining filling (reserve a couple tablespoons if you want a swirl on top like I did).  Top with the fourth layer, cut side down.
  3. Frost cake with buttercream and decorate with chocolate shaving and blueberries.  To create a swirl as I did, put reserved dallop of blueberry curd on frosting and use a knife to swirl.
Source: As seen on Beantown Baker as components are originally from - Cake from Better Homes and Gardens, Blueberry Curd from Fake Ginger, Swiss Meringue Buttercream from Epicurious

Wednesday, August 15, 2012

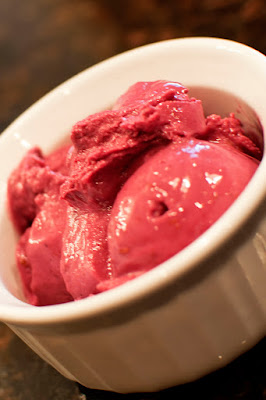
Black Raspberry Frozen Yogurt

And we're back with the desserts from Emily and my Seasonal Summer Fruit and Vegetable Extravaganza!  We made two desserts and I wasn't sure which to share first so I asked my friend Jackie.  She picked this one to share with you first.  

This healthy froyo was extremely simple and extremely DELICIOUS!!  It was my favorite recipe from the whole night.  The flavor is fresh, the texture was creamy (except for the seeds which I completely forgot to strain out...oops!), and the color was vibrantly spot-on to Graeter's Black Raspberry Chip Ice Cream which made it all the more visually appealing.  By the way, did I mention that if you make it with fat free yogurt (I love Fage 0% Greek Yogurt), that there's only about 2g of fat in the whole batch?  And that fat comes from the raspberries...who would have known that those contained fat??

To recap the Seasonal Summer Fruit and Veggies Extravaganza so far: Watermelon Slush, BLT Corn Salad Wraps, and Cherry BBQ Pulled Pork Grilled Pizza. Check back on Friday for the final dessert course and recap of our latest Extravaganza.  

Only a couple more days left to enter my Beer Flats giveaway so make sure to enter now.  Your chances of winning are pretty high!


Black Raspberry Frozen Yogurt

Black Raspberry Frozen Yogurt
Photo Credit: Emily H.
Yields: 1 quart

Ingredients
  • 2 cups Greek yogurt (whole milk preferred to help keep from freezing rock solid but we used fat free and ate it fresh - it was fine)
  • ¾ cups sugar
  • 2 cups fresh or frozen raspberries
  • 1 tsp. freshly squeezed lemon juice
  • 1-2 tbsp. vanilla extract
Directions
  1. Combine the yogurt, sugar, berries, and lemon juice in a blender or food processor.  Blend until smooth.  Press the mixture through a fine mesh sieve to remove the seeds.  Stir in the vanilla.
  2. Freeze the mixture in an ice cream maker according to the manufacturer’s instructions.
Source: As seen on and adpated by Annie's Eats from The Perfect Scoop by David Lebovitz

Friday, August 10, 2012

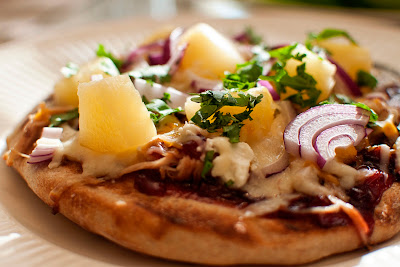
Cherry BBQ Pulled Pork Grilled Pizza

Happy Friday!  I don't know who noticed but last night I spent an extensive portion of my evening giving my blog a face lift.  After not really doing anything to my site for nearly 300 posts (next one!), I was just getting a little sick of the old look.  I changed my blog template (of course keeping my signature and favorite pink color!), moved some content onto their own pages to make the homepage more streamlined, and added better social media sharing/following features to the bottom of each post and the sidebar (please use them!).  I also moved the "print-friendly" button to a more obvious location.  If you haven't used that feature yet, it's a pretty awesome way to cut out all my witty chatter (*sad face*) and just print the recipe and/or photo if you want.  Yah for being green!  I hope all of these little changes help to make your browsing experience on my website a bit better.  Please comment and let me know how I'm doing!

Today we are continuing Emily and my Seasonal Summer Fruit and Vegetable Extravaganza.  We already shared our Watermelon Slush and BLT Corn Salad Wrap starter so onto the main course!  As it was extremely hot out lately, Emily and I thought we'd put our husbands to work on the grill and with the success of my Grilled Steakhouse Pizza in the past, I thought another grilled pizza would be a great addition to our menu.  Plus, Emily and Scott were grilled pizza virgins.

Overall the taste of this pizza was very Summery.  I do wish that the flavor of the cherries came through more but it could have been the result of using some not-so-flavorful cherries that I picked up at the grocery store.  Darn those pretty and highly-shippable fruits that look deceivingly delicious but yet fall flat on flavor!!  Either way, Scott liked the barbecue because it "wasn't overly sweet" and pizza is pretty much the only way he enjoys goat cheese.  Emily's need for carbs, meat, and cheese was definitely satisfied and she scarfed hers down faster than any of the boys!  In all fairness, she is eating for three now...yes, in case I hadn't mentioned, she's pregnant with twins!  Last but not least, my husband's verdict?  "It was yummy."  Ah, a man of few words ;).

Come back next week to see what desserts were made.  One more week until my Beer Flats giveaway ends.  Check out my review and take the time to enter.  It only takes a few seconds!


Cherry BBQ Pulled Pork Grilled Pizza

Cherry BBQ Pulled Pork Grilled Pizza
Photo Credit: Emily H.
Ingredients
  • 1.5 pounds of your favorite pizza dough, shaped into 4 individual sized balls to be stretched and grilled
  • Olive oil for brushing
  • ~1 cup cherry barbecue sauce, recipe follows
  • ~1.5 cups leftover shredded pulled pork, recipe follows
  • Shredded cheddar cheese
  • Shredded mozzarella cheese
  • Crumbled goat cheese
  • Red onion, thinly sliced
  • Pineapple chunks
  • Cilantro, chopped
For the Cherry Barbecue Sauce
  • 1/2 lb cherries, pits removed
  • 3 Tbsp sugar
  • 1/4 cup water
  • 1 cup barbecue sauce
For the Pulled Pork
  • 1 can Dr. Pepper
  • 5-7 lbs pork butt roast
  • 1/4 cup brown mustard
  • Salt and pepper, to taste
Directions
  1. Prepare the Pulled Pork: Liberally season the pork roast with salt and pepper and place the fat-side-up in a crockpot.  Add the mustard and Dr. Pepper to the crockpot and cook on low for 8-10 hours.  Shred the meat with two forks, discarding any bones and fat.
  2. Prepare the Cherry Barbecue Sauce: Roughly chop the cherries into small pieces.  Add them to a small sauce pan along with the sugar and water.  Cook over medium heat for ~20 minutes, until the liquid is thick and the cherries are soft.
  3. Grill the Pizza:  Heat grill to medium-high heat (450F) and generously oil the grate (I use a paper towel wad soaked in oil and held with tongs or a silicone brush
  4. Carefully place individually sized stretched dough rounds onto the grill and cover.  Allow to cook until nicely browned on bottom and large bubbles form on the surface (about 3-4 minutes).  Carefully remove the dough from the grill and with the cooked side facing up, top each pizza with cherry barbecue sauce.  Top with pulled pork then follow with cheddar and mozzarella cheese.  Finish with the red onions, pineapple, and goat cheese.  Carefully return the topped pizzas to the grill and cook until the bottom is browned and cheese is melted (about 4-6 minutes).
  5. Remove pizza from grill. Garnish with cilantro.  Cut and serve immediately.
Source: A combination of ingredients and ideas from Confections of a Foodie Bride and Our Best Bites

Wednesday, August 8, 2012

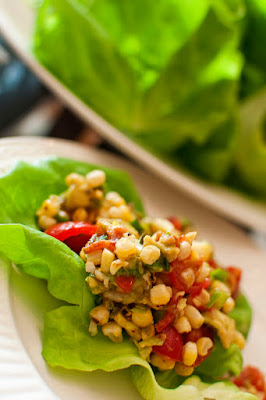
BLT Corn Salad Wrap

And so continues Emily and my Summer Seasonal Fruit and Veggies Extravaganza.  We followed our refreshing Watermelon Slush mocktails with another refreshing, barely cooked dish.  

Emily and I must have been on the same wavelength because this recipe was on both of our radars.  I like how we often think alike when it comes to food  :).  Summer tomatoes and corn are no brainers to include in this theme and having the boys give the corn some charred flavor on the grill keeps things cool in the kitchen.  Add avocado and bacon then serve it in a lettuce leaf and you have yourself a deliciously fresh finger food!

On Thursday you get a bonus post for the week- another product review+giveaway!  Then, on Friday you get the main course from Emily and my Summer Seasonal Fruit and Veggie Extravaganza before we finish off with two desserts next week.

Can't get enough lettuce wraps?  Try this Chorizo and Sweet Potato Lettuce Wrap or Asian Lettuce Wrap!


BLT Corn Salad Wrap

BLT Corn Salad Wrap
Photo Credit: Emily H.

Yields: 5 cups of corn mixture

Ingredients
  • 3 ears of corn, shucked of their husks and silk
  • 1 cup cherry tomatoes, sliced in half
  • 1/2 cup chopped green onions
  • 1 avocado, diced
  • 3 sliced crisp cooked bacon, diced
  • juice of 1 lime
  • about 1 tablespoon olive oil
  • salt and pepper to taste
  • a good sprinkling of chili powder and smokey paprika
  • butter lettuce or iceberg lettuce leaves
  • hot sauce and sour cream for topping
Directions
  1. Over a gas burner or grill, char raw shucked corn.  Rotate corn until cob is charred on all sides.  Allow corn to cool before slicing corn kernels from the cob.
  2. Add corn kernels to a medium bowl.  Add sliced cherry tomatoes, green onion, diced avocado, and diced bacon.  Squeeze in lime juice.  Add olive oil, salt, pepper, and slices.  Stir to combine.  Taste and adjust seasoning as needed.
  3. Rinse and clean individual lettuce leaves.  Serve alongside a bowl of corn salad.  To serve, scoop corn salad into lettuce leaves, top with hot sauce, sour cream, fold up like a taco and enjoy!
Source: Joy the Baker

Photobucket
This recipe was a Tasty Treasure at Fantastical Sharing of Recipes!

Monday, August 6, 2012

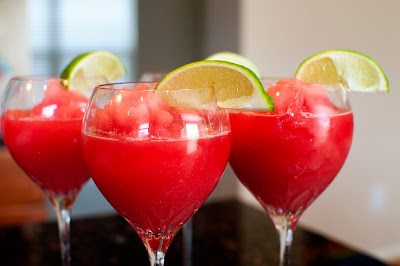
Watermelon Slush

Hello my lovelies!  Remember my extremely talented friend Emily who guestposted this General Tso's Chicken, takes all our Dinner Club photos, and did a Apple Extravaganza bakefest with me last Fall?  Well she and her husband Scott came over recently so we could continue the tradition of the wives creating deliciousness in the kitchen while the husbands did...manly things like watching TV.  But unlike during the Fall, we minimized the use of the oven (because it was hot hot hot!), focused on a theme of using seasonal fruits and veggies, and put the boys to work by manning the grill.

To kick off our Summer Fruit and Veggie Extravaganza, we started with this absolutely refreshing, totally natural and healthy watermelon slush.  The colors were gorgeously vibrant and it quenched our thirst on this hot July day.  It was a wonderful mocktail as is but we won't tell if you add a splash of vodka, tequila, or other favorite liquor to the mix ;).

Four more recipes and another awesome review+giveaway left to share in the next two weeks so stay tuned and keep coming back!

One Year Ago: 5 Minute (Healthy) Chunky Monkey "Ice Cream"
Two Years Ago: Raspberry White Chocolate Swirl Ice Cream
Three Years Ago: Grands! Taco Melts (AKA Homemade Hot Pockets)

Watermelon Slush

Watermelon Slush
Photo Credit: Emily H.
Yields: 4 servings (1 cup each)

Ingredients
  • 4 cups watermelon, seeded, diced, and frozen
  • 2 limes, juiced
  • 2 Tablespoons honey
  • 3/4 to 1 cup water
Directions
  1. Blend all ingredients in a blender until smooth.  Serve immediately.
Source: Prevention RD

Monday, April 30, 2012

Southwestern Stuffed Sweet Potatoes

Look what I have for you today...ANOTHER "stuffed" recipe!  You'd think I have a slight obsession but oddly enough, I had this recipe chosen for our Cinco de Mayo themed Dinner Club well before any of the other stuffed recipes were planned for my blog postings.

I've seen this recipe called several things: Healthy Mexican Stuffed Sweet Potatoes, Mexican-Inspired Stuffed Sweet Potatoes, and Southwestern Stuffed Sweet Potatoes.  It's a mouthful to type or say.  So, let's just put aside our differences and as in the age old potAYto versus potAHto argument we'll just call them "delicious".

You will have leftover filling.  That is, unless you're like me and start eating it by the spoonful.  But, if you do happen to have some left, I hear they make an awesome quesadilla filling!

Look for my other Cinco de Mayo Dinner Club dish later this week!

One Year Ago: Guacamole
Two Years Ago: Summer Corn and Vegetable Soup

Southwestern Stuffed Sweet Potatoes

Photo Credit: Emily H.

Ingredients
  • 3 medium sweet potatoes
  • 1 (15 oz) can corn, or 1.5 cups frozen corn, rinsed and patted dry
  • Salt, to taste
  • 2 tsp ground cumin
  • 1 tsp chili powder
  • 1/2 tsp Mexican oregano (optional)
  • 1 Tbsp olive oil
  • 1/2 yellow onion, diced
  • 1 (15 oz) can black beans, rinsed and drained
  • 1/2 c cilantro, chopped
  • 1 oz cream cheese (light is fine)
  • 1/4 c sour cream (light is fine), plus more for serving
  • 1 to 3 chipotle peppers in adobo sauce, minced or pureed (adjust to your spice tolerance)
  • 6 Tbsp shredded Mexican cheese (or other preferred flavor)
Directions
  1. Preheat oven to 350 degrees F. Place sweet potatoes on a baking sheet and bake for 50 to 60 minutes, or until fork tender. Remove from the oven and allow to set until cool enough to handle.
  2. While the sweet potatoes are cooling, saute the corn in a dry heavy skillet over medium high heat. Sprinkle with salt, cumin, chili powder and Mexican oregano. Cook until the corn is roasted and browned (about 7 to 10 minutes). Transfer to a small bowl; set aside.
  3. Wipe the skillet clean and heat the olive oil. Add the onions and cook until just translucent and tender. Transfer to the bowl with the corn. Add the black beans and cilantro to the onion and corn. Gently stir to mix.
  4. Cut the cooled sweet potatoes in half, lengthwise. Scoop the flesh into a large mixing bowl, leaving the skins intact (leaving a thin layer of potato helps to hold the skin together.) Add the cream cheese, sour cream, chipotle pepper(s) and salt to the mixing bowl with the sweet potatoes. Mash with a potato masher or blender to desired texture. Gently stir in the roasted corn, onions, black beans and cilantro mix.
  5. Preheat the broiler. Fill each potato skin with the mashed potato mixture, topping each with 1 Tablespoon of cheese. Broil for 5 minutes, or until cheese is melted and hot. Serve immediately with a dollop of sour cream, if desired.
Source: As seen on and adapted by Pennies on a Platter from Pinch of Yum

Thursday, December 22, 2011

Cinnamon Roll Cookies

This cookie looks and tastes just like a cinnamon roll!  It made the house smell fantastic as it baked.  My husband was a little disappointed because they were crispier than he expected but that could be remedied by reducing the bake time or making the slices thicker.

Make this one to add a festive look to your holiday cookie platter!

Cinnamon Roll Cookies
Yields: 48 cookies

Cinnamon Roll Cookies
Photo Credit: Emily H.
For the cookies:
  • 1 cup (2 sticks) unsalted butter, softened
  • 1/2 cup brown sugar
  • 1/2 cup sugar
  • 2 eggs
  • 1 teaspoon vanilla
  • 2 teaspoons cinnamon
  • 3 cups flour
  • 2 teaspoons baking powder
  • 1 teaspoon salt

For the filling:
  • 1/4 cup (1/2 stick) unsalted butter, very soft
  • 1/4, plus 2 tablespoons packed brown sugar
  • 2 teaspoons cinnamon

For the icing:
  • 2 cups confectioners’ sugar
  • 2 tablespoons melted butter
  • 1/2 teaspoon instant espresso powder
  • 2 teaspoons vanilla
  • 2-4 tablespoons milk

Directions

  1. To make the cookies: In a medium bowl, combine the flour, cinnamon, baking powder, and salt; set aside.
  2. In a large bowl, or the bowl of a standing mixer, cream the butter and sugars together until light and fluffy. Add the eggs one at a time, and beat until just combined. Scrape the sides of the bowl, then add half of the flour mixture and mix until just combined. Add the remaining flour mixture and beat until thoroughly combined, scraping the bowl as needed. Scrape the dough into a ball in the center of the bowl, cover with plastic wrap, and chill in the freezer for 30 minutes, or the refrigerator for at least an hour.
  3. Once the dough is chilled, divide it into two equal halves. Place one half back in the bowl and put it back in the refrigerator for now. On a large piece of plastic wrap, pat the first half of the dough into a rectangle about nine inches by twelve inches, and about half an inch thick. Place half of butter on the dough and spread it all the way to the edges. Sprinkle half of the brown sugar evenly over the buttered dough and press the sugar into the dough. Finally, sprinkle half of the cinnamon evenly over the dough. Use the plastic wrap to tightly roll the dough into a log. Place the log in the freezer for 30 minutes or the refrigerator for at least an hour. Repeat with the remaining half of the dough and filling ingredients.
  4. Preheat the oven to 350 degrees. Line a baking sheet with Silpat mats or parchment paper.
  5. After the dough has chilled again, slice each log into half inch slices (about 24 per log). Place on the prepared baking sheets and bake for 10 to 12 minutes. Transfer to a wire cooling rack and allow to cool completely before icing.
  6. To make the icing: In a medium bowl, combine the butter and instant espresso powder. Add the confectioners’ sugar and vanilla and whisk until it just comes together. Next, add the milk, one tablespoon at a time until the desired consistency is reached. It should be thin enough to drizzle, but thicker than a glaze.
  7. With the cookies on a wire cooling rack set over parchment paper, drizzle the icing over the them with your whisk. Allow the cookies to set up for a few minutes before stacking or storing.

Source: Bakingdom as seen on Sing For Your Supper

Sunday, December 18, 2011

Peanut Butter Cookie with Salted Peanut Caramel

Hello friends.  I'm sorry that I haven't blogged AT ALL this month.  It's been busy, to say the least.  Somehow, I still found time to participate in not one but two holiday cookie exchanges, though.  So, I figure I'll share the yummy cookie recipes with you all this week.

This one was my favorite of the three that I made.  I'm a sucker for anything with caramel (and, I'll admit to cheating and making semi-homemade caramel in this case but left the original recipe intact in case you have more time than I did).  They're pretty, too.  A wonderful addition to any holiday spread!

Peanut Butter Cookie with Salted Peanut Caramel

Yields: 50 cookies


Peanut Butter Cookie with Salted Peanut Caramel
Photo credit: Emily H.
For the cookie dough
  • 8 tablespoons (115g) unsalted butter, at room temperature
  • 1/2 cup (120g) packed light brown sugar
  • 1/2 cup (100g) granulated sugar
  • 1 large egg, at room temperature
  • 1 teaspoon vanilla extract
  • 3/4 cup (200g) creamy salted peanut butter (see Note)
  • 1 3/4 cups (250g) flour
  • 1/2 teaspoon baking soda
  • 1/4 teaspoon salt
For the salted peanut caramel*
  • 1 cup (250ml) heavy cream
  • 1/2 cup (125ml) water
  • 1 cup (200g) granulated sugar
  • 1 tablespoon light corn syrup
  • 1/8 teaspoon coarse salt
  • 3/4 cup (100g) finely chopped roasted salted peanuts
*Note: If you're feeling lazy like me, just add a splash of cream (or milk) and pinch of salt to caramel candies  and melt those down.  Fill the thumbprint wells with the caramel mixture then top with chopped nuts.


Optional: 4 ounces bittersweet, semisweet, or milk chocolate, melted


Directions 
  1. Preheat the oven to 350F and line two baking sheets with parchment paper or silicone baking mats.
  2. With an electric mixer, or by hand, make the cookie dough by beating the butter, brown and granulated sugar until smooth. Beat in the egg and vanilla until well blended. If using an electric mixer, scrape down the sides of the bowl. Beat in the peanut butter.
  3. In a separate bowl, whisk or sift together the flour, baking soda, and salt. Gradually add the dry ingredients to the peanut butter mixture and stir until there are no patches of flour.
  4. Scoop up tablespoon-sized portions of the dough and roll each piece between your hands so they’re as smooth as possible so they don’t crack at the edges when performing the next step.
  5. Space them 1 1/2-inches (2 cm) apart on the baking sheets, then use the rounded end of a wooden spoon, or your thumb, to make a depression in each one. Don’t worry much if the sides crack; push them back together.
  6. Bake the cookies for 13-16 minutes, rotating the baking sheets midway during cooking, until they are light-golden brown and the edges barely start to darken. Remove from oven, and while they’re warm, press in to reinforce each depression with the end of the wooden spoon. Let cool completely.
  7. Make the salted peanut caramel by warming the cream in a saucepan or microwave, and setting it aside.
  8. Cook the water, 1 cup sugar, corn syrup, and salt to a caramel, gently swirling the pan only if necessary (to ensure it melt and cooks evenly) until it turns a nice golden brown. Remove from heat and immediately whisk in the hot cream in a slow, steady stream.
  9. Cool until warm and pourable, then add the chopped peanuts. Spoon some of the caramel into each cookie, letting it set for about an hour, if you want to drizzle them with chocolate.
Storage: Cookies will keep in an airtight container, at room temperature, for 3 to 4 days. The unbaked dough can be rolled into rounds and stored in a heavy-duty freezer bag in the refrigerator or freezer, until ready to bake.
Source: The Art and Soul of Baking by Cindy Mushet as adapted by and seen on David Lebowitz

Friday, September 30, 2011

Homemade Girl Scout Samoa Cookies

This is the final course on this week's sharing of items from my 23 Things in 2011 list.  You might also know them as Caramel Delites.  Whatever you call them, we can all agree on one word: DELICIOUS.

Did you know that the reason Girl Scout Cookies are known by different names is because there are two bakeries that supply the nation with these delectable cookies?  Each manufacturer has their own names for the cookies and that's why the name is different depending on what region you're in.  Growing up as a Girl Scout myself (Troop 2180 represent!) I remember them going by both names.  Yep, I was one of those girls that sold you cookies door-to-door, at your parents' office, and even at your neighborhood Kroger.  I even have the badges to prove it :).

It's strange that I even like these cookies.  I HATE the texture of coconut but the flavor is fine by me.  I think what makes it work for me in this cookie is the fact that the coconut is completely drowned in gooey, delicious caramel.  Who can say no to that??

Yes this cookie is a little time consuming to make.  Yes, I couldn't get my holes to stay open when I baked them (I think putting them in the freezer a few minutes before baking would help them to retain their shape and therefore the hole or if you're fortunate enough to own a donut pan apparently those are awesome for this application, too).  But, that didn't make them any less appetizing...just ask my Dinner Club friends Jeff, Jackie, Toni, Ke'Mani, Scott and Emily.  They sampled these at our Luau themed Dinner Club (hey, I figured the coconut would loosely fit and it was a bonus dish anyway!).  I'd even consider making them in a bar version to save time in the future.  Taste over aesthetics any day when it's just me wanting to eat the whole batch.  Noms!

Two Years Ago: Cha Cha's White Chicken Chili - My favorite white chicken chili but watchout because it definitely packs a lot of heat!

Homemade Girl Scout Samoa Cookies

Homemade Girl Scout Samoa Cookies

Yields: 3-1/2 to 4 dozen cookies

Ingredients

For the Cookies
  • 1 cup butter, softened
  • 1/2 cup sugar
  • 2 cups all purpose flour
  • 1/4 tsp baking powder
  • 1/2 tsp salt
  • 1/2 tsp vanilla extract
  • Up to 2 Tbps milk
For the Topping
  • 3 cups shredded coconut (sweetened or unsweetened)
  • 12 oz good-quality chewy caramels (I used the Kraft ones)
  • 1/4 tsp salt
  • 3 Tbsp milk
  • 8 oz dark or semisweet chocolate (chips are okay)

Directions

To make the cookies:
  1. Preheat oven to 350 degrees.  
  2. In a large mixing bowl, cream together butter and sugar.  Mix in flour, baking powder and salt at a low speed followed by the vanilla and milk as needed to make the dough come together without being sticky (it's possible you may not need any milk at all).  The dough should come together in a soft, not-too-sticky ball.  Add in a bit of extra flour if your dough is very sticky.  
  3. Roll the dough (working in 2-3 batches) out between pieces of wax paper to about 1/4" thickness and use a 1 1/2" cookie cutter to make rounds.  Place  on a parchment lined baking sheet and use the end of a wide straw to cut a smaller center hole.  Repeat with remaining dough.  Alternatively, use scant tablespoons of dough and press into an even layer in a mini donut pan to form the rounds.  
  4. Bake cookies for 10-12 minutes until bottoms are lightly browned and cookies are set.  If using a mini donut pan, bake for only about 10 minutes, until edges are light gold.  Cool for a few minutes on the baking sheet then transfer to a wire rack to cool completely.
To top and decorate the cookies:
  1. Preheat oven to 300 degrees. Spread coconut evenly on a parchment-lined baking sheet (preferably one with sides) and toast 20 minutes, stirring every 5 minutes, until coconut is golden. Cool on baking sheet, stirring occasionally. Set aside.
  2. Unwrap the caramels and place in a large microwave-safe bowl with milk and salt. Cook on high for 3-4 minutes, stopping to stir a few times to help the caramel melt. When smooth, fold in toasted coconut with a spatula.
  3. Using the spatula or a small offset spatula, spread topping on cooled cookies, using about 2-3 tsp per cookie. Reheat caramel for a few seconds in the microwave if it gets too firm to work with.
  4. While topping sets up, melt chocolate in a small bowl. Heat on high in the microwave in 45 second intervals, stirring thoroughly to prevent scorching. Dip the base of each cookie into the chocolate and place on a clean piece of parchment paper. Transfer all remaining chocolate (or melt a bit of additional chocolate, if necessary) into a piping bag or a ziplock bag with the corner snipped off and drizzle finished cookies with chocolate.  Let chocolate set completely before storing in an airtight container.

Source: Baking Bites