Showing posts with label orange. Show all posts

Wednesday, September 4, 2013

Orange Push-Up Smoothies

Hi!  I'm popping in really quickly to share a quick recipe.  Who remembers those orange push up pops with the primary colored dots on the outside?  They remind me of my Grandparents because they always bought them for us when we visited.  It's been years since I've had one and frankly, I'm not sure if they still make them anymore?

When I made this recipe, it reminded me of that long lost orange push-up pop flavor.  The only difference was that it was in the form of a smoothie rather than the classic and fun push-up pop.  Depending on the brand of orange concentrate you use you may need more or less sugar as there are varying levels of "orange peel" bitterness to each brand.

Bottoms up and here's to our childhoods!

Orange Push-Up Smoothies


Orange Push-Up Smoothies

Ingredients

  • 1 can orange juice concentrate, slightly thawed 
  • 1 cup milk 
  • 1/2 cup sugar, or to taste
  • 1/2 teaspoon vanilla extract 
  • 2 cups ice, or to taste 
Directions
  1. Combine all ingredients, except for the ice, in a large blender and blend until smooth and creamy, taking care the sugar has dissolved and is well incorporated. If desired, add a splash more water or more milk. Add the ice and blend until smooth. Makes approximately three eight-ounce portions.
Source: Averie Cooks as seen on Delicious Melicious

Monday, September 19, 2011

Foil-Baked Fish with Black Beans and Corn

This past Friday night I was in a pinch for a quick meal and so I went scavenging my freezer to see what I could find.  This is when I came across these fish foil packets and my mouth immediately began watering.

The first time I made these they were SO GOOD.  And, since the recipe made 4 packets, I figured I'd freeze the other 2 for later.  Trust me, you want all of those packets of goodness since it freezes well and tastes great.  The texture didn't get all weird and the flavor was not at all subdued by the freezing process.  When I put the fish in my mouth the second time, it was just as wonderful as I remembered.

Spicy and zesty from the orange-chipotle compound butter, this fish is just bursting with flavor and is very moist.  The fact that it's contained in a foil packet makes clean-up a breeze.  It just may be one of my favorite fish preparations.  If you can't handle heat, I'd use fewer chipotle peppers.  Chris and I love spicy foods and even this was bordering too hot for us!

Don't forget to freeze some extra packets to grow your freezer stock!

One Year Ago: Pineapple Teriyaki Chicken
Two Years Ago: Slow Cooker Pulled Pork (or make it with chicken) - This is a staple for dinners and potlucks alike for me.  It's gobbled up in full every time.  I even made it on our recent vacation to Orlando.  Yes, I brought my crockpot with me on vacation.  Don't judge.

Foil-Baked Fish with Black Beans and Corn


Foil Baked Fish with Black Beans and Corn

Ingredients
  • 4 skinless white fish fillets (6 to 8 oz each), 1-inch thick
  • salt and pepper
  • 4 Tbs unsalted butter, softened
  • 2 tsp minced chipotle chiles in adobo sauce
  • 1 tsp grated orange zest
  • 2 Tbs freshly squeezed orange juice
  • 2 cloves garlic, minced
  • 1 (16-oz) can black beans, rinsed and drained
  • 2 cups corn kernels
  • 1/2 red onion, minced
  • 2 scallions, minced
  • 1/4 cup chopped fresh cilantro
Directions
  1. Adjust the oven rack to the lower-middle position and heat to 450 degrees.
  2. Pat the fish dry with paper towels and season with salt and pepper.  Using a fork, mix together the butter, 1 teaspoon chipotle, orange zest, half the garlic, 1/2 tsp salt, and 1/4 tsp pepper in a medium bowl until well-combined.  Spread butter mixture over the fish.
  3. Combine the beans, corn, onion, scallions, 2 tablespoons of cilantro, orange juice, remaining chipotle, remaining garlic, scallions, 1/2 teaspoon salt, and 1/4 teaspoon pepper in a bowl.
  4. Lay four 14-inch lengths of foil on the counter and divide the bean mixture evenly over the lower half of each piece of foil.  Top with fish, and fold the foil over the fish, folding the edges to seal.
  5. Arrange the packets in a single layer on a rimmed baking sheet and bake until the fish is just cooked through, 15 to 20 minutes*.  Carefully open the packets and sprinkle with remaining cilantro.  Serve.
Make ahead notes: If you are freezing the packets, follow all the steps through #4.  When you're ready to eat them, either thaw in the fridge overnight then cook as directed above or take the packets straight from the freezer and cook about 45 minutes or until fish is opaque and flakes with a fork.  

Source: America's Test Kitchen, The Best Simple Recipes as seen on Pink Parsley

Wednesday, June 22, 2011

Summer Strawberry Salad with Poppy Seed Vinaigrette

I have a cousin that is OBSESSED with Panera.  I'm talking every time she is in a city that has one it is on her "to do" list.  Sure it's a chain but who can blame her?  They do have really delicious food and chains provide great consistency no matter where you go.

This recipe is being dusted off from the archives.  It sat in the deep dark recesses of that black box that is my husband's computer hard drive for over a year before seeing the light of day again right here, right now.  You see, this time last year I was making lots of food but was lazy about blogging.  And then by the time I got time to blog, it just didn't worth doing so because the season had already changed.
Ah seasons.  This salad TOTALLY captures the spring/summer season.  It embodies all that is good about the bountiful seasonal fruits and veggies.  It is also inspired by my cousin's favorite restaurant, Panera.  Please go make this salad today.  It's a beautiful display of color bursting with natural sweetness and filled with nutrition!


Two Years Ago: Pasta Salad - This one ALWAYS gets gobbled up when I bring it to a party!

Summer Strawberry Salad with Poppy Seed Vinaigrette


Ingredients

For the dressing:
  • 1/3 cup apple cider vinegar
  • ¾ cup sugar
  • 2 tbsp. minced shallot
  • ¼ tsp. dry mustard
  • 1 tsp. salt
  • 6 tbsp. light mayonnaise
  • 3 tbsp. freshly squeezed orange juice
  • 6 tbsp. vegetable oil
  • 1½ tsp. poppy seeds
For the salad:
  • Romaine lettuce, washed and dried
  • Strawberries, hulled and sliced
  • Blueberries
  • Mandarin orange segments
  • Fresh pineapple, cubed
Directions
  1. In the bowl of a food processor, combine the vinegar, sugar, shallot, dry mustard, salt, mayonnaise and orange juice.  Process to blend well.  With the feed tube open and the processor on, add the vegetable oil in a steady stream and continue processing until incorporated.  Add the poppy seeds and pulse briefly just until blended.  Transfer to an airtight container and refrigerate until ready to use.
  2. To make the salad, chop the lettuce into bite-size pieces.  Plate individual servings of the lettuce in salad plates.  Top each serving with strawberries, blueberries, mandarin oranges and pineapple cubes as desired.  Drizzle lightly with the poppy seed dressing and serve immediately.
Source: Salad from Annie's Eats; Dressing from Jamie Cooks It Up

Saturday, February 12, 2011

Candied Orange and Walnut Salad with Orange Balsamic Vinaigrette

Look at all the beautiful colors and textures in this salad!


Do you see how the candied oranges glisten like stained glass?


And the candied walnuts?  Crunchy, tantalizingly spicy and sweet and to die for.  If you're not into spicy, watch out and suggest you reduce the level of peppers used or omit it all together.  Personally I loved the surprise little kick to these crazy nuts :).


You may be asking yourself right now what's up with all of the candied stuff.  Well, for our recent Dinner Club our hosts Sig and Kristen chose the theme of candy.  Sweet, sweet sugary candy.  Wanting to be up for a challenge, I chose to bring something from the salad/vegetable category.

Yes, this certainly stretched our culinary imaginations to the fullest.  Emily and Scott chose to serve GUMMY BEAR kiwi wontons with blackberry dipping sauce as our starter.  Surprisingly this was quite delicious and if I wasn't told there were gummy bears inside I don't think I would have known any better.  We joked that they were filled with Gummiberry Juice as the sugar started coursing through our veins and we got a bit bouncy from the extra energy.  But we were just getting started because then came my salad, Kemani and Toni's delightful homemade raviolis filled with cocoa encrusted pork and topped with a white chocolate alfredo sauce, Kristen and Sig's peanut butter cup chicken and lemonhead chicken along with caramel, oreo cookie, and chocolate filled croissants, and lastly, Jackie and Jeff's peanut butter cup cupcakes and lemon pop rock cupcakes.

Caramel croissant, gummy bear kiwi wontons, homemade ravioli with white chocolate alfredo sauce, and peanut butter cup cupcakes.  Photo credit: Emily H.

The sugar rush that followed?  OH. MY. GOD.  Let's just say it's a good thing our hosts had very fun Minute to Win It games to help us expend all of our energy before we subsequently crashed.

Minute to Win It games to burn off all of dinner's sugar: Candy Land Card Flip, Bolt Stacking, Football Roll, and Licorice jump roping.  Photo credit: Emily H.

This salad not only looked beautiful but it tasted really good too.  Kemani said that it was just like the salad at  Dewey's.  Wow what a complement!  I was very pleased with how it turned out and I know I'll be making the candied nuts again for snacking.  The oranges tasted just like those fruit slices so Chris really enjoyed them (it's his favorite flavor).  Though, you can also candy other citrus like lemons and grapefruits, if you prefer.  And then the dressing?  Delicious.  Will make again, too.

So serve up this sweet salad for your sweetie on Valentine's Day.  You'll thank me later :).

Looking for more Valentine's Day Ideas? It seems that the clear favorite on my site are these Heart-shaped Red Velvet Whoopie Pies but the Chocolate Chip Cookie Dough Truffles will be the way to a chocolate lover's heart.  But if you want a full meal, try this Linguine with Clam Sauce.  Not only is it delicious but it's simple and I hear that clams are an aphrodisiac.  Ooh la la!

Candied Orange and Walnut Salad with Orange Balsamic Vinaigrette
Printer-Friendly Version

Photo Credit: Emily H.


Yields: 2 entree-sized or 4 starter-sized salads

Ingredients
  • 2 large handfuls of baby salad greens
  • 1/4 to 1/2 cup dried cranberries (craisins)
  • 1/4 to 1/2 cup feta cheese
  • 1/4 to 1/2 candied spiced walnuts (recipe to follow)
  • candied oranges (recipe to follow)
  • orange balsamic vinaigrette (recipe to follow)
For the candied spiced walnuts 
  • 1/2 cup powdered sugar, sifted
  • 1/2 - 1 teaspoon chipotle, ancho, or cayenne chili powder
  • 1/2 teaspoon fine sea salt
  • 2 heaping cup walnuts (or can use pecans)
For the candied oranges
  • 2 organic oranges, washed (can also use lemons or grapefruit)
  • Water for boiling
  • Ice water
  • 2 cups sugar
  • 1 cup water
For the orange balsamic vinaigrette
  • 1/4 small sweet onion such as Vidalia
  • Zest of 1 large orange (preferably organic)
  • 2 cloves garlic, peeled
  • 1 Tablespoon orange marmalade or undiluted frozen orange juice
  • 6 Tablespoons balsamic vinegar
  • 12 Tablespoons extra virgin olive oil
  • 1/2 teaspoon fine sea salt
Directions
  1. Allow at least 24 hours to make the candied oranges since they need ample drying time.  To make the candied oranges, cut the oranges into thin slices (not too thin or else they tear apart too easily) removing the ends and any seeds. Bring water to a boil in a saucepan and blanch the orange slices for about a minute. Drain the orange slices and plunge them into a bath of ice water. Drain. Meanwhile, combine the sugar and 1 cup of water in a large saucepan and stir over medium heat until the sugar is dissolved. Bring to a simmer and add the orange slices. Let simmer (don’t boil) for an hour (you can simmer as much as 2 hours). Remove slices from hot sugar syrup and set on a cooling rack over a baking sheet to dry. Take up to 24 hours to dry.
  2. To make the vinaigrette, in a blender or food processor, puree the onion, orange zest, garlic, and orange marmalade.  Add the vinegar, olive oil, and salt then blend to emulsify.  Taste and balance sweetness (add a pinch of sugar, the syrup from the candied orange slices, or more marmalade), acidity (add a few more drops of vinegar), and salt.  Pour vinaigrette into a squeeze bottle.  Cap and refrigerate.  Can be made a day ahead.
  3. To make the candied walnuts, preheat oven to 350 degrees F.  In a medium-sized bowl, mix together sugar, chili powder, and salt.  Bring a small saucepan of water to a boil.  Add nuts and boil for 3 minutes (if using pecans, boil only for 15 seconds).  Drain the nuts well then shake in bag of sugar mixture until thoroughly coated.  The sugar will melt slightly.  Transfer the nuts to a baking sheet covered with parchment paper or silicone baking mat.  Bake until they are a deep golden brown, turning halfway through baking, about 15 minutes. Watch closely because the sugar burns easily.  Cool completely and then store in a air-tight container until ready to use.
  4. When ready to serve, in a large mixing bowl, toss salad greens and 1/2 to 3/4 of the dried cranberries, feta cheese, and walnuts with enough of the vinaigrette to coat each leaf.  You will likely have vinaigrette leftover for a couple more salads later.
  5. Arrange the dressed salad in the middle of the salad plate.  Finish the salads by garnishing with remaining dried cranberries, feta cheese, walnuts, and candied orange slices.
Source: A Christine's Kitchen Chronicles original with inspiration from many sources.  Candied walnuts, salad dressing, and salad concept adapted from Luna Cafe.  Candied orange slices slightly modified from Use Real Butter as originally adapted from Martha Stewart and Culinary School of the Rockies.

Monday, June 21, 2010

Orange Berry Muffins

Hi again.  Sorry I've been so sporadic in posting.  Toby keeps me very busy and even though I wake up at like 6AM daily now because of him I've been spending my extra hours cooking and uploading vacation photos rather than blogging.  There are so many great things I still need to blog about but I've been struggling to sit down and make myself write...err...type. 

Posting recipes is surprisingly a lot of work!  There's witty commentary to be made, photo editing, finding the recipe again months after you made the dish (I was about to give up on finding this one again!), recipe copy/pasting/modifying, and then making a printer-friendly link (another project left unfinished...I was supposed to back convert older recipes and am probably only halfway through.  Mental note to self to finish that up...).  Now add to the mix a dog that you have to watch to make sure he's behaving and you've got yourself some blogging difficulty.  It's a wonder I can even *cook* anymore.  But, I wouldn't trade my beagle Toby for the world.  He's awesome and so loving!

Back to the story on this recipe.  I made this one wayyyy back on EASTER WEEKEND!  Whoa that's a long time ago.  I had made these to eat as a snack in the car and for quick and inexpensive breakfasts while we were spending time with our friends Sig and Kristen on a couples road trip to Washington DC to see the Cherry Blossoms.  They were beautiful albeit I had expected it to be more enchanting.  Guess that's what happens when you go in peak season.  I was so mad when I saw people picking the blossoms and/or whole branches off the trees.  Way to ruin it for everyone!  The city itself was soooo much more awesome than I remember.  The last time I had gone was probably elementary school.  I definitely would like to visit again someday.  We *almost* saw President Obama on the way to Easter Sunday service but got tired of waiting for (at the time) what we thought might actually be nothing.

I'd have to say that Sig and Chris probably had more than their fair share of these muffins.  And I can't blame them.  They're TASTY!  The orange zest (use organic oranges to avoid the pesticides!) gives it a great morning wake-up zing while the berries burst with flavor.  The zest also smelled so fragrant and citrusy when I was rubbing it in the sugar...I'll admit I kind of wanted to stop right there and just eat the orange flavored sugar haha!  They are relatively healthy because I substituted some whole wheat flour for the white and there's relatively little sugar for a sweet bread type recipe.  I must have added strawberries to my muffins because I had some leftover.  The original recipe was just for blueberries but why not do a berry mix for some gorgeous color :).  I definitely plan on making this one again.  Especially with berries being in season now.  Yum!

One Year Ago: Exquisite Pizza Sauce

Orange Berry Muffins
Printer-Friendly Version


Yields: 12 Muffins

Ingredients
  • Grated zest and juice of 1 orange
  • About ¾ cup lowfat buttermilk
  • 2 large eggs
  • 3 tablespoons honey
  • 1 stick (8 tablespoons) unsalted butter, melted and cooled
  • ⅓ cup (2.33 ounces) sugar
  • 2 cups (9.6 ounces) all-purpose flour (I substituted 1 cup whole wheat flour for the same amount of all-purpose white flour)
  • 2½ teaspoons baking powder
  • ¼ teaspoon baking soda
  • ¼ teaspoon salt
  • 1 cup blueberries and/or strawberries – fresh, preferably, or frozen (not thawed)
  • Decorating sugar, for topping (optional)
Directions
  1. Center a rack in the oven and preheat the oven to 400 degrees F. Line the pan with paper muffin cups. Alternatively, use a silicone muffin pan, which needs neither greasing nor paper cups.
  2. Pour the orange juice into a large glass measuring cup or a bowl and pour in enough buttermilk to make 1 cup. Whisk in the eggs, honey and melted butter.
  3. In a large bowl, rub the sugar and orange zest together with your fingertips until the sugar is moist and the fragrance of orange strong. Whisk in the flour, baking powder, baking soda and salt. Pour the liquid ingredients over the dry ingredients and, with the whisk or a rubber spatula, gently but quickly stir to blend. Don’t worry about being thorough – the batter will be lumpy and bubbly, and that’s just the way it should be. Stir in the berries. Divide the batter evenly among the muffin cups.
  4. Bake for 22 to 25 minutes. If you want to top the muffins with decorating sugar, sprinkle on the sugar after the muffins have baked for 10 minutes. When fully baked, the tops of the muffins will be golden and springy to the touch and a thin knife inserted into the center of the muffins will come out clean. Transfer the pan to a rack and cool for 5 minutes before carefully removing each muffin from its mold.
Source: Slightly modified from Dorie Greenspan’s Baking: From my Home to Yours, as seen on The Way the Cookie Crumbles

Saturday, April 24, 2010

Slow Cooker Carnitas

Pssst...did you miss me?  Probably not as my readership isn't all that high.  I apologize for not blogging in nearly 2 weeks...I'm such a bad blogger! :( *goes and runs to hide in the corner*.  Don't worry, I'm still alive, and I'm still cooking.  And, I'm apparently behind by blogging recipes from MARCH when it's nearly the end of April.  My bad. 

I'll admit, I've been a slacker on not just blogging but also with Jazzercising lately.  I used to try to blog about every 2-3 days but now I'm lucky to do once a week.  I'm down to an average of 2 days per week Jazzing instead of my 3-4 that I was doing previously.  I think prepping for and then going to DC for Easter weekend just threw off my rhythm.  And then there's the whole getting ready for big Euro vacation and the nail biting with the Icelandic volcano whose name nobody can actually say.  I hope that once vacation time is over I can ease back into my routine of not just cooking but also blogging about it in a timely manner and exercising more to make sure I don't pack on any extra pounds (especially after eating such delicious foods abroad!).

OK.  Now back to the reason you're probably here - this slow cooker carnitas recipe.  I remember when I cooked this meal (apparently on March 18th based on the photo timestamp) I was so impressed by how flavorful it was to cook.  And better yet, it was way easy...like a good crockpot recipe should be!  The slow cooked meat shredded easily and practically melted in your mouth.  If you don't eat pork, no worries, I would not hesitate to use this same recipe on a different type of meat like chicken or beef because it was a serious fiesta of flavors in your mouth!  In fact, I used beef this time because I had a 2 pound chunk already in the freezer that needed using up.  The cumin gave the meat a nice smokey flavor and the citrus juice gave it some zip and brightness.  Delicious and will definitely make again because I LOVE Mexican food :).

Slow Cooker Carnitas
Printer-Friendly Version


Yields: 6 Servings

Ingredients
  • 2 pounds pork shoulder (or equivalent of your choice of meat)
  • 1/2 cup freshly squeezed orange juice (about 1 large orange)
  • 1/4 cup freshly squeezed lime juice (about 1 large lime)
  • 7 cloves garlic (whole intact)
  • 1/2 tablespoon kosher salt
  • 1 tablespoon cumin
  • 1/2 cup beef broth
  • corn or flour tortillas
  • toppings: sour cream, salsa, cheese, onions, bell peppers, sliced avocado, etc (optional)
Directions
  1. In a small bowl, combine the salt and cumin. Rub mixture all over the pork, then put into a 6 quart slow cooker. Add whole garlic cloves. Squeeze on the citrus, and pour the beef broth evenly over the top.
  2. Cook on low for 8-10 hours, or until the pork shreds quite easily with a fork. Shred meat fully and serve on warmed tortillas with desired toppings.
Source: A Year of Slow Cooking

Tuesday, April 13, 2010

Blueberry Citrus Cake

Happy (Belated) First Birthday Blog!  And, Happy Birthday to my Mother-in-Law Mary Lynn!

In a way, this is a faux birthday for the blog because I didn't actually start this public blog until the Fall of 2009.  However, it's been a year since I first started sharing recipes with my friends and family on our personal website, the Chronicles of the Chrises and those recipes were loaded with backdates this this website.  Back when I started blogging recipes, it was just a way for me to share family recipes and things that I was cooking with those that were close to us.  Back then, I didn't know about food blogging ettiquite but I now know and make an effort to take my own photos.  Eventually I thought why not start a public blog and this blog was born with a name to mirror our other more life-centric website. 

I also can't believe the improvement to my skills that's happened through the past year or so.  Honestly, I used to be kind of the black sheep of my extended family because I NEVER cooked and came from a family of cooks/restaurant owners.  Cooking became a necessity when I was living on my own in college.  It was learn to make food to eat or eat out...which on a poor college student's budget isn't so friendly on the pocket books.  I started by committing myself to trying at least 1 new recipe a week.  After I got married about 2 years ago, the domestic bug must have bit because then I started cooking even more.  I wanted to be a good wife and have dinner on the table for my husband by the time he got home from work!  And most recently, we bought a house last Fall and we gutted our entire kitchen on the same day that we closed.  We remodeled and put in a beautiful gourmet kitchen and I'm so glad that we did because nearly all my free time is spent in the kitchen trying new recipes now.  Hey, gotta get our money worth, right? :)

What I'm not new to is the concept of social media and blogging.  I grew up with the Internet (Prodigy shout out!) and chat rooms (Microsoft Comic Chat woot!).  I had to take a mandatory typing class in Junior High and because I'd been typing since I was like 6 I came into the class typing faster and more accurately than the teacher.  (Unfortunately, they made me take the class anyway...waste of time!).  I have had a personal blog since at least 2001...maybe even 2000 (I'd have to go back and see).  I distinctly remember writing about September 11th in it and was so proud that I've kept posting to it through all these years.  (I think I have to go and get my 2010 post in there!)

Anyway, I hope that you enjoy the recipes that I share with you.  This particular one is deliciously light and refreshing.  I made it for Mary Lynn's birthday and we all really enjoyed it.  I will be making this one again!  Since I started making a lot of things from scratch I've generally started turning my nose up to boxed mixes but this recipe just uses the boxed mix as a base and then adds all these delicious goodies like zested lemon and oranges, blueberries, and a homemade frosting.  In my eyes, this still makes it homemade!

I'm sorry but my sucky photo taking skills don't do this cake justice at all and you must try it!  And/or go to the Better Home and Gardens site where I found the recipe to see a prettier professional picture.  It's the perfect cake for Spring and Summer!

One Year Ago: Crockpot Turkey and Cakeballs

Blueberry Citrus Cake
Printer-Friendly Version


Prep Time: 30 min
Bake Time: 35 min
Cool Time: 2 hours
Yields:  12 Servings

Ingredients
 
For the Cake
  • 1 package 2-layer-size lemon cake mix
  • 1/2 cup orange juice
  • 1/2 cup water
  • 1/3 cup cooking oil
  • 3 eggs
  • 1-1/2 cups fresh or frozen blueberries
  • 1 tablespoon zested orange peel (from approximately 1/2 large orange)
  • 1 tablespoon zested lemon peel (from approximately 1 medium lemon)
For the Citrus Frosting
  • 1 (3 oz) package cream cheese, softened
  • 1/4 cup (1/2 stick) butter, softened
  • 3 cups powdered sugar
  • 2 tablespoons orange juice
  • 1 cup whipping cream
  • 2 tablespoons zested orange peel (from approximately 1 large orange)
  • 1 tablespoon zested lemon peel (from approximately 1 medium lemon)
Directions

To Prepare Cake
  1. Preheat oven to 350 degees F. Grease two 8 inch or 9 inch round baking pans; set aside.
  2. In a large mixing bowl combine cake mix, orange juice, water, oil, and eggs. Beat with an electric mixer on low speed for 30 seconds. Increase speed to medium; beat for 2 minutes. With a wooden spoon or rubber spatula gently fold in blueberries, orange peel, and lemon peel. Pour batter into prepared pans.
  3. Bake for 25-30 minutes (9 inch pans) or 35-40 minutes (8 inch pans) or until a wooden toothpick inserted near center comes out clean.
  4. Cool layers in pans on wire racks for 10 minutes. Remove cakes from pans. Cool thoroughly on racks. While cake is cooling, prepare Citrus frosting using the directions below.
  5. Frost cooled cake with Citrus Frosting. Garnish with orange peel curls, if desired. Store frosted cake in the refrigerator.

To Prepare Citrus Frosting
  1. In a medium bowl beat together softened cream cheese and softened butter until fluffy.  Add sifted powdered sugar and orange juice. Beat until combined.
  2. In a small bowl beat whipping cream to soft peaks; add to cream cheese mixture.
  3. Add zested orange peel and zested lemon peel. Beat on low until combined.
Source: Better Homes and Gardens

Monday, February 15, 2010

Honey Mustard Sauce

This sauce is very versatile.  I made it to accompany my Ham, Cheese, and Green Pepper Pretzel Bites which were brought to my Uncle's Super Bowl Party and it found second life as a dip for Pretzel Chicken Tenders later in the week for dinner.  It'd also be great over a salad, as a spread for sandwiches (my cousins made various cold cut sandwiches for the party and people ended up using the sauce for this application, too!) or as a dip for regular soft pretzels.  It really gives dishes that special sweet n spicy creamy zip.

I don't think I have to remind you that Chris HATES mustard...and mayonnaise for that matter.  The sight and smell of it literally makes him want to vomit...or at least that's what he tells me.  Thankfully, we've never had any issues and since it's a side (optional) dip he doesn't have to partake.

This recipe was modified from Ms. Paula Deen, who by the way is coming to Cincinnati for a special cooking show.  You can have dinner with her and/or go to a cooking demo.  How cool is that?!  Anyway, for this recipe I subbed dijon mustard for the yellow and removed the horseradish (figured the dijon would have that needed zip).  I also didn't need to use any of the orange juice but depending on the consistency you are going for you may decide you want/need to add some.  Oh yes, and there is 1 step to this recipe.  It doesn't get much easier than that!

Sorry this picture is so shady.  I snapped one of it near the end of the night.  I can't say it was ever that pretty to begin with but since it was heavily used it got drippy all over the bowl haha.

Honey Mustard Sauce
Printer-Friendly Version


Prep Time: 5 minutes
Chill Time: 2 hours
Ready In: 2 hours 5 minutes
Yields: 1 1/4 cups

Ingredients
  • 3/4 cup mayonnaise
  • 3 tablespoons honey
  • 2 tablespoons dijon mustard
  • 1 tablespoon lemon juice (or juice from 1/2 lemon)
  • 2 tablespoons orange juice (more or less as needed)
Directions
  1. Combine all ingredients except orange juice; stir well. Thin to pouring consistency for dressing or dipping consistency for dips with orange juice. Cover and chill for 2 or 3 hours.
Source: Modified from Paula Deen

Monday, September 28, 2009

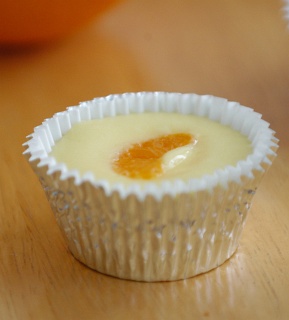
Cheesecake Cupcakes

The theme for this week is to use up as much of the house warming party leftover food as possible.  It takes some creative repurposing so we'll see what I come up with.  The first item that I made tonight were Cheesecake Cupcakes to get rid of some of those nilla wafers that we had leftover from the chocolate fountain (which, omg was awesome!). 

The recipe comes from a site that I discovered during my engineering days at UC.  If you look at the original recipe, the formatting for the instructions is a little different than a traditional cookbook but makes so much sense and takes up so little room.

Cheesecake Cupcakes
(Source: Cooking for Engineers)
Serves 12

Ingredients
  • 1 lb cream cheese, softened
  • 2 large eggs
  • 1 tsp vanilla extract
  • 1/2 c sugar
  • 12 vanilla wafer cookies (such as Nilla Wafers)
  • topping of choice - cherry pie filling, strawberry pie filling, blueberry pie filling, mandarin oranges, chocolate kisses or chips, nuts, etc...choose your poison ;)
Directions
  1. Preheat oven to 350 degrees.
  2. Line a muffin tin with aluminum foil muffin cups.
  3. Place a vanilla wafer cookie in the bottom of each cup.
  4. In a mixing bowl, cream together cream cheese, sugar, vanilla and eggs.  Let rest and disperse air bubbles by tapping mixture.  (This will prevent the cake from "falling" after you remove it from the oven.)
  5. Fill cups about 3/4 full with cream cheese mixture.
  6. Top with topping then bake for 15 minutes at 350 degrees.
  7. Take out of oven and remove cups from pan.  Place on a cooling rack until completely cooled then transfer to refrigerator.  Refrigerate until ready to serve.