Showing posts with label buttermilk. Show all posts

Monday, September 10, 2012

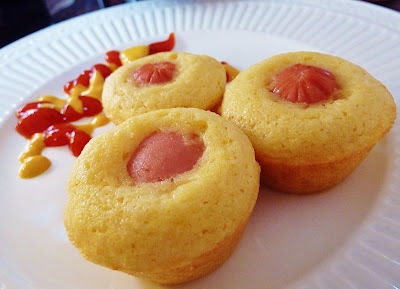
Mini Corn Dog Muffins

Hi, it's me!  Bet you weren't expecting me after I told you I was leaving, huh?  Well it turns out that my scheduled guest poster for today, Erika of Teenage Taste, had a family emergency and ended up not being able to complete her post to share on my blog today.  I really LOVE her blog so still think you should check it out anyway.  She had me for Secret Recipe Club once and took some beautiful photos of my Cheddar Cauliflower Soup.  Plus, pretty much everything she posts just looks incredibly delicious.  The part I think is the coolest?  She's still in high school!  My what talent Erika has and I know she will go far in life :).

But that left me with a hole in my blog lineup at about 10PM on Sunday.  Thank goodness I have a stockpile of posts!  Today, I'm choosing to share a very simple recipe with you.  And one that's PERFECT for Monday night football in case you need something to nosh on during the big game (WHO DEY!).

It's also a great quick meal to bring to new parents.  They freeze well (zap them in the microwave to refresh!) and their bite-sized nature makes them easy to pop in your mouth with one hand (sans plate) as you try to maneuver a baby with the other.  Just ask my friends Sigmund and Kristen whom I brought these little muffins all way from Cincinnati to New York City to Boston when I visited them and their new baby earlier this Summer.

Mini Corn Dog Muffins

The first time I made them was to give away and Chris was so sad that they weren't for us.  Given I had leftover buttermilk and needed a quick dinner, they made the menu for just us to enjoy.  We love these muffins and found it hard to not eat the entire pan (I make half a recipe).  They taste just like corn dogs but are bite-sized and healthier because they're not fried.  The funniest part of all was when I plated mine with ketchup and mustard, Chris' arch enemy.  He was so grossed out that when we sat down for dinner together, he ate and talked to me with his eyes closed the whole time!  Silly hubby!

Looking for more game day foods?  Try...
Three Years Ago: Finn Nisu Bread

Okay, signing out for now.  Guest posters coming up next!

Mini Corn Dog Muffins


Mini Corn Dog Muffins

Yields: 48 mini muffins

Ingredients

  • 1/2 cup melted butter (or 1/4 cup butter + 1/4 cup unsweetened applesauce)
  • 1/2 cup sugar
  • 2 eggs
  • 1 cup buttermilk
  • 1/2 teaspoon baking soda
  • 1 cup cornmeal
  • 1 cup all purpose flour
  • 1/2 teaspoon salt
  • 8-10 hot dogs, cut into 1" bites

Directions

  1. Preheat oven to 375F.  Spray a mini muffin pan with non-stick cooking spray.
  2. Combine the butter and sugar in a bowl and whisk to combine.  Add the eggs and whisk together.  Add the buttermilk and whisk again.
  3. In a separate bowl, combine baking soda, cornmeal, flour, and salt.  Stir to combine.  Whisk the wet ingredients into the dry in two batches.
  4. Spoon 1 Tablespoon of batter into each prepared mini muffin cup.  Place one hot dog bite into the middle of each cup.
  5. Bake for 8-12 minutes or until cornbread is golden brown.  Cool in mini muffin tin for 5 minutes before serving. Store leftovers in the refrigerator and reheat for 20-30 seconds before serving.  Can also be frozen and reheated!

Wednesday, September 5, 2012

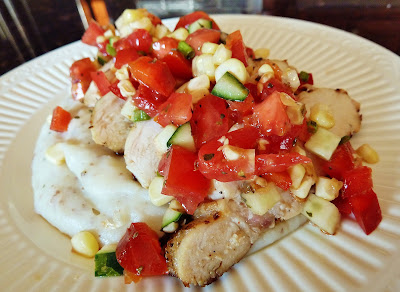
Buttermilk-Grilled Chicken with Garden Vegetable Salsa

Are you always looking for ways to use up your leftover buttermilk like I am?  Lucky for you I have a buttermilk tag on my blog just for this exact purpose!  Of course, you could always "cheat" and make fake buttermilk by adding 1 tablespoon of vinegar or lemon juice to a regular cup of milk and letting it sit for 5 minutes.  This makes it get a bit curdled and sour just like buttermilk.  It works in a pinch but for me, I like the real thing so I buy the jug of buttermilk at the store.

My CSA continues to churn out lots of wonderful garden-fresh veggies and so when I saw this on Josie's blog, I knew it would make the menu sometime this Summer.  Finally the stars aligned and the farm supplied all of the vegetables that I needed to make this recipe (even the mashed potatoes which I made as a "bed" for the chicken and veggies to rest upon).  I gathered some fresh herbs from our work garden and happened to have some buttermilk leftover from when I had made Tomato and Corn Pie (still easily the best dish from the Summer!) and Strawberry Buttermilk Ice Cream.  Perfect.

I've heard of using buttermilk for fried chicken before but never grilled so the concept was intriguing to me.  I found that allowing the chicken to marinate overnight in the buttermilk mixture resulted in meat so juicy and tender after grilling that I about died of happiness.

As a side note, this is my last month of my CSA subscription :(.  But, to preserve some of the fresh flavors of summer, I took on canning 60 POUNDS of tomatoes with my mother-in-law.  I'll post soon about that adventure so stay tuned!

One Year Ago: Oven Baked Sweet Potato Chips

Buttermilk-Grilled Chicken with Garden Vegetable Salsa


Ingredients

For the Chicken
  • 4 boneless, skinless chicken breast halves, trimmed
  • 2 cups low-fat buttermilk
  • 3 cloves garlic, peeled and crushed
  • 1/2 tsp paprika
  • 1/8 tsp crushed red pepper flakes
  • 1 tsp kosher salt
  • 1/2 tsp freshly ground pepper
For the Garden Salsa
  • 1/2 cup finely diced cucumber
  • 1/2 cup finely diced bell pepper
  • 1/2 cup minced scallions
  • 3/4 cup corn, cut from the cob (about 1-2 ears)
  • 2 medium tomatoes, cored, seeded, and diced
  • 1/4 cup minced fresh herbs (such as basil, chives, oregano, and parsley)
  • 2 Tbsp olive oil
  • 2 Tbsp red wine vinegar
  • Juice of 1/2 lemon
  • Salt and pepper, to taste
Directions
  1. In a gallon-sized ziplock bag or shallow baking dish, combine the chicken with the buttermilk, garlic, and spices.  Cover and refrigerate for at least 1 hour or up to overnight.
  2. When ready to cook, preheat the grill to medium-high heat.  Oil the grates and cook the chicken about 7 minutes per side, turning once, or until the internal temperature reaches 165F.  Remove from the heat and cover loosely with foil.  Allow to rest at room temperature about 10 minutes before serving.
  3. While the chicken is cooking, combine the ingredients for the salsa in a medium bowl.  Taste and season with salt and pepper before serving on top of chicken.

Source: Pink Parsley

Friday, August 31, 2012

Strawberry Buttermilk Ice Cream

Summer just really wouldn't be complete without ice cream.  I gave my facebook fans a chance to pick which recipe I would post today and Jaida of Sweet Beginnings voted for the dessert option while my normally sweets-loving friend Brenda wanted me to do the savory entree.  Secretly though, I think Brenda wanted to see the dessert recipe first, too.  And seeing as it is Friday, I thought it would be nice to close out this week's posting with a dessert, just like you would with a multi-course meal.

I made this recipe for my friend JJ's birthday.  He had recently been in Japan for an extended business trip and one of his first weekends back was his birthday.  Knowing that he probably wouldn't have food at home nor go shopping or even cook for awhile (because he's a bachelor), I gave him some food as a welcome home gift the night we picked him up from the airport.  This ice cream was my birthday "present" to him.  I chose it because he loves ice cream and he always asked me in the past to make him homemade strawberry ice cream.

How was it, you ask?  I loved the added tang from the buttermilk.  It really complemented the fresh fruit flavor.  To be honest, I kind of didn't want to give him the ice cream once I had tried it.  This one is a keeper!

Strawberry Buttermilk Ice Cream


Strawberry Buttermilk Ice Cream

Ingredients

  • 3/4 lb strawberries, hulled and sliced
  • 3/4 cup sugar, divided
  • 1 Tbsp kirsch or vodka (optional)
  • 1 cup heavy cream
  • 6 egg yolks, lightly whisked in a medium bowl
  • 1 cup buttermilk
Directions
  1. Before you start, make sure you freeze your ice cream maker overnight.
  2. Combine the strawberries, 1/4 cup of the sugar, and kirsch or vodka (if using) in a medium bowl.  Set aside and let the sugars cause the strawberries to soften and release the juices, about 1/2 hour.
  3. In a medium saucepan over medium heat, scald the cream and dissolve the remaining 1/2 cup sugar.  Pour a bit of the cream mixture into the lightly whisked yolk to temper (or warm) the eggs.  Add the remaining hot cream, whisking constantly to combine.  Pour the custard mixture back into the saucepan.  Cook custard until just thickened, whisking constantly, about 4-5 minutes.  Using a fine wire mesh, strain the custard into a medium bowl.
  4. In a blender, puree the macerated strawberry mixture until smooth.
  5. Combine the custard mixture and the pureed strawberries.  Cover and refrigerate until cold, at least two hours but ideally overnight.
  6. Just before churning, add the cup of cold buttermilk and stir to combine.  Churn the ice cream according to your manufacturers instructions.  For a harder, more scoopable consistency, transfer ice cream to a freezer safe container and freeze for at least 1 hour before serving.
Source: As adapted by and seen on Stresscake from The Perfect Scoop by David Lebovitz

Monday, August 27, 2012

Tomato and Corn Pie

So what did you think of last week?  It got a bit weird around here as I shared 3 different sweet recipes in a row.  I don't think that's every happened before outside of an Emily baking Extravaganza (see Apples or Summer Fruits and Veggies themes) or holiday time.  But now back to regular old food around here...my waistline really can't handle anymore desserts for a little while!

It's sad but true, summer is officially coming to an end soon.  Kids are returning or have already returned to school, pools are on their last week of being open, and summer's fruit and vegetable bounty will soon be gone.  But before that all happens, I highly encourage you to capture all the splendor of summer by making this savory pie.

This recipe is not especially difficult to make but it is a bit time consuming.  But the moment that you bite into it, you are rewarded for your hard work.  This was simply put, the freshest, most delicious dish I'd eaten all summer.  It was bursting with amazing flavors and I was so glad that I made it.

One Year Ago: Mushroom Bolognese
Two Years Ago: Blueberry Almond Cake with Lemon Drizzle

Tomato and Corn Pie


I'm sorry for this really awful photo.  I got a late start and it was quite dark by the time I had the pie done and snapped this shot.  It tastes infinitely better than I make it look.  The flavor truly took me by surprise!
Ingredients

For the Crust:
  • 2 cups all-purpose flour
  • 1 Tbsp baking powder
  • 3/4 tsp salt
  • 6 Tbsp cold unsalted butter, cut into 1/2 inch cubes
  • 3/4 cup buttermilk
  • 2 Tbsp butter, melted
For the Pie
  • 1 3/4 lb tomatoes
  • salt
  • 2/3 cup mayonnaise (light is fine) or Greek yogurt
  • 2 cups (8 oz) shredded sharp cheddar cheese
  • 1/2 cup shredded parmesan cheese
  • 2 cloves garlic, minced
  • 1/4 cup fresh basil, chopped
  • 1 Tbsp fresh chives or green onions, sliced
  • 2 Tbsp fresh lemon juice
  • Freshly ground black pepper
  • 1 1/2 cups fresh corn (from 2-3 ears)
Directions
  1. To make the crust: Whisk together flour, baking powder, and salt in a bowl.  Blend in cold butter with your fingertips, pastry blender, or two forks until it resembles coarse meal.  Add the buttermilk and stir until the mixture forms a dough.  Gather into a ball.
  2. Divide the dough in half and on a well-floured counter, roll out once piece into a 12-inch round.  Roll the dough around the rolling pin and transfer to the pie plate.  Pat the dough in with your fingers and trim any overhang.  Put the pie plate into the refrigerator to chill while preparing the filling.  Flatten the second dough bough into a disc then wrap in plastic wrap and chill as well.
  3. Bring a large pot of water to a boil.  Prepare a large bowl of ice water.  Add the tomatoes to the boiling water and cook for about 10 seconds before transferring tomatoes with a slotted spoon to the ice water.  When cool enough to handle, peel the skins from the tomatoes.
  4. Line a baking sheet with a double-layer of paper towels.  Cut the tomatoes into 1/4-inch thick slices and arrange in a single layer on the paper towels.  Sprinkle generously with salt and allow to stand at room temperature for 20-30 minutes.  Blot the tomatoes with more paper towels to remove excess moisture.
  5. Meanwhile, preheat the oven to 400F.
  6. Mix together the mayonnaise (or Greek yogurt), cheese, garlic, and lemon juice.  Season with salt and pepper to taste.
  7. Remove the pie crusts from the refrigerator.  Layer half of the tomatoes on the bottom of the pie and gently remove extra seeds from about 1/2 to 2/3 of the tomatoes (leave some for flavor!).  Scatter half of the corn on top of the tomatoes then drop spoonfuls of the cheese mixture over the top.  Sprinkle with half of the basil and chives.  Repeat the layers: tomatoes, corn, cheese, herbs.
  8. On a well-floured surface, roll the second pie crust into a 12-inch circle.  Fit it over the filling and pinch the edges of the two crusts together to form a fluted edge or use the tines of a fork to seal together.  Use a small knife to cut 4 slits on the top of the crust then brush with melted butter.
  9. Place a cookie sheet on the rack below where you will place the pie to catch any filling that may boil over.  Bake pie until crust is golden and the filling is bubbling, about 30-35 minutes.
  10. Allow to cool 10-15 minutes before cutting into slices and serving.
Source: Originally from Christ Church Cooks and Gourmet as seen on Pink Parsley

Saturday, April 9, 2011

2nd Blogiversary Celebration: Banana Split Cupcakes

Can you believe that it has been two years since I started my cooking blog adventures?  Me neither.  To celebrate I gave away a signed copy of Pioneer Woman Cooks.  It was won by lovely reader S who happens to be a local Cincinnati Nestie that I met earlier in the year when I went to a Christmas cookie swap.

Since not everyone was able to win the grand prize, I'm sharing a consolation prize so that you can all still celebrate this milestone with me.  These banana split cupcakes are like a secret adventure.  The outside gives you no hint of what lies inside.  As my sister Kelly's boyfriend/prom date stated when he bit inside, "Oh my god!  There are strawberries and pineapples!".  It's such a pleasant surprise and I think the filling keeps the cake extra moist.

Speaking of the cake, I would have liked the flavor of the banana to come through more but I think had I put in more banana than called for it would have ended up with a texture of banana bread rather than this fluffy cake.  If there were more room I would have stuffed a banana slice into the center of the cupcake but it was already pretty full.  The whipped cream frosting was perfect (and soooo easy to make.  Don't waste your time on the pre-made stuff like Cool Whip or Ready Whip.  This is infinitely better!).  The chocolate topping really pulled the taste together in my opinion and it gives it that festive look once its finished with sprinkles.  Overall it takes a little effort to make each component and assemble but nothing was especially hard and the look is worth it.  This tasted and looked just like a sundae but in cupcake form.  So fun to eat!

Tip: You can assemble the cupcake through piping the frosting a day or two in advance.  Then, store the cupcakes in your refrigerator until you're ready to finish with the gananche, sprinkles, and cherry.  Don't do the finishing steps until you're almost ready to serve because otherwise the color of the sprinkles will bleed into the chocolate and whipped cream, becoming muted in color.  Unfortunately I learned this the hard way!

Happy 2nd Blogiversary to me!  Thanks for coming to my party :).

One Year Ago: Blueberry Citrus Cake
Two Years Ago: Crockpot Turkey.  Why or how this became the first recipe I ever posted I am not quite sure but wow how far I've come in such little time!

By the way, need a way to use up the rest of your buttermilk after making this recipe?  Check out my buttermilk tag for ideas.

Banana Split Cupcakes
Printer-Friendly Version


Yields: 30+ Cupcakes

Ingredients

For the cupcakes:
  • 2½ cups all-purpose flour
  • 1 tbsp. baking powder
  • ½ tsp. salt
  • 12 tbsp. unsalted butter, at room temperature
  • 2½ cups sugar
  • 6 eggs
  • 1 cup plus 2 tbsp. buttermilk
  • 1 1/3 cups mashed ripe banana
For the filling:
  • 1 lb. strawberries, hulled and diced small
  • 2 tbsp. confectioners’ sugar
  • 12 oz. crushed pineapple, drained
For the frosting:
  • 1½ cups heavy cream, chilled
  • 1/3 cup confectioners’ sugar, sifted
  • ½ tsp. vanilla extract
For the ganache:
  • 8 oz. bittersweet chocolate, chopped
  • 1 cup heavy cream
  • 1 tbsp. light corn syrup
For garnish:
  • Multi-colored sprinkles
  • Maraschino cherries
Directions
  1. To make the cupcakes, preheat the oven to 350° F.  Line cupcake pans with paper liners.  In a medium bowl combine the flour, baking powder and salt; whisk together and set aside.  In the bowl of a stand mixer fitted with the paddle attachment cream together the butter and sugar on medium-high speed until light and fluffy, about 2 minutes.  Reduce the mixer speed to medium low and add in eggs one at a time, scraping down the sides of the bowl as needed.  Mix in 1 the mashed banana until well combined.  With the mixer on low speed alternately add the dry ingredients and buttermilk, beginning and ending with the dry ingredients and mixing only until just incorporated.
  2. Divide the batter between the prepared cupcake liners, filling each about 2/3 to ¾ full.  Bake until a toothpick inserted in the center comes out clean, about 20-22 minutes.  Allow to cool in the pan 5-10 minutes, then transfer the cupcakes to a wire rack to cool completely.
  3. To make the strawberry filling, combine the strawberries and confectioners’ sugar in a medium bowl.  Toss well, smashing slightly with a fork.  Allow the berries to macerate at least 20-30 minutes.
  4. To fill the cupcakes, cut a small cone out of the center of each cupcake with a paring knife or small biscuit cutter.  (The excess cake can be discarded or saved for cake balls or parfaits)  Add a teaspoon or two of the strawberry filling to the center of each cupcake.  Top with a teaspoon or two of the crushed pineapple, filling to the top of the cupcake.
  5. To make the frosting, add the heavy cream to the chilled bowl of an electric mixer fitted with a whisk attachment.  Whip on medium-high speed until soft peaks form.  Add the powdered sugar and continue to whip until thoroughly combined and stiff peaks form.  Be careful not to over-beat!  Blend in the vanilla extract.
  6. Add the whipped cream to a pastry bag fitted with a large plain round tip.  Pipe a swirl of the whipped cream onto each filled cupcake, covering the filling.  Transfer the filled and frosted cupcakes to the refrigerator and chill for at least 30 minutes.
  7. To make the ganache, place the chopped chocolate in a heatproof bowl.  Bring the cream to a simmer over medium-high heat.  Remove from the heat and pour the hot cream over the chocolate; let stand 1-2 minutes.  Whisk together until a thick, smooth ganache forms.  Blend in the corn syrup.  Let stand at room temperature at least 10 minutes so the ganache is not hot.
  8. To finish the cupcakes, pour a spoonful of the ganache over the whipped cream topping of each cupcake.  Garnish with sprinkles and maraschino cherries before the glaze sets.  Chill the assembled cupcakes until ready to serve.
Source: Annie's Eats 

Wednesday, March 16, 2011

Handheld Breakfast Two Ways

And the award for Worst Blogger Award goes to...me.

Has it really been a month since I updated?  Shoot.  There goes my New Year's Resolution to try to update more frequently.  Somehow anytime I get a break in life (in this case going to New York City for a week long business trip) and/or begin intensely planning a vacation (c'mon, I'm going to Europe next month...don't tell me blogging would be at the top of your mind!) my blogging just goes by the wayside.  Don't get me wrong, I've still been cooking when I'm around...just not sharing the results with the world.  I've noticed that my web traffic and viewership have suffered as a result.  Drat!  How do the hard core bloggers do this so consistently?  Please share your tips!

So, as an apology, I am giving you a recipe two-for-one!  Honestly, it kind of works out in my favor because these two recipes were photographed together :D.  Remember that Quiche Lorraine that I made as part of my 23 Things in 2011 List?  These little handheld treats were also part of that same New Years Family Brunch.

The French Toast Cups with Sausage and Apples was definitely generally preferred over the Savory Muffins.  I mean what's not to love about sweet and salty combined into a single hand-held treat?  And for the cook, it's easy to increase the number of servings because the incremental work is minimal.  If I were to make that one again, though, I think I'd reduce the amount of butter in the apple and sausage mixture.  And, I found it made wayyyy more filling than was needed to fill my French toast cups so maybe reduce that by about half.  These changes are reflected below by simply doubling the french toast amounts and keeping the filling the same.  I also envision this as being a great concept for French Toast stuffed with more traditional cream cheese and fruit filling.  Yummo!

Our beagle Toby I think preferred the Muffins, though.  Of course, he kind of didn't have a choice.  One just kind of fell off of the cupcake tree (look, another purpose for those things!  Oh and thanks Mandy for buying this from my Secret Santa list!) when Mom was getting her serving.  Toby grabbed it in his mouth as soon as it hit the floor.  Thankfully he's good about giving up food when I tell him to so no damage done.

Do you like handheld breakfast treats?  These Bacon Egg and Toast Cups are sure to rock your world!

One Year Ago: Grasshopper Cookie Bars (perfectly green for St. Patty's Day!) and Peanut Butter Oatmeal Chocolate Chip Cookies (a trifecta of cookie classic goodness!)


French Toast Cups with Sausage and Apples
Yields: 12 Servings


Ingredients
For the French Toast Cups:
  • 12 slices of whole wheat bread
  • 6 eggs
  • 2 Tbs brown sugar
  • 1 tsp cinnamon
  • pinch nutmeg
For the Apple and Sausage Filling:
  • 1 cup diced apples
  • 1 cup (8 oz) breakfast sausage
  • 1/2 cup butter
  • 3 Tbs brown sugar
  • 1 tsp cinnamon
  • pinch nutmeg
  • 1/2 tsp vanilla extract
Directions
  1. Preheat oven to 400 degrees and butter a muffin pan. 
  2. Using a cookie cutter or wide rimmed glass, cut circles out of bread slices about 3 inches in diameter.  Whisk eggs and spices together.  Dredge bread circles in egg mixture and remove any excess egg
  3. Press bread circles into the muffin pan, bake in the oven for 12 - 15 minutes, until brown
  4. While bread is in the oven prepare breakfast sausage.  In another hot skillet melt butter, stir in brown sugar, cinnamon, nutmeg and vanilla.  Add apples to brown sugar mixture and cook until apples begin to soften and sugar mixture caramelizes.   Combine sausage and dripping with apples, stir.
  5. When french toast cups are done, allow to cool for a few mintues, remove from pan using a knife to separate from the pan.  Fill french toast cups with apple and sausage mixture, drizzle with maple syrup and serve.
Source: The Noshery 

Savory Breakfast Muffins
Printer-Friendly Version
Yields: 12 Muffins

Ingredients
  • 2 cups whole-wheat flour
  • 1 cup all-purpose flour
  • 1 tablespoon baking powder
  • 1/2 teaspoon baking soda
  • 1/2 teaspoon freshly ground pepper
  • 1/4 teaspoon salt
  • 2 eggs
  • 1 1/3 cups buttermilk
  • 3 tablespoons extra-virgin olive oil
  • 2 tablespoons butter, melted
  • 1 cup thinly sliced scallions, (about 1 bunch)
  • 3/4 cup diced Canadian bacon, (3 ounces)
  • 1/2 cup grated Cheddar cheese
  • 1/2 cup finely diced red bell pepper
Directions
  1. Preheat oven to 400°F. Coat 12 muffin cups with cooking spray.
  2. Combine whole-wheat flour, all-purpose flour, baking powder, baking soda, pepper and salt in a large bowl.
  3. Whisk eggs, buttermilk, oil and butter in a medium bowl. Fold in scallions, bacon, cheese and bell pepper. Make a well in the center of the dry ingredients. Add the wet ingredients and mix with a rubber spatula until just moistened. Scoop the batter into the prepared pan (the cups will be very full).
  4. Bake the muffins until the tops are golden brown, 20 to 22 minutes. Let cool in the pan for 5 minutes. Loosen the edges and turn the muffins out onto a wire rack to cool slightly before serving.
Make Ahead Tip:  Individually wrap in plastic and refrigerate for up to 3 days or freeze for up to 1 month. To reheat, remove plastic, wrap in a paper towel and microwave on High for 30 to 60 seconds.

Nutritional Information: (per muffin) 217 calories; 9 g fat ( 3 g sat , 4 g mono ); 50 mg cholesterol; 24 g carbohydrates; 9 g protein; 3 g fiber; 339 mg sodium; 113 mg potassium; Vitamin C (25% daily value), Fiber (13% dv).
  
Source: Eating Well, April/May 2005

Monday, June 21, 2010

Orange Berry Muffins

Hi again.  Sorry I've been so sporadic in posting.  Toby keeps me very busy and even though I wake up at like 6AM daily now because of him I've been spending my extra hours cooking and uploading vacation photos rather than blogging.  There are so many great things I still need to blog about but I've been struggling to sit down and make myself write...err...type. 

Posting recipes is surprisingly a lot of work!  There's witty commentary to be made, photo editing, finding the recipe again months after you made the dish (I was about to give up on finding this one again!), recipe copy/pasting/modifying, and then making a printer-friendly link (another project left unfinished...I was supposed to back convert older recipes and am probably only halfway through.  Mental note to self to finish that up...).  Now add to the mix a dog that you have to watch to make sure he's behaving and you've got yourself some blogging difficulty.  It's a wonder I can even *cook* anymore.  But, I wouldn't trade my beagle Toby for the world.  He's awesome and so loving!

Back to the story on this recipe.  I made this one wayyyy back on EASTER WEEKEND!  Whoa that's a long time ago.  I had made these to eat as a snack in the car and for quick and inexpensive breakfasts while we were spending time with our friends Sig and Kristen on a couples road trip to Washington DC to see the Cherry Blossoms.  They were beautiful albeit I had expected it to be more enchanting.  Guess that's what happens when you go in peak season.  I was so mad when I saw people picking the blossoms and/or whole branches off the trees.  Way to ruin it for everyone!  The city itself was soooo much more awesome than I remember.  The last time I had gone was probably elementary school.  I definitely would like to visit again someday.  We *almost* saw President Obama on the way to Easter Sunday service but got tired of waiting for (at the time) what we thought might actually be nothing.

I'd have to say that Sig and Chris probably had more than their fair share of these muffins.  And I can't blame them.  They're TASTY!  The orange zest (use organic oranges to avoid the pesticides!) gives it a great morning wake-up zing while the berries burst with flavor.  The zest also smelled so fragrant and citrusy when I was rubbing it in the sugar...I'll admit I kind of wanted to stop right there and just eat the orange flavored sugar haha!  They are relatively healthy because I substituted some whole wheat flour for the white and there's relatively little sugar for a sweet bread type recipe.  I must have added strawberries to my muffins because I had some leftover.  The original recipe was just for blueberries but why not do a berry mix for some gorgeous color :).  I definitely plan on making this one again.  Especially with berries being in season now.  Yum!

One Year Ago: Exquisite Pizza Sauce

Orange Berry Muffins
Printer-Friendly Version


Yields: 12 Muffins

Ingredients
  • Grated zest and juice of 1 orange
  • About ¾ cup lowfat buttermilk
  • 2 large eggs
  • 3 tablespoons honey
  • 1 stick (8 tablespoons) unsalted butter, melted and cooled
  • ⅓ cup (2.33 ounces) sugar
  • 2 cups (9.6 ounces) all-purpose flour (I substituted 1 cup whole wheat flour for the same amount of all-purpose white flour)
  • 2½ teaspoons baking powder
  • ¼ teaspoon baking soda
  • ¼ teaspoon salt
  • 1 cup blueberries and/or strawberries – fresh, preferably, or frozen (not thawed)
  • Decorating sugar, for topping (optional)
Directions
  1. Center a rack in the oven and preheat the oven to 400 degrees F. Line the pan with paper muffin cups. Alternatively, use a silicone muffin pan, which needs neither greasing nor paper cups.
  2. Pour the orange juice into a large glass measuring cup or a bowl and pour in enough buttermilk to make 1 cup. Whisk in the eggs, honey and melted butter.
  3. In a large bowl, rub the sugar and orange zest together with your fingertips until the sugar is moist and the fragrance of orange strong. Whisk in the flour, baking powder, baking soda and salt. Pour the liquid ingredients over the dry ingredients and, with the whisk or a rubber spatula, gently but quickly stir to blend. Don’t worry about being thorough – the batter will be lumpy and bubbly, and that’s just the way it should be. Stir in the berries. Divide the batter evenly among the muffin cups.
  4. Bake for 22 to 25 minutes. If you want to top the muffins with decorating sugar, sprinkle on the sugar after the muffins have baked for 10 minutes. When fully baked, the tops of the muffins will be golden and springy to the touch and a thin knife inserted into the center of the muffins will come out clean. Transfer the pan to a rack and cool for 5 minutes before carefully removing each muffin from its mold.
Source: Slightly modified from Dorie Greenspan’s Baking: From my Home to Yours, as seen on The Way the Cookie Crumbles

Monday, April 5, 2010

Country Fried Steak

I know, I know.  I keep saying this but truly this next batch of recipes is super behind.  The only reason I realized I am so late is because our next dinner club is this weekend and I realized that I still haven't posted the recipes from our LAST month's dinner club.  D'oh!

Anyway, March was Chris and my turn to host again and I decided to do a Breakfast Theme....or better known as "brinner" (breakfast for dinner!).  It was an awesomely delicious smorgasborg of food and I must say that being a breakfast lover, I was in absolute heaven!  In our typical Dinner Club style, we made wayyyy too much food and pretty much binge ate.  Fruit bruschetta, fruit tart, quiche, gooey breakaway cinnamon rolls, belgian waffle bar, bacon egg and toast cups, and country fried steak....*die*.

My personal contributions for this dinner club consisted of:
This post is about the Country Fried Steak (sometimes known as Chicken Fried Steak)...one of my favorite unhealthy breakfast entrees!  The flavor of this one was good but we all know I don't like to fry stuff so I have NO IDEA why I chose to take this task on.  Especially given that I had to fry up 10 of them and was running out of time (guests arrived when I was just starting to fry)!  I don't think I did a very good job paying attention to making sure the oil was at a good frying temperature because some of the breading ended up soggy and others a little burnt.  And, the meat was tougher than I would have liked.  Perhaps if you made a smaller batch you could be more attentive and it would turn out better.  Like I said, great flavor but not the best execution which was entirely my fault.  (Good thing I made other delectable goodies to make up for this less than stellar one!)

Pardon the awful picture.  Like I said it was a busy day in the kitchen and I think I bit off more than I could chew for this one.  To be honest, I'm surprised I got a shot at all!  Oh and by the way, this is the reason I had a TON of buttermilk leftover and hence all of the other recipes to use it all up!

Check out our Dinner Club blog for some of the other aforementioned yummies, too!

Country Fried Steak
Printer-Friendly Version


Prep Time: 20 Min
Cook Time: 20 Min
Ready In: 40 Min
Yields: 4 Servings

Ingredients

For the Steaks
  • 4 (1/2 pound each) beef cube steaks
  • 2 cups all-purpose flour
  • 2 teaspoons baking powder
  • 1 teaspoon baking soda
  • 1 teaspoon black pepper
  • 3/4 teaspoon salt
  • 1 1/2 cups buttermilk
  • 1 egg
  • 1 tablespoon hot pepper sauce (e.g. Tabasco™)
  • 2 cloves garlic, minced
  • 3 cups vegetable shortening for deep frying
For the Country Gravy
  • 1/4 cup all-purpose flour
  • 4 cups milk
  • kosher salt and ground black pepper to taste
Directions
  1. Pound the steaks to about 1/4-inch thickness.
  2. Place 2 cups of flour in a shallow bowl. Stir together the baking powder, baking soda, pepper, and salt in a separate shallow bowl; stir in the buttermilk, egg, Tabasco Sauce, and garlic.
  3. Dredge each steak first in the flour, then in the batter, and again in the flour. Pat the flour onto the surface of each steak so they are completely coated with dry flour.
  4. Heat the shortening in a deep cast-iron skillet to 325 degrees F (165 degrees C). Fry the steaks until evenly golden brown, 3 to 5 minutes per side. Place fried steaks on a plate with paper towels to drain.  If needed, keep steaks warm by placing in a warm oven. 
  5. Drain the fat from the skillet, reserving 1/4 cup of the liquid and as much of the solid remnants as possible.   Return the skillet to medium-low heat with the reserved oil. Whisk the remaining flour into the oil. Scrape the bottom of the pan with a spatula to release solids into the gravy. Stir in the milk, raise the heat to medium, and bring the gravy to a simmer, cook until thick, 6 to 7 minutes. Season with kosher salt and pepper. Spoon the gravy over the steaks to serve.
Source: All Recipes

Wednesday, March 31, 2010

Berry Buttermilk Cake

Are you wondering what to do with leftover buttermilk?  Well, as this is apparently a common question, I've now added a "buttermilk" tag to my blog and will be featuring a few different recipes in the upcoming days as additional ideas.  Surprisingly, I already had a good 6-7 recipes using buttermilk before this series of recipes but I generally used the trick of taking regular milk and adding a bit of vinegar or lemon juice to make it sour and curdle a little.  That's all fine and dandy but it really isn't the same as using REAL buttermilk.  And I had a giant half-gallon jug of it to use!  So come explore some recipes with me, my friends...

This. Recipe. Is. Awesome. 

Even better is that it is really really simple.  I whipped it up and was in and out of the kitchen in well under an hour INCLUDING baking and cleaning time.  It's a very light cake with a delicate crumb and the slight crunch of the sugar on top adds a nice contrast to each bite.  It's light enough to be enjoyed as a breakfast yet satisfying enough to serve as your dessert, too.  Chris' family ate it right up and we enjoyed it so much that I made it again that same week.  Now, I don't know if you've noticed or not but I tend to try a bazillion new recipes so anything that gets made multiple times is a keeper in my eyes!  (I'm sorry, the photo really doesn't do this cake justice!)

The original recipe was called Raspberry Buttermilk Cake but I didn't have any raspberries, I only had frozen blueberries (which were leftover from our Belgian Waffle Bar from Dinner Club...I still need to post those recipes...d'oh!).  Thankfully this recipe is very forgiving and you can use whatever the heck berry you want and I found frozen works just fine in this case.

So if you want a lightly sweet treat tonight that's relatively healthy (less than 200 calories a slice = 1/8th of the cake!), make this one.  You won't be sorry!

Berry Buttermilk Cake
Printer-Friendly Version


Ingredients
  • 1 cup all purpose flour
  • 1/2 tsp. baking powder
  • 1/2 tsp. baking soda
  • 1/4 tsp. salt
  • 1/2 stick of unsalted butter, softened
  • 2/3 cup plus 1.5 Tbsp. sugar, divided
  • 1 tsp. vanilla extract
  • 1 large egg
  • 1/2 cup well-shaken lowfat buttermilk
  • 1 cup fresh raspberries (about 5 oz.), blackberries, blueberries, and/or strawberries*
*Note: If using frozen berries, add the berries to the batter frozen.
 
Directions
  1. Preheat the oven to 400, with a rack in the middle. Butter and flour a 9″ cake pan.
  2. In a large bowl, beat together the butter and 2/3 cup sugar at medium-high until pale and fluffy. Beat in vanilla, and then egg.  Add flour, baking powder, baking soda, and salt.  Add the buttermilk.  At low speed, mix until just combined.
  3. Pour batter into a cake pan and smooth the top using a rubber spatula. Scatter berries on top and sprinkle remaining 1.5Tbsp. sugar.
  4. Bake until cake is golden brown and a toothpick inserted in the center comes out clean, about 20-25 minutes. Cool in the pan 10 minutes and then turn onto a rack and cool to warm, 10-15 minutes.
  5. Serve with whipped cream or ice cream, if desired :).  (Sorry that will put you over the 200 calorie per serving mark...but it would taste so delicious!)

Source: Slightly adapted from Gourmet as seen on Elly Says Opa!

Nutritional Information for 1/8 of the cake: Calories: 196 / Fat: 6.7g / Saturated Fat: 3.9g / Carbs: 31.5 / Fiber: 1.5g / Protein: 3.1g

Thursday, March 4, 2010

Jalapeno Cornbread Whoopie Pies

Mmm this was the perfect accompaniment to my mother in law, Mary Lynn's, Chili.  Once I saw this recipe, I knew it was a match made in heaven.  Chris ate the bread plain because he won't touch cream cheese with a 10 foot pole and I made the filling with all neufchatel cheese (reduced fat cream cheese) instead of a blend because I didn't want to spend the extra money on goat cheese.  I bet it would have been even more awesome with the goat cheese...

Anyway, I've experimented quite a bit now in the sweet-type whoopie pies so this was a nice change from the ordinary.  Since it was just the two of us, I halved the recipe and it was just enough for 2 meals of chili and jalapeno cornbread whoopie pie accompaniments.  For simplicity, I used about 2 Tablespoons of canned diced jalapeno peppers.  In the future, I'd add more peppers or a splash of Tabasco for more kick.  You know I like it spicy!

Rather go with the traditional sweet whoopie pies?  Try one of these - one for every season!:
Or, try this regular Buttermilk Cornbread recipe if you want a no-frills cornbread.

Jalapeno Cornbread Whoopie Pies
Printer-Friendly Version


Yields: 10-12 assembled pies

Ingredients

For the Cornbread

  • 1 1/4 cups all-purpose flour
  • 1 cup cornmeal
  • 1/4 cup packed brown sugar
  • 2 teaspoons baking powder
  • 1 teaspoon salt
  • 1 cup buttermilk, at room temperature
  • 4 tablespoons unsalted butter , at room temperature (used 2 Tbsp salted, 2 Tbsp unsalted)
  • 1 large egg, at room temperature
  • 2 jalapeño chiles, seeded and finely chopped (used about 2 Tbsp canned diced jalapenos)
For the Cheese Filling

  • 6 slices bacon
  • 4 ounces soft fresh goat cheese, at room temperature (omitted)
  • 4 ounces cream cheese, at room temperature (used neufchatel cheese and doubled it to accomodate lack of goat cheese)
  • 2 tablespoons milk
  • 1 tablespoon chopped fresh scallions
Directions

To Make the Jalepeno Cornbread
  1. Position a rack in the center of the oven and preheat the oven to 375 degrees. Line two baking sheets with parchment paper.
  2. In a medium bowl, stir together the flour, cornmeal, brown sugar , baking powder, and salt. In the work bowl of a stand mixer fitted with the paddle attachment, beat together the buttermilk, butter, and egg on low speed until just combined. Increase the speed to medium and beat until thoroughly combined, about 3 minutes. Add the flour mixture and the chopped jalapeno to the batter and beat on low until just combined.
  3. Using a spoon, drop about 2 tablespoons of batter onto one of the prepared baking sheets and repeat, spacing them at least 2 inches apart. Bake one sheet at a time for about 12 minutes each or until the cornbread begin to brown around the edges. While the cornbread is cooking, prepare the cheese filling using the instructions below.  After the cornbread is cooked, remove from the oven and let the them cool in the pan for about 5 minutes before transferring them to a rack to cool completely.
To Make the Cheese Filling
  1. While the cornbread is baking, in a medium skillet, cook the bacon over medium heat until crisp. Using a slotted spoon, transfer to a paper-towel-lined plate to drain and cool. When cool, crumble into small pieces.
  2. In the work bowl of a stand mixer fitted with the paddle attachment, beat together goat cheese (if using), cream cheese and milk on low speed until just combined. Increase the speed to medium and beat until smooth and creamy, about 3 minutes. Add the crumbled bacon and the scallions and beat on low until combined.
To assemble
  1. Spread filling onto the flat side of one cake using a knife or spoon. Top it with another cake, flat-side down. Repeat with the rest of the cakes and filling. You can also use a pastry bag with a round tip to pipe the filling onto the cakes, which will give you a smoother, neater presentation.
Source: Modified from the Star Telegram newspaper, as modified and seen on Sing for Your Supper

Sunday, February 21, 2010

Red Velvet Whoopie Pies

I made these whoopie pies heart shaped so they'd really match our Valentine's Day Love at First Bite Dinner Club Theme but they'd be great any time of year in the traditional round shape, too. 

I won't lie, I was pretty scared about the full bottle of red food coloring that goes into this but that's how you get the beautifully vibrant red color of the cake.  It's interesting because I noticed that by the end of the night they were a darker red than when they were freshly baked earlier in the day.  Avoid getting the dye and uncooked batter on your hands and clothing though or you may end up a bit stained until you can scrub it back off!  I never piped anything prior to recipe but it was pretty easy and the heart shapes (see my pic below!) made this dessert extra cute.  And, I got to use my awesome cake decorating tools that I bought from Michael's for 60% off!


Nestled among Chocolate Chip Cookie Dough Truffles, they made a very cute Valentine's Day Love at First Bite Dinner Club dessert presentation (Hey, I think I'm getting better at taking pictures! The one above was accepted by Foodgawker, a site that features beautifully delicious food!  You can read about that here.). 

I was able to make about 16 fully assembled pies out of this recipe but that may vary depending on the size of the cookie (cake? pie?...never really sure what to call these things!) that you make.  These hand-held pies are perfect for picking up and snacking on for a sweet treat!

Are you a whoopie pie fan?  Check out these other flavors that I've made previously:
Red Velvet Whoopie Pies
Printer-Friendly Version


Ingredients:


For the cookies:
  • 2 cups all-purpose flour
  • 2 tbsp. cocoa powder
  • ½ tsp. baking powder
  • ¼ tsp. salt
  • 8 tbsp. unsalted butter, at room temperature
  • 1 cup light brown sugar, packed
  • 1 large egg
  • 1 tsp. vanilla extract
  • ½ cup buttermilk, at room temperature
  • 1 oz. red food coloring
For the frosting:
  • 8 oz. cream cheese
  • 5 tbsp. unsalted butter, at room temperature
  • 2 tsp. vanilla extract
  • 2½ cups confectioners' sugar, sifted
Directions:

  1. Preheat the oven to 375˚ F.
  2. To make heart-shaped whoopie pies: Using a heart template cut out from card stock or a heart shaped cookie cutter, trace evenly spaced hearts onto pieces of parchment paper sized to fit two cookie sheets. Place the parchment on the cookie sheets so that the side you have drawn on is facing down; set aside.
    To make regular round whoopie pies: Place parchment paper on cookie sheets and set aside.
  3. In a medium bowl, whisk together the flour, cocoa powder, baking powder and salt. In the bowl of a stand mixer fitted with the paddle attachment, cream together the butter and brown sugar on medium-high speed until light and fluffy, about 2 minutes. Beat in the egg until incorporated, scraping down the sides of the bowl as necessary. Blend in the vanilla. With the mixer on low speed, beat in about a third of the dry ingredients, followed by half of the buttermilk, beating each addition just until incorporated. Repeat so that all the buttermilk has been added and then mix in the final third of dry ingredients. Do not overbeat. Blend in the food coloring.
  4. To make heart-shaped whoopie pies: Transfer the batter to a pastry bag fitted with a large plain round tip. Pipe the batter onto the parchment paper using the heart tracings as a guide.
    To make regular round whoopie pies: Spoon heaping tablespoons on batter onto parchment paper.
  5. Bake 7-9 minutes or until the tops are set. Transfer cookies to a cooling rack.  Repeat with any remaining batter. Allow cookies to cool completely before proceeding.
  6. To make the cream cheese frosting, in the bowl of a stand mixer fitted with the paddle attachment beat the cream cheese and butter on medium-high speed until well combined and smooth, about 2-3 minutes. Mix in the vanilla extract. Gradually beat in the confectioners’ sugar until totally incorporated, increase the speed and then beat until smooth.
  7. Transfer the frosting to a clean pastry bag fitted with a plain, round tip.  (Alternatively, you can spoon heaping tablespoons of frosting onto each cookie and spread, leaving the edges clear).  Pair the cookies up by shape and size. Flip one cookie of each pair over so that the flat side is facing up. Pipe frosting onto the flat-sided cookie of each pair, leaving the edges clear. Sandwich the cookies together so the flat sides are facing each other and press gently to help the filling reach the edges. To store, refrigerate in an airtight container.
Source: Whoopie Pies originally from Better Homes & Gardens, December 2008; frosting adapted from Confections of a Foodie Bride; Both as seen on Annie's Eats.

Sunday, January 24, 2010

Peanut Butter Whoopie Pies

My friends Kristen and Sig and I sometimes trade treats when we make them.  It's become a kind of tradition that we re-fill the tupperware container with a treat in return when the container is being given back.  A couple weeks ago Kristen made this really delicious peanut butter chocolate cookie bar things.  Chocolate and peanut butter are a classic combination and it's easy to see why.  The flavors just perfectly compliment each other!  It reminded me that I had bookmarked a peanut butter recipe that I'd been meaning to try so that's what I opted to make in return.

Whoopie pies are kind of a cross between a cookie and a cupcake.  They are 2 soft cake-like cookies that delicately sandwich a frosting filling.  You eat them with your hands like a cupcake or ice cream sandwich (or if you really want to, I guess you could use a fork). 

I didn't really want a HUGE batch of cookies so I ended up making a half batch and it was plenty.  I was a tiny bit short on peanut butter so it probably wasn't as peanut-buttery as the recipe intended.  My peanut butter was also reduced sugar so I ended up adding a small amount of extra powdered sugar to make up for it.  Delicious.

What I love most about whoopie pies is that the possibilities and combinations are endless!  If you like this one, also give the Pumpkin Whoopie Pies a try!  That one I personally loved even more than this (but I'm partial to those flavors more so than chocolate and PB :).  That post also has a little more history on why they're supposedly called "whoopie pies" if you're curious.

Peanut Butter Whoopie Pies
Printer-Friendly Version


Yields: About 20 fully assembled whoopie pies

Ingredients

For the pies:
  • 3 1/2 cups all-purpose flour
  • 1 1/2 cups unsweetened cocoa powder
  • 1 tablespoon baking soda
  • 1 teaspoon salt
  • 2 sticks unsalted butter, room temperature
  • 2 cups granulated sugar
  • 2 large eggs
  • 2 cups buttermilk, room temperature
  • 2 teaspoons pure vanilla extract
For the filling:
  • 1 1/3 cup creamy peanut butter
  • 1 cup (2 sticks) unsalted butter, softened
  • 1 1/2 cups confectioners’ sugar
  • Salt, to taste
Directions
  1. Preheat the oven to 400 degrees Fahrenheit. Line baking sheets with parchment paper.
  2. Sift together flour, cocoa powder, baking soda, and salt into a small bowl; set aside.
  3. Put butter and sugar into a large mixing bowl. Cream together using an electric mixer high speed until smooth, about 3 minutes, until the mixture is pale and fluffy.. Add eggs, buttermilk, and vanilla and beat until well combined. On low speed, slowly add the flour mixture and mix until just combined.
  4. Using a small ice cream scoop or a large spoon, scoop rounded 1 1/2 tablespoons of dough onto baking sheets lined with parchment paper, spacing 2 inches apart. Bake until set, about 8 minutes.  Let cool completely on wire racks.  Repeat until all the cookie dough is used up.
  5. While cookies are baking and cooling, put peanut butter and butter in a bowl. Add confectioners’ sugar; mix with electric mixer on low until combined. Raise speed to high, and mix until fluffy and smooth, about 3 minutes. Season with salt, if desired.
  6. Spread a rounded tablespoon of filling on the bottom of 1 cookie. Sandwich with another cookie. Repeat with remaining cookies and filling. Cookies can be refrigerated in single layers in airtight containers up to 3 days. Bring to room temperature before serving.
Source: Martha Stewart as seen on Smells Like Home

Sunday, January 17, 2010

Sun-Dried Tomato, Basil, and Parmesan Muffins

I think I'd call this more of a biscuit rather than a muffin but the original recipe apparently thought it was a muffin.  Yes, it's baked in a muffin tin but to me, a muffin is sweet while a biscuit is savory.  This is definitely savory.

This bread was part of the birthday dinner that I made for my mom. The other items that I made can be found in separate posts:
Sun-Dried Tomato, Basil, and Parmesan Muffins
Printer-Friendly Version


Yields: 12 muffins

Ingredients
  • 2 cups all-purpose flour
  • 1 Tbsp baking powder
  • 1/2 tsp salt
  • Coarsely ground black pepper, to taste
  • 2 large eggs, room temp
  • 1 cup buttermilk, room temp
  • 6 Tbsp unsalted butter, melted and cooled
  • 3/4 cup “sun-ripened” tomatoes, chopped
  • 1/3 cup grated Parmigiano-Reggiano, plus additional 1-2 Tbsp for garnish
  • 1/4 cup fresh basil
Directions
  1. Preheat oven to 400F. Grease a 12-cup muffin pan or line with paper liners. Sift together the flour, baking powder, salt, and pepper into mixer bowl.
  2. Lightly beat eggs and add to mixer bowl. Add buttermilk, melted butter, tomatoes, basil, and Parmesan cheese. Mix on medium speed until just combined - do not overmix.
  3. Scoop the batter into the muffin pan, about 2/3 full. Sprinkle with remaining Parmesan cheese. Bake for 20 minutes, until well risen, golden brown, and firm to the touch.
  4. Let muffins cool 5 minutes in the pan before removing. Serve warm or cool completely and store covered for 3 days.
Source: Adapted from 1 Mix, 100 Muffins as seen on Confections of a Foodie Bride

Saturday, November 21, 2009

Milky Way Cake

I "built" this cake for my brother's birthday.  One of his favorite candy bars is Milky Way and I happened to have an entire bag of fun-size Milky Ways leftover from Halloween so I googled "Milky Way Cake".  I got a lot of hits for this recipe by Paula Deen and I know she's the Queen of Butter but omigod there are 3 sticks of butter in the cake and another stick in the frosting!!!  Add to that tons of candy and shoot this is just beyond unhealthy lol!

Anyway, I didn't make the frosting this time but will include the original recipe.  Once I saw that it had sugar boiling directions (similar to my failed fudge) I decided that I didn't yet have enough courage to give it a try.  So, I bought a can of Duncan Hines Whipped Chocolate Frosting.  I also omitted all of the nuts because my brother is allergic but I bet those and the frosting would have been a delicious addition.  My fun size bag was about 3oz short on the total amount of Milky Ways but I figured it was good enough.  I made a 2-layer cake instead of 3 because I only own 2 round cake pans...just add some additional baking time.  I also broke out the big guns to make this cake...the new red Kitchen Aid Professional Stand Mixer that my parents bought me for our housewarming party.

Here are some pictures of my actual cake and a picture with my brother...


Milky Way Cake
Printer-Friendly Version

Photo Credit: Love at First Bite


Yields: 16-20 servings

Ingredients

For Cake:
  • Confectioners' sugar or cocoa  powder, for dusting pans
  • 8 (1 3/4 ounce) Milky Way bars
  • 1 1/2 cups butter
  • 2 cups granulated sugar
  • 4 eggs, well beaten
  • 2 1/2 cups all-purpose flour
  • 1/4 teaspoon baking soda
  • 1 1/4 cups buttermilk
  • 1 cup chopped pecans
  • 1 teaspoon vanilla extract
For Icing:
  • 2 1/2 cups granulated sugar
  • 1 cup evaporated milk
  • 1 cup marshmallow cream
  • 1/2 cup butter
  • 6 ounces chocolate chips
  • 1 cup chopped pecans
Directions
  1. Preheat the oven to 325ºF. Grease three 9-inch cake pans and dust them with confectioner's sugar. To make the cake, melt the Milky Way bars with 1 stick of butter. Remove from heat and let cool.
  2. Cream the remaining 2 sticks of butter with the granulated sugar. Add the beaten eggs and the cooled chocolate mixture. Sift the flour and the baking soda together. Alternately add the flour and buttermilk to the batter, blending well. Add the nuts and vanilla.
  3. Divide the batter among the prepared pans and bake for 30-40 minutes or until the cake is firm to the touch. Cool for 5 minutes, remove from the pans and place on cooling racks.
  4. While the cake cools prepare the icing. Combine the sugar and milk in a heavy saucepan. Cook to the soft-ball stage (234 degrees on a candy thermometer). Remove the pan from the heat and add the marshmallow cream, butter and chocolate chips, stirring until melted. Add the pecans. When the cake has cooled completely, frost each layer, sides and top of the Milky Way Cake.
Source: Paula Deen as seen on Love at First Bite

Sunday, November 1, 2009

Buttermilk Cornbread

I made this recipe to go with the Turkey Bean Pumpkin Chili that I made earlier in the week.  We had the chili and the cornbread for Halloween dinner.  I was short on sugar and too lazy to go to the store (even though it's literally like 1/4 mile away) so I just used 1/2 cup instead of 2/3.  Having made it with the full amount of sugar before, I do prefer the full amount :).  In retrospect, I probably should have added some honey or something to make up for the sweetness.  Maybe i'll make a honeybutter to spread on the top...

Buttermilk Cornbread
Printer-Friendly Version


Prep Time:15 MinCook Time:40 Min
Ready In: 55 Min
 Ingredients
  • 1/2 cup butter
  • 2/3 cup white sugar
  • 2 eggs
  • 1 cup buttermilk (or substitute just under 1 cup milk with 1 Tablespoon white vinegar or lemon juice) 
  • 1/2 teaspoon baking soda
  • 1 cup cornmeal
  • 1 cup all-purpose flour
  • 1/2 teaspoon salt

Directions

  1. Preheat oven to 375 degrees F (175 degrees C). Grease an 8 inch square pan or a 12 muffin tin. 
  2. Melt butter in large skillet. Remove from heat and stir in sugar. Quickly add eggs and beat until well blended. Combine buttermilk with baking soda and stir into mixture in pan. Stir in cornmeal, flour, and salt until well blended and few lumps remain. Pour batter into the prepared pan.
  3. Bake in the preheated oven for 30 to 40 minutes (8" square pan) or about 20 minutes (muffin tin), or until a toothpick inserted in the center comes out clean.
Source: All Recipes