Showing posts with label pizza. Show all posts

Monday, November 11, 2013

Apple, Brie, and Sausage Pizza on a Pumpkin Crust

Have you ever had a moment where you looked at a recipe and thought "hmmm...this is interesting...different and could it *really* work?".  This was one of those recipes to me when I was searching for a way to use some of my 16 cups of pumpkin puree.  Yes...you read that correctly.  16 cups.  That's enough for EIGHT pumpkin pies and I wasn't about to do that!

When you get over the fact that this is a non-traditional pizza without any sauce and instead think about the ingredients it does have, it starts to make a lot of sense.  Brie and apples aren't anything out of the ordinary.  Sausage is always delicious.  And pumpkin pizza crust?  Just a small departure from pumpkin bread.  Starting to warm up to the concept already, aren't ya? :)

I have to say that I truly fell in love with this pizza.  It has a subtle pumpkin flavor but you can tell it's there by the fun slightly orange color of the dough.  I'm actually starting to formulate a dessert pizza in my head using this crust...

Melty brie.  Need I say more?

Sweet apples and salty sausage meld together to form this unique glaze-like "sauce" on the crust.  And then to finish, instead of arugula I added some fresh sage which left me wanting more with every bite.

It was really quite a delicious Fall treat!  This pizza could make a great Thanksgiving appetizer (cut into smaller rectangular pieces a la Donatos pizza style) or dinner entree.  Please give this one a try.  You won't regret it!

One Year Ago: Spicy Garlic and Ginger Chicken with Green Beans and Smoked Macaroni and Cheese
Two Years Ago: Caramelized Onion Mashed Potatoes
Four Years Ago: Spinach, Sausage and Cheese Manicotti

Apple, Brie, and Sausage Pizza on a Pumpkin Crust


Ingredients

For the Pumpkin Pizza Dough
  • 1 1/2 tsp yeast 
  • 3/4 cups warm water (~110 F), divided 
  • 5 TBSP + 1 tsp brown sugar 
  • 1 TBSP unsalted butter 
  • 1 tsp salt 
  • 3 cups all-purpose flour
  • 3/4 cups pumpkin puree
For the Pizza
  • Corn meal
  • 4 baking apples such as Fuji, Honeycrisp, or Granny Smith
  • 4 oz brie 
  • 2 spicy Italian turkey sausage links, casings removed 
  • 4-6 fresh sage leaves, rubbed and chopped chiffonade
Directions
  1. In a small bowl, proof the yeast by combining it with 3/8 cup warm water and brown sugar.  Let sit for about five minutes or until it starts foaming. 
  2. Meanwhile, in a small saucepan, combine butter, salt, and the remaining 3/8 cup water. Heat until the butter melts. Let it cool until warm, but not hot. 
  3. Pour butter mixture into the yeast mixture and then into the bowl of a stand mixer. Mix the pumpkin puree into the yeast and butter mixtures. Then mix in the bread flour. Using the bread hook attachment, mix the dough on speed 2 for 10 minutes. Cover the bowl with a damp kitchen towel and allow the dough to rise in a warm place until doubled, about one hour. 
  4. Preheat oven to 500. Sprinkle some corn meal onto pizza pan.
  5. After dough has risen, flour it and shape into a ball.  Stretch into desired size and shape. Place on prepared pizza pan. Bake for 3-4 minutes and remove from the oven. 
  6. Meanwhile, cook sausage in a skillet over medium heat, crumbling it up using a spatula. Cut apples into thin slices. Layer onto pizza. Next layer slices of brie onto the pizza. Sprinkle with turkey sausage. 
  7. Bake assembled pizza for 10-12 minutes or until bottom of dough is starting to get brown.  
  8. Garnish with fresh sage and serve.
Source: Modified from Eats Well with Others as seen on PreventionRD

Monday, August 5, 2013

Pepperoni Pizza Puffs

This is it my friends.  The final week of pregnancy...at least according to my estimated due date!  Of course, we all know that baby will make his appearance when he's good and ready so he could stick around another two weeks before my OB would consider intervening.  Good thing I'm not *too* uncomfortable yet.

I've been spending the past couple weeks filling my freezer with all sorts of goodies so that we won't starve after baby arrives.  It takes me a little longer than normal to prep things because I need to take frequent breaks and my feet/ankles look gigantic (my sister affectionately calls them "fat kid feet") once I'm done but I know it will all be worth it in the end.  As long as baby stays put, I'll continue to grow my freezer meal stash!

Last week I posted a teaser pic of these pepperoni pizza puffs and had more than one request for the recipe.  I had actually made these for my friends Kristen and Sig when they had their little boy but apparently I never got to blogging about them so here they are now!

They're a bit like cheesy dough puffs (reminding me of the Brazilian cheese bread pao de queijo for those familiar) filled with pepperoni and then served with pizza sauce for dipping.  Of course feel free to substitute whatever pizza toppings you enjoy.  I freeze them on a baking sheet first so they don't clump together and then dump them into a plastic freezer bag.  To reheat, I just pop them in the microwave.  Easy peasy one-handed eating and kid-friendly, too!

One Year Ago: Creamed Corn and Watermelon Slush
Two Years Ago: Five-Minute Healthy Chunky Monkey Ice Cream (one of my favorite treats anytime but especially during pregnancy!)
Four Years Ago: Grands! Taco Melts aka Homemade Hot Pockets (I haven't tried it before but I bet this would also make a great freezer lunch if you fully prepared it and then followed a similar freezing method as in these pizza puffs!)

Pepperoni Pizza Puffs


Pepperoni Pizza Puffs

Ingredients
  • 3/4 cup flour
  • 3/4 teaspoon baking powder
  • 3/4 tsp Italian seasoning
  • 3/4 cup milk
  • 1 egg, lightly beaten
  • 1 cup mozzarella cheese, shredded
  • 4 oz (about 1 cup) pepperoni, cut into small pieces
  • 1/2 cup pizza sauce
  • 2 Tablespoons fresh basil, finely chopped
Directions
  1. Preheat oven to 375 degrees.  Prepare a 24-cup mini muffin pan by spraying with cooking spray.
  2. In a large bowl, whisk together the flour, baking powder, and Italian seasoning.  Add the milk and egg.  Finally, stir in the mozzarella and pepperoni and then let the mixture stand for 10 minutes.
  3. Give the batter a stir then divide evenly among the mini muffin cups.  Bake until puffed and golden, about 20-25 minutes.  If you intend to freeze them, remove the puffs from the pan while still warm and then arrange in a single layer on a baking sheet to freeze.  Once frozen, transfer to a ziploc freezer bag, removing as much extra air as possible.
  4. When ready to serve, microwave the pizza sauce until warmed through, then stir in basil.  Serve warm puffs with pizza sauce for dipping.
Source: Barely modified from Noble Pig

Monday, April 8, 2013

Chicago-Style Deep Dish Pizza

It was our turn to host dinner club and we chose to bring back an oldie but goodie theme...Restaurant Copycats!  Last time we contributed Outback's Blooming Onion with Dipping Sauce and as a bonus I made some Clone of Cinnabon cinnamon rolls.  Our friends made Carraba's Chicken Bryan, P.F. Chang's Chicken Lettuce Wraps among others and it was by far one of the best dinner clubs because it was like having the best of what every restaurant had to offer.

Oddly enough, when it came time to pick the main dish that I was going to serve, I was at a loss as to what to make!  So I asked my wonderful facebook fans for advice.  Fans suggested everything from Cheesecake Factory's Cajun Chicken Pasta to Olive Garden's Chicken Scampi to Outback's Alice Springs Chicken and more.  All excellent ideas and then it dawned on me that there was one recipe I had bookmarked long long ago that I kept seeing on multiple websites and that would fit the bill.

Chicago-Style Deep Dish Pizza made famous by restaurants like Uno's Chicago Grill and Giordano's and Lou Manalti's.  There's even local takes such as Chi-nnati's Chicago-Style Pizza in Cincinnati.  Now, I won't get into an argument on whose pizza is best, whether Chicago-style means just deep dish or stuffed, or whether corn meal goes IN the crust or not because in the end, all that matters is that this particular recipe is pretty awesome!

I created one cheese pie and another with pepperoni.  There are a number of pizza aficionados in the group (with my husband and our friends Daniel and Scott).  The boys agreed this was pass-along-the-recipe-please worthy pizza and better than some of those that we bought in restaurants.

First of all, I LOVE that it uses a plain 9-inch round cake pan to make this.  No fancy equipment needed!  The crust is thick, buttery, and full of airy pockets from the laminating process (don't let it scare you and check out step-by-step photos in Brown Eyed Baker's post; it's easier than it seems!).  The simple homemade sauce is chunky and full of flavor.  And the cheese, well, you cannot go wrong with cheese and I was told this was just the right ratio of crust to cheese to sauce for a deep dish pizza.

Tomorrow is my 4th blogiversary so come back for a sweet (literally!) recipe and giveaway in celebration.  Then on Friday, I pay homage to National Grilled Cheese Day with another recipe copycat that is so radical you won't want to miss it!

In the meantime, if you can't get enough copycat recipes, be sure to check out my copycat label!  I make sure each post is tagged with key words to make it easier for you to find recipes with similar ingredients and/or themes.  You can find these tags at the bottom of each post or the full list can be found on the right side bar below the Archive section.


Chicago-Style Deep Dish Pizza

Chicago-Style Deep Dish Pizza

Ingredients

For the Dough:
  • 3 1/4 cups all-purpose flour
  • 1/2 cup yellow cornmeal
  • 1 1/2 teaspoons salt
  • 2 teaspoons sugar
  • 2 1/4 teaspoons instant yeast
  • 1 1/4 cups water, room temperature
  • 3 tablespoons unsalted butter, melted
  • 4 tablespoons unsalted butter, softened
  • 1 teaspoon + 4 tablespoons olive oil, divided
For the Sauce:
  • 2 tablespoons unsalted butter
  • 1/4 cup grated onion
  • 1/4 teaspoon dried oregano
  • 1/2 teaspoon salt
  • 2 garlic cloves, minced
  • 1 (28-ounce) can crushed tomatoes
  • 1/4 teaspoon sugar
  • 2 tablespoons coarsely chopped fresh basil
  • 1 tablespoon olive oil
  • Freshly ground black pepper, to taste
  • Crushed red pepper, to taste (optional)
For the Toppings:
  • 1 pound (4 cups) mozzarella cheese, shredded
  • Pepperoni, Italian sausage, mushrooms, onions, green peppers...whatever you want to add inside if you like to load your pizza with toppings.  Personally, I'm a purist!
  • 1/4 cup grated Parmesan cheese 
Direction
  1. To Make the Dough: In a large bowl, whisk together the flour, cornmeal, salt, sugar, and yeast. Add water and melted butter.  Using a dough hook, mix on low speed until fully combined, 1 to 2 minutes.  Scrape down the sides and bottom of the bowl occasionally if needed.  Increase speed to medium and knead until dough is glossy and smooth and pulls away from sides of bowl, 4 to 5 minutes. If you do not have a mixer, you could use a food processor or knead by hand. Coat a large bowl with 1 teaspoon olive oil. Transfer dough to bowl and turn to coat in oil. Cover tightly with plastic wrap and let rise at room temperature until nearly doubled in volume, 45 to 60 minutes.
  2. To Make the Sauce: While dough rises, melt butter in a medium saucepan over medium heat. Add onion, oregano, and salt; cook, stirring occasionally, until liquid has evaporated and onion is golden brown, about 5 minutes. Add garlic and cook until fragrant, about 30 seconds. Stir in tomatoes, sugar, and crushed red pepper flakes if desired.  Increase heat to high and bring to a simmer then lower heat to medium-low and simmer until reduced to about 2½ cups, 25 to 30 minutes. Remove the pan from the heat then stir in the basil and olive oil.  Season with salt and pepper.
  3. To Laminate the Dough.  Turn the dough out onto a clean dry work surface and roll into a 15x12-inch rectangle. Spread the softened butter over the surface leaving a ½-inch border along the edges. Starting at the short end, roll the dough into a tight cylinder. With seam side down, flatten the cylinder into an 18x4-inch rectangle. Cut rectangle in half crosswise. Working with one half, fold into thirds like a business letter; pinch seams together to form ball. Repeat with remaining half. Return balls to oiled bowl, cover tightly with plastic wrap, and let rise in refrigerator until nearly doubled in volume, 40 to 50 minutes. Meanwhile, adjust oven rack to lower position and preheat oven to 425 degrees F.
  4. To Bake the Pizzas: Coat two 9-inch round cake pans with 2 tablespoons olive oil each. Transfer 1 dough ball to work surface and roll out into a 13-inch circle. Transfer dough to the pan by rolling the dough loosely around a rolling pin and unrolling into pan. Lightly press dough into pan, working into corners and 1 inch up sides. If dough resists stretching, let it relax for 5 minutes before trying again. Repeat with remaining dough ball.
  5. For each pizza, sprinkle 2 cups mozzarella evenly over surface of dough. If you're using any toppings, layer them now on top of the cheese. Spread 1¼ cups tomato sauce over the cheese (or toppings) and sprinkle 2 tablespoons Parmesan over sauce. 
  6. Bake until crust is golden brown, 20 to 30 minutes. Remove pizza from oven and let rest 10 minutes before slicing and serving.

Source: Cook's Illustrated, January-February 2010 as seen on and adapted by Brown Eyed Baker

Wednesday, August 22, 2012

S'mores Pizza with Graham Cracker Cookie Crust

S'mores seem to be all the craze these days and after posting a photo of this creation on my facebook page this weekend, Kathy and Whitney pretty much DEMANDED that this recipe be posted immediately.  But, since Monday was Secret Recipe Club reveal day for me, we compromised and settled for Wednesday to post this recipe.  That'd be today and what a lucky day it is for you since normally I wouldn't post so many dessert recipes so close together (in case you haven't noticed, I do mostly savory recipes)!

I think people are familiar with the concept of Fruit Pizzas and this is a similar idea but with all the flavors of S'mores.  Now, I've seen S'mores Pizza recipes on the internet before but they all seem to incorporate a chocolate chip cookie dough or regular pizza crust topped with graham crackers.  I've also seen homemade Graham Cracker recipes floating around, too.  So why oh why has nobody COMBINED the two recipes together yet so that the crust itself is a graham cracker cookie??  Or if someone has thought of this before, I haven't seen it.  Either way, let me feel special for feeling like I invited the idea ;).

I wasn't sure how much cookie dough I would need for the crust so I just went with an entire recipe worth.  I prefer a soft cookie with slightly crunchy exterior.  The cookie crust worked out perfectly for me as written - just like I had envisioned.  I'd venture to say it was about 1/4 inch thick after it was baked.  If you like your cookies really crunchy like a real graham cracker, perhaps use 1/2 - 3/4 of the dough, spread it thinner, and/or bake it longer....play with the idea and let me know what works since I haven't tested this myself!

I LOVED this dessert pizza.  I seriously went back for seconds...and then thirds.  We left the pizza outside in the sun while we played outside and this kept it nice and gooey...the best way to enjoy s'mores!  I was also amazed at how quickly the marshmallows toasted in the oven under the broiler (just 5 quick minutes!).  I might toast marshmallows this way just to eat.  Mmmm...gooey marshmallow centers with toasty outsides.  I'm salivating just thinking about this pizza.  Good thing we ate it all or I'd be going for fourths!

Enjoy, friends!

S'mores Pizza with Graham Cracker Cookie Crust


S'mores Pizza with Graham Cracker Cookie Crust
Wow iPhone photos are actually pretty good!  Natural lighting really is the key to a quality photo!  I only wish that I was able to take advantage of it more often but my day job usually gets in the way of that...
Ingredients

For the Graham Cracker Cookie Crust
  • 2 cups plus 2 Tablespoons (300g) all-purpose flour
  • 1/2 cup (75g) whole wheat flour or whole wheat pastry flour
  • 1 cup (176g) brown sugar, lightly packed
  • 1 teaspoon (6g) baking soda
  • 3/4 teaspoon (4g) kosher salt
  • 7 Tablespoons (100g) unsalted butter, cut into cubes and frozen (at least 20-30 minutes)
  • 1/3 cup (114g) mild-flavored honey
  • 5 Tablespoons (77g) milk, whole preferred
  • 2 Tablespoons vanilla extract
For Topping the Pizza
  • 1 cup bittersweet chocolate chips
  • 1 Hershey's milk chocolate candy bar, cut into bite sized pieces
  • 2 1/2 cups marshmallows (mini or regular sized cut into small pieces)
Directions
  1. Preheat oven to 350 degrees.  Cut a piece of parchment paper to fit a 14" round pizza pan.  Hint: I tore off a piece of parchment big enough to fit the pan then laid it on top of the pan and ran my fingernail around the inner edge of the pizza pan to get the correct size.  Then, I just cut along the crease marks!
  2. Make the graham cracker cookie dough crust, combine the flours, brown sugar, baking soda, and salt in the bowl of a food process fitted with the metal blade.  Pulse to blend.  Add in the butter, pulsing in short bursts until the mixture resembles coarse meal.  If you don't have a food processor, you can also use a mixer, pastry cutter, or in a real pinch - two forks.  
  3. In a liquid measuring cup, combine the honey, milk, and vanilla.  Whisk to blend.  Add the liquid to the bowl of the food processor and process just until the dough has come together.  The mixture will be fairly sticky.  
  4. Form the dough into a ball and press it into the prepared pizza pan.  It doesn't have to be perfectly even because the dough will spread as it bakes.  Bake for 18-23 minutes or until cookie is evenly browned and just crisped.  Remove from oven.  Switch your oven to the broiler and if necessary, move the rack to the highest position.
  5. Top the hot pizza with chocolate chips, chopped candy bar, and marshmallows.  Feel free to use more or less of each to suit your tastes.  Put the topped pizza back into the oven for about 5 minutes until marshmallows are toasted.  Watch carefully and take care not to burn it...mine honestly got a bit more toasty than I personally intended!
  6. Slice into pizza wedges and serve warm to enjoy.  If you're like me, serve outside in the summer sun so it stays gooey longer...that is, if it even lasts that long.  You're welcome!
Source: Inspired by Fake Ginger and Graham Cracker Cookie Crust from Annie's Eats

Friday, August 10, 2012

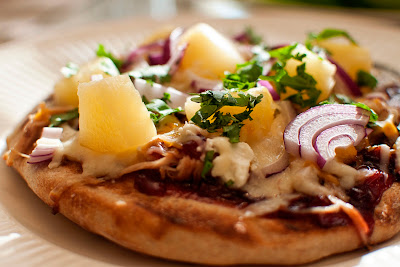
Cherry BBQ Pulled Pork Grilled Pizza

Happy Friday!  I don't know who noticed but last night I spent an extensive portion of my evening giving my blog a face lift.  After not really doing anything to my site for nearly 300 posts (next one!), I was just getting a little sick of the old look.  I changed my blog template (of course keeping my signature and favorite pink color!), moved some content onto their own pages to make the homepage more streamlined, and added better social media sharing/following features to the bottom of each post and the sidebar (please use them!).  I also moved the "print-friendly" button to a more obvious location.  If you haven't used that feature yet, it's a pretty awesome way to cut out all my witty chatter (*sad face*) and just print the recipe and/or photo if you want.  Yah for being green!  I hope all of these little changes help to make your browsing experience on my website a bit better.  Please comment and let me know how I'm doing!

Today we are continuing Emily and my Seasonal Summer Fruit and Vegetable Extravaganza.  We already shared our Watermelon Slush and BLT Corn Salad Wrap starter so onto the main course!  As it was extremely hot out lately, Emily and I thought we'd put our husbands to work on the grill and with the success of my Grilled Steakhouse Pizza in the past, I thought another grilled pizza would be a great addition to our menu.  Plus, Emily and Scott were grilled pizza virgins.

Overall the taste of this pizza was very Summery.  I do wish that the flavor of the cherries came through more but it could have been the result of using some not-so-flavorful cherries that I picked up at the grocery store.  Darn those pretty and highly-shippable fruits that look deceivingly delicious but yet fall flat on flavor!!  Either way, Scott liked the barbecue because it "wasn't overly sweet" and pizza is pretty much the only way he enjoys goat cheese.  Emily's need for carbs, meat, and cheese was definitely satisfied and she scarfed hers down faster than any of the boys!  In all fairness, she is eating for three now...yes, in case I hadn't mentioned, she's pregnant with twins!  Last but not least, my husband's verdict?  "It was yummy."  Ah, a man of few words ;).

Come back next week to see what desserts were made.  One more week until my Beer Flats giveaway ends.  Check out my review and take the time to enter.  It only takes a few seconds!


Cherry BBQ Pulled Pork Grilled Pizza

Cherry BBQ Pulled Pork Grilled Pizza
Photo Credit: Emily H.
Ingredients
  • 1.5 pounds of your favorite pizza dough, shaped into 4 individual sized balls to be stretched and grilled
  • Olive oil for brushing
  • ~1 cup cherry barbecue sauce, recipe follows
  • ~1.5 cups leftover shredded pulled pork, recipe follows
  • Shredded cheddar cheese
  • Shredded mozzarella cheese
  • Crumbled goat cheese
  • Red onion, thinly sliced
  • Pineapple chunks
  • Cilantro, chopped
For the Cherry Barbecue Sauce
  • 1/2 lb cherries, pits removed
  • 3 Tbsp sugar
  • 1/4 cup water
  • 1 cup barbecue sauce
For the Pulled Pork
  • 1 can Dr. Pepper
  • 5-7 lbs pork butt roast
  • 1/4 cup brown mustard
  • Salt and pepper, to taste
Directions
  1. Prepare the Pulled Pork: Liberally season the pork roast with salt and pepper and place the fat-side-up in a crockpot.  Add the mustard and Dr. Pepper to the crockpot and cook on low for 8-10 hours.  Shred the meat with two forks, discarding any bones and fat.
  2. Prepare the Cherry Barbecue Sauce: Roughly chop the cherries into small pieces.  Add them to a small sauce pan along with the sugar and water.  Cook over medium heat for ~20 minutes, until the liquid is thick and the cherries are soft.
  3. Grill the Pizza:  Heat grill to medium-high heat (450F) and generously oil the grate (I use a paper towel wad soaked in oil and held with tongs or a silicone brush
  4. Carefully place individually sized stretched dough rounds onto the grill and cover.  Allow to cook until nicely browned on bottom and large bubbles form on the surface (about 3-4 minutes).  Carefully remove the dough from the grill and with the cooked side facing up, top each pizza with cherry barbecue sauce.  Top with pulled pork then follow with cheddar and mozzarella cheese.  Finish with the red onions, pineapple, and goat cheese.  Carefully return the topped pizzas to the grill and cook until the bottom is browned and cheese is melted (about 4-6 minutes).
  5. Remove pizza from grill. Garnish with cilantro.  Cut and serve immediately.
Source: A combination of ingredients and ideas from Confections of a Foodie Bride and Our Best Bites

Wednesday, July 11, 2012

Grilled Steakhouse Pizza

This pizza is a man's dream.  It is pizza.  And it has steak.  With lots of sauce.  Don't tell me your husband or other men in your life wouldn't go crazy for this.

And, a leftover repurposer's, fast meal, too!  It was a great way for me to use up leftover steak that I had already grilled on a previous night, used pizza dough that I always have frozen on-hand, and made use of the Heinz 57 steak sauce that I bought for the Pulled Hawaiian Chicken Sandwiches.  Win for the husband and win for me!  Of course, if you don't have leftover steak, you can just throw one on the grill, just before/while the pizza grills, too.

I loved all of the flavors in this pizza.  Very bold and manly.  Pioneer Woman originally baked this but I wanted to try grilled pizza and figured why not try it with this recipe since it was like 110 degrees outside.  It worked out fantastically.  Grilled pizza has a little extra oomph of char flavor and will be my cooking method of choice during the hot dog days of summer.  Try it!

By the way, just a couple more days to enter my Daelia's Biscuits for Cheese giveaway!  My husband ate the remainder of my Almond Raisin ones last night and I was so upset when I went to snack on them only to discover they were no more.  It was only in this moment that I realized how much I really loved them!

One Year Ago: Persian Turkey Kofta Kebabs and Tomato Basil Orzo Salad
Two Years Ago: Fajitas
Three Years Ago: Chicken Parmesan Meatball Subs

Edited 7/15/12: A really awesome thing happened on Friday the 13th.  This post was listed as #3 on the FoodBuzz Top 9 list!  What a total honor and thank you!

Grilled Steakhouse Pizza

Grilled Steakhouse Pizza

Ingredients

  • 1/2 Recipe pizza crust
  • 1 Skirt steak or flank steak, grilled to medium rare and cut into thin slices
  • Salt and pepper, to taste
  • 2 Red onions, sliced thin
  • 3 Tablespoons butter
  • 4 Tablespoons balsamic vinegar
  • 1/2 teaspoon Worcestershire sauce
  • 2 cups marinara sauce
  • 12 ounces fresh mozzarella cheese
  • Shaved parmesan cheese
  • 1/2 cup steak sauce (more if desired)
  • Green onions (optional)
Directions
  1. To Bake: Preheat oven to 475 degrees. Arrange rack in the bottom half of the oven.To Grill: Heat grill to medium-high heat (450F) and generously oil the grate (I use a paper towel wad soaked in oil and held with tongs).
  2. Saute red onions in butter and 2 tablespoons balsamic vinegar over medium-low heat until dark and caramelized, about 10-12 minutes. Remove from heat and set aside.
  3. Combine marinara sauce with 2 tablespoons balsamic and Worcestershire sauce. Set aside.
  4. Roll out pizza dough until very thin. If grilling, make 2 smaller individual sized pizzas so that it's easier to handle.  
  5. To Bake: Top with marinara mixture and spread to coat dough. Lay caramelized red onions all over the sauce, then top onions with slices of mozzarella cheese. Bake pizza for 12-15 minutes, or until crust is golden and cheese is bubbly (but watch to make sure it doesn't burn.)
    To Grill: Carefully place dough rounds onto the grill and cover.  Allow to cook until nicely browned on bottom and large bubbles form on the surface (about 3-4 minutes).  Carefully remove the dough from the grill and with the cooked side facing up, top each pizza with marinara mixture.  Lay caramelized red onions all over the sauce, then top with mozzarella cheese.  Carefully return the topped pizzas to the grill and cook until the bottom is browned and cheese is melted (about 4-6 minutes).
  6. Remove pizza from the oven or grill, then drape slices of steak all over the surface. Drizzle the top of the pizza with steak sauce (use squirt bottle if you have one) and top the whole thing with Parmesan shavings. Garnish with sliced green onions, if desired.  Cut and serve immediately.

Source: Pizza recipe from Pioneer Woman.  Grilling directions from Annie's Eats.

Thursday, April 26, 2012

Stuffed Crust Pizza

Okay.  I decided that after sharing the Chocolate Chip Cookie Dough Stuffed Cinnamon Rolls earlier this week I might as well stay with the stuffed theme...and am on a roll...*ba dum dump*.  Okay.  Enough bad puns already.

But really, who can say no to pizza with gooey, melted cheese?  How about having some of that cheesy goodness in the crust in addition to on top of the rest of the pie?  I remember when stuffed crust pizza came out at Pizza Hut.  It seemed like the greatest invention ever at the time.  The commercials featured people diving into their pizza slices crust first.  Suddenly,  the crust became a desirable part of the pizza and so many crusts were spared from ending up in the trash.  Because let's face it.  Before stuffed crust pizza, generally speaking unless you had some yummy Papa John's garlic butter or equally delicious dipping sauce the crust was really just filler.

When I saw this recipe in the cookbook that my mother-in-law gave me for Christmas I knew it was a "must make".  The answer to execute to make this "dressed up" pizza at home was so simple: string cheese!  Let's just say that this recipe didn't disappoint and came together surprisingly quickly and easily.  Though there's yeast in the dough you don't need to let it rise or anything before baking.  It'll be on our menu again for sure!

One Year Ago: Churro Bites 
Two Years Ago: Slow Cooker Carnitas

Stuffed Crust Pizza

Prep Time: 25 Minutes; Cook Time: 25 Minutes
Yields: 8 slices

Stuffed Crust Pizza

Ingredients
  • 2 to 2-1/2 c all-purpose flour
  • 1 package (0.25 oz) quick-rise yeast
  • 1 tsp salt
  • 1 c water
  • 2 Tbsp canola oil
  • 8 pieces string cheese
  • 1 c tomato sauce
  • 1 tsp dried oregano
  • 1 tsp dried basil
  • 1/4 tsp pepper
  • 1/8 tsp garlic powder
  • Dash of cracked red pepper flakes
  • 1-1/2 c (6 oz) shredded mozzarella cheese
  • Pizza toppings of choice
  • Olive oil
Directions
  1. Preheat oven to 425 degrees F.
  2. In a large bowl, combine 2 cups flour, yeast, and salt.  In a saucepan, heat water and oil to 120-130 degrees F.  Add to dry ingredients and beat until just moistened.  Stir in enough remaining flour until it forms a soft dough.  Let rest for 5 minutes.
  3. On a lightly floured surface, roll dough into a 14-inch circle.  Transfer to greased 12-inch pizza pan, letting dough drape 2 inches over the edge.  Place string cheese around the edge of the pan.  Fold the dough over the cheese and pinch to seal (obviously make sure you get a good seal or your cheese will all melt out of the crust and that would be sad!).  Prick the dough pizza bottom thoroughly with a fork.  Bake at 425 degrees F for 10 minutes.
  4. Meanwhile, combine tomato sauce and spices.  Spread sauce over pre-baked crust.  Sprinkle with mozzarella and add desired toppings.  Lightly brush pizza crust edge with olive oil.  Bake for 15-20 minutes or until cheese is melted and crust is golden brown.
Source: Barely modified from The Taste of Home Cookbook, pg 145

Saturday, February 13, 2010

Pizza Bites

Yummy little morsels that burst with flavor when you bite into them.  Be careful, they're addicting!!! 

I used the other 1/2 batch of Basic Pizza Dough that I had frozen.  They do get surprisingly bigger when you bake them so next time, I'll make mine a bit smaller (I didn't split my dough out into the number of pieces in advance so ran short on dough and room). 

I really don't have much else to say about this recipe except to go try it.  I served it with some spaghetti sauce for dipping because I had made a batch that same morning but Marinara Magnifica, other tomato sauce, and/or ranch dressing would taste great too, I think.  Chris probably ate half of them..  He requested them the next day again so I'd have to say these got 2 thumbs up from him.  Yum!

Pizza Bites
Printer-Friendly Version


Ingredients:
  • ½ batch pizza dough (enough for 1 pizza)
  • 4 oz. mozzarella cheese, cubed (about 20-24 pieces)
  • Sliced pepperoni
For topping:
  • Olive oil based butter, melted
  • Garlic powder
  • Italian seasoning
  • Shredded Parmesan cheese
Directions:

  1. Preheat the oven to 400˚ F. Lightly grease a 9-inch pie plate or cake pan.
  2. Divide the pizza dough into 20-24 roughly equal sized pieces.
  3. Take one of the dough pieces, top with a cube of cheese and a slice or two of pepperoni. Pull the edges of the dough around the fillings and pinch closed. Place seam-side down in the baking dish. Repeat with the remaining dough pieces.  (Bites will touch each other and bake together but pull apart for you to enjoy as individual bites)
  4. Lightly brush the tops of the dough balls with melted olive oil-based butter. Sprinkle with garlic powder, Italian seasoning and shredded Parmesan cheese.
  5. Bake for 20 minutes, or until the tops are golden brown. Serve warm, pulling apart individual bites and enjoy with dipping sauce as desired.
Source: Modified from Annie's Eats

Saturday, January 23, 2010

Basic Pizza Dough

Everybody loves pizza.  What's awesome about pizza is the fact that you can make it a million different ways so it never gets boring.  Thin crust - pan crust; Red sauce - white or pesto sauce; Cheese purist - Load it up!  Let your imagination go wild!  For this pizza I did cubes of mozzarella from a block (leftover from Baked Sausage Ziti), red onions, green peppers, mushrooms (my half) and pepperoni (Chris' half) then a generous sprinkle of Pizza Seasoning.

I previously posted a recipe for Exquisite Pizza Sauce which is my base sauce recipe for a traditional pizza.  Now I'm going to share with you a tried and true Pizza Dough upon which you can use to make your pizza base.  The dough makes 2 large pizzas (takes up almost my whole pizza stone) and can be frozen so you always have some on hand.  I use my bread maker to make things easier but you can also use your mixer, food processor (this is something new I learned!) or do it the old-fashioned way by hand.

What I need to perfect is the ability to transfer the loaded pizza to the pre-heated pizza stone.  Any tips?  I think I need to use more corn meal on the bottom of the pizza next time so it slides off easier.  Or, maybe I should buy one of this pizza peel things.  This time I had to cook it on my pizza pan until it was solid enough to transfer to the pizza stone.  If you can, bake it on a pizza stone because it makes the crust MUCH more crispy!  It draws the moisture out of the pizza to provide a perfectly crunchy crust on the outside and chewy on the inside.

What are you favorite sauces and topping combinations?  Here's some that I have tried...
Basic Pizza Dough
Printer-Friendly Version


Yields: 2 large pizzas

Ingredients
  • ½ cup warm water (about 110°)
  • 1 envelope (2 ¼ tsp.) instant yeast
  • 1 ¼ cups water, at room temperature
  • 2 tbsp. extra-virgin olive oil
  • 4 cups (22 oz.) bread flour, plus more for dusting (used all-purpose)
  • 1 ½ tsp. salt
  • olive oil or non-stick cooking spray for greasing the bowl
Directions:

Using a bread machine:
  1. Add the ingredients to your bread machine in the order that your manufacturer suggests.  Press the dough cycle and machine knead bread and allow to rise.
  2. To bake, place a pizza stone in the lower third of the oven. Heat the oven to 500° for at least 30 minutes. Turn the dough out onto a lightly floured work surface. Divide the dough into two equal pieces. Form both pieces of dough into smooth, round balls and cover with a damp cloth. Let the dough relax for at least 10 minutes but no more than 30 minutes
  3. Working with one piece of dough and keeping the other covered, shape the dough and transfer to a pizza peel or round of parchment dusted with semolina or cornmeal. Top as desired. Slide the dough onto the pizza stone. Bake until the crust edges brown and cheese is golden brown in spots, about 8 to 12 minutes. Repeat with remaining ball of dough or freeze for later use.
Using a stand mixer:
  1. Measure the warm water into a 2-cup liquid measuring cup. Sprinkle in the yeast and let stand until the yeast dissolves and swells, about 5 minutes. Add the room temperature water and oil and stir to combine. 
  2. Place the flour and salt in the bowl of a stand mixer fitted with the paddle attachment. Briefly combine the dry ingredients at low speed. Slowly add the liquid ingredients and continue to mix at low speed until a cohesive mass forms. Stop the mixer and replace the paddle with the dough hook. Knead until the dough is smooth and elastic, about 5 minutes. Form the dough into a ball, put it in a deep oiled bowl, and cover with plastic wrap. Let rise until doubled in size, about 1 ½ to 2 hours. Press the dough to deflate it.
  3. To bake, place a pizza stone in the lower third of the oven. Heat the oven to 500° for at least 30 minutes. Turn the dough out onto a lightly floured work surface. Divide the dough into two equal pieces. Form both pieces of dough into smooth, round balls and cover with a damp cloth. Let the dough relax for at least 10 minutes but no more than 30 minutes
  4. Working with one piece of dough and keeping the other covered, shape the dough and transfer to a pizza peel or round of parchment dusted with semolina or cornmeal. Top as desired. Slide the dough onto the pizza stone. Bake until the crust edges brown and cheese is golden brown in spots, about 8 to 12 minutes. Repeat with remaining ball of dough or freeze for later use.
Source: adapted by Annie's Eats, originally from Baking Illustrated by the Editors of Cook’s Illustrated Magazine

Friday, January 15, 2010

Mmmm...BACON!!!

This isn't one recipe but OVER ONE HUNDRED recipes on how to use bacon in all things savory or sweet.  I saw this shared on my brother's friend's facebook and had to cross-share it with my Dinner Club friends.  We do a different theme every month and we often joke that one day, we should have a bacon themed dinner.  I'm pretty sure this blogpost is driving us one step closer to that...

Here's a little photo teaser...


Check out all the delicious recipes and photos for 100 Ways to Use a Strip of Bacon at the Endless Simmer.  Just try not to drool on your keyboard, okay?

PS: Taking requests on something to make with bacon.  Leave a comment!

Tuesday, December 1, 2009

Cincinnati Style Chili

Anybody that knows me would know that I am a HUGE fan of Skyline Chili.  Eating Skyline is seriously a ritual for me: While waiting for my order to arrive, dash a bit of hot sauce on the oyster crackers and eat a few.  The 3-way quickly arrives (sometimes half vegetarian (black beans & rice mixture)...which often confuses the waitresses!) and I first eat the shredded cheese off the top until a thin melty layer remains, then cover the dish with lots of hot sauce, then cut the noodles into a column followed buy cutting that column into a row, eat a square of delishness, repeat until all that remains is a bit of chili juice on the plate.  Ahhh.  Heaven. 

I always joke that one reason that I could never move away from Cincinnati would be that I would have Skyline withdrawal.  Sure, you can buy Skyline in a can or frozen but it's not the same.  Even further off from the real deal but still good in its own way is the powdered Cincinnati-style chili mixes.  There's something about the consistency of the chili at the restaurant (velvety smooth and not too runny!) and the huge and flavorful mound of Skyline cheese (yes, I swear they have their own special cheese!) that really makes the dish.

Tonight, I tried my hand at making Cincinnati Style Chili from scratch.  I found several recipes and this just might be a series of posts until my quest for the best recipe is complete.  (If you have one you love, please share!).  This particlar one was good but not GREAT.  Very similar to the Cincinnati-Style (Blue) Powder packets that you can buy in the local groceries but with a weaker spice in my opinion.  Definitely NOT Skyline.  Alas, that secret recipe lies with the Lambrinides Family...if only I had thought of asking them to share it with me when they were my parent's neighbors!

Brief tutorial for Cincinnati Chili Virgins (ha, no pun intended!):
One-way: Chili only
Two-Way: Spaghetti noodles topped with chili.
Three-Way: Spaghetti noodles, chili, finely shredded mild cheddar cheese
Four-Way: Spaghetti, chili, cheese, and red kidney beans OR finely chopped white onions
Five-Way: Spaghetti, chili, cheese, beans AND onion.
Coney: Mini hot dog in a bun with chili; mustard and onions optional.
Cheese Coney: Mini hot dog in a bun with chili and shredded cheddar cheese; mustard and onions optional.
Pizza: Not really a traditional usage but sometimes I like to mix things up a bit.  You can use a regular pizza dough and top it with chili for the sauce.  Top with cheddar cheese, onions, and cut up hot dog pieces.


Cincinnati Style Chili
Printer-Friendly Version


Photo credit: Delicious Melicious

Yields: 6 pints

Ingredients:
  • 3 lbs. lean hamburger, DO NOT BROWN!
  • 2 qts. water
  • 2 lg. onions, finely chopped
  • 29 oz. can tomato sauce
  • 1/2 tsp. allspice
  • 1/2 tsp. crushed red pepper
  • 1/2 tsp. garlic powder
  • 1/2 tsp. ground cloves
  • 1/2 tsp. ground cumin
  • 5 tbsp. chili powder
  • 2 tbsp. vinegar
  • 2 tsp. cinnamon
  • 3 tsp. Worcestershire sauce
  • 1/2 oz. unsweetened baking chocolate squares (or 1/2 Tbsp cocoa powder)
  • 1 1/2 tsp. salt
  • 10 drops Tabasco sauce
Directions:
  1. In a large pot whisk together hamburger, water and onions until beef is broken up; Turn stove on and bring to a boil then simmer for 30 minutes.
  2. Then add remaining ingredients. Simmer for 2 or 3 hours, uncovered.
  3. Serve it your way, as per tutorial above.
Source: Modified from Delicious Melicious

Sunday, September 20, 2009

Barbeque Chicken Pizza

Lunches on weekends always seems to be a challenge.  You want to throw something together quickly and without much effort.  Generally I like to reheat leftovers :).  Today, I decided to combine bits and pieces of leftovers to create an all new, original meal.  How about that!  Now, you may customize this to your own needs but this is what I ended up using because as I said earlier, it's what we had "leftover".

BBQ Chicken Pizza
Source: A Christine Original
Serves 2


Ingredients
  • 4 Pillsbury Grands biscuits
  • BBQ Sauce
  • Rotisserie chicken, pulled into bite size pieces
  • 1/4 red onion, sliced thin
  • Cheddar cheese
  • Mozzerella cheese
Directions
  1. Preheat oven to 350*.  Combine biscuits into a single large dough ball.  Stretch dough and spread thin onto a pizza pan or baking sheet.
  2. Spread a thin layer of BBQ sauce onto the dough.  Top with chicken pieces and onion slices.  Last, sprinkle with the cheddar and some mozzerella, to taste.
  3. Bake pizza in oven about 14 minutes or until crust is golden brown and cheese is bubbly. 
  4. Remove from oven.  Cut and serve.  Add some dashes of Tobasco, if desired.  Bon appetite!

Saturday, June 13, 2009

Exquisite Pizza Sauce

After a long day of shopping for kitchen cabinets and appliances we decided to make a quick lunch out of pita pizzas.  I remembered I had a can of tomato paste sitting around and a recipe for pizza sauce that I'd been wanting to try and boy am I glad we did this instead of the usual jarred pizza (or sometimes even spaghetti) sauce!  I have some leftovers in the fridge and some extra pitas...I wouldn't be surprised if we make more later tonight :P.  Since I didn't have parmesan on hand I just used shredded Italian blend cheese and doubled up on the red pepper flakes because I didn't have any Cayenne.  No anchovies for us but I'll leave it since it was in the original recipe in case someone cares for little fishies :).  I added a splash of olive oil for flavor and to help the flavors blend.  To save time, I let the sauce sit and blend for about 10 minutes and then began assembling the pita pizzas.  I figured even if I spoon it out of the bowl it's still blending...and we were hungry!

Try it - you'll never go back and it truly is EXQUISITE as the title says! 

Exquisite Pizza Sauce
(Source: modified from All Recipes)
Exquisite Pizza Sauce Recipe
PREP TIME
10 Min
READY IN
40 Min
Original recipe yield 1 pizza
SERVINGS 4

INGREDIENTS (Nutrition)
  • 1 (6 ounce) can tomato paste
  • 6 fluid ounces warm water (110 degrees F/45 degrees C)
  • 3 tablespoons grated Parmesan cheese
  • 1 teaspoon minced garlic
  • 1 tablespoon honey
  • 1 teaspoon anchovy paste (optional)
  • 3/4 teaspoon onion powder
  • 1/4 teaspoon dried oregano
  • 1/4 teaspoon dried marjoram
  • 1/4 teaspoon dried basil
  • 1/4 teaspoon ground black pepper
  • 1/8 teaspoon cayenne pepper
  • 1/8 teaspoon dried red pepper flakes
  • 1/2 teaspoon extra virgin olive oil
  • salt to taste
DIRECTIONS
  1. In a small bowl, combine tomato paste, water, Parmesan cheese, garlic, honey, anchovy paste, onion powder, oregano, marjoram, basil, ground black pepper, cayenne pepper, red pepper flakes, olive oil, and salt; mix together, breaking up any clumps of cheese.
  2. Sauce should sit for 30 minutes to blend flavors; spread over pizza dough or pita bread.  Top with cheese and desired toppings.  Bake according to dough directions (or for pita bread, 375 degrees for about 10 minutes or until cheese is melted and crust is slightly crispy)