Showing posts with label bread. Show all posts

Monday, March 25, 2013

Easy Spicy Garlic Bread in a Pot

It's supposed to be Spring right now...I think.  But the snow outside my window tells me otherwise.  I'm hoping that it's warmer where you're living...

There's something about cold weather that makes me want to bake.  Enter this gorgeous artisan bread.  It looks like something straight out of a fancy bakery and yet I made it in my own home.  In a pot.  Free of preservatives.  And it was easy!  All it takes is a bit of patience to wait for the magic to happen.  You're rewarded with a crispy crust (how does it do that??) and fluffy interior.

Enjoy!

Three Years Ago: Creme Brulee, Chicken Bruschetta, and The Easiest White Bean Chicken Chili

Easy Spicy Garlic Bread in a Pot


Easy Spicy Garlic Bread in a Pot

Ingredients

  • 1 cup (8 ounces) of warm water (between 110 and 115 degrees F) 
  • 2 1/4 teaspoons active dry yeast 
  • Pinch of granulated sugar 
  • 4 ounces unsalted butter, melted 
  • 2 Tablespoons chopped fresh herbs such as thyme, chives, rosemary, or basil (I used rosemary and basil)
  • 3/4 teaspoon dried red chili flakes 
  • 2 or 3 cloves of garlic, peeled and sliced 
  • About 4 cups (20 ounces) bread flour, plus more for dusting the work surface 
  • A few big pinches of coarse ground black pepper 
  • 2 teaspoons salt 
  • Olive oil, coarse sea salt, and chili flakes for topping 
Directions
  1. Sprinkle yeast over warm water, add pinch of sugar and stir gently. Allow yeast and warm water to rest, foam and froth for about 5 minutes. If yeast does not foam and froth after 5 minutes, toss it and start over again with new yeast. 
  2. Melt butter in a small saucepan. When butter is melted, remove from heat and add herbs, chili flake, and garlic. Set aside. 
  3. Place flour in the bowl of an electric stand mixer, fitted with a bread hook. Add salt and pepper. Pour in activated yeast mixture, and butter mixture. Stir on low speed, with the dough hook, for about 10 to 12 minutes. The dough ball should clean the sides of the bowl and not stick to the bottom of the mixing bowl. The dough will be relatively smooth and supple.  
  4. Place dough in a large greased bowl. Cover with plastic wrap and allow to rest in a warm place until double in size, about 1 hour. 
  5. Preheat oven to 450 degrees F. 
  6. When dough has doubled in size, place on a lightly floured surface and knead by hand for about 2 minutes. 
  7. In a large Dutch oven, add about 2 tablespoons olive oil, to coat the bottom of the pot. Place dough in pot and use a large knife to slice a fairly deep cross into the dough. Drizzle about 3 more tablespoons of olive oil atop the bread. Sprinkle generously with coarse sea salt and pepper flakes. 
  8. Cover with tight fitting lid and bake for 30 minutes. Reduce oven heat to 400 degrees F, remove lid, and allow to make for about 15-20 minutes more. Remove from oven and allow to cool until easily removed from the pan. Bread will last, well wrapped at room temperature, for up to 3 days.
Source: Joy the Baker

Wednesday, January 23, 2013

Homemade Cinnamon Swirl Bread

One of my favorite things to do on a lazy day is to make homemade bread.  For those of you that are afraid of dealing with yeast, don't be.  Everything will be fine as long as you don't add the yeast to an overly hot liquid (which kills them) and allow it a warm place to rise and grow (my kitchen counter is usually fine except on cold Winter days I will sometimes heat my oven to the "keep warm" setting and then keep it propped open slightly with a wooden spoon so it doesn't get too hot and start baking prematurely).  A good way to know if your yeast is alive and active is by seeing if it gets foamy during the initial proofing period.  If it doesn't, then throw it out and start over.  Your yeast may be too old (check the "best by" date), you liquid may be too hot (it should be lukewarm to the touch), or your environment is not warm enough for the yeast to get happy and begin multiplying.

Each time I have cinnamon swirl bread, I think of my Dad because he loves this stuff.  I feel great knowing that the bread I'm making is preservative free and I often will substitute up to half the total flour content with whole wheat flour to up the nutritional content.  To make things easier, I provided options for doing a slow rise in the refrigerator overnight so that you can have freshly baked bread first thing in the morning.  The overnight rise also allows the proteins in the whole wheat flour to soften which makes it taste just like white bread!

We enjoyed ours in Microwave Streusel Topped French Toast in a Mug and I ate it toasted with butter or peanut butter throughout the week.  Just lovely!

Homemade Cinnamon Swirl Bread


Homemade Cinnamon Swirl Bread


Ingredients

  • 1 cup Milk 
  • 6 Tablespoons Salted Butter 
  • 2-1/2 teaspoons Active Dry Yeast 
  • 2 whole Eggs 
  • 2/3 cup Sugar, divided 
  • 3-1/2 cups All-purpose Flour (I used 1-1/2 cups whole wheat flour)
  • 1 teaspoon Salt 
  • 2 Tablespoons Cinnamon 
  • Egg And Milk, Mixed Together, For Brushing 
  • Softened Butter, For Smearing And Greasing 
Directions

  1. Melt butter with milk. Heat until very warm, but don't boil. Allow to cool until still warm to the touch, but not hot. Sprinkle yeast over the top, stir gently, and allow to sit for 10 minutes. 
  2. Combine flour and salt. In the bowl of an electric mixer, mix 1/3 cup sugar and eggs with the paddle attachment until combined. Pour in milk/butter/yeast mixture and stir to combine. Add half the flour and beat on medium speed until combined. Add the other half and beat until combined. 
  3. Switch to the dough hook attachment and beat/knead dough on medium speed for ten minutes. If dough is overly sticky, add 1/4 cup flour and beat again for 5 minutes. 
  4. Heat a metal or glass mixing bowl so it's warm. Drizzle in a little canola oil, then toss the dough in the oil to coat. Cover bowl with a clean damp kitchen towel or plastic wrap and set it in a warm place for at least 2 hours. 
  5. Turn dough out onto the work surface. Roll into a neat rectangle no wider than the loaf pan you're going to use, and about 18 to 24 inches long. Smear with 2 tablespoons melted butter. Mix remaining 1/3 cup sugar and cinnamon together, then sprinkle evenly over the butter-smeared dough. Starting at the far end, roll dough toward you, keeping it tight and contained. Pinch seam to seal. 
  6. Smear loaf pan with softened butter. Place dough, seam down, in the pan. Cover with a clean damp kitchen towel or plastic wrap and allow to rise for 2 hours in a warm place.  Alternatively, you can allow it to do a slow rise overnight in the refrigerator.
  7. When ready to bake, preheat oven to 350 degrees. Mix a little egg with milk, and smear over the top. Bake for 40 minutes on a middle/lower rack in the oven. 
  8. Remove from the pan and allow bread to cool. Slice and serve, or make cinnamon toast or French toast with it. 
Source: Pioneer Woman

Monday, January 21, 2013

SRC: Microwave Streusel Topped French Toast in a Mug

Ah the microwave.  What did people do before they had this easy, quick cooking wonder?  Suddenly people that have no idea how to cook are enabled and empowered with this tool.  And sometimes, even more advanced chefs can use it to take the easy way out...kind of like how I did with this month's Secret Recipe Club pick from Alli 'N Son's.

Alli's blog includes a bit about baking, motherhood, and life with her boys.  I was touched when I read her PCOS story because it reminded me of my own struggle from last year when I had my miscarriage.  It's inspiring to read her story and see the success that she's had raising beautiful children.

As for the food, since she's a busy mama, a lot of the recipes that you'll find on her blog are kid friendly and quick along with a lot of sweets. Having just come off of the Holiday sugar high, I considered but then ultimately avoided decadent recipes like Peanut Butter Cup S'mores BarApple Pie Cinnamon Rolls, and Cookie Dough Ice Cream Cake.  Instead, I tried to find something that I'd be able to fold into our regular dinner rotation.  I considered Grilled Cheese Waffle Sandwich and Peanut Sesame Noodles with Szechuan Style Tofu.  In the end, I had  recently made a  homemade Cinnamon Swirl Bread (recipe to be shared) which inspired the choice of Streusel Topped French Toast in a Mug.  Sweet but not overly so and still quite simple.  Hello brinner.

I've seen and pinned  many microwave recipes in the past but this was my first time actually *trying* it.  And wow was it delightfully good, fast, and simple!  The entire recipe was done in about 5 minutes and had the yummy french toast flavor covered in a sinful streusel topping.  The only thing I missed was the slight crispness that comes with real french toast.  But in a pinch or when you just want enough for a single serving (or two), this would definitely do.

Thank you to April of the blog Angel's Homestead SRC ring leader and Debbi of the blog Debbi Does Dinner, our Group C Hostess!  Please also check the blog hop to see what everyone else in Group C made this month!

One Year Ago: 2011 Recap: Reader Favorites
Two Years Ago: French Dip Sandwiches and Football Snackadium 
Three Years Ago: Chinese Bolo Bao with Nai Wong Filling (Pineapple Custard Buns) and Copycat Chipotle Burrito Bols

Microwave Streusel Topped French Toast in a Mug


Microwave Streusel Topped French Toast in a Mug

Ingredients

For the French Toast
  • 3-4 slices cinnamon swirl bread, depending on the size and thickness of your bread 
  • 1 large egg 
  • 3 tablespoons milk 
  • dash cinnamon 
  • drop or two vanilla extract or almond extract 
For the Streusel Topping
  • 1/2 tablespoon butter, cold 
  • 1 tablespoons flour 
  • 1/2 tablespoon brown sugar 
  • 1/2 teaspoon cinnamon 
Instructions
  1. Spray a large mug or small bowl with nonstick spray. Set aside. Cube the bread into 1-inch pieces. Place in the prepared mug. 
  2. In a small bowl beat together the egg, milk, cinnamon and vanilla or almond extract with a fork. Pour over the bread. Stir together until all of the egg mixture has been absorbed by the bread. 
  3. To make the struesel topping: In a small bowl combine the butter, flour, brown sugar and cinnamon in a small bowl. Use your fingers to everything together. The mixture will resemble coarse sand. Sprinkle evenly on top of the bread mixture. 
  4. Microwave for 1 minute on high. Check and microwave in 10 second increments until the eggs are no longer runny. Let cool before enjoying.
Source: Alli 'N Sons

Secret Recipe Club

Wednesday, November 14, 2012

Savory BBQ Pulled Pork Cinnamon Roll

What I'm about to share with you may sound weird.  In fact, tons of my facebook fans who saw the sneak peek photo said they would have to see and try it to believe it.  But by the end of this post, I'll have you being a believer.  And once I break it down for you, you'll come to understand that what sounds crazy is actually quite genius!

The savory BBQ Pulled Pork Cinnamon Roll.  It is the love child of two American favorites - BBQ Pulled Pork and Cinnamon Rolls.  It is savory with a touch of sweetness.  Consider that cinnamon and brown sugar, the basic components of a traditional cinnamon roll filling, are easily ingredients in a pork entree glaze or bbq sauce, anyway.  Then, consider that a cinnamon roll, is no more than a bread bun that's rolled up all fancy.  Instead of serving pulled pork on a bun, it's rolled up cinnamon bun style!  And then it's drizzled with extra barbecue sauce.  Because no one likes a naked cinnamon roll and it just looks pretty.  Suddenly, what seems like a freak Frankenstein dish is not that mad but instead makes perfect sense!

Once I tried this dish, my mind started racing and considering all of the other savory cinnamon roll possibilities.  I could stuff it with shredded buffalo chicken and either cheddar or blue cheese with a drizzle of ranch or blue cheese dressing.  Or how about that fantastic Hawaiian Pulled Chicken and jazzed up hawaiian bread dough and then finishing with some of that extra sauce?  Yes...I think I shall be trying to bring some of these recipes to reality someday soon.  This recipe opened up my mind to a whole new world of possibilities!

Give it a try, I think you'll like it!

One Year Ago: Roast Beef with Onion Gravy
Three Years Ago: Corn Casserole and Sweet Potato Souffle

Savory BBQ Pulled Pork Cinnamon Roll


Ingredients

For the dough
  • 1/2 cup milk (2%)
  • 1/2 cup butter
  • 1/2 cup warm water
  • 1 packet (2 1/4 tsp) active dry yeast
  • 1/4 cup granulated sugar
  • 2 eggs
  • 4 - 4 1/2 cups all purpose flour, plus more for dusting work surface
For the Filling
  • 2 Tbsp butter, melted
  • 1 tsp cinnamon
  • 1/2 cup brown sugar
  • Leftover BBQ Pulled Pork (suggest 2 recipes of Slow Cooker Pulled Pork)
For Drizzling
  • Additional BBQ sauce
Directions
  1. Heat the milk and butter in s mall saucepan or in the microwave until the butter melts.  Set aside and allow to cool until the mixture is lukewarm (about 100 degrees).
  2. In the bowl of a stand mixer fitted with the paddle attachment, mix together warm water, yeast, sugar, and eggs at low speed until well combined.  Then add the warm milk mixture and 2 cups of flour.  Mix at medium speed until thoroughly blended, about 1 minute.
  3. Switch to the dough hook attachment.  Add another 2 cups of flour and continue to knead at medium speed until dough forms a ball and is smooth, about 10 minutes.  If needed, add additional flour by the tablespoon to make the dough come together.  Cover bowl with a clean, damp kitchen towel and leave in a warm, draft-free spot to rise until doubled in size  (about 1 1/2 to 2 hours).
  4. Meanwhile, combine the brown sugar and cinnamon in a small bowl and set aside.  Generously butter a 9x13 metal baking pan.
  5. After the dough has doubled in size, punch it down and turn it out onto a lightly floured work surface.  Using a rolling pin, roll the dough into a 16 by 12 inch rectangle with the short side facing you.  Brush the melted butter over the surface of the dough.  Then sprinkle the cinnamon sugar mixture.  Finally, spread a healthy layer of pulled pork over the surface of the dough leaving a 1-inch strip on one of the short sides.  Tightly roll the dough into a spiral and pinch the free end to seal.
  6. Using a piece of string or sharp serrated knife, cut the roll into six equal slices and place them swirl side up in the prepared 9x13 pan.  Cover with a clean, damp dish cloth and allow to rise until puffy and almost doubled (about 1 hour).  Near the end of the second rise time, preheat an oven to 350 degrees F.
  7. Bake rolls at 350 degrees F for 40-50 minutes.  Remove from oven and allow to cool in the pan for 10-15 minutes.  Drizzle with your favorite barbecue sauce and serve warm.
Source: Adapted from Food Pusher

Friday, October 5, 2012

Recipe Swap: Breakfast Skillet

I don't know if you've been following me on facebook and/or twitter or not lately but if you have, you'll notice that I'm border-line obsessed with my "new" (ie: hand-me-down inheritance) iPhone4 from my husband and posting instagram photos of my food.  Seriously I'm amazed at how this tiny little phone can take such fancy looking pictures!  I'll have to do a before and after on here sometime so you can see what I mean.

Today's post is a What's Cooking Recipe Swap and the theme is breakfast.  Long time followers of my blog would know that this is a favorite theme of mine.  In fact, "brinner" aka breakfast for dinner was one of my chosen Dinner Club themes in the past.  For this swap, I submitted the super decadent Chocolate Chip Cookie Dough Stuffed Cinnamon Rolls.  So, it was fitting that I received something equally sweet to start my day from Lynsey of Lynsey Lou's.

The recipe is called a "breakfast skillet" but really, it's like dessert for breakfast.  My husband smelled it cooking and said "Mmm that smells good!  It smells sweet!  Are you making dessert for dinner?!".  Truth be told it could have passed for dessert but was in fact our dinner.  We convinced ourselves that the sprinkling of apples and craisins (very Fall!) in the dish made it healthy and justified getting seconds...and thirds.  HA!  It was like cinnamon rolls with a fraction of the effort + FRUIT for added nutrition.  Win.

I should also probably call mine a Breakfast Dutch Oven because that's what I ended up making mine in.  I don't actually own a cast iron skillet so this was the closest cooking vessel that I had.  It worked out fine but a cast iron skillet is now on the wishlist.  I just love how nice they look in food photos :).

Thank you Lynsey for sharing this winning recipe with us!

One Year Ago: Spaghetti Pie

Breakfast Skillet


Ingredients

For the streusel topping
  • 1/4 cup sugar
  • 4 Tbsp unsalted butter
  • 1/2 to 1 Tbsp ground cinnamon
For the skillet cake
  • 12 oz can of buttermilk biscuits
  • 2 Tbsp butter
  • 2 Tbsp brown sugar
  • 1 cup fruit of your choice, fresh, dried, or frozen (I used craisins)
  • 1 small apple, thinly sliced
Directions
  1. Preheat oven to 350 degrees.
  2. In a small bowl, prepare the streusel topping by combining 4 tablespoons butter, sugar, and cinnamon by mashing together with a fork until well mixed.
  3. Place skillet over low-medium heat.  Add 2 tablespoons butter and brown sugar and stir until butter is melted and sugar is combined.  Remove skillet from heat.
  4. Line the bottom of the skillet with 1/4 of the apple slices.  Next, place the biscuits in a single layer on the pan.  Layer on 3/4 of the remaining apple slices and sprinkle 3/4 of your selected fruit over top of the biscuits.  Sprinkle the streusel topping over the fruit and biscuits.  Layer the remaining fruit over the streusel topping.
  5. Place prepared skillet into the oven and bake for 30-45 minutes, until the biscuits are cooked through and lightly browned and the streusel topping has melted.
 Source: As seen on and adapted by Lynsey Lou's from Paula Deen


Friday, September 28, 2012

Banana Pumpkin Nutella Bread

Hi everyone! I'm back!

Well.  Not really.  But, back long enough to write my own recipe post anyway.  I won't be home for good until early October but at least now it's a short trip for pleasure rather than business.

Before I jump into today's recipe, how about those fantastic guest posters of mine these past few weeks?  Which blogger's recipe was your favorite?  Serious big kudos to each of the wonderful bloggers that shared yummy recipes here on my page:
The weather really changed dramatically since I came back to The States.  Sure, the fact that I came from the tropical weather of the Equator makes it feel even cooler but there are definitive signs of Fall in the air.  The mornings are cool and require jacket...and sometimes even heat in the car.  The leaves on the trees are starting to display beautiful Fall colors.  And, I'm feeling like making warm, comforting foods again.

In my book, nothing says fall more than pumpkin.  Hence, I'm sharing this recipe with you today.  It was just one of many recipes that I made with my homemade Nutella.  The bananas and pumpkin made it super moist and the Nutella gave it a great look and just enough chocolate boost.  Lovely to welcome Fall!

One Year Ago: French Onion Soup
Three Years Ago: Hot Spinach Artichoke Dip

Banana Pumpkin Nutella Bread

Photo Credit: Emily H.
Ingredients

  • 1 cup sugar
  • 1/2 cup butter, softened
  • 2 eggs
  • 2 tsp vanilla extract
  • 4 bananas (preferably overly ripe), mashed
  • 1 cup canned or freshly pureed pumpkin
  • 2 cups all-purpose flour
  • 1/2 tsp baking soda
  • 1/2 tsp kosher salt
  • 4 Tbsp Nutella, divided
Directions
  1. Preheat oven to 350 degrees.  Prepare a 9x5 loaf pan by spraying with cooking spray.
  2. Add sugar and butter to a mixing bowl and cream together until light and fluffy.  Add the eggs and vanilla extract, mixing well until combined.  Then add the mashed bananas and pumpkin.  Again mixing until well combined.
  3. In a separate bowl, add flour, salt, and baking soda.  Whisk together to combine.  Gradually add the flour mixture to the wet ingredients and mix until combined.  The batter will be thick.
  4. Pour batter into prepared loaf pan and dollop Nutella on top.  Using a toothpick, swirl the Nutella through the batter.  Bake for about an hour or until a toothpick inserted into the center of the bread comes out clean. 
Source: As seen on The World in my Kitchen and adapted by Mom's Crazy Cooking from Babble - The Family Kitchen

Thursday, October 6, 2011

Recipe Swap: Pumpkin Pecan Loaf

It's been awhile since I participated in a swap (did you notice?) but I was excited to jump back in after being absent with vacations and general business.  This week's Recipe Swap theme was Pumpkin/Apple to savor the flavor of Fall.  I received this classic pumpkin loaf recipe from Fried Ice and Donut Holes and Joelen from What's Cookin' Chicago received my Turkey Bean Pumpkin Chili.

When I was putting together the ingredients I was a bit surprised by the amount of ginger in it but it actually worked out fine and gave it a nice warmth.  I added cinnamon to the topping and resisted the urge to use butter and flour in the topping (which is what I'd do with my typical crumble toppings) in order to stay true to the original recipe.  I ended up taking it to work as a brainstorming session treat and it was well received.  People told me it was the moistest bread they've ever eaten and kept coming back for more :).

See the full round-up of recipes at A Taste of Home Cooking

Need more Fall flavor and looking for more pumpkin treats on my blog?  Try Turkey Bean Pumpkin Chili, Pumpkin Whoopie Pies, Pumpkin Pie Fudge, Pumpkin Fluff Dip, Amazingly Creamy Pumpkin Penne, Turkey Pumpkin Meatloaf with Cranberry Glaze

How about Apple (the other swap theme ingredient for the week)?  Caramel Apple Cheesecake Pie, Asian Lettuce Wraps, or see my whole Dinner Club's Apple Themed Spread


Pumpkin Pecan Loaf


Ingredients

For the Bread:

  • 1/2 cup Canola or Vegetable Oil
  • 1 1/2 cup Sugar
  • 2 Eggs
  • 1 cup Pumpkin
  • 1/3 cup Milk
  • 1 1/2 cup Flour
  • 1 teaspoon Baking Soda
  • 1/2 teaspoon Salt
  • 1 teaspoon Cinnamon
  • 1 teaspoon Ginger
  • 1/2 cup Pecans (omitted)

For the Topping:

  • 1/2 cup Pecan Pieces
  • 1/4 cup Sugar
  • 2 tablespoons Oil
  • Couple good shakes of Cinnamon

Directions

  1. Heat oven to 350 degrees and coat a 9x5 loaf pan with non-stick spray.
  2. In a bowl, stir oil and sugar together with a spoon.  Stir in eggs until blended.  Add the pumpkin and the milk.
  3. In a separate bowl, combine the flour, baking soda, salt, cinnamon, and ginger.  Add to the pumpkin mixture and stir well until combined.  Stir in the pecans if using.  Pour batter into the prepared pan.
  4. In another small bowl, combine the topping ingredients until mixed and crumbly.  Sprinkle the topping over the batter.  
  5. Bake for 55-60 minutes or until a toothpick inserted into the center of the loaf comes out clean.  Cool for 10 minutes before removing from the pan to cool completely.  Slice and serve.
Source: Barely adapted from Fried Ice and Donut Holes

Monday, September 26, 2011

French Onion Soup

I was encouraged by my husband and my friend Emily to post a midway status update on my 23 Things in 2011 List.  This is when we realized that the year is actually 3/4 of the way through.  Oh snap.  Still, worth a revisit and you can see what I've made (and blogged about) to date by checking out the link above. 

All in all, I've only made 11 of the 23 things and even worse, only blogged about 4 (after this one) to date.  Where have you guys been to hold me accountable the rest of year?!  Now it looks like I have some serious work to make up on the back end of the year if I want to even come close to achieving all 23 items!

This French onion soup was exactly as I remember it being when I went to France last year.  My brother, the French onion aficionado gave it his stamp of approval, too.

This week, I'm going to post only things from the list to help me get caught up!  See the list for a sneak peek of what this week's posts may be ;).

Two Years Ago: Sausage, Onion, and Green Pepper Fra Diavolo

French Onion Soup


Ingredients
  • 2 tbsp. unsalted butter
  • 2 large red onions, thinly sliced
  • Pinch of sugar
  • 2 leeks, including tender green portions, thinly sliced
  • 2 cloves garlic, minced
  • 3 cups low-sodium chicken broth
  • ¾ cup low-sodium beef broth
  • ¼ cup dry red wine
  • 2 sprigs fresh parsley
  • 1 sprig fresh thyme
  • 1 bay leaf
  • Salt and pepper, to taste
  • Baguette slices, ¾-inch thick
  • Sliced Gruyere cheese
Directions
  1. Melt the butter in a Dutch oven or large stockpot over medium-high heat. Add in the sliced red onions, reduce the heat to medium, and cook, stirring frequently, until the onions have wilted. Mix in the sugar and leeks and continue to cook, stirring frequently, until the onions are completely caramelized and dark in color (about 15 more minutes). Add the garlic to the pot and sauté just until fragrant, about 1 minute. Stir in the chicken and beef broths and red wine, scraping the browned bits from the bottom of the pot. Add the parsley, thyme and bay leaf. Cover, reduce the heat to medium-low and simmer about 30 minutes. Discard the herbs and season with salt and pepper to taste.
  2. Preheat the broiler with an oven rack in the upper-middle position. Portion the soup into oven-safe bowls or crocks placed on a baking sheet. Top each serving with two baguette slices, and layer with thin slices of Gruyere cheese. Place under the broiler until the cheese is browned and bubbly, 2-5 minutes. Cool a few minutes before serving.
Source: Originally from Williams Sonoma and The New Best Recipe as adapted by and as seen on Annie's Eats

Friday, April 15, 2011

Churro Bites

Everything is better as miniature sized.  And nobody can deny that fried food is just...delicious.  That makes these Churro Bites a 1-2-punch, a knockout.  These were so good when they were fresh out of the fryer that it was hard to keep up with my husband eating them.  I was surprised at how easy they were to make.  Just mix together the batter, put it in a piping bag with a large star tip (I used a Wilton 1M) and then squeeze into the hot oil cutting it off with a knife in 2" intervals.  Then, roll in cinnamon sugar goodness.  Yum!  For my more visual readers, check out the recipe source for some great step-by-step photos.

I made these as part of our Tapa's Theme Dinner Club.  There was an extraordinary amount of food there...40 dishes to be exact.  And in true Dinner Club style, folks didn't seem to scale back their portion sizes so we had enough food to feed at least 20 people while there were really only 10 of us.

I'll be posting the rest of the recipes once I'm back from vacation as part of my Cinco Recipes for Cinco De Mayo collection and for now, I leave you with this drool worthy dish as #1 in this series :).  Call it a teaser, if you will.

One Year Ago: Summer Corn and Vegetable Soup
Two Years Ago Penne a la Vodka


Churro Bites

Churro Bites

Ingredients
  • 1/2 cup granulated white sugar
  • 2-3 teaspoons ground cinnamon
  • 1 cup water
  • 3 tablespoons unsalted butter
  • 1/4 teaspoon salt
  • 1 cup all purpose flour
  • 3 eggs, beaten
  • Oil for frying  
Directions
  1. Combine sugar and cinnamon in bowl and set aside. Heat about 1-2 inches of oil in a deep sauce pan until it reaches 325 degrees F.
  2. In a medium saucepan, heat water, butter, salt and 1 tablespoon of the cinnamon sugar mixture. Bring to a boil and stir in flour. Remove from heat and stir vigorously until mixture forms a ball of "dough", about 1 minute. Add beaten eggs and stir until fully combine and dough is smooth.
  3. Transfer dough into a pastry bag fitted with a large star tip (I used a Wilton 1M Tip). Holding your piping bag straight up and down over your pot of oil, squeeze out about 2 inches of dough and slice it off into the oil with a knife. Fry until golden brown about 4 minutes, making sure to flip the churros around in the oil to fry each side evenly.
  4. Transfer to paper towels to drain. Toss in cinnamon sugar mixture and enjoy!  They're obviously best fresh and hot!
Source: Dollhouse Bake Shoppe

Wednesday, March 30, 2011

Mini Whole Wheat Bagels

I have a new-found respect for bakers.  As Belle from Beauty and the Beast sang, "there goes the baker with his tray like always.  The same old bread and rolls to sell."  (yes, I'm a huge Disney nerd...I'm pretty sure I can sing every song from this and many other movies!)  Yeah you know, the kind of baker that wakes up in the wee hours of the morning to bake artisan breads so you can eat them fresh for breakfast?  Bless them.

I'm fortunate in that I've never had an issue with making yeasted breads.  This wasn't hard either but boy was it very time consuming!  At least most of the time is latent.  It requires planning the night before so that you can get the pre-doughs kneaded.  I'm not positive but I'm pretty sure this step is what allows the gluten in the wheat to be broken down some and that's what makes this taste like a refined white bagel yet still with the nutrition of whole wheat.  So smart!  Then, if you're hoping to serve it for breakfast, you best get up at the butt-crack-of-dawn to finish combining the pre-doughs (yeah, this was a THICK dough...I seriously thought my Kitchen Aid was going to die at one point from overworking so I shut it off!) and then shaping the bagels for rising.  But wait!  You're not done yet!  Once your little bagels are all puffy and cute (mine got so puffy they nearly lost their holes!), you have to boil them in baking soda water to get that chewy texture AND THEN bake them to get the characteristic crunch.  After all of that, you forget that carbs are bad for you and feast!  I'll say it once and I'll say it again, I LOVE carbs.  Oh heck...they're mini-sized AND whole wheat.  Go ahead and eat a couple.

Sooooo good!  Worth the effort when you want something a little extra special :).  If you happen to have leftovers and want to try something different than just cream cheese, try using the bagels for sandwiches or top them with tomato sauce, cheese, and your favorite toppings for a copy-cat Bagel Bite Pizza.  The latter is what I ended up doing for the Super Bowl and they were gone in a hurry!

Check another item off the 23 Things in 2011 List...woo hoo!  I can't wait to try other varieties of bagels.  My favorite at Panera is the Asiago Cheese Bagel with the Sun-dried Tomato Cream Cheese.  Who has a copy-cat recipe for that??

One Year Ago: Carrot Cake

Mini Whole Wheat Bagels

Mini Whole Wheat Bagels

Yields: 8 large or 12 mini bagels

Ingredients

Pre-dough 1:
  • 8 ounces whole wheat flour
  • 1/4 tsp instant yeast
  • 6 ounces (3/4 cup) water
Pre-dough 2:
  • 2 Tbsp barley malt syrup (or molasses)
  • 5 ounces water
  • 8 ounces whole wheat flour
  • 1/2 tsp salt
Final dough:
  • Both pre-doughs
  • 1 Tbsp water
  • 2 tsp yeast
  • 3/4 tsp salt
  • 7 Tbsp flour, plus more if necessary
  • 1 Tbsp baking soda (for boiling)
Directions
  1. In the bowl of a stand mixer fitted with the dough hook, mix all of the ingredients in Pre-dough 1 on medium-low speed until combined. Set aside for 5 minutes. Meanwhile, in a 1-cup measuring cup, stir together the barley malt syrup and the 5 ounces of water in Pre-dough 2. Set aside, stirring occasionally, until the barley malt syrup dissolves into the water. Return to Pre-dough 1 and knead on low speed for 1 minute. Transfer to a small bowl and cover with plastic wrap or a damp kitchen towel. Refrigerate overnight. Add the flour and salt for Pre-dough 2 to the empty mixer bowl; with the mixer on low speed, pour in the water-syrup mixture. Mix on medium-low just until combined. Cover the mixer bowl with plastic wrap or a damp kitchen towel and set aside at room temperature for at least 8 hours or overnight.
  2. The following day, transfer the refrigerated Pre-dough 1 to room temperature for a couple hours to warm slightly. When you’re ready to make the final dough, stir together the 1 tablespoon water and the yeast. In the bowl of a stand mixer fitted with the dough hook, mix both pre-doughs, the water and yeast, and the salt on low speed until combined. While the mixer is running, add in the flour, 1 tablespoon at a time, until it’s fully absorbed by the dough. Knead on low speed for 5-6 minutes, adding more flour or water if necessary to form a smooth, firm dough. It shouldn’t be sticky.
  3. Let the dough rise at room temperature until it increases to about 1 1/2 times its original size, 1-2 hours.
  4. Divide the dough into 8-12 pieces. Shape each piece into a smooth ball, then roll each piece into a rope about 3/4-inch thick (slightly thicker for larger bagels). Bring the ends of the rope together and roll them by placing your fingers inside the hole and gently rolling against a flat surface to seal. Set aside for about 20 minutes.
  5. Meanwhile, preheat the oven to 500 degrees, line a baking sheet with parchment paper or a silicone mat, and bring at least three inches of water to a boil in a large pot over high heat. Add 1 tablespoon baking soda, reduce the heat to medium-high and gently drop 2-4 bagels (as many as will fit without crowding) into the water. Boil for 1 minute, flipping the bagels halfway through.  If you can only fit one baking sheet, holding half a batch of bagels, in your oven at once, refrigerate the remaining unboiled bagels until the first pan is almost done baking, then boil and bake them.
  6. Place the boiled bagels on the prepared baking sheet.  Transfer the sheet to the oven, reduce the oven temperature to 450 degrees, and bake until the bagels are browned and feel hard, 13 minutes for small bagels and slightly longer for larger bagels. Cool completely before serving.
Source: Originally from Whole Grain Breads by Peter Reinhart as seen on Beantown Baker and The Way the Cookie Crumbles

Saturday, January 1, 2011

2010 Recap Part 1: Reader Favorites

Happy 2011!

I thought I'd kick off this (nerd alert: binary!) New Year with a recap of your favorite recipes from 2010.  Because let's face it, I don't just cook and blog for myself.  I do it for you, too!  That's right.  This post is dedicated to all 55 of you that subscribe to me on Google Reader.  All 8 that subscribe via blogger, too.  And, the countless others that follow my blog sans subscription through Google search, my facebook posts, and the like.  Together you checked out my website a whopping 16,635 times!  Whoa!  I'm so honored to have people that *want* to read about my kitchen chronicles and try new recipes with me. 

What I'd love even more is if you began to come out of your shell and start leaving comments on my blog, too.  Let's face it, we all know that my blogging dwindled in the second half of the year and I just couldn't find the motivation to get back on track.  For 2011, I resolve to get back on the blogging band wagon and I need *you* to help hold me accountable.  Cheer me on when you see something you like!  Let me know if you tried something from my blog - successful or not, too!  Together, we can cook great things :).

So now back to Reader Favorite Recipes from 2010.  These recipes are the most popular ones from my website based on number of hits.  Yup, I have this nifty thing called Google Analytics.  It tells me how many people visit my site, what they look at, how long they spend there, and what part of the world they are visiting from.  Neat, huh?  Don't worry my privacy protection fans, it's all aggregated data and so I can't like...internet stalk you or anything :P.

Without further adieu, here are your favorites from 2010.  (And you can see 2009 favorites, here!)

#10: Copy-Cat Chipotle Burrito Bols
(201 pageviews in 2010)


Do you love Chipotle?  Then you'll love these bols. (Yes, not a typo, there's no w.  It's Spanish!)

#9: Spaghetti Meatballs
(213 page views in 2010)

Photo Credit: Amadeo


You really can't go wrong with this classic Italian dish.  This one comes from Chris' Grandmother who was from Sicily and is one of the few dishes that I will make over and over again.  It freezes well so one batch will provide a good 6 meals for the 2 of us!

#8: Spinach, Sausage, and Cheese Manicotti
(291 page views in 2010)

Photo Credit: Eater's Digest


I have smart readers that know a good recipe when they see one.  This is another one of those recipes that actually gets repeated in this household.  The method of stuffing the shells *uncooked* is ingenious.  I like to use sausage, spinach, and cheese (as the title of this recipe suggests) but it is adaptable to the filling of your choice.  Bonus: this one freezes well, too!

#7: Grandpa N's Char Siu Bao (Chinese BBQ Pork Bun)
(337 page views in 2010)


A never-before-seen on the web recipe from my family to yours.  This authentic bun recipe was made countless times by my Grandpa for me.  Since Chinese people tend to not write down recipes, it didn't quite taste exactly as I remembered but is a good starting point.  As I tweak (and document!) this recipe over time I hope to someday get it just as Grandpa used to make.  Stay tuned for future iterations and improvements to this recipe!

#6: Red Lobster's Parmesan Crusted Tilapia
(439 page views in 2010)


This one came straight off of Red Lobster's own website so it's not even a copy-cat - it's the real deal!  Tilapia is one of my favorite types of fish and this preparation is yummy.

#5: Mock Bravo Della Casa Salad
(485 page views in 2010)


Me thinks my readers have a thing for copy-cat restaurants based on Top Reader Picks #10, 6, and 5!  This copy-cat salad is based on my husband's favorite from Bravo! Cucina Italian.  It is the only creamy dressing that he'll eat and he ate this recipe too so I'll take it as a stamp of approval.

By the way, what other copy-cat recipes would you like to see on here?  Now's your chance to leave a comment!

#4: Red Velvet Whoopie Pies (626 page views in 2010)


Each time I see this pictures it practically brings tears to my eyes.  This is by far the most beautiful food photograph that I have ever taken in my life...let alone 2010.  It holds a special place in my heart because it was the first (and only) time that I was accepted to the "food porn" website Food Gawker.  I have no doubt that this recipe made the Top 10 because of the traffic it brought to my site.  That and this recipe is actually quite divine!  Here's to hoping my photography skills continue to improve in 2011.

#3: Lasagna
(662 page views in 2010)

[No food photo.  Sad face.]

This recipe was shared by my Aunt Wah to my mom and I practically grew up on this stuff.  No kitchen should go without a tried and true lasagna recipe.  This one uses cottage cheese instead of ricotta and I find I like the texture better...perhaps because it's what I grew up knowing.  Now to just remember to take a picture of this when I make! 

Garfield would approve.


 #2: Chinese Bakery-Style Cake
(1,278 page views in 2010)


Did you all see the page view count on this one?!  It completely blows all others above out of the water and for good reason, too!  I just wish I had better photography skills to truly capture the magnificence of this cake.  As I said previously, authetic Chinese recipes are hard to come by because the cooks just don't write them down.  I got really lucky and found this one online.  I made some minor modifications and shared it with you.  This is the most commented upon recipe in my blog and I can tell you all love it, too.  What's not to love about the sponge cake layers sandwiching fresh fruit and custard before the entire thing is enveloped in fresh whipped cream.  It looks complicated but it's really not so bad.  And, I gaurentee that it's totally worth it.  If you haven't tried this yet, go.  Now.

Drumroll please....

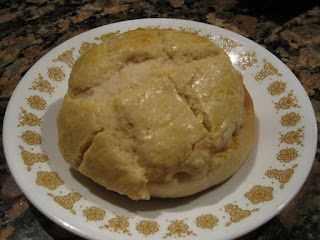
#1: Chinese Bolo Bao with Nai Wong Filling ("Pineapple" Custard Bun)
(1,590 page views in 2010)


No big surprise here!  The King of 2010 Recipes (mostly due to Google search where it indexes #1!) is the Chinese Bolo Bao with Nai Wong Filling.  This is sort of kind of a Christine's Kitchen Chronicles original because I took 2 existing web recipes to recreate a bun Chris knows and loves.  I have to say that nobody that saw or ate this little beauty was disappointed.  It tasted and looked like it came from a real Chinese bakery.  From its sweet crisp topping to its tender bun leading to a silky custard surprise inside, it is 100% goodness.
There you have it, folks.  Your favorite recipes from 2010.  Be sure to stay tuned to Part 2 of this series - MY favorite recipes from the year!  So far so good on getting back on the blogging wagon, huh? :)

Wishing you a fantastic 2011!
Christine

Monday, April 5, 2010

Bacon Egg and Toast Cups

In my mind, this recipe was the surprise favorite from my personal menu contributions for our Breakfast Themed Dinner Club.  Funny how that works since this one had such simple ingredients and was the easiest to make in bulk!  Or, maybe it's because this was a blog recipe (vs. All Recipes) and I generally have better luck with those.  You can bake up to 2 muffin tins (24 bacon egg and toast cups) at the same time so it's a great recipe to serve for to a crowd.  They're great snacking and finger foods which are generally popular in our dinner club crowd.  And, they can be saved and re-heated in the oven or toaster oven for later.  These made an awesome lazy breakfast the morning following our gorge fest.  Yum!

I'll say that I've always been slightly afraid of eating my eggs any way except for scrambled, hard boiled, or in an omelette because there's something about liquidy egg yolks that just gross me out...that and a fear of contracting samonella.  The eggs in this recipe when cooked as directed are still runny but you can cook them longer (watchout, this could result in a rubbery egg white though).  Since I did make this recipe, I gave the recipe a try...runny yolks and all.  I'm happy to report that I did not get sick and I actually enjoyed it!  This recipe has converted me..at least in this application.  I'm still not a sunny-side up girl and will stick to my fully cooked yolks, if at all, for other egg applications!

I can also see this recipe with a variet of twists - added ham bits, peppers, onions, mushrooms, different types of cheese and/or bread.  The possibilities are endless!

The Noshery, the blog from which I found this recipe, also has a version that is french toast cups stuffed with sausage and apples that I'd like to try sometime.  I think I'd have more luck with Chris eating that one over this one which is clearly eggy.  Of course, with all the other stuff I was making for this round of dinner club, that recipe will have to wait for me to make it another time!

My personal contributions for this dinner club consisted of:
Check out our Dinner Club blog for some additional yummies from my friends!

Bacon Egg and Toast Cups
Printer-Friendly Version


Yields: 6 cups (can easily be doubled, tripled, or even quadrupled for a crowd!)

Ingredients
  • 6 slices of bread (I used wheat)
  • 6 slices of bacon
  • 6 eggs
  • 1/2 cup of shredded cheese
  • salt and pepper, to taste
Directions
  1. Preheat oven to 400 degrees. Spray muffin pan with butter non-stick spray.
  2. Using a cookie cutter or a wide-mouthed glass, cut circles out of bread slices about 3 inches in diameter.  Take bread circles and press them into the muffin pan, set aside.
  3. Heat a large skillet on medium-high. Cook bacon on the skillet until partially cooked but still pliable, about 3 minutes. 
  4. Shape bacon strips into the toast cups, fill with 1 Tablespoon of shredded cheese. Place in the oven for 5 minutes, allowing the bacon to toast just a little more. Remove from oven.
  5. Crack an egg and drop a whole egg into the cup, sprinkle with salt and pepper to taste. Repeat for remaining cups. Place back in the oven and cook until white begins to set, about another 8 – 10 minutes. The yolk should be creamy. If a more fully cooked yolk is desired, continue cooking until desired done-ness is achieved.
  6. Remove from oven when done and pop out using a spoon, serve warm.
Source: The Noshery

Thursday, March 4, 2010

Jalapeno Cornbread Whoopie Pies

Mmm this was the perfect accompaniment to my mother in law, Mary Lynn's, Chili.  Once I saw this recipe, I knew it was a match made in heaven.  Chris ate the bread plain because he won't touch cream cheese with a 10 foot pole and I made the filling with all neufchatel cheese (reduced fat cream cheese) instead of a blend because I didn't want to spend the extra money on goat cheese.  I bet it would have been even more awesome with the goat cheese...

Anyway, I've experimented quite a bit now in the sweet-type whoopie pies so this was a nice change from the ordinary.  Since it was just the two of us, I halved the recipe and it was just enough for 2 meals of chili and jalapeno cornbread whoopie pie accompaniments.  For simplicity, I used about 2 Tablespoons of canned diced jalapeno peppers.  In the future, I'd add more peppers or a splash of Tabasco for more kick.  You know I like it spicy!

Rather go with the traditional sweet whoopie pies?  Try one of these - one for every season!:
Or, try this regular Buttermilk Cornbread recipe if you want a no-frills cornbread.

Jalapeno Cornbread Whoopie Pies
Printer-Friendly Version


Yields: 10-12 assembled pies

Ingredients

For the Cornbread

  • 1 1/4 cups all-purpose flour
  • 1 cup cornmeal
  • 1/4 cup packed brown sugar
  • 2 teaspoons baking powder
  • 1 teaspoon salt
  • 1 cup buttermilk, at room temperature
  • 4 tablespoons unsalted butter , at room temperature (used 2 Tbsp salted, 2 Tbsp unsalted)
  • 1 large egg, at room temperature
  • 2 jalapeño chiles, seeded and finely chopped (used about 2 Tbsp canned diced jalapenos)
For the Cheese Filling

  • 6 slices bacon
  • 4 ounces soft fresh goat cheese, at room temperature (omitted)
  • 4 ounces cream cheese, at room temperature (used neufchatel cheese and doubled it to accomodate lack of goat cheese)
  • 2 tablespoons milk
  • 1 tablespoon chopped fresh scallions
Directions

To Make the Jalepeno Cornbread
  1. Position a rack in the center of the oven and preheat the oven to 375 degrees. Line two baking sheets with parchment paper.
  2. In a medium bowl, stir together the flour, cornmeal, brown sugar , baking powder, and salt. In the work bowl of a stand mixer fitted with the paddle attachment, beat together the buttermilk, butter, and egg on low speed until just combined. Increase the speed to medium and beat until thoroughly combined, about 3 minutes. Add the flour mixture and the chopped jalapeno to the batter and beat on low until just combined.
  3. Using a spoon, drop about 2 tablespoons of batter onto one of the prepared baking sheets and repeat, spacing them at least 2 inches apart. Bake one sheet at a time for about 12 minutes each or until the cornbread begin to brown around the edges. While the cornbread is cooking, prepare the cheese filling using the instructions below.  After the cornbread is cooked, remove from the oven and let the them cool in the pan for about 5 minutes before transferring them to a rack to cool completely.
To Make the Cheese Filling
  1. While the cornbread is baking, in a medium skillet, cook the bacon over medium heat until crisp. Using a slotted spoon, transfer to a paper-towel-lined plate to drain and cool. When cool, crumble into small pieces.
  2. In the work bowl of a stand mixer fitted with the paddle attachment, beat together goat cheese (if using), cream cheese and milk on low speed until just combined. Increase the speed to medium and beat until smooth and creamy, about 3 minutes. Add the crumbled bacon and the scallions and beat on low until combined.
To assemble
  1. Spread filling onto the flat side of one cake using a knife or spoon. Top it with another cake, flat-side down. Repeat with the rest of the cakes and filling. You can also use a pastry bag with a round tip to pipe the filling onto the cakes, which will give you a smoother, neater presentation.
Source: Modified from the Star Telegram newspaper, as modified and seen on Sing for Your Supper

Sunday, February 28, 2010

Grandpa N's Char Siu Bao (Chinese BBQ Pork Bun) - Trial 1

When I was a young girl, one of my absolute FAVORITE things to eat was my Grandpa N's Char Siu Bao (Chinese BBQ Pork Bun).  I loved them so much that my grandpa would literally bake a whole party tray of like 50 to bring for my birthday parties.  They were divine.  The bread was tender, soft and fluffy, the meat was sweet and salty at the same time with beautiful red coloring, and the glaze on top was both buttery and sugary.  While Chris' favorite Chinese bakery bun is the Bolo Bao with Nai Wong Filling, I go for the Char Siu Bao anyday.

Sadly, when my grandpa passed away, there were no more char siu bao to be had.  The kitchen had closed.  My mom and aunt had a recipe that was supposedly his.  The recipe looked authentic enough...a small scrap of paper with both english and chinese, all crinkled with wear and stained with cooking ingredients but it just didn't taste the same as when Grandpa made it. 


We swear it's because he used lard instead of butter as in the supposed written recipe.  Or maybe it was because he probably really did knead the dough the old fashioned way - by hand.  What also was strange was that no one seemed to have a recipe for the filling, just the bun dough itself...which makes it even harder to try to replicate.  Either way, I asked my mom for the recipe and decided I would make it my life's goal (ok, a bit dramatic, I know...but I really do LOVE these buns!) to try to re-create my grandpa's buns that we all know and love.

This post will document my first trial run.  I made the buns and ended up bringing them with me to my extended family's Chinese New Year celebration so I would have lots of expert critique on them.  The final verdict was that the filling that I had concocted (with the help of the internet and sheer taste and trial during cooking!) was pretty good and authentic.  Where the epic failure was was in the dough bun itself...very dense and hard, not at all like Grandpa's.  Heart wrenching but I won't lie, I didn't have high expectations of myself because the recipe that I was given was poorly written/vague and we all know that grandpa/grandma/mom/etc always has that special touch to make things taste delicious.

So below I will post what I did in Trial Run #1 (I tried to interpret the original written recipe and clarify what I thought it meant) and then I will post what I would do differently next time in Trial #2.  I won't lie, this really might be a life-long pursuit because it is time consuming (4-5 hours dough rising time!) and I got the BBQ pork from my mom who doesn't make it often.  I could get the recipe to roast the pork myself, I suppose, but again, that process itself is a bit time consuming.

Grandpa N's Meat Bun Dough with Christine N's Char Siu Bao Filling - Trial #1
Printer-Friendly Version


Yields: 24 buns

Ingredients

For the Dough
  • 2 packages of yeast (4 ½ tsp)
  • 1 Tbsp sugar
  • 1 c warm water
  • 7 c bread flour
  • 1 c milk
  • 1 c sugar
  • 1 ½ sticks (3/4 c) butter
  • 1 egg
For the BBQ Pork Filling (as Christine made it; No recipe from Grandpa N)
  • 1 Tbsp vegetable oil
  • 1 ½ pounds char siu, cooked and diced (this is a complete guesstimate!  Buy at a Chinese grocery store or Google for a recipe because my mom gave me this pre-cooked!)
  • 1 onion, diced
  • ¼ c dry red wine
  • ¼ c ketchup
  • 1 Tbsp oyster sauce
  • 1 Tbsp low sodium soy sauce
  • 1 ½ Tbsp honey
  • 2 tsp rice vinegar
  • 2 tsp hoisin sauce
  • 1 tsp sesame oil
  • 1 tsp garlic powder
  • 1 tsp onion powder
  • 1 tsp Chinese 5 spice seasoning*
  • ½ tsp ground black pepper
  • Red food coloring, if desired
*Note: DO NOT leave this ingredient out!  During my taste test trials this was the last ingredient that I added and when I did, it was truly the golden ticket to making it taste "right" in my opinion.  Everything before it tasted good but didn't have the correct taste.  If you can't find Chinese 5 spice seasoning, Google has a substitute listed as: 2 teaspoons of Szechuan peppercorns, roasted & ground + 8 star anise, ground + ½ teaspoon ground cloves + 1 tablespoon ground cinnamon + 1 tablespoon ground fennel seeds.  As you can see, a very unique flavor is imparted from this blend.
For the Egg Wash

  • 1 egg
  • 1 Tbsp milk
For Finishing
  • ½ stick (1/4 c) butter, melted
  • 1 ½ Tbsp honey
Directions


For the Dough
  1. In a large mixing bowl, proof the yeast by combining warm water, 1 Tablespoon sugar, and yeast. Mix together and let sit in a warm place until mixture is frothy (forms bubbles on surface).
  2. Combine remaining ingredients and knead (by hand or in stand mixer with dough hook) until smooth and elastic, about 15 minutes. Add more flour by the Tablespoon if dough continues to be too sticky. Cover bowl with a damp cloth and set aside in a warm place and let dough rise for 4-5 hours. While the dough is rising, make filling.
For the Filling
  1. In a large sauté pan, heat vegetable oil over medium high heat. Add onions and cook until translucent and slightly carmelized (browned). Then add cooked char siu pieces and sauté until heated.
  2. Add red wine and cook until reduced by half, about 3 minutes. Add remaining ingredients and stir to combine. If a redder colored filling is desired, add food coloring until desired redness is reached. Continue cooking until heated throughout.
  3. Remove from heat and set aside to cool.
For Making the Buns
  1. Line baking sheets with parchment paper.
  2. After dough has risen, punch down and separate into 24 pieces. Roll each piece between your hands to form a ball.
  3. Add a heaping Tablespoon of cooled filling to the center of the dough ball. Pull edges of dough around filling and pinch to close. Place seam side down onto prepared baking sheets. Continue until all buns have been formed.
  4. Preheat oven to 375 degrees Fahrenheit.
  5. In a small bowl, use a fork and beat together the egg and milk. Gently brush the mixture onto the buns as to not disturb the risen dough.
  6. Bake buns in preheated oven for about 20 minutes, or until tops are lightly golden brown.
  7. While buns are baking, combine melted butter and honey in a small bowl. Brush the mixture generously on top of each warm bun after it has come out of the oven.
  8. Allow buns to cool completely on a wire rack and serve or store in an airtight container.
Source: Meat Bun Dough recipe from Grandpa N (Christine's Grandfather) and Char Siu Filling Recipe a Christine's Kitchen Chronicles Original, inspired by Kiteless on Visual Recipes
What I'd do differently next time:
  1. Substitute 1 stick of butter for vegetable shortening (Crisco).
  2. Change first rise time to about 1-2 hours, or until dough has doubled in size.
  3. Use a rolling, pin, roll each piece of dough into a circle, making the edges thinner than the center. Do not roll too thin or holes may form during baking. Add a heaping Tablespoon of cooled filling to the center of the dough circle. Pull edges of dough around filling and pinch to close. Place seam side down onto prepared baking sheets. Continue until all buns have been formed.
  4. Change second rise time to 4-5 hours (after buns have been filled and formed).  Periodically mist buns with water during this long rise time to ensure that they don't dry out.  This long rise time before baking should result in a lighter, less dense bun.
  5. Aunt Peggy says to consider using the Bolo Bao bun recipe instead of Grandpa's.  Will consider for a future trial run.