Showing posts with label CSA share. Show all posts

Wednesday, July 10, 2013

Caprese Burgers with Pesto Mayonnaise

It's Summertime and you know what that means...grilling!  And farm fresh veggies!  Hooray!

With the first red tomatoes of the season rolling in from my CSA farm share I decided to make a very simple burger that would highlight the super fresh flavors.  And when I say "I" made this meal I really mean that I sent my husband outside in the heat to go grill up these burgers :D.  Yet another reason grilling makes the menu...it's group participation from the hubby!

The original recipe called for sliders but we had a pack of leftover pre-made patties so ours were regular sized burgers.  Personally I think it works out better because the size of the tomato and mozzarella is a better match, anyway.  This was a great quick meal that will have you spending virtually no time to make and you can use any extra topper ingredients to make a fast Caprese Salad on the side.  For the salad, just layer the mozzarella, tomatoes, basil then drizzle with extra virgin olive oil and balsamic vineagar.  Season with fresh cracked pepper and sea salt and you're good to go!

Caprese Burgers with Pesto Mayonnaise


Caprese Burgers with Pesto Mayonnaise

Ingredients

  • 1 pound ground beef
  • Salt and pepper
  • Fresh mozzarella, sliced
  • 1 tomato, sliced
  • Fresh basil leaves
  • Burger buns
  • 1/2 cup mayonnaise (As usual I used Fat Free Greek Yogurt instead)
  • 1/4 cup pesto

Directions

  1. Mix salt and pepper into beef (or if using pre-formed patties, season each side of the patty).  Place on a hot grill and cook through, flipping once.  Near the end of the grilling time, add cheese.  Cover grill and cook for a few minutes until the cheese is melted.
  2. Meanwhile, mix together the mayonnaise and pesto in a small bowl.  Set aside.
  3. Place burger onto bottom half of bun.  Top with tomato and basil.  Spread pesto mayonnaise on top half of bun.  Serve.

Source: I was Born to Cook 

Monday, June 3, 2013

Mascarpone Pasta with Chicken, Bacon, and Kale

I apologize for being absent lately.  May/June is always a crazy time for me between our anniversary (our 5th was this year!), my birthday, and general Summer craziness.  Add to the mix the impending arrival of our Baby Boy this year and my blogging is unpredictable to say the least.

What makes things extra interesting is that I'm still participating in a CSA share so that means fresh veggies are waiting for me to whip them into something delicious each week.  Spring is greens time and it's always a surprise as to just what kind will come in our box week to week.

I had some leftover mascarpone cheese and so I tweaked a recipe that I found on All Recipes to include some of the gorgeous green kale that we received.  My husband isn't really a fun but when you add bacon, and chicken, and creamy cheesey pasta, he can't really complain.  Of course, if you don't have kale, you could always use spinach as in the original recipe.  This one reminded me somewhat of Macaroni Grill's Pasta Milano.

Two Years Ago: SweetFire Chicken (A Panda Express copycat and one of my husband's favorite) and Sweet Beginning's Summer Pasta Salad
Three Years Ago: Buckeyes
Four Years Ago: Quick and Easy Alfredo Sauce

Mascarpone Pasta with Chicken, Bacon, and Kale

Mascarpone Pasta with Chicken, Bacon, and Kale

Ingredients
  • 3 slices bacon 
  • 1 tablespoon olive oil 
  • 1/2 cup minced onion 
  • 1-1/2 pounds skinless, boneless chicken breast halves, cubed 
  • 1/4 teaspoon garlic powder 
  • Salt and ground black pepper to taste 
  • 2 tablespoons drained and chopped sun-dried tomatoes packed in oil 
  • 1 tablespoon prepared pesto sauce 
  • 1/4 pound fresh kale (or you can also use spinach)
  • 4 ounces mascarpone cheese 
  • 1 clove garlic, minced 
  • 1-1/2 teaspoons Dijon mustard, or more to taste 
  • 1/2 lemon, juiced 
  • 1/4 cup milk 
  • 1/4 cup grated Parmesan cheese plus additional for topping if desired 
  • 8 ounces shaped pasta such as penne, rigatoni, or farfalle. 
Directions

  1. Bring a large pot of lightly salted water to a boil. Cook pasta according to package directions to al dente.  Drain and set aside.
  2. In a large skillet over medium-high heat, cook bacon, turning occasionally, until evenly browned, about 10 minutes. Alternatively, follow the directions on the package for microwave cooking.  Drain the bacon on paper towels and crumble when cooled.
  3. In the same skillet, heat olive oil over medium heat.  Add crumbled bacon and onion and cook until the onion is translucent, about 5 minutes. Add chicken and season with garlic powder, salt, and black pepper. Cook and stir until chicken is no longer pink inside and lightly browned outside, about 10 minutes. Add sun-dried tomatoes and pesto; stir in kale and cook until wilted, stirring constantly. 
  4. In a saucepan over medium heat, mix together mascarpone cheese, 2 cloves of garlic, Dijon mustard, lemon juice, and milk. Cook until smooth and bubbling, stirring constantly, about 5 minutes; stir in 1/2 cup Parmesan cheese until cheese has melted, 2 to 3 more minutes. Pour sauce over chicken and bacon mixture. Season with additional salt and/or pepper if needed.
  5. Gently fold pasta into chicken mixture and transfer to a serving bowl. Sprinkle with additional Parmesan cheese if desired.

Source: Slightly modified from All Recipes

Wednesday, January 30, 2013

Meet Ribeye and T-Bone + Beef and Sweet Potato Stew

Since Monday was a vegetarian recipe, today here's one for the carnivores.  Remember when I said I'd be partaking in a cow share?

Meet Ribeye and T-Bone.

Ribeye (left) and T-Bone (right) as babies.
The email I received about them from their owner said "Ribeye and T-Bone Say 'Hi We're Tasty!'".  When I saw their baby picture, it made me sad to think that in a few short months, they'd be food.  I thought you weren't supposed to name the animals that you eat but what do I know.  My friend Amy said she visited the farm herself and saw how they were raised.  She assured me they had a really good life and quite well taken care of while alive.  They were grass fed cows that were raised using organic methods by her co-worker on his personal land.  Amy bought 1/4 of T-Bone and of that, we purchased 1/4 of that for a total of 1/16th of a cow share for our personal consumption.  It was a hot, dry Summer here in Ohio which resulted in less grass for T-Bone and Ribeye to graze upon.  Thus, they ended up smaller than anticipated.  Just about 1000 pounds.  After all the processing, our total yield was just roughly 20 pounds of meat.  A lot of time and effort goes into such a small amount of meat and now I understand why it is better for our planet if we would reduce our consumption of it.

In all, our part of the share included:
  • 1.2 lb stew meat
  • ~2 lb round steak
  • 2.58 lb flat iron steak
  • 1.27 lb sirloin strip steak
  • 1.10 lb filet mignon
  • 1.5 lb brisket
  • 1.58 lb soup beef bones
  • 3.33 lb beef chuck steak
  • 1.04 lb ribeye steak
  • 8 lb ground beef
  • 1 ox tail
Our 1/16th cow share in our side-by-side freezer.
We needed surprisingly less room needed than we anticipated.
Now here's where the story gets a little bit sad.  We stored our beef in our spare refrigerator which is kept the basement.  Sometime over Christmas, the circuit broke on that outlet along with 3 others in the house.  While we noticed our outdoor Christmas lights mysteriously stopped working, it never occurred to us that other outlets could also have been affected.  It wasn't until 2 or 3 days later that my husband went to the basement and to his horror, saw a bloody puddle forming underneath the refrigerator.  We felt the beef and though it felt cool to the touch, it clearly had thawed almost completely.  We deemed it too risky to try to eat or save and with a heavy heart, threw away nearly all our precious cow share.  I had only used the tail (mom made a great soup out of it), the stew meat, and the round steak.  The brisket is safe at Amy's house because it's a part of a giant chunk of meat which we could not divide as it was frozen.  We had plans to grill the steaks when the summer got warmer.  I felt so guilty that T-Bone had died in vain...

So this brings me to the meat that we DID get to enjoy.  This stew was sweet and salty and comforting.  I enjoyed the use of sweet potatoes instead of the regular run of the mill potatoes.  The flavor contrast was lovely.  It was by far the most tender, rich beefy tasting meat I have ever had.  Given this wasn't even that premium of a cut, it makes me lament the more prime cuts that will never be tasted.

RIP T-Bone.  You were a good cow.

Two Years Ago:  Cookies and Cream Oreo Look-Alike Cake and Stovetop Mac and Cheese
Three Years Ago: Vegetable Soup (with Optional Sausage for the Men)

Beef and Sweet Potato Stew


Yields: 6 servings

Ingredients
  • 3/4 cup all-purpose flour with a big pinch of salt and pepper 
  • 1 1/4 pound stew beef, cut into 1-inch chunks 
  • about 1/4 cup olive oil 
  • 1 medium yellow onion, coarsely diced 
  • 2 cups peeled and thickly sliced carrots 
  • 3/4 pound cremini mushrooms, cleaned and cut in half 
  • 6 cloves of garlic, minced 
  • 3 tablespoons tomato paste 
  • 1/2 cup light beer (I used red wine)
  • 1 pound sweet potato, peeled and diced into 1-inch chunks 
  • 4 cups beef broth (more if you’d like it more soupy) 
  • 1 bay leaf 
  • 3 teaspoons fresh thyme leaves, coarsely chopped
  • 1 tablespoons Worcestershire sauce 
  • 1-2 tablespoons sugar 
  • salt and pepper to taste 
  • couscous, rice, or pasta and parsley to serve 
Directions

  1. In a large ziplock bag, place flour, salt, and pepper. Add diced beef. Close the bag. Hold it tight and shake, ensuring that all of the beef is lightly coated in flour and seasoning.  Set aside. 
  2. In a large dutch oven, heat 2 tablespoons of olive oil over medium heat. Add as much beef as will fit along the bottom of the pan in a single layer. Cook, browning on all sides. The beef doesn’t need to be cooked through, just browned. Once all of the beef is cooked, remove from the pan and place on a plate. Set aside. 
  3. In the same dutch oven, heat the remaining 2 tablespoons of olive oil. Add onions and carrots and cook until onions are translucent, about 5 minutes. Add mushrooms and garlic, and cook for another 3 minutes. Add tomato paste and heat through. Deglaze the pan with the beer or wine, scraping the browned bits from the bottom of the pan as the beer steams. 
  4. Add the sweet potatoes, and cover with beef broth. Add bay leaf, thyme, and Worcestershire sauce. 
  5. Add beef. Turn heat to low and let gently simmer for 45 minutes, until the vegetables are cooked through. Taste and add sugar (this helps the acidity), salt, and pepper as necessary.  Remove the bay leaf. 
  6. Serve stew over couscous, rice, or pasta with fresh parsley if desired.

Source: Joy the Baker

Wednesday, October 3, 2012

California Roll Lettuce Roll-Ups

I love it when the stars seem to align between what I receive my CSA basket for the week and the things I have bookmarked to make.  My only regret is having had to wait this long to share this recipe with you since I had been traveling so much recently (food photo adventures have been shared on facebook!).  But, I'll call it a nod to my recent trip to Japan by sharing it now :).

What I loved about this recipe was how quickly you could put it together and how healthy it was.  If you love the flavor of California Rolls but don't want the hassle of creating actual sushi rolls, this is the way to go.  I could even see adding some chopped nori (seaweed sheets) to really get the full flavor experience.  And why stop there?  You could adapt this recipe as a vehicle to contain the flavors of any of your favorite sushi rolls!

One Year Ago: Homemade Girl Scout Samoa Cookies and Chicken, Blueberry, and Summer Squash Salad

California Roll Lettuce Roll-Ups


Yields: 4 servings (3 wraps each)

Ingredients

  • 1 cup dry rice
  • 2 Tbsp seasoned rice vinegar
  • 1 head (~12 leaves) Boston lettuce, leaves removed and washed
  • 1/2 English cucumber, seeded and cut into 1-inch matchsticks
  • 1/2 cup (about 2) carrots, shredded or cut into 1-inch matchsticks
  • 5 oz surimi (imitation crab meat), cut into 1-inch matchsticks
  • 1/2 avocado, diced
  • 3 Tbsp pickled ginger, chopped (optional)
  • 2 Tbsp low-sodium soy sauce
Directions
  1. Cook rice according to package directions.  Once cooked, stir in the vinegar and then set aside.
  2. Assemble the lettuce roll-ups by layering several tablespoons of rice in each lettuce leaf.  Then add 2-3 pieces of cucumber, carrot, crab, and avocado.  Top with pickled ginger if desired and finish with a dash of soy sauce.

Source: Adapted by and as seen on PreventionRD from Good Housekeeping

Sunday, September 9, 2012

Canning Whole Peeled Tomatoes

If you've been following my blog these past few years, you'll know that I'm part of Cedarmore CSA (Community Supported Agriculture).  Each week is a new surprise bounty of wholesome goodness.  One of my favorite things to receive are the tomatoes.  They have SO much more flavor than the ones that you get at a grocery store.  Those impostors really shouldn't even be called tomatoes!  So when the farm said they had canning tomatoes available for just $0.50/lb, I jumped at the chance to give canning, something I'd always wanted to try, a shot.

My first order of tomatoes was 20 pounds.  I figured it would be a trial run without too much risk (I can spare $10!) and would give me lots of fresh organically grown tomatoes throughout the dreary Winter months if things went right.  The first adventure was whole tomatoes because it looked like it would require the least amount of effort.  It actually turned out so well and was quite fun so I ended up ordering ANOTHER 20 pounds for myself to make tomato sauce!

How did it go?  Well, I'd say quite well!  My labor yielded 12 pints (2 cups each) of whole tomatoes and 5 quarts (4 cups each) of fresh tomato sauce.  I used the Ball regular-mouth pints and quarts because their jars are high quality and made right here in the USA!


Sure, it was a lot of work (maybe 5-6 hours?) and each pint cost roughly $0.50 or $1 per quart for the tomatoes plus the cost of jars (less than $1/jar) but the satisfaction of knowing EXACTLY where my tomatoes came from and how they came to be, knowing they were pesticide free and packed in BPA-free, glass jars.  This was priceless to me and I know my long-term health will be all the better for it.

But how did we get to such a glorious end result?  By starting with a big 'ol box of tomatoes!  This was the box that contained my first 20 pounds....


The first step to canning tomatoes is to core them then remove the skins by blanching them.  Some people say to cut an "X" into the bottom of the tomato to make the peeling easier but personally, I find that the skins slide off just fine without that step so I skip it.  I'm all about simplification.  Since these are canning tomatoes and therefore contain imperfections, you want to cut out any bad parts, too.  You don't want that yucky stuff in your jars.

So here are the first batch of blanched tomatoes, naked and ready to be placed into their jars.


Now, when canning whole tomatoes, you'd want to keep them as...well...whole as possible!  After gently squishing (we're not making crushed tomatoes, here!) a few whole ones into my pint-sized jars, I found there was still extra room so I cut some into holes and even quarters to fill the voids.  In the case of making sauce, you'd use the handy wide-mouth funnel to help you easily transfer the saucy goodness.


Now acidify the jars with a tablespoon of lemon juice (Note: For quarts, add 2 tablespoons).  This will make sure the tomatoes have the proper pH level to be safely canned using a simple water bath.  I ran out of bottled lemon juice here so had to use fresh lemons but again for simplicity's sake, TOTALLY recommend getting a big bottle of pre-squeezed lemon juice when you can your tomatoes!


Then you use this handy dandy bubble remover which came with my new Ball Canning Utensils Set.  See how much fun I was having?!  Die bubbles, die!


You'd think that the jar is ready to be closed with the lid but not quite yet.  First you want to wipe the mouth of the jar real clean with a clean, dry, lint-free cloth.  My mother-in-law, Mary Lynn, helped with that.  You may have tried your darndest to be neat but let's face it, things get a little messy in the kitchen.  If you skip this step, you risk the chance of not forming a good seal and then all your hard work will have gone to waste!


Now time to use the magnetic tool from the Ball Canning Utensils Set.  This thing was so handy because you could dip it right into your pot of simmering water to retrieve a sterilized lid and ring without contaminating them with your super tomatoey hands!  Onto the jars they go and then into the water bath.  For our first batch, we just used a regular old pot which unfortunately only held four jars at a time.  It did the job without added cost but you know what they say, time is money!  To speed things along in subsequent canning adventures, Mary Lynn bought huge pot with lots of capacity because it is designed for canning.


Once you process the jars forever for 45 minutes (pints), you lift them out using...you guessed, it, more handy tools from your Ball Canning Utensils Set!  Place them on a clean, dry kitchen towel to cool and then pray that you hear the glorious sound of popping which indicates that they have sealed correctly.  I can't tell you how elated I was to hear that first pop and then to my delight, an entire SYMPHONY of popping soon followed.  SUCCESS!


Before you tuck your pretty new jars of homemade, canned tomatoes away, make sure you label them so you know what they are and when you made them :).


I hope you enjoyed my photo adventure.  Check out the real instructions for canning at Food in Jars or Annie's Eats also did a wonderful feature including step-by-step photos recently, too.  

By the way, to do tomato sauce, there's an extra step of milling your whole tomatoes in a food mill to get rid of those pesky seeds and cooking them down to your desired thickness but worth the effort!  We had just about a cup or two extra so made some dipping sauce for stromboli.  It was the richest, freshest sauce I've ever experienced and was so proud that it came out of MY kitchen!

Now, I'm leaving on a jet plane for a few weeks for work.  But no worries, starting tomorrow, I have lined up SEVEN fabulous bloggers who will be guest posting for me while I'm gone.  There are some seriously drool-worthy recipes coming up and a little bit of something for everyone.  I hope that you discover a new blog to love! :)

Happy canning and until we meet again!
Christine

Wednesday, September 5, 2012

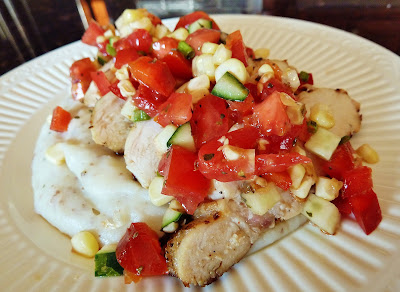
Buttermilk-Grilled Chicken with Garden Vegetable Salsa

Are you always looking for ways to use up your leftover buttermilk like I am?  Lucky for you I have a buttermilk tag on my blog just for this exact purpose!  Of course, you could always "cheat" and make fake buttermilk by adding 1 tablespoon of vinegar or lemon juice to a regular cup of milk and letting it sit for 5 minutes.  This makes it get a bit curdled and sour just like buttermilk.  It works in a pinch but for me, I like the real thing so I buy the jug of buttermilk at the store.

My CSA continues to churn out lots of wonderful garden-fresh veggies and so when I saw this on Josie's blog, I knew it would make the menu sometime this Summer.  Finally the stars aligned and the farm supplied all of the vegetables that I needed to make this recipe (even the mashed potatoes which I made as a "bed" for the chicken and veggies to rest upon).  I gathered some fresh herbs from our work garden and happened to have some buttermilk leftover from when I had made Tomato and Corn Pie (still easily the best dish from the Summer!) and Strawberry Buttermilk Ice Cream.  Perfect.

I've heard of using buttermilk for fried chicken before but never grilled so the concept was intriguing to me.  I found that allowing the chicken to marinate overnight in the buttermilk mixture resulted in meat so juicy and tender after grilling that I about died of happiness.

As a side note, this is my last month of my CSA subscription :(.  But, to preserve some of the fresh flavors of summer, I took on canning 60 POUNDS of tomatoes with my mother-in-law.  I'll post soon about that adventure so stay tuned!

One Year Ago: Oven Baked Sweet Potato Chips

Buttermilk-Grilled Chicken with Garden Vegetable Salsa


Ingredients

For the Chicken
  • 4 boneless, skinless chicken breast halves, trimmed
  • 2 cups low-fat buttermilk
  • 3 cloves garlic, peeled and crushed
  • 1/2 tsp paprika
  • 1/8 tsp crushed red pepper flakes
  • 1 tsp kosher salt
  • 1/2 tsp freshly ground pepper
For the Garden Salsa
  • 1/2 cup finely diced cucumber
  • 1/2 cup finely diced bell pepper
  • 1/2 cup minced scallions
  • 3/4 cup corn, cut from the cob (about 1-2 ears)
  • 2 medium tomatoes, cored, seeded, and diced
  • 1/4 cup minced fresh herbs (such as basil, chives, oregano, and parsley)
  • 2 Tbsp olive oil
  • 2 Tbsp red wine vinegar
  • Juice of 1/2 lemon
  • Salt and pepper, to taste
Directions
  1. In a gallon-sized ziplock bag or shallow baking dish, combine the chicken with the buttermilk, garlic, and spices.  Cover and refrigerate for at least 1 hour or up to overnight.
  2. When ready to cook, preheat the grill to medium-high heat.  Oil the grates and cook the chicken about 7 minutes per side, turning once, or until the internal temperature reaches 165F.  Remove from the heat and cover loosely with foil.  Allow to rest at room temperature about 10 minutes before serving.
  3. While the chicken is cooking, combine the ingredients for the salsa in a medium bowl.  Taste and season with salt and pepper before serving on top of chicken.

Source: Pink Parsley

Tuesday, September 4, 2012

Farro Spaghetti with Beets, Brown Butter, and Poppy Seeds

This is the story of the recipe that made me LOVE beets.

The first time I ever had a beet was a couple years ago when I joined a CSA (community supported agriculture).  Often times I would get vegetables that I wouldn't normally buy and sometimes, I wouldn't even know what the mystery vegetables were in my box.  But it's okay.  I'm an adventurous person.  As I used my beets in the past for things like Greek Salsa or simply roasting them or pickling them, I adored their bright pink color (except for when they stained my hands...and anything else the beets came in contact with...).  But in terms of taste, I could take it or leave it.  Beets are slightly sweet and very earthy.  They were just okay.

It was not until I came across this recipe that I fell in love.  I wasn't too sure about them at first but am so glad to have made it because it changed my life.  I happily ate it at dinner and then the leftovers again the very next day for lunch.  Now, it could be that I love pasta...and cheese...and butter (yeah, who doesn't love real butter?  Browned butter?  Even better.).  But the beets, with their regular beautifully bold hot pink color and slightly sweet, earthy flavor, were perfectly complemented by the rich browned butter, toasted poppy seeds, and salty yet creamy goat cheese.  Okay, so I accidentally bought feta at the grocery instead of goat.  Still fabulous but I bet the goat cheese would have added a wonderful melty tang.

I beg of you, try this!!  It will change your life.  Even if you don't like beets or are indifferent.

One Year Ago: Thai Peanut Turkey Burgers

Farro Spaghetti with Beets, Brown Butter, and Poppy Seeds


Farro Spaghetti with Beets, Brown Butter, and Poppy Seeds

Ingredients

  • 1 pound red beets, cleaned
  • 1/4 cup olive oil
  • 1/4 cup water
  • 1 pound good-quality farro or whole wheat spaghetti (I used penne because I was out of spaghetti...how does that happen??)
  • 6 Tablespoons unsalted butter
  • 1 heaping Tablespoon poppy seeds
  • 1 teaspoon kosher salt
  • Red pepper flakes (optional - I added this because I like a little heat to my pasta)
  • 1/4 cup pasta water
  • 1/4 pound goat's milk cheese (Feta is yummy, too!)
Directions
  1.   Preheat the oven to 400F.  Place the beets in a glass or ceramic baking dish.  Cover with olive oil and water.  Bake until a tester easily passes through the beets, about 1 1/4 hours.  Let cool.  Note: This step can be done the evening in advance and stored in the refrigerator to expedite the next evening's dinner.
  2. Bring a large pot of salted water to a boil.
  3. Peel the cooled beets and cut into chunks.  Add to the bowl of a food processor fitted with a metal blade and process to a rough puree.  Add the spaghetti to the boiling water and cook according to the package directions.
  4. In a large skillet over high heat, add the butter.  Brown the butter, about 2 minutes.  Add the poppy seeds and toast for 2 minutes more.  Add the pureed beets, salt, a couple dashes of red pepper flakes (if desired) and 1/4 cup pasta water.  Stir to full incorporate.
  5. Using a wire-mesh skimmer or tongs, remove the spaghetti from the pot and place them directly in the skillet with the sauce.  Stir to combine.
  6. Divide the spaghetti into equal portions and place on warm plates.  Use two round or oval soup spoons to form little balls of the goat cheese.  Place a ball on top of each serving of pasta.  Serve immediately.
Source: Barely modified from Epicurious, December 2009 and Pasta Sfoglia by Ron and Colleen Suhanosky 

This recipe was shared at Foodie Friends Friday Linky Party!  Thanks to This and That for being a hostess and letting me know about the party :).

Monday, August 27, 2012

Tomato and Corn Pie

So what did you think of last week?  It got a bit weird around here as I shared 3 different sweet recipes in a row.  I don't think that's every happened before outside of an Emily baking Extravaganza (see Apples or Summer Fruits and Veggies themes) or holiday time.  But now back to regular old food around here...my waistline really can't handle anymore desserts for a little while!

It's sad but true, summer is officially coming to an end soon.  Kids are returning or have already returned to school, pools are on their last week of being open, and summer's fruit and vegetable bounty will soon be gone.  But before that all happens, I highly encourage you to capture all the splendor of summer by making this savory pie.

This recipe is not especially difficult to make but it is a bit time consuming.  But the moment that you bite into it, you are rewarded for your hard work.  This was simply put, the freshest, most delicious dish I'd eaten all summer.  It was bursting with amazing flavors and I was so glad that I made it.

One Year Ago: Mushroom Bolognese
Two Years Ago: Blueberry Almond Cake with Lemon Drizzle

Tomato and Corn Pie


I'm sorry for this really awful photo.  I got a late start and it was quite dark by the time I had the pie done and snapped this shot.  It tastes infinitely better than I make it look.  The flavor truly took me by surprise!
Ingredients

For the Crust:
  • 2 cups all-purpose flour
  • 1 Tbsp baking powder
  • 3/4 tsp salt
  • 6 Tbsp cold unsalted butter, cut into 1/2 inch cubes
  • 3/4 cup buttermilk
  • 2 Tbsp butter, melted
For the Pie
  • 1 3/4 lb tomatoes
  • salt
  • 2/3 cup mayonnaise (light is fine) or Greek yogurt
  • 2 cups (8 oz) shredded sharp cheddar cheese
  • 1/2 cup shredded parmesan cheese
  • 2 cloves garlic, minced
  • 1/4 cup fresh basil, chopped
  • 1 Tbsp fresh chives or green onions, sliced
  • 2 Tbsp fresh lemon juice
  • Freshly ground black pepper
  • 1 1/2 cups fresh corn (from 2-3 ears)
Directions
  1. To make the crust: Whisk together flour, baking powder, and salt in a bowl.  Blend in cold butter with your fingertips, pastry blender, or two forks until it resembles coarse meal.  Add the buttermilk and stir until the mixture forms a dough.  Gather into a ball.
  2. Divide the dough in half and on a well-floured counter, roll out once piece into a 12-inch round.  Roll the dough around the rolling pin and transfer to the pie plate.  Pat the dough in with your fingers and trim any overhang.  Put the pie plate into the refrigerator to chill while preparing the filling.  Flatten the second dough bough into a disc then wrap in plastic wrap and chill as well.
  3. Bring a large pot of water to a boil.  Prepare a large bowl of ice water.  Add the tomatoes to the boiling water and cook for about 10 seconds before transferring tomatoes with a slotted spoon to the ice water.  When cool enough to handle, peel the skins from the tomatoes.
  4. Line a baking sheet with a double-layer of paper towels.  Cut the tomatoes into 1/4-inch thick slices and arrange in a single layer on the paper towels.  Sprinkle generously with salt and allow to stand at room temperature for 20-30 minutes.  Blot the tomatoes with more paper towels to remove excess moisture.
  5. Meanwhile, preheat the oven to 400F.
  6. Mix together the mayonnaise (or Greek yogurt), cheese, garlic, and lemon juice.  Season with salt and pepper to taste.
  7. Remove the pie crusts from the refrigerator.  Layer half of the tomatoes on the bottom of the pie and gently remove extra seeds from about 1/2 to 2/3 of the tomatoes (leave some for flavor!).  Scatter half of the corn on top of the tomatoes then drop spoonfuls of the cheese mixture over the top.  Sprinkle with half of the basil and chives.  Repeat the layers: tomatoes, corn, cheese, herbs.
  8. On a well-floured surface, roll the second pie crust into a 12-inch circle.  Fit it over the filling and pinch the edges of the two crusts together to form a fluted edge or use the tines of a fork to seal together.  Use a small knife to cut 4 slits on the top of the crust then brush with melted butter.
  9. Place a cookie sheet on the rack below where you will place the pie to catch any filling that may boil over.  Bake pie until crust is golden and the filling is bubbling, about 30-35 minutes.
  10. Allow to cool 10-15 minutes before cutting into slices and serving.
Source: Originally from Christ Church Cooks and Gourmet as seen on Pink Parsley

Friday, August 24, 2012

Recipe Swap: Zucchini Brownies

Today I'm thrilled to be sharing a Blogger's Choice Recipe Swap from a fellow Cincinnati suburbanite blogger, Melissa of Delicious Meliscious.  A long long time ago I had tried and posted about a Cincinnati-Style Chili which I had found through her blog.

For this swap, I wasn't sure what to choose.  The original plan was actually her Uno's Deep Dish Pizza but that was axed when I realized I didn't have enough yeast and had already done my grocery shopping for the week.  I also considered this English Muffin Bread with Strawberry Butter but darnit again with the yeast!  I never realized just how much I use/love yeasted recipes until this little delimma!  But then Tuesday rolled around and in my CSA box was a single small zucchini and a larger yellow summer squash.  It was a sign and I was being beckoned.  I was to make these Zucchini Brownies.

I had previously made this version of zucchini brownies on All Recipes which doesn't include any eggs and is super fudgey and topped with a chocolate frosting.  That recipe made me a believer and I remember I ended up raving about the recipe on the cooking message board after my first bite.  And yet...I never shared it on here...oops.  Sorry about that.  If you've never made zucchini brownies before, they're quite delightful and a nice change of pace from the (wonderful but completely overused) zucchini bread.  You can hardly taste the zucchini in them (and if you shred them finely, the visible evidence is all but obliterated) but can rest easy knowing they're loaded with lots of fiber.  

I didn't have enough zucchini so subbed some of the summer squash which worked out nicely.  This particular recipe was nice too because it used ZERO oil, butter, or other added fat AND used whole wheat flour.  The flavor of the cardamom was interesting and loved all the melty chocolate chips scattered within the brownie.  I have to admit though, that I prefer a dense, fudgey brownie and therefore the All Recipes version wins out for me...the frosting on that one also probably helped haha.

Yes, this was probably the most healthy brownie I've ever eaten but you would be none the wiser ;).  So go ahead and use that bumper crop or happily accept your neighbors extras and turn it into a chocolatey, cake-like, beautiful thing.

One Year Ago: Greek Salsa and Fussili a la Crazy Bastard

Zucchini Brownies


Ingredients
  • 2 eggs
  • 1 Tbsp vanilla extract
  • 1 c (200g) sugar
  • 1/4 tsp salt
  • 1/4 c (60 mL) applesauce
  • 1 c (150g) whole wheat flour
  • 1/4 c (45g) unsweetened cocoa powder
  • 1 1/2 tsp baking soda
  • 1 tsp cinnamon
  • 1/4 tsp ground cardamom
  • 2 c (~300 to 320g) grated zucchini
  • 1 1/2 c semi-sweet chocolate chips
  • Powdered sugar for dusting (optional)
Directions
  1. Preheat oven to 350F (175C).
  2. In a mixing bowl, combine eggs, vanilla, sugar, salt, and applesauce.
  3. Sieve the flour and cocoa powder into another bowl.  Add the baking soda, cinnamon, and cardamom.  Mix well.
  4. Add the wet mixture to the dry flour mixture and combine until well mixed.  Add the grated zucchini and chocolate chips.  Mix again.
  5. Pour the batter into a greased 8"x8" (20x20 cm) pan and bake for 30-40 minutes, or until a toothpick inserted into the center comes out somewhat clean (note: because there are chocolate chips in it, you may get some melted chocolate on your toothpick!).
  6. Allow to cool completely in the pan.  Dust with powdered sugar, if desired.
Source: Baltic Maid as seen on Delicious Melicious

Wednesday, August 15, 2012

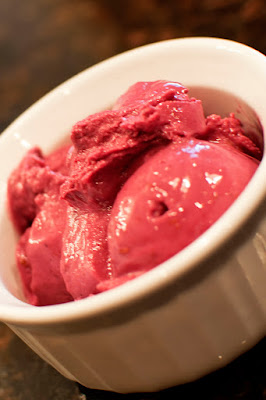
Black Raspberry Frozen Yogurt

And we're back with the desserts from Emily and my Seasonal Summer Fruit and Vegetable Extravaganza!  We made two desserts and I wasn't sure which to share first so I asked my friend Jackie.  She picked this one to share with you first.  

This healthy froyo was extremely simple and extremely DELICIOUS!!  It was my favorite recipe from the whole night.  The flavor is fresh, the texture was creamy (except for the seeds which I completely forgot to strain out...oops!), and the color was vibrantly spot-on to Graeter's Black Raspberry Chip Ice Cream which made it all the more visually appealing.  By the way, did I mention that if you make it with fat free yogurt (I love Fage 0% Greek Yogurt), that there's only about 2g of fat in the whole batch?  And that fat comes from the raspberries...who would have known that those contained fat??

To recap the Seasonal Summer Fruit and Veggies Extravaganza so far: Watermelon Slush, BLT Corn Salad Wraps, and Cherry BBQ Pulled Pork Grilled Pizza. Check back on Friday for the final dessert course and recap of our latest Extravaganza.  

Only a couple more days left to enter my Beer Flats giveaway so make sure to enter now.  Your chances of winning are pretty high!


Black Raspberry Frozen Yogurt

Black Raspberry Frozen Yogurt
Photo Credit: Emily H.
Yields: 1 quart

Ingredients
  • 2 cups Greek yogurt (whole milk preferred to help keep from freezing rock solid but we used fat free and ate it fresh - it was fine)
  • ¾ cups sugar
  • 2 cups fresh or frozen raspberries
  • 1 tsp. freshly squeezed lemon juice
  • 1-2 tbsp. vanilla extract
Directions
  1. Combine the yogurt, sugar, berries, and lemon juice in a blender or food processor.  Blend until smooth.  Press the mixture through a fine mesh sieve to remove the seeds.  Stir in the vanilla.
  2. Freeze the mixture in an ice cream maker according to the manufacturer’s instructions.
Source: As seen on and adpated by Annie's Eats from The Perfect Scoop by David Lebovitz

Wednesday, August 8, 2012

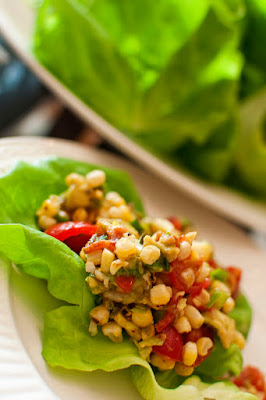
BLT Corn Salad Wrap

And so continues Emily and my Summer Seasonal Fruit and Veggies Extravaganza.  We followed our refreshing Watermelon Slush mocktails with another refreshing, barely cooked dish.  

Emily and I must have been on the same wavelength because this recipe was on both of our radars.  I like how we often think alike when it comes to food  :).  Summer tomatoes and corn are no brainers to include in this theme and having the boys give the corn some charred flavor on the grill keeps things cool in the kitchen.  Add avocado and bacon then serve it in a lettuce leaf and you have yourself a deliciously fresh finger food!

On Thursday you get a bonus post for the week- another product review+giveaway!  Then, on Friday you get the main course from Emily and my Summer Seasonal Fruit and Veggie Extravaganza before we finish off with two desserts next week.

Can't get enough lettuce wraps?  Try this Chorizo and Sweet Potato Lettuce Wrap or Asian Lettuce Wrap!


BLT Corn Salad Wrap

BLT Corn Salad Wrap
Photo Credit: Emily H.

Yields: 5 cups of corn mixture

Ingredients
  • 3 ears of corn, shucked of their husks and silk
  • 1 cup cherry tomatoes, sliced in half
  • 1/2 cup chopped green onions
  • 1 avocado, diced
  • 3 sliced crisp cooked bacon, diced
  • juice of 1 lime
  • about 1 tablespoon olive oil
  • salt and pepper to taste
  • a good sprinkling of chili powder and smokey paprika
  • butter lettuce or iceberg lettuce leaves
  • hot sauce and sour cream for topping
Directions
  1. Over a gas burner or grill, char raw shucked corn.  Rotate corn until cob is charred on all sides.  Allow corn to cool before slicing corn kernels from the cob.
  2. Add corn kernels to a medium bowl.  Add sliced cherry tomatoes, green onion, diced avocado, and diced bacon.  Squeeze in lime juice.  Add olive oil, salt, pepper, and slices.  Stir to combine.  Taste and adjust seasoning as needed.
  3. Rinse and clean individual lettuce leaves.  Serve alongside a bowl of corn salad.  To serve, scoop corn salad into lettuce leaves, top with hot sauce, sour cream, fold up like a taco and enjoy!
Source: Joy the Baker

Photobucket
This recipe was a Tasty Treasure at Fantastical Sharing of Recipes!

Wednesday, August 1, 2012

Creamed Corn

This. Is. Bliss.  And, there's not much more that screams "summer" to me than sweet corn.  I'm saddened by the corn crop shortage this year and thus higher-than-normal pricing but if you can manage to get some good corn this year, you should give this recipe a try.

I used to eat and love the type of creamed corn that was swimming in butter or *gasp* even the stuff that comes from a can.  It wasn't until I tried this recipe that I realized creamed corn could be so much more.  This recipe opened my eyes to how creamed corn should taste.  And it was worth risking the possibility of running into an icky worm in the tip of my organically grown CSA corn to access its freshness at its very peak.

The sweet corn flavor shines through and the cream and butter play supporting roles.  It's not thick with creamy texture but rather, a subtle creamy flavor.  Fresh basil kicks it up a notch to gourmet territory.  Even if you have an aversion for the canned stuff, you just might fall in love with this fresh, homemade version.

One Year Ago: Bob's Mexican Stuffed Chicken

Creamed Corn


Ingredients

  • 8 ears of corn, husked
  • 2 Tbs butter, divided
  • 1/2 cup finely chopped Vidalia onion
  • 3/4 cup heavy cream
  • 1 tsp sugar
  • 2 Tbs minced fresh chives
  • 1 Tbs minced fresh basil
  • kosher salt and freshly ground black pepper
Directions

  1. Cut the tip off of each cob of corn, and stand in a shallow bowl.  Use a knife to remove the kernels by slicing downward.
  2. Over another bowl, use the back of a spoon scrape the kernels clean of the pulp.
  3. In a large skillet, melt 1 tablespoon of the butter.  Add the onion and cook until just softened, 3-4 minutes.  Add the corn kernels, pulp, and 3/4 cup water.  Bring to a boil.  Reduce the heat, cover, and simmer until the corn is tender, 10 to 15 minutes.  Add the cream and sugar, and bring to a simmer.  Cook until the cream has thickened, 4 to 6 minutes.  Use an immersion blender to puree part of the corn - just pick 5-6 spots in the pan to puree.  Add the remaining tablespoon of butter, the chives, and the basil.  Season with salt and pepper to taste, and serve.

Source: Adapted by and as seen on Pink Parsley from Martha Stewart

Wednesday, July 25, 2012

Pasta with Grilled Plum Tomato Sauce

Who has fresh vine ripened tomatoes ready to be eaten?  Or, have lots of green tomatoes that are soon to be ripe?  My tomato plant is looking rather sad.  It got burned up by the 100+ degree heat wave that we had recently and despite my daily watering, the leaves are rather crisp.  But, I did get a few good tomatoes off of it and also am getting some lovely heirloom tomatoes from my Cedarmore CSA share.  And my oh my what lovely flavor these home and farm-grown tomatoes have when compared to their tasteless grocery store counterparts!

This recipe is very simple and relies on the grilling to add depth.  I'd only consider making this with farm fresh Summer tomatoes and the highest quality ingredients.  It's the simple pleasures in life that you have to come to appreciate :).

One Year Ago: Peanut Butter Banana Chocolate Chip Cookies
Three Years Ago: Honey Lime Grilled Chicken - to this day still one of my favorite grilled chicken recipes!


Pasta with Grilled Plum Tomato Sauce


Ingredients

  • 10 medium plum tomatoes (about 2 pounds)
  • 4 Tbs extra-virgin olive oil, divided
  • 2 cloves garlic, minced
  • Pinch red pepper flakes (add more to taste)
  • 1/4 cup minced fresh basil leaves
  • 1 Tbs minced fresh parsley
  • Salt and freshly ground black pepper, to taste
  • 1 pound pasta (I used Angel Hair)
  • Parmesan cheese, for serving
Directions
  1. Prepare grill. Lay the tomatoes on a large baking sheet and brush with 1 tablespoon of the oil.  Bring a large pot of water to a boil. Place the tomatoes on the grill and cook, turning once, until the flesh is streaked with dark grill marks and the skins are charred and blistered, about 8 minutes. 
  2. Transfer the tomatoes to a cutting board and cool them slightly. Peel and discard the tomato skins, and chop the tomatoes.  Transfer to a large bowl, and combine with the garlic and oil, basil leaves, parsley leaves, and salt and pepper to taste.
  3. Meanwhile, salt the boiling water and cook the pasta until al dente, and drain.
  4. In a small skillet, heat the remaining oil over medium heat, and add the garlic and red pepper flakes.  Cook until just fragrant and beginning to turn golden-brown, one to two minutes.  Remove from heat.
  5. Toss the pasta with the tomato sauce and mix well.  Divide evenly among serving plates, sprinkle with Parmesan, and serve immediately.
Source: Originally from The Complete Italian Vegetarian Cookbook, by Jack Bishop as seen on and adapted by Pink Parsley.

Wednesday, June 27, 2012

Summer Corn Fettuccine

Apparently this is one of those recipes that you either love or hate.  Chris found it to be very strange and I'll admit that at first, I wasn't really a fan either.  But, by the time I was reaching the end of my plate, I found myself yearning for more and wanting to lick the plate.

The contrast between the sweet corn and the salty bacon with accents of parmesan and fresh basil kind of blows your mind once you temper it into accept something other than the expected pasta sauces.  This must be why this particular recipe took the blogging world by storm and fueled a great debate.

Love it or not?  Leave your comments below!


One Year Ago: Herbed Potato Salad (Look ma!  No mayo so perfect for your 4th of July/Summer BBQ!)


Summer Corn Fettucine


Ingredients
  • 1 pound fettuccine
  • 6 slices bacon, chopped
  • 6 ears corn on the cob, shucked
  • 1 onion, finely chopped
  • 12-oz mushrooms, sliced 
  • Freshly ground black pepper
  • 1 cup half-and-half
  • 1/2 cup chicken stock
  • 2 tablespoons fresh thyme leaves, chopped
  • A few dashes of hot sauce
  • 1 cup grated parmesan cheese, divided
  • 1/2 cup sweet basil leaves, cut in a chiffonade
Directions
  1. Cook pasta according to package directions. Drain and set aside. 
  2. Meanwhile, heat a large skillet over medium-high heat. Add the bacon and cook for a few minutes until rendered and crisp. 
  3. Put a small bowl inverted into a large bowl, steady the corn cobs on the smaller bowl and cut the kernels off the ears. Add three-quarters of the scraped corn and any corn liquid to the pan with the bacon. Add the onions and mushrooms and liberally season with salt and pepper to taste. Cook until the vegetables are tender, 5 to 6 minutes.
  4. dd the remaining corn and half-and-half to a food processor or blender and puree until smooth. Pour the stock into the corn and vegetables and simmer over low heat for a minute to reduce. Stir in the thyme and corn-cream mixture and cook for 3 to 4 minutes, stirring frequently, to thicken. Add the hot sauce and season with salt and pepper to taste.
  5. Add the pasta to the sauce just before serving and toss with Parmesan cheese. Top with basil and serve.
Source: Originally from Cassie Craves and Evil Chef Mom as seen on and adapted by A Taste of Home Cooking

Monday, May 14, 2012

Creamed Chard and Spring Onion Pasta

Spring is here and this means lots of leafy greens!  Here's another one of those recipes that I made using my Cedarmore Farm CSA from last year but am just now getting around to sharing.  You can either make it as a sauce for pasta (per directions below) or as a side dish (see the original recipe at Smitten Kitchen).  It's very simple and perfect for busy days and/or meatless Mondays.

One Year Ago: Lemon Raspberry Layer Cake
Two Years Ago: Blonde Brownies


Creamed Chard and Spring Onions


Ingredients
  • 1/2 pound pasta, cooked
  • 1 1-pound bunch Swiss chard, thick stems removed and leaves sliced into ribbons
  • 3 spring onions, ends trimmed, white and some green parts sliced into thin coins
  • 3 tablespoons butter
  • 3 tablespoons all-purpose flour
  • 1 3/4 cups milk
  • 1/4 cup parmesan cheese
  • Salt and pepper, to taste
Directions
  1. Wash your chard, but no need to dry it, just place it in a large pot over high heat. Cook, covered, with just the water clinging to leaves, stirring occasionally, until wilted, about 6 minutes.
  2. Press or squeeze out the excess liquid any number of ways, either by wringing it out in cheesecloth (my favorite method), putting it in a mesh strainer and pressing the moisture out with a spatula or large spoon or letting it cool long enough to grab small handfuls and squeezing them to remove as much water as possible.
  3. Wipe out the large pot so you can use it again. Heat milk or cream in a small saucepan over moderate heat, stirring, until warm. Keep warm. Meanwhile, cook onion and garlic, if using, in butter in your wiped-out large pot over moderately low heat, stirring occasionally, until softened, about six minutes. Whisk in flour and cook roux, whisking, about three minutes. Add warm milk or cream in a slow stream, whisking constantly to prevent lumps, and simmer, whisking, until thickened, three to four minutes. Add parmesan cheese and stir until melted.  Stir in chard, then salt and pepper to taste and cook, stirring, until heated through.  Serve over hot pasta.
Source: Smitten Kitchen

Friday, May 11, 2012

Foil-Baked White Fish with Ginger Over Wilted Greens

It's springtime but this recipe was tried LAST FALL.  By the time I got around to posting it though, the veggies weren't in season so I decided to hold on to posting until this year.  Good thing these types of greens are prevalent in both ends of the growing season...enjoy!
-----------------------------------
I've been getting a crazy amount of greens from our farmshare lately.  Spicy greens, napa cabbage, lettuce, spinach, swiss chard, turnip greens.  Seriously.  You name it, I've probably gotten it in the past month.  Chris and I could only eat so many salads and honestly, I was starting to run out of foods to make with all these greens.  That was, until I saw this recipe in our CSA newsletter.

I'm a sucker for baked foil packet fish.  The last version that I made (Foil-Baked Fish with Black Beans and Corn) pretty much knocked my socks off.  This one was great too!  The foil packet preparation results in a moist fish that cooks in all the yummy juices that you add.  This recipe tasted just like my favorite Chinese Steamed Fish but simpler with its "one dish" preparation.

Do you have any other favorite foil-baked recipes?  I kind of feel like the possibilities are endless!


Foil-Baked White Fish with Ginger Over Wilted Greens


Ingredients

  • 6 cups baby spinach OR any mixed greens
  • 4 – 5 ounce white fish filets
  • 4 teaspoons minced fresh ginger
  • 2 teaspoons minced garlic
  • ½ cup Marsala wine or chicken broth
  • 8 teaspoons soy sauce
  • 2 teaspoon sesame oil
  • 1 lime quartered
  • 2 Tablespoons basil chiffonade
Directions

  1. Preheat oven 400 degrees.
  2. Tear off 4 sheets of foil or parchment paper that are 12 inches long. On individual squares: Place 1 ½ cups of greens in center of the square then on top of the greens add the fish. Sprinkle 1 teaspoon into each packet of ginger, garlic, soy sauce, ½ teaspoonful sesame oil.  Drizzle 2 Tablespoons of liquid or wine.  Bringing the two long sides of the square together, fold over the food.  Fold over three or more times.  Fold and crimp the remaining sides. Repeat until all 4 packets are made.
  3. Bake 10 minutes in hot oven.  Let sit 5 minutes before opening.  Squeeze lime juice and sprinkle basil into each packet and enjoy!
Source: Cedarmore Farm CSA Newsletter

Wednesday, November 9, 2011

Caramelized Onion Mashed Potatoes

Do not let this mundane looking photo fool you.  These are no ordinary mashed potatoes.  In fact, these mashed potatoes are SO FULL OF FLAVOR that they don't even need gravy.  Everybody (especially my now blog-famous friend Emily) knows that caramelized onions make any dish irresistible.  And that, my friends, is what sets this mashed potato recipe apart from any other.  Those craving more flavor can add a hit of garlic (roasted for more mellow flavor or raw for a bite) and parmesan cheese.

Caramelized Onion Mashed Potatoes


Yields: 4 Servings

Ingredients
  • 2 pounds potatoes, washed, peeled, cubed
  • 1 large onion, thinly sliced
  • 2/3 cup hot milk
  • 2 Tbsp parsley, finely minced
  • 3 Tbsp butter
  • Garlic (optional, roasted or raw)
  • Grated parmesan cheese (optional)
  • Salt and pepper, to taste
Directions
  1. Put prepared raw potatoes into a large pot and submerge in water.  Bring to a boil and cook until tender, about 20 to 25 minutes.  Drain and allow to steam dry.
  2. Meanwhile, in a large saute pan, heat butter until it begins to bubble.  Add sliced onions and season with a pinch of salt and pepper.  Reduce heat to low and cook for 20-30 minutes, stirring occasionally, until soft and browned.
  3. Transfer half of the onions and all of the milk to a blender and blend until smooth.
  4. Mash the potatoes and stir in the hot onion milk.  Add a little extra butter and check the seasoning.  Stir in the remaining caramelized onions and the minced parsley.  If desired add garlic and parmesan cheese for a boost of flavor.

Monday, November 7, 2011

Chicken and Roasted Root Vegetable Pot Pie

This was a fantastic change from the standard pot pie and captures the best Fall flavors in a spin off from a comforting classic.  It also used a ton of different root vegetables that I got from my CSA share big win! While there are quite a few steps and dirty dishes made in the process of creating this pie, the end result is worth it.  The roasted root vegetables lend an earthy but naturally sweet flavor to the dish while the chicken makes it familiar and adds protein to a dish my husband would otherwise not eat.

Oh and by the way, I made the pie crust for this so though I originally intended to share a dessert recipe for that one I think I can officially check that one off my 23 Things in 2011 list :).  Woo hoo!


Chicken and Roasted Root Vegetable Pot Pie


Yields: 8 Servings


Ingredients

For the filling
  • 2 split bone-in, skin-on chicken breasts
  • 2 tablespoons olive oil
  • 1/2 pound parsnips (approximately 2), peeled and sliced into 1/2-inch pieces
  • 3/4 pound turnips (approximately 2 medium), peeled and sliced into 1/2-inch cubes
  • 1/2 pound butternut or other winter squash, peeled, seeded, and cut into 1/2-inch cubes
  • 1/2 pound sweet potatoes, peeled and sliced into 1/2-inch cubes
  • 1/2 pound carrots, peeled, and - yes, you know it by now - cut into 1/2-inch cubes
  • one head of garlic, peeled down to the last layer of skin, leaving that last layer of skin intact, and the top 1/4-inch of the head removed to expose the tops of the cloves within
  • salt
  • pepper
  • 1 teaspoon thyme
For the gravy
  • 1/4 cup butter
  • 1/4 cup flour
  • 1/4 teaspoon black pepper
  • 1/4 teaspoon celery seed
  • 1/4 teaspoon dried oregano
  • 1/4 teaspoon dried parsley 
  • 1/2 teaspoon salt
  • 3 cups chicken broth (saved from boiled chicken breasts above)
For the crust (makes 3 9" round circles)
  • 3 cups all-purpose flour
  • 1 1/2 teaspoons salt
  • 1 teaspoon baking powder
  • 1/2 cup very cold vegetable shortening
  • 1 stick very cold unsalted butter
  • 1/2 to 3/4 cup ice water
  • 1 egg yolk
  • 1 tablespoon milk (any type)
Directions
  1. To make the chicken filling and broth: In a large stock pot, add chicken and enough water to cover.  Bring to a boil and then reduce to simmer for 30 minutes or until chicken is fully cooked.  Remove cooked chicken and place on a cutting board to cool.  Strain the broth using a fine mesh sieve and set aside for use in the gravy.  When chicken is cool enough to handle, cut into cubes or shred using fingers or forks.
  2. To make the vegetable filling: Preheat the oven to 375 degrees. In a large bowl, toss the parsnips, turnips, carrots, and butternut squash with the olive oil to coat. Transfer to a large baking sheet or roasting pan. Sprinkle the salt, pepper, and thyme over top. Wrap the head of garlic in aluminum foil, drizzle olive oil over the cut side, salt and pepper, and seal it in the foil. Roast the vegetables and garlic in the oven on the middle rack until vegetables are softened and beginning to brown on the edges, approximately 45 minutes.  While the vegetables roast, you can make the pie crust and gravy.
  3. To make the crust: In a food processor fitted with the metal blade, add the flour, salt, and baking powder. Then add the cubed very cold butter and cubed very cold vegetable shortening to the flour, and pulse until fats are pea-sized. With the motor running, add 1/2 cup of very cold water to the dough. If the dough does not come together completely, add very cold water, 1 tablespoon at a time, until it does. Turn the dough out onto a lightly floured surface and knead quickly and gently into a ball. Cover in plastic wrap and place in the refrigerator for 30 minutes.  Once chilled, on a lightly floured surface, roll out the dough to fit a 9" pie crust.  You should be able to make about 3 out of the dough ball.
  4. To make the gravy: Add butter to large saucepan and melt completely.  Then add flour and stir until combined.  Allow to cook for about a minute.  Whisk in the reserved chicken broth then all of the spices.  Continue to whisk until no lumps remain.
  5. To assemble and bake:  If you turned off the oven, pre-heat it back up to 375 degrees.  Put one pie crust round into the bottom of a pie plate.  Fill with the roasted vegetable and chicken filling (use as much or as little as you want...I probably used half of what I cooked).  Pour the gravy over the top.  Put the other pie crust round on top.  Seal the edges and cut decorative slashes into the top.  In a small bowl beat the egg yolk and milk together.  Brush it on top of the pie crust.  Bake on the middle rack for 40 minutes or until the top of the crust is golden brown.
Source: Inspired by Poor Girl Gourmet and My Recipes