Showing posts with label fish. Show all posts

Monday, July 2, 2012

Smoked Salmon Tea Sandwiches

These dainty little tea sandwiches were delightful at my friend Jackie's bridal shower and though very simple, would make the British Royals proud.

At first when I looked at the recipe I had to do a double take on the butter for a couple of reasons: 1) 1 teaspoon per slice of bread?? and 2) unsalted?  Well, after some thought, the reason for the latter was clear to me - smoked salmon is salty so you don't need any from the butter, too.  As for the entire teaspoon of butter on each bread slice...I just couldn't bring myself to do that.  When I researched the rationale, tea sandwiches are usually heavily buttered because it supposedly provides structure for the bread.  For the calories though, I was willing to take my chances and am happy to report that I was able to get away with using about 1/2 teaspoon per slice of bread.

If you're making a lot of sandwiches like I did (13 in total!), you will probably want to do it assembly line style buttering all the bread first, then moving on to the cream cheese, then finally the salmon and cutting.  After taking a couple sandwiches all the way through from start to finish I realized it was a mess and not so effective since handling the salmon made my hands pretty slimy.

I'm a little anal and actually weighed out my cream cheese and salmon as I put them on my bread slices (mostly because I didn't want to run out before I had made enough sandwiches because I bought just enough!).  If you're trying to stretch your dollar, you can get away with using less of both (about 0.8 oz cream cheese and 1.3 oz salmon seemed okay to me).  The end product will not suffer as there is plenty of flavor to go around.  Oh, and I couldn't resist but to add fresh cracked pepper and a few squeezes of lemon juice to brighten the flavor.

Three Years Ago: Peanut Butter Cookie Treats

Smoked Salmon Tea Sandwiches

Smoked Salmon Tea Sandwiches
Photo Credit: Emily H.
Ingredients:
  • 2 small slices bread (I used white and wheat sandwich breads for variety and less waste on cutting since the edges are straight instead of round on top)
  • 1 teaspoons unsalted butter, softened
  • 1 tablespoon minced fresh dill
  • 1 ounce low fat cream cheese, softened
  • 1.3-2 ounces smoked salmon
  • Lemon juice (optional)
  • Pepper (optional)

Directions:

  1. Spread one teaspoon of butter on one side of each slice of bread. 
  2. Mix the dill into the cream cheese. If desired, add a few squeezes of lemon juice and freshly ground pepper to taste.  Spread the cream cheese on the buttered sides of bread. 
  3. Layer the salmon on the cream cheese on one slice of bread, and cover with other bread slice. 
  4. Cut the crusts off the sandwich and then on the diagonals to create four triangles.
Source: Slightly modified from About.com

Friday, May 11, 2012

Foil-Baked White Fish with Ginger Over Wilted Greens

It's springtime but this recipe was tried LAST FALL.  By the time I got around to posting it though, the veggies weren't in season so I decided to hold on to posting until this year.  Good thing these types of greens are prevalent in both ends of the growing season...enjoy!
-----------------------------------
I've been getting a crazy amount of greens from our farmshare lately.  Spicy greens, napa cabbage, lettuce, spinach, swiss chard, turnip greens.  Seriously.  You name it, I've probably gotten it in the past month.  Chris and I could only eat so many salads and honestly, I was starting to run out of foods to make with all these greens.  That was, until I saw this recipe in our CSA newsletter.

I'm a sucker for baked foil packet fish.  The last version that I made (Foil-Baked Fish with Black Beans and Corn) pretty much knocked my socks off.  This one was great too!  The foil packet preparation results in a moist fish that cooks in all the yummy juices that you add.  This recipe tasted just like my favorite Chinese Steamed Fish but simpler with its "one dish" preparation.

Do you have any other favorite foil-baked recipes?  I kind of feel like the possibilities are endless!


Foil-Baked White Fish with Ginger Over Wilted Greens


Ingredients

  • 6 cups baby spinach OR any mixed greens
  • 4 – 5 ounce white fish filets
  • 4 teaspoons minced fresh ginger
  • 2 teaspoons minced garlic
  • ½ cup Marsala wine or chicken broth
  • 8 teaspoons soy sauce
  • 2 teaspoon sesame oil
  • 1 lime quartered
  • 2 Tablespoons basil chiffonade
Directions

  1. Preheat oven 400 degrees.
  2. Tear off 4 sheets of foil or parchment paper that are 12 inches long. On individual squares: Place 1 ½ cups of greens in center of the square then on top of the greens add the fish. Sprinkle 1 teaspoon into each packet of ginger, garlic, soy sauce, ½ teaspoonful sesame oil.  Drizzle 2 Tablespoons of liquid or wine.  Bringing the two long sides of the square together, fold over the food.  Fold over three or more times.  Fold and crimp the remaining sides. Repeat until all 4 packets are made.
  3. Bake 10 minutes in hot oven.  Let sit 5 minutes before opening.  Squeeze lime juice and sprinkle basil into each packet and enjoy!
Source: Cedarmore Farm CSA Newsletter

Monday, September 19, 2011

Foil-Baked Fish with Black Beans and Corn

This past Friday night I was in a pinch for a quick meal and so I went scavenging my freezer to see what I could find.  This is when I came across these fish foil packets and my mouth immediately began watering.

The first time I made these they were SO GOOD.  And, since the recipe made 4 packets, I figured I'd freeze the other 2 for later.  Trust me, you want all of those packets of goodness since it freezes well and tastes great.  The texture didn't get all weird and the flavor was not at all subdued by the freezing process.  When I put the fish in my mouth the second time, it was just as wonderful as I remembered.

Spicy and zesty from the orange-chipotle compound butter, this fish is just bursting with flavor and is very moist.  The fact that it's contained in a foil packet makes clean-up a breeze.  It just may be one of my favorite fish preparations.  If you can't handle heat, I'd use fewer chipotle peppers.  Chris and I love spicy foods and even this was bordering too hot for us!

Don't forget to freeze some extra packets to grow your freezer stock!

One Year Ago: Pineapple Teriyaki Chicken
Two Years Ago: Slow Cooker Pulled Pork (or make it with chicken) - This is a staple for dinners and potlucks alike for me.  It's gobbled up in full every time.  I even made it on our recent vacation to Orlando.  Yes, I brought my crockpot with me on vacation.  Don't judge.

Foil-Baked Fish with Black Beans and Corn


Foil Baked Fish with Black Beans and Corn

Ingredients
  • 4 skinless white fish fillets (6 to 8 oz each), 1-inch thick
  • salt and pepper
  • 4 Tbs unsalted butter, softened
  • 2 tsp minced chipotle chiles in adobo sauce
  • 1 tsp grated orange zest
  • 2 Tbs freshly squeezed orange juice
  • 2 cloves garlic, minced
  • 1 (16-oz) can black beans, rinsed and drained
  • 2 cups corn kernels
  • 1/2 red onion, minced
  • 2 scallions, minced
  • 1/4 cup chopped fresh cilantro
Directions
  1. Adjust the oven rack to the lower-middle position and heat to 450 degrees.
  2. Pat the fish dry with paper towels and season with salt and pepper.  Using a fork, mix together the butter, 1 teaspoon chipotle, orange zest, half the garlic, 1/2 tsp salt, and 1/4 tsp pepper in a medium bowl until well-combined.  Spread butter mixture over the fish.
  3. Combine the beans, corn, onion, scallions, 2 tablespoons of cilantro, orange juice, remaining chipotle, remaining garlic, scallions, 1/2 teaspoon salt, and 1/4 teaspoon pepper in a bowl.
  4. Lay four 14-inch lengths of foil on the counter and divide the bean mixture evenly over the lower half of each piece of foil.  Top with fish, and fold the foil over the fish, folding the edges to seal.
  5. Arrange the packets in a single layer on a rimmed baking sheet and bake until the fish is just cooked through, 15 to 20 minutes*.  Carefully open the packets and sprinkle with remaining cilantro.  Serve.
Make ahead notes: If you are freezing the packets, follow all the steps through #4.  When you're ready to eat them, either thaw in the fridge overnight then cook as directed above or take the packets straight from the freezer and cook about 45 minutes or until fish is opaque and flakes with a fork.  

Source: America's Test Kitchen, The Best Simple Recipes as seen on Pink Parsley

Monday, August 29, 2011

Grilled Maple-Chili Salmon

This was my play on words for our most recent Dinner Club.  We grilled our salmon up on cedar planks so called it Cedar PLANKed Salmon to go along with the pirate theme.  It was Chris and my first time using cedar planks so we're just glad it didn't catch fire on the the grill :D.  I LOVED the way that this dish turned out.  The flavor was fantastic and I will for sure be making this again.

We bought a gigantic 2.7 pound wild salmon filet from Costco and the maple syrup that I used came from one of our new Dinner Club members, Delia.  She hails from the border of NY and VT so gets some of the best maple syrup.  Scott was skeptical when he saw me drizzling it on as the finishing touch.  I could see it in his eyes lol.  But I think it's safe to say he's converted.  The sweet, smokey, and savory is a wonderful combination.  A total hit!  And if you don't have a cedar plank, no worries, you can do without it and Shawnda from Confections of a Foodie Bride says she and her husband actually prefer it that way.

See the rest of our Pirate themed menu at our Dinner Club blog.  Since we've renewed the club by saying goodbye to two couples due to relocation and welcomed two new ones, we're going to try to make an effort to do a better job of updating the blog :).

Grilled Maple-Chili Salmon


Yields: 3-4 servings

Grilled Maple-Chili Salmon

Ingredients
  • 1 lb salmon, cut into 3-4 fillets
  • 1 tsp chili powder
  • 1/2 tsp paprika
  • 1/2 tsp cumin
  • 1/8 tsp garlic powder
  • 1/8 tsp cinnamon
  • 1/4 tsp salt
  • Fresh ground black pepper
  • 1 Tbsp creole mustard (or any spicy brown mustard)
  • 1 Tbsp olive oil
  • 3-4 tsp maple syrup
Directions

  1. If using, soak the cedar plank per the manufacturer instructions.
  2. Stir together the dry ingredients and then stir in the olive oil and mustard.
  3. Spread the rub over the top and sides of the fillets and let sit while the grill heats.
  4. Preheat grill to medium-high.  Place fish on the soaked plank and cook for ~15 minutes, until the fish flakes and the internal temperature reaches 140.  If not using the plank, place skin side down and cook 8-10 minutes.
  5. Remove from heat and immediately drizzle each fillet with ~1 tsp of maple syrup.
Source: Confections of a Foodie Bride

Friday, August 19, 2011

Fish Tacos with Lime-Cilantro Crema

Tomorrow, I'm going to check something off of my bucket list.  I'm going whitewater rafting!!  I'm incredibly excited for this trip and glad I was finally able to make it on my friend Vanessa's annual trip.  There are 18 of us going to a huge 9BR/9BA cabin and then 16 going rafting.  We'll be spending a full day going down the Lower New River (dubbed the Grand Canyon of the East) which is Class I - V.  I have ZERO experience and was told that even though some of these rapids are almost the most challenging class possible, this run is suitable for beginners.  Pray that I come back intact in one piece and don't end up swimming with the fishies too much!

That brings me to my recipe for today.  Fish!  I previously posted a recipe for fish tacos and they're both quite nice.  What makes this recipe stand out is the Lime-Cilantro Crema.  Don't skip that.  The contrasting cool and fresh flavor is outstanding!  I was also excited to use my cabbage and tomatoes to top these tacos.

PS:  I just realized 3 recipes I've posted this month have cilantro in them.  Clearly I'm on a cilantro kick.  I just LOVE the unique flavor!  For those that aren't fans, you can leave it out.  And, just for you, I promise my next post won't have cilantro in it :).


Fish Tacos with Lime-Cilantro Crema
Printer-Friendly Version


Yield: 4 servings (2 tacos each).

Ingredients

For the Crema
  • 1/4 cup (about 3) green onions, thinly sliced
  • 1/4 cup fresh cilantro, chopped
  • 3 Tbsp low-fat mayonnaise (I used unflavored Greek yogurt)
  • 3 Tbsp reduced-fat sour cream
  • 1 tsp lime rind, grated
  • 1 1/2 tsp fresh lime juice
  • pinch of salt
  • 1 garlic clove, minced
For the Tacos
  • 1 tsp ground cumin
  • 1 tsp ground coriander
  • 1/2 tsp smoked paprika
  • 1/4 tsp ground red pepper
  • 1/8 tsp salt
  • 1/8 tsp garlic powder
  • 1 1/2 lbs mahi mahi fillets (I used tilapia)
  • Cooking spray
  • 8 (6-inch) corn tortillas
  • 2 cups cabbage, shredded
Directions
  1. Preheat oven to 425 F.
  2. To prepare crema, combine the first 8 ingredients in a small bowl; set aside.
  3. To prepare tacos, combine cumin and next 5 ingredients (through garlic powder) in a small bowl; sprinkle spice mixture evenly over both sides of fish. Place fish on a baking sheet coated with cooking spray. Bake at 425 for 13-15 minutes or until fish flakes easily. Break fish into pieces with a fork. Heat tortillas according to package directions. Divide fish evenly among tortillas; top each with 1/4 cup cabbage and 1 tablespoon crema.
Source: Cooking Light, December 2006 as adapted by and seen on Prevention RD

Nutrition Information (per serving): 323 calories; 7 g. fat; 124 mg. cholesterol; 401 mg. sodium; 28.5 g. carbohydrate; 3.3 g. fiber; 35.5 g. protein

Tuesday, April 12, 2011

Chinese Steamed Fish

Well, based on my Google Analytics for the month, fish is pretty much the new black.  Or, it could just be Lent.  So, as Easter is coming up and you're rounding up the last of your Lenten specialties or you just want to try to eat healthier, I encourage to give this a try.

Asian-style steamed fish is one of my favorite things to order at Chinese restaurants.  I made this along with several other Chinese goodies as part of my Chinese New Year celebration.  Fish, or "yu", is symbolic of richness and abundance.  If you eat the fish for Chinese New Year, you will be prosperous.  And, the saying goes that you should leave a little bit on your plate to save for later...so that you have prosperity in the future, too!  I don't know about all the traditional/superstitious mumbo jumbo but prosperity sounds good to me :).

If you're going all out, you'd buy a very fresh piece of intact fish - skin, bones, and *gasp*...head!  In Chinese culture, it's the head (with the fish's clear glassy eyes) that lets you know that it's really fresh.  Heck, you might have even selected it from the tank yourself!  Since I live in Cincinnati and am personally a bit squeamish, I went with filets and it still tasted just like the restaurants to me.  And, less work because you don't have to pick out tiny bones or (if you're like me), discard the skin while you're eating it.  My mom eats the skin though.  And the meat in the head.  She'll fight you for it because she claims the cheek meat is the sweetest.  Don't worry Mom, it's all yours!

This preparation of fish is relatively healthy since it is steamed.  There is a moderate amount of oil used in the "sauce" but you can either reduce the amount used or just not spoon as much of the "sauce" on top of your fish serving when you go to eat it.  The flavor really comes from the ginger and scallions that flavor the oil in addition to the soy sauce.  Yum!

One Year Ago: Slow Cooker Carnitas
Two Years Ago: Cake Balls (Truffles)

Chinese Steamed Fish
Printer-Friendly Version


Ingredients
  • 1 pound whole fish (or fillets 1″ or thicker) yields the best results
(A)
  • 4 stalks, scallions – cut into 3″ lengths
  • 3″ piece of ginger – slice into “coins”
  • small bunch of cilantro
  • 1 1/2 tablespoons Shaoxing wine to pour on fish prior to steaming (or any cooking wine like dry sherry)
  • salt and pepper
(B)
  • 2 tablespoons rough chopped cilantro
  • 1 teaspoon sesame oil
  • 2 tablespoons soy sauce
  • 1/2 teaspoon sugar
  • 1/4 teaspoon salt + 1/4 teaspoon white pepper (or black pepper if you don’t have white)
  • fresh chilli – thinly sliced (optional)
(C)
  • 2 stalks, scallions – cut into 3″ lengths
  • 2″ piece of ginger – finely julienned to the skinniest, thinnest strips you can possibly manage without a microscope
  • 2 tablespoons cooking oil
Equipment: shallow pan to hold fish and large pot or wok for steaming. If you don’t have a fancy steamer or steamer insert, take a shallow-ish bowl and invert to use as a stand. Or…3 shot glasses inverted.

Directions
  1. Clean and Stuff: Clean your fish, pat dry. Season generously inside and out with salt and pepper. Take half of (A) and stuff inside the fish. If you are using fillets, skip this.
  2. Make your bed: Take the other half of (A) and lay it in a shallow pan. If using fillets, just use all of (A) for the bed. Lay the fish on top of the bed. If fish is too long, cut in half. Pour 1 1/2 tablespoons Shaoxing wine on top of the fish. 
  3. Steam: Add 2″ of water to your large pot, cover and boil. When it is boiling, uncover and wipe the inside of the cover clean of any condensation (all this condensation will drip back down on your fish, diluting the flavor) Put your fish pan inside, propped up with a small inverted bowl. Steam the fish on medium (see below for cooking times).
  • Whole fish 1 lb: check at 12 minutes, add 2 minutes for every 1/2 lb
  • Fillets 1″ and thicker: check at 10 minutes, add 2 minutes for every 1/2″ more thickness
  • Fillets less than 1″: check at 7 minutes
  • Super thin fillets: check at 5 minutes
    1. Check to see if its done at the times indicated.  Poke your chopstick at the flesh near the top fin. If flesh flakes easily near the top fin, then its done. If flesh sticks together still, then add 1-2 more minutes to cooking time. For fillets, just gently poke at the flesh in the middle. Timing really depends on the thickness of your fish.  Also check to make sure you haven’t run out of steaming water.
    2. Aromatics: Towards the end of the steaming process, you’ll want to start preparing the aromatics that garnish the finished dish. Take a microwave-safe bowl, add (B) and microwave for 30 seconds. Set aside. When fish is done steaming, carefully lift the fish out onto a serving platter, discarding all of the cooked cilantro/ginger/scallions and the fish juice in the pan. Pour the hot (B) over fish.
    3. Now we’ll work with (C): In a separate pan or wok, heat up cooking oil until you see smoke. Add the ginger and scallions, fry for 10 seconds to “pop” the flavors. Pour this cooking oil + herbs over the fish. You’ll hear a very satisfying sizzle!
    Source: Steamy Kitchen

    Sunday, April 3, 2011

    Fish Tacos

    One fish, two fish.  Red fish, blue fish.  Okay...I'm no Dr. Seuss and this is actually a white fish.  A little white fish that has taken the food blogging world by storm.  Why it's taken me so long to try I do not know.

    It's light and fresh.  Perfect for the weather as it begins heating up and/or if you're needing some easy family-pleasing seafood recipes for lent.  I feel like most Americans really only know one kind of fish.  Fish sticks fried to a golden crisp and served with a big side of tarter sauce for dipping.  Or, maybe you're like Cincinnati and have a bazillion Fish Frys on Fridays during lent.  No shame in that.  I'll admit I kind of like fish sticks and even McD's Filet-O-Fish...but...the friedness and tarter sauce, though yummy, are not so healthy.  Good thing I only eat them once in a blue moon.
    This recipe will expand your fish horizons and it's healthy enough to eat without shame.  It's not fried and there is no tartar sauce (*gasp*).  Speaking of, I personally I am in love with the sauce in this recipe.  But then again, I'm a cilantro lover.  Yum!  The flavor reminds me of the uber delicious fish tacos that I got at Maui Taco when I was in Hawaii last year.  Ahhh...Hawaii.  Let's leave this post with that thought in mind.  *cue ukulele*

    One Year Ago: Berry Buttermilk Cake.  Wow I'm glad this popped back up because I just so happen to have some leftover buttermilk to use AND last year when I discovered this recipe I made it twice in a single week.  Yep, it's that good!

    And hey, did you remember to enter my 2nd Blogiversary Givaway yet?  If the drawing were today you'd have about a 1 in 30 chance of winning your very own AUTOGRAPHED Pioneer Woman Cooks cookbook!  I'd say those are some pretty good odds :).  But don't drag your heels too long.  Contest ends at 11:59PM this Friday!
    Fish Tacos


    Ingredients

    For the fish

    • 2 Tbsp. freshly squeezed lime juice
    • 3 Tbsp. extra virgin olive oil, divided
    • 3 Tbsp. minced cilantro
    • 1/4 tsp. cumin
    • 2 cloves garlic, minced
    • 1 lb. white fish (halibut, cod, tilapia, etc.)
    • Salt
    For the cilantro cream sauce
    • Juice of 1/2 lime
    • 1 Tbsp. cilantro, minced
    • 1/3 cup nonfat greek yogurt
    • 1 clove garlic, minced
    • Pepper, to taste
    For serving
    • Cherry tomatoes, quartered
    • Green onions, chopped
    • Red cabbage, shredded
    • avocado slices
    • 6-inch flour tortillas
    Directions
    1. Combine the lime juice, 2 tablespoons of the olive oil, cilantro, cumin, and garlic in a shallow dish.  Whisk together until well blended.  Place the fish in the mixture, turning to coat.  Let marinate 15-30 minutes.
    2. Meanwhile, prepare the cilantro cream sauce.  Combine the lime juice, cilantro, greek yogurt, garlic and pepper in a small bowl.  Mix until well blended.  Refrigerate until ready to use.
    3. Heat the remaining 1 tablespoon olive oil in a large skillet over medium-high heat until shimmering.
    4. Place the fish in the pan and cook without disturbing for about 3 minutes.  Flip the fish and cook on the second side 2-3 minutes more.  (Cook until fish reaches 130 degrees)
    5. Remove to a plate and season with salt and let rest for a few minutes.  Shred the fish into bite-sized pieces with two forks.
    6. Assemble tacos on flour tortillas with shredded fish, cilantro cream sauce and toppings as desired.
    Source: As seen on Christine's Cuisine, Annie's Eats, and it all began with The Way the Cookie Crumbles

    Tuesday, February 23, 2010

    Red Lobster's Parmesan Crusted Tilapia

    This recipe comes straight from the Red Lobster's website.  I actually wanted to make their Fish in a Bag because that's my favorite meal there but ended up feeling that was too complex for a week night.  It was extremely simple to put together and a perfect dinner during Lent.  It's so good and easy it's worth considering adding this to your regular meal rotation because we all know we should add more lean protein like fish to our diets :).  I intended to also try the Red Lobster Copycat Cheese Biscuit Recipe from Jes' blog but got too lazy that night.  Maybe next time...

    I halved the recipe for the two of us but will leave the original recipe for 4 intact. I ended up using those individually wrapped tilapia filets that you can get at like Kroger and then brushed each with a thick coat of alfredo and then sprinkled some bread crumbs, parmesan, and parsley on top instead of pre-mixing them in a bowl.  I figured it would taste the same and was much easier :).  The bread crumbs give it a nice crunch to an otherwise tender and flaky fish but without the whole frying thing (which, I think we established in the Pretzel Chicken Tenders post I just prefer to avoid...).  Sadly, I didn't have any panko on hand and settled for the regular italian seasoned bread crumbs that I had.  I know it would have been a million times better with panko.

    I chose to use my Quick and Easy Alfredo Sauce (leftover from when I made Pasta Bravo) as the sauce for the fish and pasta for simplicity but you can always use the recipe supplied here.  Again, multiple sauce use makes life easier!

    Need more ideas for Lent?  There are many meals on my blog with which you can subsitute meat choices (ex: Chicken Lo Mein or Fried Rice but with shrimp instead of other meats).  I also found there to be plenty of delicious looking recipes on Red Lobster's Recipe Files (amazing that they can share so many of what you'd think are top secret recipes!). 

    You can also try one of these seafood recipes from my blog:
    Parmesan Crusted Tilapia
    Printer-Friendly Version


    Yields: 4 Servings

    Ingredients:
    • 4 ea 5-6 oz Tilapia Fillets
    • Non-stick Cooking Spray
    • ½ lb. Linguini, cooked
    For the Parmesan Crust:
    • ½ cup Panko Bread Crumbs
    • ½ cup Parmesan Cheese, pre-shredded
    For the Parmesan Base:
    • ½ cup Parmesan Cheese, pre-shredded
    • 1 Tbsp. Parsley, dried
    • 10 oz Prepared Refrigerated Alfredo Sauce
    For the Parmesan Cream Sauce: (used Quick and Easy Alfredo, instead)
    • 1.2 Tbsp. Fresh Basil, Chopped
    • 2.¼ cup Chablis or Chardonnay Wine, optional
    • 3.¼ cup Half and Half
    Directions
    1. Preheat oven to 425 degrees.
    2. Spray a 9X13 baking dish with Non-stick Cooking Spray. Place the 4 Tilapia fillets in the dish and set aside.
    3. In a small bowl, mix the Panko bread crumbs and ½ cup Parmesan cheese to make the crust for the topping. Set aside.
    4. To assemble the Parmesan Base, place ½ cup Parmesan cheese, 1 Tbsp. parsley and the prepared Alfredo sauce in a medium bowl and stir well. Remove ½ cup of the mixture (reserving the rest to make the Parmesan Cream Sauce) and brush onto the 4 pieces of Tilapia, making a thick, even covering on the fish. Evenly sprinkle the Parmesan Crust on top of the fish. Bake on the top shelf of the oven for 15-20 minutes or until fish reaches 140-150 degrees and the crust is golden brown.
    5. Meanwhile while the fish is baking, make the Parmesan Cream sauce if desired for using on pasta. Place the remaining Parmesan Base in a medium sauce pan, add the fresh Basil, Wine, and Half and Half and heat over medium heat until the sauce is simmering, stirring often.
    6. Toss the Parmesan Cream Sauce (or other prepared alfredo sauce) and the Linguini together and serve with the Parmesan Crusted Tilapia. Sprinkle with additional Parmesan cheese if desired.
    Source: Red Lobster

    Sunday, January 17, 2010

    Sushi

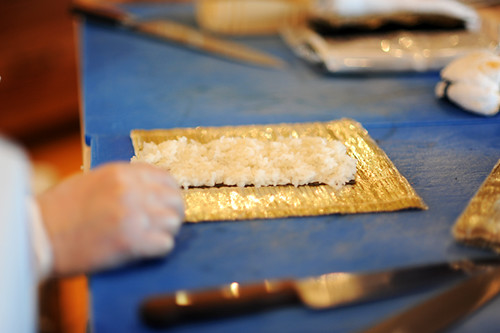
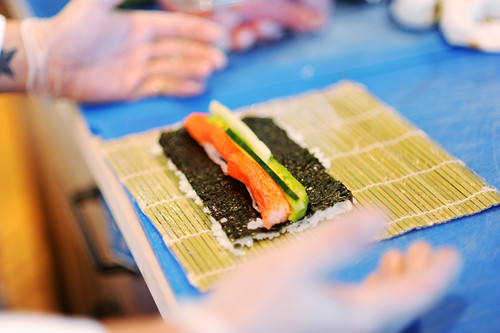
    Below are the basic ingredients for sushi.  You can then buy fillings of your choice to make various delicious rolls.  This was my first attempt at making rolls so they're not the prettiest but they held together for the most part and were very tasty :).

    As I wasn't sure how adventures our group of Dinner Clubbers would be, I opted for all cooked (and inside out so you can't see the nori (seaweed) - out of sight, out of mind right?) maki rolls.  For my rolls, I made the standard California Roll and then did some Spicy Crab Rolls and just a few Shrimp Rolls.  If you do decide to go raw,  make sure you're buying sushi grade fish!

    I highly suggest Sushi Day for inspiration and recipes...there's even some rolls with BACON! (Bacon Crunchy Shrimp Roll and Kristen Maki). 

    Pioneer Woman has an awesome tutorial with really good pictures (very helpful if you're a visual person like I am!) on how to create your rolls.  There's also a few good recipes on there as well.


    Mmmm...good thing Emily took pictures of my rolls because I forgot to!

    Sushi Rice
    Printer-Friendly Version


    Prep Time: 30 minutes
    Cook Time: 20 minutes
    Yields: 8 cups cooked rice or about 16 rolls

    Ingredients
    • 4 cups Short Grain/sushi Rice, uncooked
    • 1 cup Rice Wine Vinegar
    • ½ cups Sugar
    • ¼ cups Sake Or Mirin (a Japanese Rice Wine)
    Note: Used seasoned rice wine vinegar instead of sushi su (vinegar + sugar + sake).

    Instructions

    “Rice Prep”
    1. Use short or medium-grain rice. It’s more starchy and round than the long-grain variety, which just won’t hold together well enough to support ingredients in sushi. Many stores now sell specifically-labeled “sushi rice”.
    2. Before you cook it, wash/rinse the rice until the water runs totally clear—about five or six times. If you don’t thoroughly rinse the rice, it’ll end up in a big, sticky ball. There’s enough internal starch in the rice for it to sufficiently hold together for sushi, so get all the stuff on the outside off by rinsing well.
    3. Use a rice cooker/steamer. Rice made on the stovetop will not work for sushi; it won’t be the right consistency. Rice cookers are widely available for as low as $12.
    4. Add the rinsed rice to the rice cooker with equal parts water, and follow the directions for the rice cooker. After it’s done, transfer the cooked rice to a large mixing bowl.
    You’ll need 1 part sushi su for every 4 parts rice.

    Sushi Su/Sushi Rice:
    1. Heat vinegar, sugar, and sake or mirin in a saucepan just to dissolve and combine. Allow to cool to room temperature. (Note: skipped this step as I just subbed pre-made seasoned rice wine vinegar)
    2. Cook rice according to rice cooker directions. Transfer to large mixing bowl.
    3. Pour su (vinegar mixture) over the rice, gently folding to incorporate.
    4. Let rice stand for 10 minutes, then fold again.
    Rice should be shiny, not mushy and have a slightly tart/sweet taste. Cover with a warm, wet towel and keep warm.

    Source: Cody the Sushi Chef as seen on Pioneer Woman

    Spicy Mayonnaise
    Printer-Friendly Version


    Ingredients
    • ½ cup (low-fat) mayonnaise
    • 2 Tbsp Sriracha hot sauce
    • ¼ tsp roasted sesame oil
    Directions
    1. Whisk the ingredients together until well blended.
    2. Store in fridge until ready to use.  Use in rolls or as a dipping/drizzled sauce.
     Source: Group Recipes
    California Rolls
    Printer-Friendly Version


    Ingredients and Supplies
    • 1 piece Makisu (bamboo Rolling Mat)
    • Dark Green Nori (dried Seaweed)
    • Sushi Rice (recipe above)
    • Imitation Crab (round leg style)
    • Avocado, Thinly Sliced
    • Cucumber (Japanese, If Available), Thinly Sliced
    • Toasted Sesame Seeds
    • Soy sauce, for dipping
    • Wasabi, if desired (used prepared Wasabi in a tube that I bought at Kroger)
    • Ginger, if desired
    Instructions

    1. First, in order to keep your rice from sticking to the Makisu and making a terrible mess, carefully wrap the Makisu in plastic cling wrap.
    2. To begin, fold the pieces of nori in half to split them. Nori is very delicate, so as soon as you press along the seam, it easily breaks in two. Next, lay the half-sheets of nori on the work surface and grab a handful (about a ½ cup) of sushi rice and cover one side of a half-sheet of nori with it. To do so, first set the rice on the end of the nori sheet closest to you. Then, working with your fingertips and/or knuckles, gently spread the rice over the surface of the nori.
    3. On California Rolls, the rice is typically on the outside – not the inside – so to begin, quickly flip the rice-coated sheet of nori so that the rice side is down. Carefully position it horizontally so it will roll lengthwise. Next, place a single row of the crab across the middle of the nori. Next, place slices of avocado end to end right against the crab. It’s best to use an avocado that’s ripe but still quite firm. Lastly, lay the very thin (slightly thicker than a matchstick) cucumber slices end-to-end right alongside the crab and avocado.
    4. To roll the sushi, carefully lift the edge of the mat closest to you, begin rolling the mat away from you, pressing it lightly to keep it firm. At this point, the end of the roll has been rolled upward, and your very light pressure is ensuring that they roll will remain nice and tight. Next, lift up the end of the rolling mat and pull it away from you, allowing the roll to roll the rest of the mat. Then carefully remove the roll from the mat and place it on a cutting board. Lay the mat over the top of the roll and exert gentle pressure once more to make sure it’s all secure.
    5. Next, hold the roll on the mat and sprinkle the top with toasted sesame seeds. Slice using a very sharp knife, first running the knife through a damp dishtowel with the blade facing away from you. Begin by slicing the roll exactly in half. Then set the two halves side-by-side to slice into individual pieces. This ensures that each piece will be a uniform size.
    6. Wrap in plastic cling and store in refrigerator until ready to serve.  Serve with soy sauce, wasabi, and pickled ginger, if desired.
    Source: Pioneer Woman

    For the Spicy Crab Rolls I just shredded some imitation crab and then mixed with the spicy mayonnaise.  Added some avocado and cucumber.  For the Shrimp Rolls I used cocktail shrimp (cut in half lengthwise), a dab of spicy mayo, carrots, and avocado.

    Sunday, January 10, 2010

    Herb Breaded Tilapia

    For whatever reason I had a craving for fish and I remembered I had this recipe bookmarked for awhile now.  This recipe was nice as it was designed for 2 people (I almost always have to either scale things down or save lefteovers).  I was hesitant because the fish is pan fried and I never use more than say a Tablspoon of oil when I fry things.  This one called for a pan full of oil!  I went with it anyway and I'm glad I did because the end result was a crunchy crust with a beautifully flaky fish beneath.  Chris said it tasted like fish sticks...silly boy.  It's much more gourmet than that!  Worthy of sharing with company.

    I forgot to get a picture this time so please enjoy Elly's for now.

    Herb Breaded Tilapia
    Printer-Friendly Version


    Ingredients
    • 2 tilapia fillets
    • 2 Tbsp. flour
    • 1 egg
    • 1 lemon, divided
    • 1/3 cup bread crumbs
    • 2 Tbsp, fresh chopped parsley
    • 2 tsp. fresh chopped thyme
    • 1/4 tsp. garlic powder
    Directions
    1. Season the tilapia with salt and pepper and then dredge in the flour, shaking off any excess.
    2. Lightly beat an egg in a small baking dish or bowl and mix in the juice of half the lemon. In another dish, combine the breadcrumbs, parsley, thyme, garlic powder, and salt and pepper to taste.
    3. Dip the floured tilapia first in the egg, and then into the breadcrumb mixture, coating evenly and pressing to adhere if necessary.
    4. Heat a nonstick skillet over medium heat, and add enough oil to coat the bottom of the pan. Once hot (if you flick a little piece of the breadcrumb mixture in there and it bubbles/sizzles, you’re good to go), add the tilapia. Cook for approximately 3 minutes per side, or until fish is cooked through and flakes with a fork.
    5. Cut the remaining half lemon into wedges and serve alongside the tilapia.
    Source: Elly Says Opa!