Showing posts with label freezer friendly. Show all posts

Thursday, August 8, 2013

Copycat McDonald's Sausage Egg McMuffins

Is anyone else a fan of breakfast?  How about Sausage Egg McMuffins from McDonald's?  I hardly ever eat at McDonald's but I LOVE their Sausage Egg McMuffins.  If I'm feeling really good, I'll even splurge on some hashbrowns.

When it came time to round-out my freezer stash with some breakfasts, I knew I wanted to try to make my own version at home.  What is about to follow is a copycat recipe but honestly, it's such an easy thing to make that I use the term "recipe" loosely.  If you want, you could also leave out the sausage or substitute Canadian bacon or regular bacon.

The hardest part was figuring out how to make a round egg "patty" like they do...because I'm anal and like everything to be round and match.  For that, I used what I had on hand and that was canning bands.  They were slightly smaller than the English muffins but close enough.  I experimented a bit on whether it was better to put them with the thread-side up or down.  In the end, threads up seemed to work better in terms of getting a better spray and containing the eggs (the picture below is from one of my earlier runs but I got better at avoiding spillage over time!).  If you greased your rings well, the eggs should fall out pretty easily but some of them required a little more oomph.  I just separated the crusty parts that stuck to the rings then pushed them out gently with my fingers.

These are totally yummy and I am so grateful to have about 2 1/2 dozen of them stashed away in the freezer. Having a good (and fast, one-handed) breakfast is the key to starting your day off right!

One Years Ago: BLT Corn Salad Wrap
Two Years Ago: Jerk Chicken with Mango Cilantro Relish

Copycat McDonald's Sausage Egg McMuffins


Copycat McDonald's Sausage Egg McMuffins

Ingredients
  • 12 English muffins
  • 12 slices American cheese
  • 12 fully cooked frozen sausage patties
  • 12 large eggs
  • Salt and pepper
Directions
  1. Place canning bands with thread side up into a skillet over medium-high heat (or if you have them or want to buy something fancy you can use something like these egg ring rounds).  Spray pan and inside of bands generously with cooking spray.

  2. Crack an egg into each band and sprinkle each with salt and pepper.  Use a knife to gently break each yolk so that it spreads out.  Don't worry if the egg spills out of the rings, if you're a perfectionist, you can peel or cut them off later.  Cover and cook through.  When eggs are done, remove the egg-filled ring using tongs and gently push the eggs out of the rings.  Set aside for assembly.

  3. Meanwhile, split your English muffin and place a slice of cheese on the top of each muffin half.  If desired, fold over each cheese corner so that it is the same size as the muffin.  Place a frozen sausage patty on the bottom of each muffin then top with a cooked egg round.  Put the two halves together to form the sandwich.
  4. Wrap each sandwich in square of deli paper wrap (or just use parchment paper).  
  5. To enjoy now: Microwave sandwich until sausage patty is cooked through, about 45 seconds to a minute.  To enjoy later: Place wrapped sandwiches into gallon sized freezer bags, squeezing out as much air as possible.  When ready to eat, microwave from frozen until heated through, about one minute to 90 seconds.  Flip the sandwich halfway through cooking for more even heating.
Source: Christine's Kitchen Chronicles as inspired by McDonald's

Monday, August 5, 2013

Pepperoni Pizza Puffs

This is it my friends.  The final week of pregnancy...at least according to my estimated due date!  Of course, we all know that baby will make his appearance when he's good and ready so he could stick around another two weeks before my OB would consider intervening.  Good thing I'm not *too* uncomfortable yet.

I've been spending the past couple weeks filling my freezer with all sorts of goodies so that we won't starve after baby arrives.  It takes me a little longer than normal to prep things because I need to take frequent breaks and my feet/ankles look gigantic (my sister affectionately calls them "fat kid feet") once I'm done but I know it will all be worth it in the end.  As long as baby stays put, I'll continue to grow my freezer meal stash!

Last week I posted a teaser pic of these pepperoni pizza puffs and had more than one request for the recipe.  I had actually made these for my friends Kristen and Sig when they had their little boy but apparently I never got to blogging about them so here they are now!

They're a bit like cheesy dough puffs (reminding me of the Brazilian cheese bread pao de queijo for those familiar) filled with pepperoni and then served with pizza sauce for dipping.  Of course feel free to substitute whatever pizza toppings you enjoy.  I freeze them on a baking sheet first so they don't clump together and then dump them into a plastic freezer bag.  To reheat, I just pop them in the microwave.  Easy peasy one-handed eating and kid-friendly, too!

One Year Ago: Creamed Corn and Watermelon Slush
Two Years Ago: Five-Minute Healthy Chunky Monkey Ice Cream (one of my favorite treats anytime but especially during pregnancy!)
Four Years Ago: Grands! Taco Melts aka Homemade Hot Pockets (I haven't tried it before but I bet this would also make a great freezer lunch if you fully prepared it and then followed a similar freezing method as in these pizza puffs!)

Pepperoni Pizza Puffs


Pepperoni Pizza Puffs

Ingredients
  • 3/4 cup flour
  • 3/4 teaspoon baking powder
  • 3/4 tsp Italian seasoning
  • 3/4 cup milk
  • 1 egg, lightly beaten
  • 1 cup mozzarella cheese, shredded
  • 4 oz (about 1 cup) pepperoni, cut into small pieces
  • 1/2 cup pizza sauce
  • 2 Tablespoons fresh basil, finely chopped
Directions
  1. Preheat oven to 375 degrees.  Prepare a 24-cup mini muffin pan by spraying with cooking spray.
  2. In a large bowl, whisk together the flour, baking powder, and Italian seasoning.  Add the milk and egg.  Finally, stir in the mozzarella and pepperoni and then let the mixture stand for 10 minutes.
  3. Give the batter a stir then divide evenly among the mini muffin cups.  Bake until puffed and golden, about 20-25 minutes.  If you intend to freeze them, remove the puffs from the pan while still warm and then arrange in a single layer on a baking sheet to freeze.  Once frozen, transfer to a ziploc freezer bag, removing as much extra air as possible.
  4. When ready to serve, microwave the pizza sauce until warmed through, then stir in basil.  Serve warm puffs with pizza sauce for dipping.
Source: Barely modified from Noble Pig

Monday, September 24, 2012

Guest Post by Coffee and Cannolis: Mini Frittatas

Any coffee lovers out there?  How about cannolis?

Well, like I said in my last post, I'm not much of a coffee drinker but I do LOVE cannolis (Umm have you been to Mike's Pastry in Boston? Yum!).  I also am a fan of  Coffee and Cannolis!  Angie, the voice behind this blog, is another What's Cooking message board member but I only recently started following her myself.
She had my attention at her Baked Cinnamon Sugar Churros (I had tried a fried Churro Bites recipe but am always looking for equally delicious baked versions of fried foods).  After that point, I went back and pursued her other recipes.  I bookmarked a couple recipes that I know my peanut butter, dessert loving husband would go crazy over: Peanut Butter Cup Cheesecake with Pretzel Crust and Peanut Butterfinger Mini Cheesecakes.  I honestly don't know which one would he'd like more but can say that they'll definitely be contenders for future birthday cakes.  I also saw Angie post a recipe for Fruit Salsa with Cinnamon Chips, one that I love but realized I have never shared on my own blog.

Today she has chosen to share a super easy savory recipe and she must have read my mind because I love breakfast foods!  I love a good frittata or quiche but my egg-hating husband would never go for it.  This recipe would work well in my house because I could eat a few and then freeze the rest for later.  I can also add whatever leftover veggies and meats I have for customized flavors.  Awesome! It'll get filed right next to the Bacon Egg and Toast Cups for quick, bite-sized eggy breakfast treats.

One Year Ago: Peanut Butter Cup Chocolate Cheesecake - A past birthday cake for my husband...and it was 9 LAYERS high!
Three Years Ago: Cha Cha's White Chicken Chili
-----------------------------------------------------------------------------

Hi!  My name is Angie from Coffee and Cannolis, and I’m so excited to be able to guest post today on Christine’s Kitchen Chronicles!  I have been following Christine for a few years now, so it’s an honor to be able to help her out with a post while she’s busy!  (And PS – have you seen that S’Mores Pizza?  I cannot wait to try it!)

Since you may not know me – a few things… I am a (new) mom to 15-month-old Tyler, who takes up A LOT of my time, but I wouldn’t have it any other way!  With what little free time I get, I enjoy baking and cooking (and Pinterest, Netflix Instant Queue, reading…).  Since my free time has been cut significantly, I’ve learned to take some shortcuts, make adjustments, and that I don’t have to get a completely gourmet meal on the table every night.  My new goal (aside from just getting the kid to eat!) is to create REAL food that anyone can make.  Quickly and easily, with as few convenience foods as possible.  I wish I were superwoman, but alas I am not.

In efforts to save some time in the kitchen while still getting a healthy breakfast in my son’s tummy, I’ve discovered my love of these mini frittatas!  I like to make them on Sunday during nap time, or even once he’s down for the night, and freeze them to grab throughout the week.  Not only are they quick and freezer-friendly, they’re very versatile.  Your kids LOVE broccoli?  Throw some in.  You have a kid like mine that loves turkey sausage and super sharp white cheddar cheese?  Well, good news – these are fantastic with sausage and cheese!

Mini Frittatas


Ingredients:
  • 8 large eggs
  • ½ cup milk or half and half
  • Salt and Pepper
  • Assorted Mix Ins, such as: Shredded Cheese, Cooked Sausage Crumbles, Diced Peppers, Diced Steamed Broccoli
Directions:
  1. Preheat oven to 350 degrees and coat a 12-cup muffin tin with non-stick cooking spray
  2. Whisk together eggs, milk and salt and pepper in a large bowl.  Evenly distribute egg mixture among the 12 muffin cups.  Add about 2 tablespoons of mix-ins to each cup.
  3. Bake about 20-25 minutes until the eggs are puffy and the edges are golden brown.  (If necessary, run a butter knife around the edges to loosen before removing from pan). 
Makes 12-mini frittatas

* These can be frozen in a freezer-weight bag.  To defrost I pull them out and keep in the fridge overnight, and just microwave for 10 seconds for my son, 30-45 seconds for me!

Monday, September 10, 2012

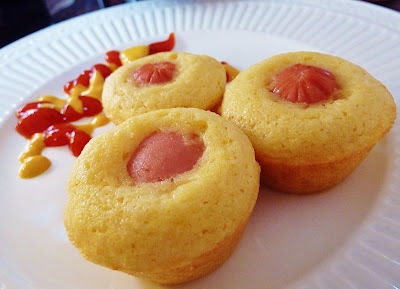
Mini Corn Dog Muffins

Hi, it's me!  Bet you weren't expecting me after I told you I was leaving, huh?  Well it turns out that my scheduled guest poster for today, Erika of Teenage Taste, had a family emergency and ended up not being able to complete her post to share on my blog today.  I really LOVE her blog so still think you should check it out anyway.  She had me for Secret Recipe Club once and took some beautiful photos of my Cheddar Cauliflower Soup.  Plus, pretty much everything she posts just looks incredibly delicious.  The part I think is the coolest?  She's still in high school!  My what talent Erika has and I know she will go far in life :).

But that left me with a hole in my blog lineup at about 10PM on Sunday.  Thank goodness I have a stockpile of posts!  Today, I'm choosing to share a very simple recipe with you.  And one that's PERFECT for Monday night football in case you need something to nosh on during the big game (WHO DEY!).

It's also a great quick meal to bring to new parents.  They freeze well (zap them in the microwave to refresh!) and their bite-sized nature makes them easy to pop in your mouth with one hand (sans plate) as you try to maneuver a baby with the other.  Just ask my friends Sigmund and Kristen whom I brought these little muffins all way from Cincinnati to New York City to Boston when I visited them and their new baby earlier this Summer.

Mini Corn Dog Muffins

The first time I made them was to give away and Chris was so sad that they weren't for us.  Given I had leftover buttermilk and needed a quick dinner, they made the menu for just us to enjoy.  We love these muffins and found it hard to not eat the entire pan (I make half a recipe).  They taste just like corn dogs but are bite-sized and healthier because they're not fried.  The funniest part of all was when I plated mine with ketchup and mustard, Chris' arch enemy.  He was so grossed out that when we sat down for dinner together, he ate and talked to me with his eyes closed the whole time!  Silly hubby!

Looking for more game day foods?  Try...
Three Years Ago: Finn Nisu Bread

Okay, signing out for now.  Guest posters coming up next!

Mini Corn Dog Muffins


Mini Corn Dog Muffins

Yields: 48 mini muffins

Ingredients

  • 1/2 cup melted butter (or 1/4 cup butter + 1/4 cup unsweetened applesauce)
  • 1/2 cup sugar
  • 2 eggs
  • 1 cup buttermilk
  • 1/2 teaspoon baking soda
  • 1 cup cornmeal
  • 1 cup all purpose flour
  • 1/2 teaspoon salt
  • 8-10 hot dogs, cut into 1" bites

Directions

  1. Preheat oven to 375F.  Spray a mini muffin pan with non-stick cooking spray.
  2. Combine the butter and sugar in a bowl and whisk to combine.  Add the eggs and whisk together.  Add the buttermilk and whisk again.
  3. In a separate bowl, combine baking soda, cornmeal, flour, and salt.  Stir to combine.  Whisk the wet ingredients into the dry in two batches.
  4. Spoon 1 Tablespoon of batter into each prepared mini muffin cup.  Place one hot dog bite into the middle of each cup.
  5. Bake for 8-12 minutes or until cornbread is golden brown.  Cool in mini muffin tin for 5 minutes before serving. Store leftovers in the refrigerator and reheat for 20-30 seconds before serving.  Can also be frozen and reheated!