Showing posts with label rice. Show all posts

Wednesday, February 6, 2013

Ginger Chicken Jook (Chinese Rice Porridge)

Jook, congee, or rice porridge.  No matter what you call this authentic Asian soup, it is downright delicious and comforting.  Many people compare it to the Chicken Noodle Soup of the Asian world.

When I was healing from my miscarriage, my Mom made me a big pot of jook.  When the Thanksgiving turkey carcass or Christmas ham bone are picked through, we make jook.  In fact, Turkey jook is the most coveted of all because the turkey bones provide an extra sweet base flavor and it's a rarity enjoyed just once a year.

Sometimes, jook in its cheapest and simplest form is just rice and water.  That also brings back childhood memories of when my Grandma and Mom would make a pot of rice in the rice cooker and then using the hard bits at the bottom, add some water and allow it to become a magical soup.  I was somewhat addicted to this and steamed rice mixed with ice water growing up.  It's a wonder that I didn't become malnourished.

In this case, the inspiration for making this recipe was a roasted chicken carcass that was given to me by my in-laws after our weekly Sunday dinner together.  Anytime they have bones they know I'll take it home because I love making homemade broths and soups out of them.  Why let it go to waste?  That's what the Asian in my is thinking, anyway.  The frugal person in me is thinking of the cost savings that comes from making my own broth (which is SO EASY) at home without any added salt.

This was my first time making jook on my own.  I'd watched family members do it many times before but as usual, there's no recipe and no measurements.  The only measurements used were based on "bowls" (of the Chinese soup variety).  After some searching, I found a good starting recipe and put my own family spin on it so that it was closer to the way that Mom would do it.

I don't know why I was so intimidated to try this before.  Perhaps it is because I had witnessed too many times where the bottom of the jook ends up burning by accident and thus tainting the entire pot with the unwanted burnt flavor.  But my Mom taught me the trick to avoiding that.  She always told me to NEVER stir your jook or else you'd have to keep stirring it.  As long as you have a vigorous simmer going on, that will be enough to move the rice around and prevent it from burning.

With my first bite I was pleasantly surprised.  In fact, don't tell Mom but I think it might have been the best (non-turkey) jook that I've ever eaten.  This recipe used chicken broth versus my family uses just water.  Needless to say, the broth added a boost of flavor that I had not yet known.  It also integrates ginger directly into the soup.  While ginger is a common garnish that is served with jook, I usually skip it because I hate chomping on a big piece of it.  But, I enjoy the subtle flavor it lends so cooking it directly in the jook was perfect to me.  I ate this for 4 days straight and can't wait to get some more bones to make more!

I hope you give it a try and discover this Asian staple for yourself!

Ginger Chicken Jook (Chinese Rice Porridge)


Ingredients

  • 6 cups water
  • 4 cups low-sodium chicken broth
  • 1 leftover chicken carcass, with some meat intact and skin removed and trimmed of excess fat
  • 1 cup long-grain white rice
  • 1 tsp ginger, finely minced
  • Salt and white pepper, to taste
  • Chopped fresh cilantro, for garnish
  • Thinly sliced scallions, for garnish
  • Thousand year old eggs, for garnish (optional)
  • White pepper, sesame oil and soy sauce, for personal seasoning
Directions
  1. Place all ingredients except the garnishes in a large heavy-bottomed saucepan and bring to a boil over medium-high heat.  Reduce the meat to medium low and cook at a lively simmer.  Do not stir!  Continue to cook until the rice has completely broken down and the mixture is creamy, about 1 hour.  The soup will continue to thicken as it stands but it will get watery if you stir it too much after cooking.
  2. Turn off the heat and remove the carcass to a cutting board.  When it's cool enough to handle, pull off the meat in bite-sized pieces, discarding the cartilage and bones.  Return the chicken pieces to the jook.  Stir to combine and season with salt and pepper as needed.
  3. Ladle into bowls.  If desired, season with more white pepper, sesame oil, and/or soy sauce then top with cilantro and scallions.  If you like thousand year old eggs, throw those on top, too.
Source: Slightly modified from Christine Gallary's recipe on Chow.com

Monday, October 8, 2012

Chicken Marsala Risotto

Hello, my name is Christine and I'm a food alcoholic.  I said it in my Southern Comfort (Drunken) Apple Pie post yesterday and I'll say it again.  I love booze in my food!

I also told my facebook fans on Friday when I made it that this meal that I'm about to share was easily one of the best I'd had in a long time.  And surprise surprise...it has booze in it!  I promised Jené and Whitney that I'd post it today so here I am taking their request.

Risotto is kind of a pain to make because you have to stir it constantly but the results always seem worth it to me.  My only other complaint is that it's usually doused in cream, cheese, and butter.  This recipe is different.  It carries nearly all of its fine flavor in the Marsala wine and uses only one tablespoon of butter (if you grill your chicken like I did), 1/4 cup cheese, and zero cream!  I told you alcohol makes food pack a flavor punch ;).

Nicole of Prevention RD says it yields 3 servings (4 if you serve with a salad and stretch it) but I found that it easily makes 4 servings all on its own.  Especially if you cut up your chicken breast into slices.  Since the meat is spread out, it tricks your mind into thinking you're eating more of it than you really are allowing you to stretch out the servings.  It's kind of similar to the trick of serving your meals on smaller plates.

Three Years Ago: (Sugary Sweet) Chili - My mother-in-law's recipe and how appropriate timing since this particular recipe won Nicole's 2nd Annual Chili Contest last year!  Check out her blog as she goes through eight chili entries in the 3rd annual contest.  Yep, I entered another recipe this year, too.

Chicken Marsala Risotto


Ingredients
  • 4 cups low-sodium chicken broth
  • 1 Tbsp unsalted butter*
  • 1 medium shallot, minced
  • 2 cloves garlic, minced
  • 1 Tbsp tomato paste
  • 1 cup Arborio rice
  • 1 cup Marsala wine, divided
  • 3 (4 oz) boneless, skinless chicken breasts
  • 2 cups mushrooms, sliced
  • 1/4 tsp kosher salt and fresh ground pepper
  • 1/4 cup (1 oz) Parmesan cheese, grated
  • 2 Tbsp fresh basil, cut chiffonade
*Note: I had my husband grill our chicken because it was still nice out but if you would like to prepare everything indoors and in a skillet, you'll want an additional 1 Tbsp of butter to cook the chicken.  The skillet method is also recommended for those that are cooking alone since you really can't leave risotto unattended!

Directions
  1. Heat the chicken broth in a medium saucepan until it simmers.  
  2. Melt 1 Tablespoon of butter in a large heavy-bottomed skillet or dutch oven over medium heat.  Add shallots and cook until soft, 2-3 minutes.  Add garlic and tomato paste and cook until fragrant, about 1 minute longer.  Add the Arborio rice and toast until opaque around the edges, 2-3 minutes.  Add 3/4 cup of Marsala wine and cook, stirring often, until absorbed, about 2-3 minutes.
  3. Stir in 1 cup of chicken broth and stir occasionally until almost absorbed, 5-8 minutes.  Working 1 ladle of broth at a time, continue to add broth and stirring often so that the rice doesn't stick to the bottom of the pan.  Add another ladle when the broth is almost completely absorbed.  After you have been cooking the risotto for 10 minutes, stir in the mushrooms.  At this time, have your significant other or cooking partner in crime preheat your grill to medium-high. Continue cooking the risotto, stirring constantly, until all of the broth is absorbed for a total of 20-25 minutes.
  4. Meanwhile, pound chicken breasts to desired thickness, about 1/2 inch.  Season with salt and pepper.
    To Grill: Grill until cooked through, about 12-15 minutes or until thermometer inserted into center of the meat registers 170 degrees. Remove to a plate and cover with foil until ready to serve.
    To Cook in Skillet: Heat additional Tablespoon of butter in a large skillet.  Pan fry the chicken until lightly browned on each side, about 3-4 minutes per side. Remove to a plate and cover with foil until ready to serve.
  5. Remove risotto from heat and stir in remaining 1/4 cup of Marsala wine, Parmesan cheese, and basil.  Cut chicken breasts into slices and top each risotto portion with the slices or if desired, serve topped with whole chicken breasts.  Serve immediately.
Source: Slightly adapted from Prevention RD

 
This recipe was shared on This Week's Cravings.  The hostess for this linky arty are: Tina from MOMS CRAZY COOKINGNicole from The Daily Dish and Kristi from Veggie Converter

Tuesday, July 17, 2012

Spicy Beans and Rice Burritos

This recipe is for my facebook fans Lauren and Sara who requested that this be my next post.

I really enjoyed this vegetarian meal and Chris called it like homemade Chipotle but better.  This was a light and refreshing meal that came together easily.  It made a lot of burritos (6) so I had many burritos for lunches that week.  I also saved some of the extra beans and rice mixture to serve with taco salads that we had for dinner that same week.

Enjoy!


Spicy Beans and Rice Burritos


Ingredients


For the filling:
  • 1 tablespoon canola oil
  • 2 cloves garlic, minced
  • 1 teaspoon chili powder
  • 1 pepper from a can of chipotles in adobo, minced
  • 1 tablespoon sauce from a can of chipotles in adobo
  • 1 teaspoon ground cumin
  • Several dashes cayenne pepper
  • 1/3 cup water
  • 1 15 ounce can black beans, drained and rinsed
  • 1 15 ounce can pinto beans, drained and rinsed
  • 2 cups cooked rice (brown rice, if desired)
  • 1/4 cup fresh salsa of preferred spiciness
For serving:
  • 6 burrito-sized tortillas, warmed (we like to use Flatout Flatbread Wraps)
  • 8 ounces shredded cheese
  • Shredded lettuce
  • 4 green onions, chopped
  • Fat-free Greek yogurt (or sour cream)
Directions:
  1. Heat canola oil in a large skillet over medium heat. Add the garlic, chili powder, chipotle, adobo sauce, cumin, and cayenne. Cook briefly until fragrant, about 30-60 seconds. Add in drained and rinsed beans, and water. Bring to a simmer, then lower heat to medium-low and cook for 8 minutes, mashing the bean mixture slightly. Remove from heat, and stir in rice and salsa.
  2. Divide mixture evenly among the center of each tortilla. Top with cheese, lettuce, green onions, and greek yogurt. Roll up and serve!  Make extra burritos and wrap in foil for an easy future meal :).
Source: As adapted by and seen on A Bitchin' Kitchen from Cooking Light

Sunday, March 7, 2010

Chicken Palava (African Peanut Stew)

Are you ready to travel to Africa?  I decided to give this recipe a try because it seemed a bit different.  Surprisingly when you look at the ingredients list its not so exotic...to the point where I'm not really sure what makes this African.  Either way, it was a pretty easy week night meal and a refreshing change of pace.  I added more peanut butter and hot sauce to the original recipe because I thought the flavor needed a little boost for personal preference.  I brought leftovers to work and the aroma was enough such that my administrator, who sits across from my cube wall, popped her head up and asked me what it was because she said it smelled delicious.

Look closely at the picture below.  You think I served this over rice, I bet.  Well, I'll let you in on a little secret.  That "rice" is really shredded steamed cauliflower!  "Caulirice" as its sometimes called, is a great substitute because it not only helps to cut down on your carb intake, but it also gets in some extra servings of veggies!  Genius!  All you do is to shred your raw cauliflower using a cheese grater or food processor and then steam it (I used the microwave and some veggie steaming bags).  We used half a head for the 2 of us so I guess if you grated the whole head you could serve 4 entree sized portions.  I have to say that I was skeptical (I mean, I LOVE carbs!) but it really was pretty darn good.  You can use it as you would use rice except for when you need it to really absorb.  But as a base for this dish or other Asian dishes (I've even seen it used in fried rice!), it works like a charm.

Give this stew and caulirice a shot today!

Chicken Palava (African Peanut Stew)
Printer-Friendly Version


Ingredients
  • 1 pound boneless, skinless chicken breast
  • 1 large onion, sliced
  • 1 large red bell pepper, sliced
  • 2 large garlic cloves, minced
  • 2 large tomatoes, coarsely diced
  • 1/2 pound fresh spinach, washed and dried
  • 4 tbsp peanut oil (used vegetable oil because that's all I had)
  • 1 tsp sesame oil
  • 1/4 tsp chili powder
  • 1/2 tsp ground ginger (omitted)
  • 2 tsp brown sugar
  • 1/2 tsp dried thyme
  • 6 tbsp peanut butter
  • 2 cups chicken broth
  • Hot sauce, to taste
  • Extra brown sugar, salt, and pepper, to taste
Directions
  1. Cut chicken breast into 1" cubes.  In a gallon sized ziplock bag or bowl, combine chicken, peanut oil, sesame oil, chili powder, ginger, garlic, brown sugar, thyme, and some salt and pepper.  Put in refrigerator and marinate at least 15 minutes.
  2. Heat a large saute pan over medium-high heat.  After chicken has marinated, add chicken to hot pan and cook until the outside turns white and loses its rawness.  Add onion and red bell pepper, sauteeing for 5 more minutes.  Stir in peanut butter, chicken broth, and tomatoes.  Bring the mixture to a boil.
  3. Reduce heat and simmer over low heat for 20-25 minutes with the lid off.  Stir occasionally.  Adjust seasoning with additional brown sugar, salt, pepper, and hot sauce to taste.
  4. Add spinach and when it has wilted, turn off the heat.  Serve over rice (or caulirice).
Source: Slightly modified from Kayotic Kitchen

Wednesday, January 20, 2010

Copycat Chipotle Chicken Burrito Bols

I am a big Chipotle fan.  My order?  Barbacoa fajita burrito bol topped with lettuce, tomato salsa AND corn salsa, cheese, a dab of sour cream.  Absolutely divine (and full of calories...which is why it's so yummy)!  I also love their guacamole but holy moly they charge a lot for that stuff!

Imagine my surprise when I found a copycat recipe on Elly's blog.  Sadly,  I had difficulty finding dried ancho chilies at my Kroger (hmm...this seems like a common theme lately!).  So, I looked for approriate substitutes online and ended up using chili powder.  Not quite the same effect, I'm sure.  In the end, it tasted great but not quite the Chipotle I know and love.  I'm sure part of it was due to not using the correct pepper...and the other part is that I'm used to doing the barbacoa beef versus  the chicken.

I also made some Corn and Avocado Salsa (to be posted soon, I promise!) to try to mimic the corn salsa flavor that I get at Chipotle.

Copycat Chipotle Chicken Burrito Bols
Printer-Friendly Version


Yields: 4 Servings

Ingredients

For the Chicken
  • 2 oz. dried ancho chilies (Used about 2 Tablespoons chili powder)
  • 1 tsp. ground black pepper
  • 2 tsp. ground cumin
  • 2 tsp. dried oregano
  • 6 cloves garlic, coarsely chopped
  • 1/4 red onion, coarsely chopped
  • 3 Tbsp. canola oil
  • 4 chicken breasts
For the Cilantro-Lime Rice
  • 1 cup rice, uncooked
  • Water
  • 1 lime
  • 2 Tbsp. chopped cilantro
Additional Ingredients for Topping - Salsa, guacamole, shredded cheese, lettuce, tomatoes, etc.

Directions
  1. Soak the dried chilies overnight in water. Remove stems and seeds, and chop coarsely. Add all ingredients except chicken to a food processor or blender and puree until smooth.
  2. Rub the marinade into the chicken and marinate at least one hour, up to 24. Season the chicken with salt to taste.
  3. The next day, rinse the uncooked rice until the water is no longer milky.  Fill the rice cooker to the marker "1" and then cook. 
  4. While the rice is cooking, grill the chicken for about 5 minutes per side or until cooked through. Cut chicken into slices or cubes then set aside.
  5. After the rice has cooked, stir in the lime juice (add the zest if you want it more lime-y), cilantro, and a pinch of salt. Fluff with a fork.
  6. Assemble bols by putting a base of rice in a bowl.  Top with sliced chicken and toppings of your choice.
Source: Adapted and as seen on Elly says Opa! from Chipotle Fan

Sunday, January 17, 2010

Sushi

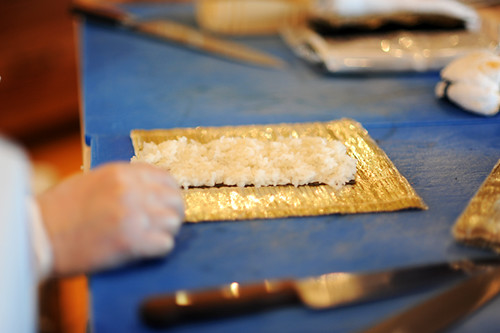
Below are the basic ingredients for sushi.  You can then buy fillings of your choice to make various delicious rolls.  This was my first attempt at making rolls so they're not the prettiest but they held together for the most part and were very tasty :).

As I wasn't sure how adventures our group of Dinner Clubbers would be, I opted for all cooked (and inside out so you can't see the nori (seaweed) - out of sight, out of mind right?) maki rolls.  For my rolls, I made the standard California Roll and then did some Spicy Crab Rolls and just a few Shrimp Rolls.  If you do decide to go raw,  make sure you're buying sushi grade fish!

I highly suggest Sushi Day for inspiration and recipes...there's even some rolls with BACON! (Bacon Crunchy Shrimp Roll and Kristen Maki). 

Pioneer Woman has an awesome tutorial with really good pictures (very helpful if you're a visual person like I am!) on how to create your rolls.  There's also a few good recipes on there as well.


Mmmm...good thing Emily took pictures of my rolls because I forgot to!

Sushi Rice
Printer-Friendly Version


Prep Time: 30 minutes
Cook Time: 20 minutes
Yields: 8 cups cooked rice or about 16 rolls

Ingredients
  • 4 cups Short Grain/sushi Rice, uncooked
  • 1 cup Rice Wine Vinegar
  • ½ cups Sugar
  • ¼ cups Sake Or Mirin (a Japanese Rice Wine)
Note: Used seasoned rice wine vinegar instead of sushi su (vinegar + sugar + sake).

Instructions

“Rice Prep”
  1. Use short or medium-grain rice. It’s more starchy and round than the long-grain variety, which just won’t hold together well enough to support ingredients in sushi. Many stores now sell specifically-labeled “sushi rice”.
  2. Before you cook it, wash/rinse the rice until the water runs totally clear—about five or six times. If you don’t thoroughly rinse the rice, it’ll end up in a big, sticky ball. There’s enough internal starch in the rice for it to sufficiently hold together for sushi, so get all the stuff on the outside off by rinsing well.
  3. Use a rice cooker/steamer. Rice made on the stovetop will not work for sushi; it won’t be the right consistency. Rice cookers are widely available for as low as $12.
  4. Add the rinsed rice to the rice cooker with equal parts water, and follow the directions for the rice cooker. After it’s done, transfer the cooked rice to a large mixing bowl.
You’ll need 1 part sushi su for every 4 parts rice.

Sushi Su/Sushi Rice:
  1. Heat vinegar, sugar, and sake or mirin in a saucepan just to dissolve and combine. Allow to cool to room temperature. (Note: skipped this step as I just subbed pre-made seasoned rice wine vinegar)
  2. Cook rice according to rice cooker directions. Transfer to large mixing bowl.
  3. Pour su (vinegar mixture) over the rice, gently folding to incorporate.
  4. Let rice stand for 10 minutes, then fold again.
Rice should be shiny, not mushy and have a slightly tart/sweet taste. Cover with a warm, wet towel and keep warm.

Source: Cody the Sushi Chef as seen on Pioneer Woman

Spicy Mayonnaise
Printer-Friendly Version


Ingredients
  • ½ cup (low-fat) mayonnaise
  • 2 Tbsp Sriracha hot sauce
  • ¼ tsp roasted sesame oil
Directions
  1. Whisk the ingredients together until well blended.
  2. Store in fridge until ready to use.  Use in rolls or as a dipping/drizzled sauce.
 Source: Group Recipes
California Rolls
Printer-Friendly Version


Ingredients and Supplies
  • 1 piece Makisu (bamboo Rolling Mat)
  • Dark Green Nori (dried Seaweed)
  • Sushi Rice (recipe above)
  • Imitation Crab (round leg style)
  • Avocado, Thinly Sliced
  • Cucumber (Japanese, If Available), Thinly Sliced
  • Toasted Sesame Seeds
  • Soy sauce, for dipping
  • Wasabi, if desired (used prepared Wasabi in a tube that I bought at Kroger)
  • Ginger, if desired
Instructions

  1. First, in order to keep your rice from sticking to the Makisu and making a terrible mess, carefully wrap the Makisu in plastic cling wrap.
  2. To begin, fold the pieces of nori in half to split them. Nori is very delicate, so as soon as you press along the seam, it easily breaks in two. Next, lay the half-sheets of nori on the work surface and grab a handful (about a ½ cup) of sushi rice and cover one side of a half-sheet of nori with it. To do so, first set the rice on the end of the nori sheet closest to you. Then, working with your fingertips and/or knuckles, gently spread the rice over the surface of the nori.
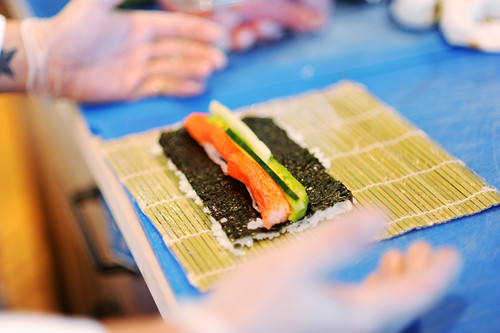
  3. On California Rolls, the rice is typically on the outside – not the inside – so to begin, quickly flip the rice-coated sheet of nori so that the rice side is down. Carefully position it horizontally so it will roll lengthwise. Next, place a single row of the crab across the middle of the nori. Next, place slices of avocado end to end right against the crab. It’s best to use an avocado that’s ripe but still quite firm. Lastly, lay the very thin (slightly thicker than a matchstick) cucumber slices end-to-end right alongside the crab and avocado.
  4. To roll the sushi, carefully lift the edge of the mat closest to you, begin rolling the mat away from you, pressing it lightly to keep it firm. At this point, the end of the roll has been rolled upward, and your very light pressure is ensuring that they roll will remain nice and tight. Next, lift up the end of the rolling mat and pull it away from you, allowing the roll to roll the rest of the mat. Then carefully remove the roll from the mat and place it on a cutting board. Lay the mat over the top of the roll and exert gentle pressure once more to make sure it’s all secure.
  5. Next, hold the roll on the mat and sprinkle the top with toasted sesame seeds. Slice using a very sharp knife, first running the knife through a damp dishtowel with the blade facing away from you. Begin by slicing the roll exactly in half. Then set the two halves side-by-side to slice into individual pieces. This ensures that each piece will be a uniform size.
  6. Wrap in plastic cling and store in refrigerator until ready to serve.  Serve with soy sauce, wasabi, and pickled ginger, if desired.
Source: Pioneer Woman

For the Spicy Crab Rolls I just shredded some imitation crab and then mixed with the spicy mayonnaise.  Added some avocado and cucumber.  For the Shrimp Rolls I used cocktail shrimp (cut in half lengthwise), a dab of spicy mayo, carrots, and avocado.

Sunday, October 18, 2009

Christine's Fried Rice

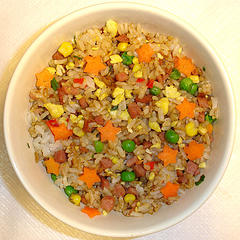
I found another use for that leftover turkey.  I must admit (and hang my head in shame) that until this past week I have NEVER made fried rice before!  I know...what kind of Chinese person am I?!  But, I had tons of leftover refrigerated rice from our dinner party and also leftover turkey from another night's dinner and so a creative solution was born!  Everybody in the know knows that they key to great fried rice is that it's nice and cold/refrigerated so this was a perfect use!  I would have loved to use Momma L's recipe for fried rice but alas, most things like this (and most family Chinese food recipes in general) do not have written recipes.  And so I searched the internet for a point to begin and then found the inspiration from the inner Momma Louie in myself to create this original recipe.  I thought it turned out very good for my first attempt and I hope you enjoy it

Christine's Fried Rice
Printer-Friendly Version


INGREDIENTS
  • 2 c. white rice (uncooked)
  • 1/2 small onion, diced
  • 1 1/2 c. frozen mixed vegetables
  • 1 c. various cooked meat (ham, chicken, turkey, shrimp, etc.), diced 
  • 2 Tbsp. vegetable oil
  • 2 eggs (optional)
  • Oyster sauce, to taste (start with about 1 tsp.) 
  • Reduced sodium soy sauce, to taste
  • Seasoning salt, to taste
  • Garlic powder, to taste
  • Pepper, to taste 
  • Drizzle of sesame oil (optional)
DIRECTIONS
  1. Make rice in a rice cooker per your unit's directions then put in refrigerator until well cooled.  Day old rice works best! 
  2. In a small bowl, thaw frozen vegetables by adding some water.  Drain and set aside.
  3. Heat wok over high heat. Pour in oil, then stir in onions, mixed vegetables, and meat; cook until onions are translucent and meat is heated.
  4. If desired, crack in eggs, stirring quickly to scramble eggs with vegetables and meat.
  5. Stir in cooked cooled rice. Shake in oyster sauce, soy sauce, and seasonings tossing rice to coat.  Heat until rice is warmed.  Taste and adjust seasonings as necessary. 
  6. Drizzle with sesame oil if desired and toss again.  Serve hot.
Source: A Christine's Kitchen Chronicles original inspired by Momma L. and the internet

Tuesday, May 12, 2009

Mexican Chicken and Rice Casserole

Another new recipe...trying to use up the canned chicken that my mom had given me a couple months ago.  This recipe was easy enough (came mostly from cans!) and pretty healthy (only 216 calories, 3g of fat per serving!  let's not forget it also gives you 4g fiber).  The original recipe called for cooking in a Dutch Oven but I don't have one of those.  Instead of dirtying another dish to bake in the oven I opted to cook the whole dish on the stove and it worked out fine.  Just make sure you have a big enough pan because it makes A LOT!  I added tabasco sauce and a sprinkling of Mexican style cheese to mine after I dished it out as a personal preference.

Mexican Chicken and Rice Casserole
(Source: modified from All You magazine)

Prep: 15 min.
Cook: 30 min.
Serves: 8
Cost per serving: $1.41

Ingredients
  • 1 Tbsp. vegetable oil
  • 1 red onion, chopped
  • 1 tsp. garlic, minced
  • 1 Tbsp. chili powder
  • 1 Tbsp. cumin
  • 2 cups uncooked white rice
  • 1 14.5-oz. can low-sodium chicken broth
  • 1 14.5-oz. can diced tomatoes with jalapenos
  • 1 15.5-oz. can black beans, drained and rinsed
  • 1 14.5-oz. can whole-kernel corn, drained
  • 1 4.5-oz. can chopped green chilies
  • 1 12.5-oz. can chicken breast in water, drained
  • Salt and pepper, to taste
  • 1 tsp. dried parsley
  • Tabasco sauce (optional)
  • Mexican style cheese (optional)

Directions
1. In a large saute pan over medium heat, warm oil. Add garlic and onion and saute until softened and translucent, 5 to 7 minutes. Add chili powder and cumin; stir for 1 minute. Add rice; cook, stirring, for 2 minutes. Stir in 2 cups water, broth, tomatoes, beans, corn, chilies and chicken, season with parsley, salt and pepper and bring to a boil. Reduce heat and simmer uncovered until rice is tender and liquid has been absorbed, 25 to 30 minutes.  Stir occasionally.
2. Remove from heat and let stand, covered, for 5 minutes. Fluff rice with a fork, check and adjust seasoning and serve.  Sprinkle with cheese and tabasco sauce, if desired.