Showing posts with label emily. Show all posts

Friday, August 17, 2012

White Chocolate Layer Cake with Blueberry Curd Filling

Okay I'm slacking, I'm sorry.  Normally I write these posts in advance and schedule them to go live in the mornings but when I got into work today I realized that not only did I not schedule this post but I hadn't even written it yet!  Yikes!  I guess that's what happens when you're busily trying to can 21 pounds of tomatoes or buy 1/16th of a cow (more on both of those at a later date).

So here we are, the grand finale of Emily and my Summer Seasonal Fruits and Veggies Extravaganza.  So far we've already shared the following:
And now, without further delay than I've already caused today, here's the final course, a layer cake filled with  vibrant blueberry curd!

For those of you that follow me on facebook or twitter you probably saw me post something a few weeks ago when this was all happening about my little butter mishap.  Somehow I had completely managed to misread the instructions and put just 1/2 stick of butter in the frosting instead of 1/2 POUND.  Yep...that's only 1/4 of what was necessary and would totally explain why the texture of my frosting was marshmallow fluffy and a bit weird.  All in all, it didn't affect the overall flavor of the cake but apologize for the presentation since the frosting was a shapeless goop!

Flavorwise, this was really good.  I loved the flavor of the blueberry curd, especially.  And the petite 6" cake size was the perfect way to end our Extravaganza evening!  Looking at the directions is daunting (and I'm sure you can see how I easily misread the butter content!) but no step is particularly difficult.

I hope you enjoyed this series (also check out our last one on Apples!).  Emily and I really look forward to doing them so if you have suggestions for themes or even recipes you'd like to see made in the future, please let us know.  She might be quite busy soon with the pending arrival of twins and all but we'll do our best!  After all, a girl has still got to eat!

PS: Last day to enter the Beer Flats giveaway!  Ends tonight.  Commenting takes just a few seconds and your chances to win are just 1 (or more if you do additional entries)  in 14 right now!

White Chocolate Layer Cake with Blueberry Curd Filling

White Chocolate Layer Cake with Blueberry Curd Filling
Photo Credit: Emily H.
Ingredients

For the Cake
  • 4 oz white baking chocolate, chopped
  • 1 cup + 2 Tbsp flour
  • 1 tsp baking powder
  • 1/8 tsp salt
  • 5 Tbsp butter, softened
  • 1/2 cup + 2 Tbsp sugar
  • 2 eggs
  • 3/4 tsp vanilla
  • 1/2 cup + 2 Tbsp milk
For the Swiss meringue buttercream
  • 2 oz egg whites (1-2 large egg whites or about 1/4 cup)
  • 1/2 cup granulated sugar
  • 1/2 lb unsalted butter, room temperature (see, it DOES say pound, NOT stick...oops!)
  • 2 tsp lemon extract, almond extract, orange extract, or vanilla extract
For the Blueberry curd
  • 1 cup blueberries
  • 1 Tbsp water
  • 1 cup sugar
  • 1/4 cup butter
  • 3 eggs, lightly beaten
For decorating
  • Swiss meringue buttercream
  • 1 cup blueberry curd
  • 2 oz white chocolate shavings/curls for garnish
  • Blueberries for garnish
Instructions

To Make the Cake
  1. Preheat oven to 350 F.  Grease and lightly flour two 6-inch round cake pans.  Line bottoms of pans with parchment paper.
  2. In a medium saucepan, cook and stir the white chocolate over low heat until melted.
  3. In a medium bowl, combine flour, baking powder, and salt and set aside.
  4. In a large bowl, beat the butter with mixer on medium to high speed for 30 seconds.  Gradually add the sugar, beating until combined.  Add eggs one at a time, beating after each addition.  Beat in the vanilla.  Alternately add flour mixture and milk to butter mixture, beating on low speed after each addition until just combined.  Beat in melted white chocolate just until combined.
  5. Spread batter into the prepared cake pans.  Bake 30 minutes of until a toothpick inserted into the centers comes out clean.  Meanwhile, prepare the blueberry curd and buttercream.  Cool the cake layers in the pans on wire racks for 10 minutes.  Remove layers from pans and peel off parchment paper.  Cool completely on the wire racks.
To Make the Blueberry Curd
  1. Put blueberries and water in saucepan and cook over low heat until blueberries are very soft, about 10 minutes.
  2. Press the mixture through a fine mesh sieve and put the resulting liquid back into the saucepan off of the heat.  Stir everything together and cook on medium-low heat, stirring constantly until mixture is thickened, about 5 minutes.  The curd will continue to thicken as it cools.
To Make the Swiss Meringue Buttercream
  1. Lightly whisk egg whites and sugar together over simmering water until egg white mixture is hot to touch or candy thermometer reads 140F (60C)
  2. Pour hot whites into a room temperature bowl and whip with whisk attachment of electric mixer on medium-high speed until double in volume.  The meringue should not move around in the bowl.  Meanwhile, cut up butter into 2-inch pieces.  (The butter should be slightly moist on the outside but cold inside.)
  3. Attach the paddle attachment to your mixer.  Add half the butter into the bowl and pulse the mixer until the meringue has covered the butter completely, forcing the butter to the bottom of the bowl.  Add the remaining butter and pulse several more times.  Slowly increase the mixer's speed, starting with the lowest speed and continuing to increase the speed every 10 seconds until you read medium-high speed.
  4. Continue to beat until the mixture looks light and fluffy.  Stop the mixer and scrape the bowl.  Reduce speed to low.  Add flavoring and continue to beat on low speed for 45 seconds.  Then beat on medium-high speed for an additional 45-60 seconds.
To Assemble the Cake
  1. Use a long serrated knife to cut each layer in half horizontally.  Place one layer, cut side up, on a serving plate.
  2. Spread 1/3 of the filling on the first layer.  Top with second layer; spread with 1/3 of the filling.  Top with the third layer and spread with the remaining filling (reserve a couple tablespoons if you want a swirl on top like I did).  Top with the fourth layer, cut side down.
  3. Frost cake with buttercream and decorate with chocolate shaving and blueberries.  To create a swirl as I did, put reserved dallop of blueberry curd on frosting and use a knife to swirl.
Source: As seen on Beantown Baker as components are originally from - Cake from Better Homes and Gardens, Blueberry Curd from Fake Ginger, Swiss Meringue Buttercream from Epicurious
Wednesday, August 15, 2012

Black Raspberry Frozen Yogurt

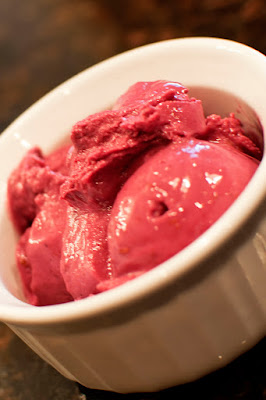
And we're back with the desserts from Emily and my Seasonal Summer Fruit and Vegetable Extravaganza!  We made two desserts and I wasn't sure which to share first so I asked my friend Jackie.  She picked this one to share with you first.  

This healthy froyo was extremely simple and extremely DELICIOUS!!  It was my favorite recipe from the whole night.  The flavor is fresh, the texture was creamy (except for the seeds which I completely forgot to strain out...oops!), and the color was vibrantly spot-on to Graeter's Black Raspberry Chip Ice Cream which made it all the more visually appealing.  By the way, did I mention that if you make it with fat free yogurt (I love Fage 0% Greek Yogurt), that there's only about 2g of fat in the whole batch?  And that fat comes from the raspberries...who would have known that those contained fat??

To recap the Seasonal Summer Fruit and Veggies Extravaganza so far: Watermelon Slush, BLT Corn Salad Wraps, and Cherry BBQ Pulled Pork Grilled Pizza. Check back on Friday for the final dessert course and recap of our latest Extravaganza.  

Only a couple more days left to enter my Beer Flats giveaway so make sure to enter now.  Your chances of winning are pretty high!


Black Raspberry Frozen Yogurt

Black Raspberry Frozen Yogurt
Photo Credit: Emily H.
Yields: 1 quart

Ingredients
  • 2 cups Greek yogurt (whole milk preferred to help keep from freezing rock solid but we used fat free and ate it fresh - it was fine)
  • ¾ cups sugar
  • 2 cups fresh or frozen raspberries
  • 1 tsp. freshly squeezed lemon juice
  • 1-2 tbsp. vanilla extract
Directions
  1. Combine the yogurt, sugar, berries, and lemon juice in a blender or food processor.  Blend until smooth.  Press the mixture through a fine mesh sieve to remove the seeds.  Stir in the vanilla.
  2. Freeze the mixture in an ice cream maker according to the manufacturer’s instructions.
Source: As seen on and adpated by Annie's Eats from The Perfect Scoop by David Lebovitz

Friday, August 10, 2012

Cherry BBQ Pulled Pork Grilled Pizza

Happy Friday!  I don't know who noticed but last night I spent an extensive portion of my evening giving my blog a face lift.  After not really doing anything to my site for nearly 300 posts (next one!), I was just getting a little sick of the old look.  I changed my blog template (of course keeping my signature and favorite pink color!), moved some content onto their own pages to make the homepage more streamlined, and added better social media sharing/following features to the bottom of each post and the sidebar (please use them!).  I also moved the "print-friendly" button to a more obvious location.  If you haven't used that feature yet, it's a pretty awesome way to cut out all my witty chatter (*sad face*) and just print the recipe and/or photo if you want.  Yah for being green!  I hope all of these little changes help to make your browsing experience on my website a bit better.  Please comment and let me know how I'm doing!

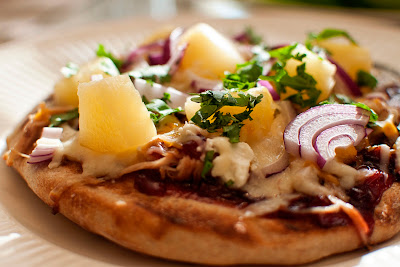
Today we are continuing Emily and my Seasonal Summer Fruit and Vegetable Extravaganza.  We already shared our Watermelon Slush and BLT Corn Salad Wrap starter so onto the main course!  As it was extremely hot out lately, Emily and I thought we'd put our husbands to work on the grill and with the success of my Grilled Steakhouse Pizza in the past, I thought another grilled pizza would be a great addition to our menu.  Plus, Emily and Scott were grilled pizza virgins.

Overall the taste of this pizza was very Summery.  I do wish that the flavor of the cherries came through more but it could have been the result of using some not-so-flavorful cherries that I picked up at the grocery store.  Darn those pretty and highly-shippable fruits that look deceivingly delicious but yet fall flat on flavor!!  Either way, Scott liked the barbecue because it "wasn't overly sweet" and pizza is pretty much the only way he enjoys goat cheese.  Emily's need for carbs, meat, and cheese was definitely satisfied and she scarfed hers down faster than any of the boys!  In all fairness, she is eating for three now...yes, in case I hadn't mentioned, she's pregnant with twins!  Last but not least, my husband's verdict?  "It was yummy."  Ah, a man of few words ;).

Come back next week to see what desserts were made.  One more week until my Beer Flats giveaway ends.  Check out my review and take the time to enter.  It only takes a few seconds!


Cherry BBQ Pulled Pork Grilled Pizza

Cherry BBQ Pulled Pork Grilled Pizza
Photo Credit: Emily H.
Ingredients
  • 1.5 pounds of your favorite pizza dough, shaped into 4 individual sized balls to be stretched and grilled
  • Olive oil for brushing
  • ~1 cup cherry barbecue sauce, recipe follows
  • ~1.5 cups leftover shredded pulled pork, recipe follows
  • Shredded cheddar cheese
  • Shredded mozzarella cheese
  • Crumbled goat cheese
  • Red onion, thinly sliced
  • Pineapple chunks
  • Cilantro, chopped
For the Cherry Barbecue Sauce
  • 1/2 lb cherries, pits removed
  • 3 Tbsp sugar
  • 1/4 cup water
  • 1 cup barbecue sauce
For the Pulled Pork
  • 1 can Dr. Pepper
  • 5-7 lbs pork butt roast
  • 1/4 cup brown mustard
  • Salt and pepper, to taste
Directions
  1. Prepare the Pulled Pork: Liberally season the pork roast with salt and pepper and place the fat-side-up in a crockpot.  Add the mustard and Dr. Pepper to the crockpot and cook on low for 8-10 hours.  Shred the meat with two forks, discarding any bones and fat.
  2. Prepare the Cherry Barbecue Sauce: Roughly chop the cherries into small pieces.  Add them to a small sauce pan along with the sugar and water.  Cook over medium heat for ~20 minutes, until the liquid is thick and the cherries are soft.
  3. Grill the Pizza:  Heat grill to medium-high heat (450F) and generously oil the grate (I use a paper towel wad soaked in oil and held with tongs or a silicone brush
  4. Carefully place individually sized stretched dough rounds onto the grill and cover.  Allow to cook until nicely browned on bottom and large bubbles form on the surface (about 3-4 minutes).  Carefully remove the dough from the grill and with the cooked side facing up, top each pizza with cherry barbecue sauce.  Top with pulled pork then follow with cheddar and mozzarella cheese.  Finish with the red onions, pineapple, and goat cheese.  Carefully return the topped pizzas to the grill and cook until the bottom is browned and cheese is melted (about 4-6 minutes).
  5. Remove pizza from grill. Garnish with cilantro.  Cut and serve immediately.
Source: A combination of ingredients and ideas from Confections of a Foodie Bride and Our Best Bites

Wednesday, August 8, 2012

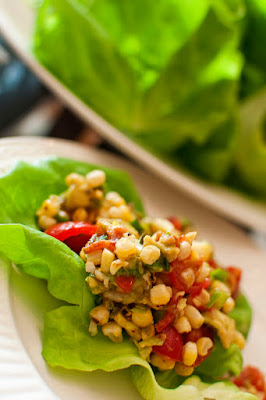
BLT Corn Salad Wrap

And so continues Emily and my Summer Seasonal Fruit and Veggies Extravaganza.  We followed our refreshing Watermelon Slush mocktails with another refreshing, barely cooked dish.  

Emily and I must have been on the same wavelength because this recipe was on both of our radars.  I like how we often think alike when it comes to food  :).  Summer tomatoes and corn are no brainers to include in this theme and having the boys give the corn some charred flavor on the grill keeps things cool in the kitchen.  Add avocado and bacon then serve it in a lettuce leaf and you have yourself a deliciously fresh finger food!

On Thursday you get a bonus post for the week- another product review+giveaway!  Then, on Friday you get the main course from Emily and my Summer Seasonal Fruit and Veggie Extravaganza before we finish off with two desserts next week.

Can't get enough lettuce wraps?  Try this Chorizo and Sweet Potato Lettuce Wrap or Asian Lettuce Wrap!


BLT Corn Salad Wrap

BLT Corn Salad Wrap
Photo Credit: Emily H.

Yields: 5 cups of corn mixture

Ingredients
  • 3 ears of corn, shucked of their husks and silk
  • 1 cup cherry tomatoes, sliced in half
  • 1/2 cup chopped green onions
  • 1 avocado, diced
  • 3 sliced crisp cooked bacon, diced
  • juice of 1 lime
  • about 1 tablespoon olive oil
  • salt and pepper to taste
  • a good sprinkling of chili powder and smokey paprika
  • butter lettuce or iceberg lettuce leaves
  • hot sauce and sour cream for topping
Directions
  1. Over a gas burner or grill, char raw shucked corn.  Rotate corn until cob is charred on all sides.  Allow corn to cool before slicing corn kernels from the cob.
  2. Add corn kernels to a medium bowl.  Add sliced cherry tomatoes, green onion, diced avocado, and diced bacon.  Squeeze in lime juice.  Add olive oil, salt, pepper, and slices.  Stir to combine.  Taste and adjust seasoning as needed.
  3. Rinse and clean individual lettuce leaves.  Serve alongside a bowl of corn salad.  To serve, scoop corn salad into lettuce leaves, top with hot sauce, sour cream, fold up like a taco and enjoy!
Source: Joy the Baker

Photobucket
This recipe was a Tasty Treasure at Fantastical Sharing of Recipes!

Monday, August 6, 2012

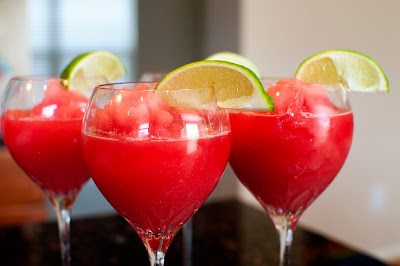
Watermelon Slush

Hello my lovelies!  Remember my extremely talented friend Emily who guestposted this General Tso's Chicken, takes all our Dinner Club photos, and did a Apple Extravaganza bakefest with me last Fall?  Well she and her husband Scott came over recently so we could continue the tradition of the wives creating deliciousness in the kitchen while the husbands did...manly things like watching TV.  But unlike during the Fall, we minimized the use of the oven (because it was hot hot hot!), focused on a theme of using seasonal fruits and veggies, and put the boys to work by manning the grill.

To kick off our Summer Fruit and Veggie Extravaganza, we started with this absolutely refreshing, totally natural and healthy watermelon slush.  The colors were gorgeously vibrant and it quenched our thirst on this hot July day.  It was a wonderful mocktail as is but we won't tell if you add a splash of vodka, tequila, or other favorite liquor to the mix ;).

Four more recipes and another awesome review+giveaway left to share in the next two weeks so stay tuned and keep coming back!

One Year Ago: 5 Minute (Healthy) Chunky Monkey "Ice Cream"
Two Years Ago: Raspberry White Chocolate Swirl Ice Cream
Three Years Ago: Grands! Taco Melts (AKA Homemade Hot Pockets)

Watermelon Slush

Watermelon Slush
Photo Credit: Emily H.
Yields: 4 servings (1 cup each)

Ingredients
  • 4 cups watermelon, seeded, diced, and frozen
  • 2 limes, juiced
  • 2 Tablespoons honey
  • 3/4 to 1 cup water
Directions
  1. Blend all ingredients in a blender until smooth.  Serve immediately.
Source: Prevention RD

Wednesday, November 30, 2011

Guest Post: General Tso's Chicken

Today I've invited my friend Emily to guest post for me.  You'll probably recognize her drool worthy photography from some of my Dinner Club posts as well as our recent Apple Extravaganza from October.  I'm always envious of her skills both in the kitchen and behind the lens.  She's an amazing person and I'm so glad to have her as a friend.  Hopefully this won't be the last that you see of Emily on this blog ;).

If you'd like to guest post, please leave a comment!

 This officially marks my first food blog post. Ever. Seriously. I’ve taken hundreds of photos of food I’ve cooked…and baked….and grilled….and, sometimes, when I’m feeling rebellious, even fried. But, never once written a blog post. So, as you can imagine I was a bit reluctant to take Christine up on her offer for a guest post, but I’m not one to turn down trying new things. Especially those food-related.

The recipe I’m sharing with you all today is quite the standard: General Tso’s Chicken. I’m sure this one has been done a hundred thousand times over, across blogs, recipe sites and the like. Heck, I would argue that this dish has been over done. However, the reasons I wanted to post this are two-fold:

First, I’m generally anti-fry. I’m more or less a border-line health nut about 80% of the week (the other 20%? Well, that’s what weekends are for!), making this recipe fall squarely outside of my comfort zone. I confess, we own a Fry Daddy (I blame the husband!), but require it never be used inside. There are few things that will make my stomach turn, but waking up to a kitchen with the lingering odor of a McDonald’s only results in my being overcome by the urge to shower. Or exercise. A lot.

Good news! This recipe does NOT require a Fry Daddy. Seriously, nothing ever should. And, yet….
Second, I was quite frankly blown away by the end result. It was border-line restaurant comparable. I’m not kidding. Let’s just say the husband put this recipe in his Top 5, and mandated it have a regular appearance in “The Rotation.” On one condition: that I continue to keep his plate broccoli-free (you see what I have to deal with?). 

And now, for the main event….

General Tso’s Chicken
General Tso’s Chicken

Ingredients
FOR THE CHICKEN
  • 1-½ teaspoon Toasted Sesame Oil
  • 1 Tablespoon Soy Sauce
  • 1 whole Large Egg White
  • ¼ cups Plus 2 Tablespoons Cornstarch
  • 1 pound Boneless, Skinless Chicken Thighs
  • Canola, Peanut, Or Vegetable Oil For Frying
  • Flour to coat the chicken (1/2 - 1 cup, depending on desired coating)
FOR THE SAUCE:
  • 1 Tablespoon Peanut, Canola Or Vegetable Oil
  • 2 cloves Garlic, Peeled And Minced
  • 2 Tablespoons Finely Chopped Fresh Ginger Root
  • 1 cup Chicken Broth Or Stock
  •  ¼ cups Soy Sauce
  • 1 Tablespoon Cornstarch
  • 1 teaspoon Chinese Chile-garlic Sauce
  • 3 Tablespoons sugar. (The original recipe calls for Raw (turbinado Or Demerara) Sugar, but I’m not sure it matters either way)
FOR SERVING:
  •  4 whole Scallions, Thinly Sliced
  • Steamed Rice (we’re partial to sushi rice, but I’m sure this would taste phenomenal with sawdust, so it matters not!)
  • Steamed Broccoli
Preparation Instructions

  1. Prep your chicken: In a mixing bowl, stir together the sesame oil, soy sauce, egg white, and 1/4 cup plus 2 tablespoons of cornstarch until a thick slurry forms. It will look gummy but smooth. Add the chicken pieces and stir until all are evenly coated. At first it may appear that it will not come together but it does! Set chicken aside, covered lightly with plastic wrap, at room temperature for 20 minutes, stirring occasionally.
  2. Begin the sauce: Add the tablespoon of oil to a large, heavy-bottomed saucepan over high heat. Stir the garlic and ginger into the oil and cook, stirring constantly, until fragrant, about 1 minute. In a separate bowl, whisk together the remaining sauce ingredients until smooth. Pour into the garlic and ginger, stirring, until the sauce becomes thick and shiny. Once the sauce thickens, lower heat and keep the saucepan over a low burner partially covered to stay warm.
  3. To fry the chicken: Heat 1/2-inches of oil in a heavy-bottomed, high-sided frying pan or skillet over high heat. In the meantime, add the flour to your coated chicken, mixing everything together. When the oil is shimmering, add one piece of chicken at a time, taking care not to crowd the pan. Cook chicken for 4 minutes on each side, or until deep golden brown and crisp on both sides.
  4. Transfer the fried chicken to a paper towel lined plate and repeat the process until you’ve cooked all the chicken. Then slide all of the fried chicken into the prepared sauce and toss to coat. (If desired, add some steamed broccoli to coat with the sauce also.) Increase the heat to medium, stir and cook just until hot all the way through.
  5. Sprinkle with sliced scallions and serve immediately over white rice. Or brown rice. Or sushi rice. You get the idea.
Source: Adapted from Rebecca at on Tasty Kitchen (Original Recipe)

Friday, October 28, 2011

Apple Cinnamon Truffles

This is it.  The grand finale to Apple Extravaganza week on my blog and coincidentally also all-time post #250! That's some pretty exciting stuff!  Who would have known that in just a few years I would have made so many new recipes (and honestly, what I post isn't even all of it!).  You all inspire me to do what I do!

Now back to this recipe.  My husband absolutely LOVES truffles.  At Valentine's Day one year I made Chocolate Chip Cookie Dough Truffles and our friend Jackie made Oreo Truffles.  He pretty much inhaled them both and we were baffled at how few truffles were leftover at the end of the night.  Anytime I make a dessert he practically begs me to make the cookie dough truffles so I thought I'd throw a truffle recipe into the baking mix.  Chris wasn't so keen on the idea of having fruit instead of chocolate in the mix but he went along with it anyway.

Scott was a little sad when he found out the oreos were going to be pulverized to be used in the recipe but once they were put together he changed his tune, too.  These were a hit with both of our guys!  They're very sweet and the small size makes them deadly because you feel justified in eating several at a time.  Not surprisingly Chris guarded his allotted truffles once we got home.  Sharing was not an option but that's okay because I happily ate the other treats that Emily and I produced.

To sum things up, Emily and I made six recipes between the two of us:
If you liked these posts, leave a comment to let us know because Emily and I (and/or any of my Dinner Club friends) would LOVE to do another marathon cooking/baking session sometime.  Any theme ideas or recipes that you have to share would be lovely!  If you want to be a taste-tester for one of our sessions, we might be able to arrange that, too ;).

Apple Cinnamon Truffles

Apple Cinnamon Truffles
Photo Credit: My wonderfully talented friend, Emily
Ingredients
  • 1 package Golden Oreos
  • 6 oz Cream Cheese, at room temperature
  • 1/4 cup Apple Pie Filling, pureed
  • 1 tsp Ginger, divided
  • 2 packages White Chocolate Baking Bars
  • 2 tsp Cinnamon 
  • Crushed Pecans, for garnish
Directions
  1. Add the Oreos to the bowl of a food processor and pulse until fine crumbs form. Transfer to the bowl of a stand mixer (or a large bowl) and mix together with the pumpkin (or pureed apple pie filling), cream cheese and 1/2 tsp. ginger. Once combined, use a cookie scoop to form into small balls and place on a plate. Refrigerate for 30 minutes, until firm. 
  2. Cover a baking sheet with wax paper and set aside. Melt the chocolate in the microwave in 30 second intervals, stirring after each time, until fully melted. Stir in the cinnamon and remaining 1/2 tsp. ginger. 
  3. Remove the balls from the fridge and dip into the chocolate, making sure they are coated evenly. Place on the wax paper and repeat until all balls are covered in chocolate. Sprinkle pecans on top and refrigerate until hardened.
Source: The Jey of Cooking as slightly adapted from Cooking with Christen

Thursday, October 27, 2011

Caramel Apple Cheesecake Bars

Holy mother of butter!  I urge you to try to ignore the fact that there are not one, not two, but THREE sticks of butter in this recipe because once you do, you can fully enjoy the ecstasy of this rich dessert.  As I mentioned yesterday, this is a Paula Deen recipe so to contain lots of butter is a pre-requisite.  Oh and don't worry, Paula threw in three APPLES to offset all that butter :P.

I picked this as an option because I wanted something caramel.  Apples are caramel just go together and this recipe is no different.  The flavor was much like the Caramel Apple Cheesecake Pie but way less time intensive in the event presentation is not so important.  With its classic, rich flavors, it's no wonder that Emily voted this her favorite recipe of the bunch.  But, Emily being Emily and not able to practice self control gave THE ENTIRE PAN to me and my husband to take home.  Thank a lot Em.  Way to make Chris and me fat ;).

Tomorrow I'm wrapping up the Apple Extravaganza posts.  I'm saving the boys' favorite recipe for last.  Hint: They're bite sized which makes them extra deadly!

Caramel Apple Cheesecake Bars

Caramel Apple Cheesecake Bars
Photo Credit: My beautiful friend Emily

Ingredients

For the Bars
  •  2 cups all-purpose flour 
  • 1/2 cup firmly packed brown sugar 
  • 1 cup (2 sticks) butter, softened 
  • 2 (8-ounce) packages cream cheese, softened
  • 1/2 cup sugar, plus 2 tablespoons, divided 
  • 2 large eggs 
  • 1 teaspoon vanilla extract 
  • 3 Granny Smith apples, peeled, cored and finely chopped 
  • 1/2 teaspoon ground cinnamon 
  • 1/4 teaspoon ground nutmeg 
For the Streusel Topping
  • 1 cup firmly packed brown sugar 
  • 1 cup all-purpose flour 
  • 1/2 cup quick cooking oats 
  • 1/2 cup (1 stick) butter, softened
  • 1/2 cup caramel topping
Directions
  1. Preheat oven to 350 degrees F. 
  2. To make the streusel topping: In a small bowl, combine all ingredients except the caramel.
  3. To make the bars: In a medium bowl, combine flour and brown sugar. Cut in butter with a pastry blender until mixture is crumbly. Press evenly into a 13 by 9 by 2-inch baking pan lined with heavy-duty aluminum foil. Bake 15 minutes or until lightly browned. 
  4. In a large bowl, beat cream cheese with 1/2 cup sugar in an electric mixer at medium speed until smooth. Then add eggs, 1 at a time, and vanilla. Stir to combine. Pour over warm crust. 
  5. In a small bowl, stir together chopped apples, remaining 2 tablespoons sugar, cinnamon, and nutmeg. Spoon evenly over cream cheese mixture. Sprinkle evenly with Streusel topping. Bake 30 minutes, or until filling is set. Drizzle with caramel topping. 
Source: Originally from Paula Deen as seen on Delicious Meliscious

Wednesday, October 26, 2011

Shrimp with Green Apple Chipotle Salsa

All of the recipes that Emily and I made during our apple extravaganza were sweet with the exception of this one.  I have had this particular recipe bookmarked in my Google Reader forever and had suggested this as a savory option for our collection.  To be honest, I'd take savory over sweet any day, anyway!  When it came time to pick the final recipes I actually didn't end up picking this one but it was Emily's husband Scott that chose it to be made.  Yep, we gave the boys a say.  They were going to be eating everything, after all, so it only seemed fair.

I really liked the bold slightly spicy flavor of the shrimp in this recipe and overall it was quite a delicious dish.  It certainly gave our sweet tastebuds a break.  What we all agreed was disappointing was the fact that the apple was completely overwhelmed by the red onion and cilantro.  It really isn't all that surprising given how strong those particular flavors are and if it weren't for the whole "apple" theme it wouldn't matter at all.  Eh...who am I kidding...to me, it still didn't matter at all.  I happily gobbled up this savory treat and was so glad that Scott added it back into the mix :).

Only two more recipes left to share!  Tomorrow I'll be sharing Emily's favorite recipe from the batch.  Hint: It's a Paula Deen so get ready to get your butter on.

Shrimp with Green Apple Chipotle Salsa

Photo Credit: My friend Emily

Ingredients

For the salsa

  • 1/2 c. diced Granny Smith apple
  • 1/4 c. diced red onion
  • 1/4 c. diced red bell pepper
  • 2 TBSP chopped fresh cilantro
  • 2 TBSP apple cider vinegar
  • 1/4 tsp. chipotle chile powder
  • 1/8 tsp. Cayenne pepper
  • salt and black pepper, to taste 
For the shrimp
  • 1 TBSP olive oil
  • 1 lb. shrimp, peeled and deveined
  • 1/2 tsp. paprika
  • 1/2 tsp. ground cumin
  • 1/4 tsp. black pepper
  • 1/4 tsp. salt
  • 1/2 tsp. chili powder
  • 1/2 tsp. ground ginger
  • 1 tsp. light brown sugar
Directions
  1. Combine all ingredients for salsa in a medium bowl and mix well.  Cover and refrigerate at least one hour before serving.
  2. To cook the shrimp, heat the oil in a large saute pan over medium heat.  Meanwhile, combine shrimp and all spices in a large bowl.  Toss to coat.  Place shrimp in the saute pan and cook one to two minutes per side, depending on size of shrimp.
  3. Serve shrimp over a bed of salsa. Serves four.

Source: Scoot Uehlein, Canyon Ranch Cooks as adapted by and seen on Apple a Day

Tuesday, October 25, 2011

Apple Cider Butter

So continues apple extravaganza week here at Christine's Kitchen Chronicles.  This particular recipe was considered a "bonus".  Emily had the bright idea to make something that we could enjoy later once everything else was long gone into our bellies.  I didn't even know we were making apple butter until I showed up at her house and saw a bunch of canning supplies out on her kitchen table.  What a pleasant surprise :).

Since we haven't opened these precious jars yet I can't speak to the taste but the smell while it was cooking?  Wow.  Delicious.  Just like apple cider!  Honestly, I've never tried apple butter before and am curious as to why it's called "butter".  Also, I need inspiration!  What's your favorite way to enjoy apple butter?

Coming up tomorrow, something savory to mix things up a bit!  And remember, if the anticipation of waiting to see what might show up is killing you, you can always become a fan of my facebook page for sneak peeks of posts!

Apple Cider Butter

Yields: 4 pints
Photo Credit: My friend Emily
Ingredients
  • 10 cups peeled, chopped, cored Granny Smith (or other tart) apples
  • 6 cups apple cider
  • 4 cups sugar
  • 1.5 teaspoons cinnamon
  • 1.5 teaspoons allspice
  • 1 teaspoon cloves
  • 1.5 teaspoons nutmeg
Directions
  1. Prepare canner, jars and lids per manufacture directions.
  2. In a stainless steel saucepan, combine apple pieces and cider. Cook until apples are tender – about 20 minutes.  Puree apples using an immersion blender or transfer cooked apples into a blender.  Put the pureed mixture back into the pan and add your sugar and spices. Cook over medium-low heat, stirring constantly to prevent burning, until thick.
  3. Pour into hot, sterilized jars, leaving 1/2 inch head space. Wipe rim, center lid on jar, and add screw band to fingertip tight.
  4. Process in a canner bath for 20 minutes at sea level, more depending on altitude or larger size of jar. Remove canner lid and let jars rest for 5 minutes before removing from the water. Lift the jars out of the water and let them cool without touching or bumping them.
  5. Cool jars overnight. Once the jars have cooled, ensure they are sealed. Press down gently in the center of the lid. If it pops up and down (often making a popping sound), it is not sealed. Put the jar in the refrigerator and enjoy it for the next 3 – 4 weeks. If the lid remains taut, you've got a good seal.
Source: Canning with Kids

Monday, October 24, 2011

Apple Cider Beignets with Butter-Rum Caramel Sauce

I can't believe it's already been over a week since Emily and I had our apple baking extravaganza.  As promised, I'll be continuing to share the recipes EVERY DAY this week.  That's two bonus posts for the week...not to mention more of Emily's drool worthy pictures.  You should be excited!

It has always been an inside joke...and probably desire...of the folks in my Dinner Club to do a fried theme.  So, Emily and I figured we should bust out her Fry Daddy and make sure we had a fried recipe in our repertoire to make in their honor.  Since we tagged teamed the recipe list and I was *still* working on those oh-so-time-consuming Apple Pie Cookies, this recipe was all Emily.

On the outside, these look like simple donuts but on the inside, there's actually an entire apple slice to offset the unhealthiness ;).  This recipe also uses sparkling apple cider instead of sugar to give them just a touch of sweetness.  Personally, I was craving more sweetness so I'd either dust it with more powdered sugar, douse it in more of that yummy butter-rum caramel sauce, or go ahead and add some regular sugar to the batter...or maybe all of the above.  Haha!

Next up tomorrow?  Something that will keep long after everything else was gobbled up.  Any guesses?  

Apple Cider Beignets with Butter-Rum Caramel Sauce

Photo Credit: My friend Emily
Ingredients

For the Sauce
  • 1 cup sugar
  • 3 Tablespoons unsalted butter, cut into pieces
  • 1/3 cups water
  • 1/4 cup dark rum
  • 1/2 teaspoon cider vinegar
  • 1/4 cup heavy cream
For the Beignets
  • About 8 cups vegetable oil, divided
  • 2 Golden Delicious apples
  • 1 3/4 cups self-rising cake flour*, divided
  • 1 large egg
  • 3/4 cup sparkling apple cider
  • Confectioner's sugar for dusting
*If you can’t find self-rising cake flour, you can substitute self-rising all-purpose. Use 1 cup in the batter and 1/2 cup for dredging. Increase cider to 1 cup and follow recipe as directed.

Directions
  1. Make the Sauce: Heat sugar in a 12-inch heavy skillet over medium heat, stirring with a fork to heat sugar evenly, until it starts to melt, then stop stirring and cook, swirling skillet occasionally so sugar melts evenly, until it is dark amber. Stir in butter, water, rum, vinegar, and a pinch of salt (caramel will harden and steam vigorously) and cook over low heat, stirring occasionally, until caramel has dissolved. Add cream and bring to a boil, stirring, then remove from heat. Cool to warm. 
  2. Make the Beignets: If you have a deep-fryer, use that and heat the oil to 375F.  Otherwise, preheat oven to 250°F with rack in middle. Set a cooling rack in a large shallow baking pan. Heat 2 inches oil in a 5- to 6-quart heavy pot over medium-high heat to 375°F.
  3. Meanwhile, peel apples and cut crosswise into 1/4-inch-thick slices. Cut out core with cutter, then pat apple rings dry. 
  4. Put 1 1/4 cups flour in a large shallow bowl and make a well in center. Beat egg in a small bowl with a fork, then stir in cider and 1 tablespoon oil and pour into well. Stir with fork until a lumpy batter forms.
  5. Working in batches of 3 or 4, dredge apple rings in remaining 1/2 cup flour, shaking off excess, then dip in batter to coat, letting excess drip off, and fry, gently turning over once with a slotted spoon, until golden brown on both sides, about 2 minutes total per batch. Transfer to rack and keep warm in oven. Return oil to 375°F between batches.  
  6. Just before serving, dust warm beignets with confectioners sugar. Stir sauce, then serve on the side.
Make-ahead Notes: 
  • Sauce can be made 3 days ahead and chilled, covered. Warm before serving.
  • Beignets are best freshly made but can be fried 2 hours ahead and kept, loosely covered, at room temperature. Reheat beignets (they should not touch) on a rack set in a large shallow baking pan, uncovered, in a 325°F oven until hot, 15 to 20 minutes.
Source: Gourmet

Friday, October 21, 2011

Apple Pie Cookies

My friend Emily and I love to cook and bake.  Emily, in particular, almost always makes sure to snag the dessert category for our Dinner Club.  She's also our resident photographer with her fancy d-SLR camera and eye for composition.  I'm always so envious of her pictures!

When she had the idea to do a marathon baking session we were both giddy with excitement.  We decided it would be fun to go to an apple orchard and pick apples then make tons of recipes with them that same day.  Unfortunately for us the apple crop in our area was damaged from bad weather earlier in the year and the one orchard that did have u-pick apples was about 45 minutes away and pretty picked over by the time we were ready to get together this past weekend.  So, the apples came from our local grocer but that didn't stop us from baking up a storm.

We donned our cute aprons (which Emily specially bought an apple print one for the occasion!) and went to work while our husbands plopped down on the couch and watched massive amounts of TV.  The only time they paused was when a new dish was ready for them to try.  So, with the recipe list was set, the ingredients purchased, and taste-testers lined up, we were ready to go!

To kick us off, Emily pre-made the crust for this recipe the evening before our event.  She also helped prep my apples and spice mixture and then off I went to roll, cut, and assemble these gorgeous cookies.  Somehow as time went on my cookies got fatter...I guess because I didn't have the best gauge of how much filling to put in.  Honestly, they were a royal pain in the butt to assemble but the end result was a cookie sized apple pie...essentially a small apple pie or hand pie :).  As our friend Jackie pointed out, these were certainly the cutest of all the treats that were created that day.  They were fantastic when warm out of the oven or re-heated in the toaster oven.  In fact, it made a perfectly good breakfast this morning when I realized my husband had used all of the milk ;).

Don't forget to come back next week when I'll post a recipe EVERY (WEEK) DAY!  If you're a fan on facebook, I'll even give you a sneak peek photo for the next post ;).


Apple Pie Cookies

Photo Credit: My friend and baking partner in crime, Emily
Ingredients

For the Crust
  • 2 1/2 cups all-purpose flour, plus more for dusting surfaces, dipping fork
  • 2 tablespoons granulated sugar (doubled from my standard pie dough to make this more cookie-like)
  • 1 teaspoon table salt
  • 2 sticks (8 ounces, 16 tablespoons or 1 cup) unsalted butter, very cold
  • 1/2 cup water, very cold (I pour 1 cup and add ice while I work, then measure 1/2 cup from it when I need it)
For the Filling
  • 3 medium baking apples (such as granny smith, gala, or golden delicious)
  • Squeeze of lemon juice (optional)
  • 1/3 cup granulated sugar
  • 1 teaspoon ground cinnamon
  • Few gratings fresh nutmeg
  • A pinch of any other spices you like in your apple pie
For Finishing
  • 1 large egg
  • Coarse or granulated sugar for garnish
Directions
  1. Make your pie dough: Whisk together flour, sugar and salt in the bottom of a large, wide-ish bowl. Using a pastry blender, two forks or your fingertips, work the butter into the flour until the biggest pieces of butter are the size of small peas. Gently stir in the ice water with a rubber spatula, mixing it until a craggy mass forms. Get your hands in the bowl and knead it just two or three times to form a ball. Divide dough in half. Wrap each half in plastic wrap and flatten a bit, like a disc. Chill in fridge for at least an hour or up to two days. 
  2.  Meanwhile, get everything else together: Line up six small dishes. In the first one, pour some water. Leave the second one empty; you’ll use it for your apples in a bit. In the third one, mix the sugar, cinnamon, nutmeg and any other spices you like in your pie, such as a pinch of cloves. In the fourth one, place a little bit of flour to dust your surface and dip your fork for crimping. In the fifth one, whisk an egg with one teaspoon of water until smooth. In the last one, or in whatever container you keep it in, add some coarse or regular sugar for decorating the tops of the pies. 
  3. On a well-floured counter, roll out your pie dough a little shy of 1/8-inch thick. Lift and rotate your dough as you roll it, to ensure that it rolls out evenly and so you can be sure it’s not sticking in any place. Use a round cookie cutter (I used 2 1/2") to cut as many rounds as you can from the dough. Transfer them to parchment- or silcone mat lined baking sheets and keep them in the fridge until you need them. Once you’ve finished the first packet, repeat the process with the second packet of dough
  4. Prepare your apples: Peel your apples. Cut into thin (1/8-inch thick) slices. Place them in your second bowl, covering them with a few drops of lemon juice if you find that they’re browning quickly.
  5. Preheat oven to 350 degrees. 
  6. Assemble your cookies: Grab your first disc of chilled dough and lightly dampen it on one side with the water to help it seal. Add some apple slices to the center of the disk, leaving about 1/2" to 3/4" around the edges. Place a second disc of dough on top and press the tops and bottoms around the apple with your fingers. Cut decorative slits in your “pies”. Dip your fork in the flour and use it to create a decorative crimp on the sealed edges. Brush your cookie with egg wash and sprinkle with coarse sugar. Replace on baking sheet and chill while you prepare the others. 
  7. Bake your apple pie cookies for 20-25 minutes, or until puffed and bronzed and very pie-like. Transfer to a cooling rack to cool before eating.  
Do ahead: These will keep for a few days at room temperature. You could also make a larger batch of these, doing everything but brushing them with egg and sprinkling them with sugar, and keep them frozen until needed. Bake them directly from the freezer, just adding a couple minutes to the baking time.

Source: Smitten Kitchen