Showing posts with label grilled. Show all posts

Tuesday, September 17, 2013

Cones for the Cure Winner and Grilled Zucchini, Yellow Summer Squash and Red Onion with Lemon-Basil Vinaigrette

Hi fans!  I'm here to announce the Cones for the Cure Giveaway Winner and while I'm at it, I wanted to share a recipe for Summer's last hurrah as Fall seems to be rapidly upon us!  Oh, and in other news, we finally took the plunge and bought one of those fancy dSLR cameras so we could take lots of great pictures of our little cutie.  This also means better (hopefully!) food photography coming your way.  What do you think??

First thing's first, congratulations Kesha G. for winning the prize pack.  I've sent you an email with details on how to claim your prize.  I hope you enjoy the goodness!

Now for this recipe.  I loved grilled veggies but it never fails that when I send my husband out to grill em up, many of them end up as grill casualties when they slide down between the grates during transfer and/or flipping.  With this recipe, I skewered the vegetables for him so that they'd stay intact.  Good thing too because while the recipe said it served 4-6, I doubled it and it still only seemed to serve 4-6 which was a bummer considering I was trying to serve 10.  I made changes to the below so that you can get sufficient quantities and not be disappointed with your yield.  The flavor was wonderful so it was too bad we had to ration it...loved that caramelized flavor with the brightness of the lemon!  You can use whatever veggies you have on hand.  The farm had sent us zucchini and yellow squash so that's what I used.  I would have loved to add eggplant if we had it.  Yum!

One Year Ago: Chicken Fajita Lettuce Wraps
Two Years Ago: Foil-Baked Fish with Black Beans and Corn
Three Years Ago: Pineapple Teriyaki Chicken
Four Years Ago: Sausage, Pepper, Onion, and Green Pepper Fra Diavolo

Grilled Zucchini, Yellow Summer Squash and Red Onion with Lemon-Basil Vinaigrette 


Grilled Zucchini, Yellow Summer Squash and Red Onion with Lemon-Basil Vinaigrette

Ingredients
  • 1 lb zucchini, sliced into 1/3-inch rounds 
  • 1 lb yellow summer squash, sliced into 1/3-inch rounds
  • 1 red onion, sliced into 1/2-inch rounds 
  • 1/2 cup + 3 Tbsp olive oil 
  • Salt and pepper, to taste
  • 2 cloves garlic, minced 
  • Zest and juice from 1 lemon (preferably organic)
  • 2 tsp spicy brown mustard 
  • 6-8 large basil leaves, chopped
Directions

  1. Heat grill to medium and prepare skewers by soaking in water per the instructions on your package.
  2. Carefully thread the onion rounds onto prepared skewers, taking care to ensure the skewer goes through every onion ring.  If desired, thread the remaining vegetables onto skewers as well.  
  3. Brush onions, zucchini, and yellow summer squash rounds with 1/2 cup olive oil and season liberally with salt and pepper. 
  4. Grill vegetables 9-10 minutes each side, until nicely caramelized. 
  5. In a small bowl, whisk garlic, lemon juice, zest, mustard, remaining 3 tablespons oil, and a pinch of salt and pepper together.
  6. Place cooked vegetables on a platter, drizzle with dressing, and top with chopped basil leaves.

Source: Barely modified from Confections of a Foodie Bride

Friday, July 26, 2013

Recipe Swap: Shrimp, Black Bean, and Pineapple Foil Packets

Okay.  I need to GET ON THE BALL.  This pregnancy brain thing really sucks.  It's about 10:50PM on Thursday and this post is supposed to be going live at 7AM on Friday.  And I have had an ENTIRE MONTH to make and schedule it.  In all fairness, I did actually make my swap recipe a couple weeks ago.  It was the whole blog posting part that I've been putting off.  Sometimes, it just seems like so much work...but enough whining for now.  I'm just being a cranky 38 week pregnant lady :P.

Anyway, this is the What's Cooking recipe swap hosted by Sarah at A Taste of Home Cooking.  The theme is Grilled Foods and I received a recipe from Jenna at Jenna's Cooking Journey.  You may recognize her as the guest blogger that brought you these yummy Oatmeal Carmelitas awhile back.

As for this recipe, I've actually made it before but it didn't make it onto the blog.  The reason for that was that unlike the similar Foil Baked Fish with Black Beans and Corn recipe which I adore, this one just lacked flavor to me.  I only share recipes which I and/or my husband enjoy.  But as it was a swap recipe, I dutifully made it again.  And unfortunately, it fell flat for me, again.  I love pineapples and jalapeno peppers and shrimp.  It really should be a winner in theory but you can't win them all.  I don't know what's wrong with me...it seems to get such rave reviews by other bloggers!  Thanks anyway Jenna for having me give it another shot.  And dear readers, since so many others like it, you should probably give it a try for yourself  even if I didn't care for it :).

One Year Ago: Pasta with Grilled Plum Tomato Sauce and Magic in the Middles (peanut butter stuffed chocolate sugar cookies!)
Two Years Ago: Bob's Mexican Stuffed Chicken

Shrimp, Black Bean, and Pineapple Foil Packets


Shrimp, Black Bean, and Pineapple Foil Packets

Ingredients
  • 8 oz raw, medium sized shrimp (peeled, deveined) 
  • 1 15-oz can black beans, drained and rinsed 
  • 1 cup pineapple, finely chopped 
  • 1/3 cup red onion, finely chopped 
  • 1/2-1 jalapeno pepper, minced (depending on the amount of spice you want) 
  • 2 tablespoons pineapple juice, divided 
  • 1/2 teaspoon ground coriander 
  • 1 teaspoon ground cumin, divided 
  • pinch of salt 
  • freshly ground black pepper 
  • 2 tablespoons chopped cilantro 
  • 1/2 avocado, diced
Directions
  1. Preheat grill to medium. 
  2. Rinse the shrimp and pat dry. Sprinkle with 1/4 teaspoon cumin, chili powder, salt and pepper. Toss to coat. Set aside. 
  3. In a medium bowl, combine the black beans, pineapple, red onion, and jalapeno. Stir in 1 tablespoon pineapple juice, coriander, and remaining 1/2 teaspoon cumin. 
  4. Spray two large pieces of aluminum foil with cooking spray. Spoon half of the black bean mixture into the center of each and top with half of the shrimp. Pour the remaining pineapple juice over the shrimp. Bring the edges of the foil together and fold down, sealing well. 
  5. Place the foil packets on the grill, cover, and cook for 10-12 minutes, until shrimp are opaque. Carefully open the foil packets and stir the contents. Top with the diced avocado and sprinkle with cilantro. 
Source: Jenna's Cooking Journey as modified from PreventionRD

PS: It's now going on 11:10PM.  See, these posts don't just write themselves, ya know!  Ah this blog is a labor of love :P.

Wednesday, July 10, 2013

Caprese Burgers with Pesto Mayonnaise

It's Summertime and you know what that means...grilling!  And farm fresh veggies!  Hooray!

With the first red tomatoes of the season rolling in from my CSA farm share I decided to make a very simple burger that would highlight the super fresh flavors.  And when I say "I" made this meal I really mean that I sent my husband outside in the heat to go grill up these burgers :D.  Yet another reason grilling makes the menu...it's group participation from the hubby!

The original recipe called for sliders but we had a pack of leftover pre-made patties so ours were regular sized burgers.  Personally I think it works out better because the size of the tomato and mozzarella is a better match, anyway.  This was a great quick meal that will have you spending virtually no time to make and you can use any extra topper ingredients to make a fast Caprese Salad on the side.  For the salad, just layer the mozzarella, tomatoes, basil then drizzle with extra virgin olive oil and balsamic vineagar.  Season with fresh cracked pepper and sea salt and you're good to go!

Caprese Burgers with Pesto Mayonnaise


Caprese Burgers with Pesto Mayonnaise

Ingredients

  • 1 pound ground beef
  • Salt and pepper
  • Fresh mozzarella, sliced
  • 1 tomato, sliced
  • Fresh basil leaves
  • Burger buns
  • 1/2 cup mayonnaise (As usual I used Fat Free Greek Yogurt instead)
  • 1/4 cup pesto

Directions

  1. Mix salt and pepper into beef (or if using pre-formed patties, season each side of the patty).  Place on a hot grill and cook through, flipping once.  Near the end of the grilling time, add cheese.  Cover grill and cook for a few minutes until the cheese is melted.
  2. Meanwhile, mix together the mayonnaise and pesto in a small bowl.  Set aside.
  3. Place burger onto bottom half of bun.  Top with tomato and basil.  Spread pesto mayonnaise on top half of bun.  Serve.

Source: I was Born to Cook 

Wednesday, April 3, 2013

Steak, Asparagus, and Chimichurri Pasta

Is it Spring, yet?

I'm still waiting for the time where delicate flowers begin to poke their heads out of the ground and start to bloom.  Fat robins hatch their young and begin to chirp. Fresh produce can be found and it becomes warm enough to begin grilling again.

Steak, Asparagus, and Chimichurri Pasta

What I have to share with you today is a dish that envelopes the concept of Spring to me.  Fresh grilled steak slices covered in a light and flavorful chimichurri sauce.  Tossed with bright green asparagus and pasta. It's fresh, healthy, and can be thrown together in a pinch!  For those that are on Clean Eating diets, you could easily adapt this recipe to use 100% whole grain pasta.

In case you've never had chimichurri before and are not sure what to expect, I call it Green Goodness.  It's essentially the Argentine version of pesto.  If you love garlic and herbs, you'll love this!

Two Years Ago: Fish Tacos

Steak, Asparagus, and Chimichurri Pasta


Steak, Asparagus, and Chimichurri Pasta

Ingredients

For the Chimichurri
  • 3 cloves garlic
  • 2 cups Italian or curly parsley, loosely packed
  • 1/2 cup cilantro
  • 1 cup extra virgin olive oil
  • 1 tsp red wine vinegar
  • 3 Tbsp lemon juice
  • 1 tsp red pepper flakes (adjust to your desired heat tolerance...I could have used more!)
  • 1 tsp salt
For the Pasta
  • 1 lb pasta (I used Rotini but the original recipe called for Rigatoni)
  • 1 lb skirt steak
  • 1 lb thick asparagus, tough ends removed
Directions
  1. Make the chimichurri by placing all of the ingredients in a blender or food processor and pulsing until all large pieces of parsley, cilantro, and garlic are gone.  You can also do this by hand by finely chopping the garlic, parsley, and cilantro then whisking together with the remaining ingredients.
  2. In a gallon sized ziplock bag, combine flank steak and about 1/4 cup of the chimichurri sauce.  Return to the refrigerator to marinate overnight.
  3. When ready to cook, heat your grill to medium-high heat.  For those in colder climates still, you can use a grill pan on your stove.  Here's the one that I use!
  4. Once the grill is hot, place the steak on and cook to desired doneness (I do about 4-5 minutes on each side), flipping once.  Grill the asparagus , turning often to ensure it doesn't burn.  Remove the asparagus when it is tender but still crisp, about 4-6 minutes.  Remove the steak and allow it to rest 5 minutes.  Slice the steak into thin strips and cut the asparagus into 1-inch pieces.
  5. While grilling, bring a large pot of water to boil.  Salt the boiling water then add pasta to the boiling water and cook until al dente.  Drain and return to the pot.
  6. Toss the pasta and asparagus with chimichurri sauce until well coated (about 2/3 of what remains).  Top with slices of steak and drizzle with additional chimichurri before serving.  Any extra chimichurri sauce can be refrigerated for up to 3 weeks.
Source: Slightly modified from Bitchin' Camero

Wednesday, September 26, 2012

Guest Post by SteakNPotatoesKindaGurl: Grilled Filet with Bourbon Butter

Here we are with my final guest blogger.  Did you enjoy all of the new blogs that I shared?  As I said from the beginning, I hope you found a new one to love and follow.  There was a bit of something for everyone because bloggers come from all life-stages...from high school to young professional to mommy.  All of us are so different and yet we all share a love for cooking and blogging!

Desiree (or Desi for short) the voice of SteakNPotatoesKindaGurl, is a fellow Cincinnatian and Secret Recipe Club Group C member.  I'm always excited to meet others in the area that share my passion for food.  Desi and I even joked about how we annoy our (not-as-food-loving) friends by taking pictures of our food whenever we go out to eat.  I told her we really ought to get together for dinner or drinks sometime :).

When Desi sent me her recipe, I could practically smell and taste the steak through my screen.  Like...I wanted to go over to her house immediately to eat this thing!  My husband's favorite cut of meat is filet and yet we have never tried to make it a home ourselves.  We did take a cooking class together once at The Learning Kitchen where we made filet on a grill pan but that was the end of that (so much for using our newly acquired skills, huh?).  But now, between this recipe, her Filet Mignon with Creamy Mushroom Sauce, and the fact that we're buying 1/16th of a cow this fall, we have no excuses!  (Seriously, you can come back and ask me later if I made some succulent filet mignon with those cows...who...oddly enough are named T-Bone and Ribeye...but that will be a story for another day.)

I'd also love to try making her Bacon Pancakes with Maple-Peanut Butter Syrup (BACON!  And breakfast foods again with peanut butter for the hubby...surprised?  I think not.).  After all is said and done, I'd wash everything down with Cherry Limeade Slushies, my favorite drink to order when we go to Sonic Drive-In.

I'll be seeing you all with a personal post next week if I'm not entirely jetlagged.  Hello to all of my new (and veteran) readers!  Where do you come from?  Any other Great Cincinnatians?  Leave me a comment and stay tuned, okay? :)

One Year Ago: French Onion Soup
Three Years Ago: Hot Spinach Artichoke Dip
-----------------------------------------------------------------------------

Why hello there! I'm so happy to be guest posting on Christine's blog today! My name is Desi and I host a little blog called SteakNPotatoesKindaGurl. It's so cool that Christine and I are both part of the Secret Recipe Club, and both live in the Cincinnati area. 

I love bacon, salted caramel, margaritas, and steak and potatoes of course :) 

But I realized something. I don't have many steak recipes on my blog. 

And I'm the steak n potatoes kinda gurl! 

So here's my attempt to change that. 

A delicious and simple grilled steak recipe that I personally love...

...Grilled Filet with Bourbon Butter.

The perfect steak with the perfect topping. 


Grilled Filet with Bourbon Butter
Bourbon Butter from Traeger

  • Two filet mignons
  • Salt and pepper for seasoning, if desired
 Bourbon Butter
  • 1 stick of unsalted butter, at room temperature
  • 2 cloves garlic, finely minced
  • 2 tablespoons bourbon
  • 1 tablespoon finely chopped green onion
  • 1 tablespoon finely chopped parsley
  • 1/2 teaspoon salt
  • 1/2 teaspoon freshly ground black pepper
Note: Butter can be prepared ahead and refrigerated until serving time. You may want to let the steaks sit out of the fridge for 10-20 minutes also to come to room temp.

In a small bowl, combine the butter, garlic, bourbon, green onion, parsley, salt and pepper and stir with a wooden spoon.

Season steaks with salt and pepper, if desired. Place steaks on the grill on medium-high and cook, turning once, until done to your liking in the center of thickest part. Transfer the steaks to a plate and top with the bourbon butter. 

You can use whatever cut of meat you like but we like tender filet steaks. The bourbon butter was a nice topping and the bourbon wasn't overpowering, for me at least. And we like our steaks cooked medium with a touch of pink inside.

You can even make the steaks indoors using a skillet. And the bourbon butter is oh so easy. 


This is definitely going in the grilling rotation! And it's been a pleasure guest posting here at Christine's Kitchen Chronicles :)

Peace, and bacon grease!
 

Wednesday, September 5, 2012

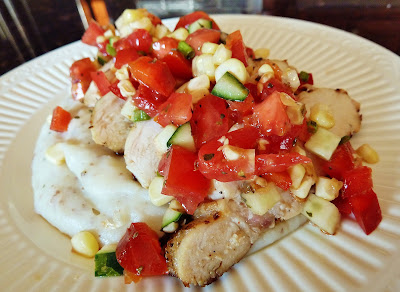
Buttermilk-Grilled Chicken with Garden Vegetable Salsa

Are you always looking for ways to use up your leftover buttermilk like I am?  Lucky for you I have a buttermilk tag on my blog just for this exact purpose!  Of course, you could always "cheat" and make fake buttermilk by adding 1 tablespoon of vinegar or lemon juice to a regular cup of milk and letting it sit for 5 minutes.  This makes it get a bit curdled and sour just like buttermilk.  It works in a pinch but for me, I like the real thing so I buy the jug of buttermilk at the store.

My CSA continues to churn out lots of wonderful garden-fresh veggies and so when I saw this on Josie's blog, I knew it would make the menu sometime this Summer.  Finally the stars aligned and the farm supplied all of the vegetables that I needed to make this recipe (even the mashed potatoes which I made as a "bed" for the chicken and veggies to rest upon).  I gathered some fresh herbs from our work garden and happened to have some buttermilk leftover from when I had made Tomato and Corn Pie (still easily the best dish from the Summer!) and Strawberry Buttermilk Ice Cream.  Perfect.

I've heard of using buttermilk for fried chicken before but never grilled so the concept was intriguing to me.  I found that allowing the chicken to marinate overnight in the buttermilk mixture resulted in meat so juicy and tender after grilling that I about died of happiness.

As a side note, this is my last month of my CSA subscription :(.  But, to preserve some of the fresh flavors of summer, I took on canning 60 POUNDS of tomatoes with my mother-in-law.  I'll post soon about that adventure so stay tuned!

One Year Ago: Oven Baked Sweet Potato Chips

Buttermilk-Grilled Chicken with Garden Vegetable Salsa


Ingredients

For the Chicken
  • 4 boneless, skinless chicken breast halves, trimmed
  • 2 cups low-fat buttermilk
  • 3 cloves garlic, peeled and crushed
  • 1/2 tsp paprika
  • 1/8 tsp crushed red pepper flakes
  • 1 tsp kosher salt
  • 1/2 tsp freshly ground pepper
For the Garden Salsa
  • 1/2 cup finely diced cucumber
  • 1/2 cup finely diced bell pepper
  • 1/2 cup minced scallions
  • 3/4 cup corn, cut from the cob (about 1-2 ears)
  • 2 medium tomatoes, cored, seeded, and diced
  • 1/4 cup minced fresh herbs (such as basil, chives, oregano, and parsley)
  • 2 Tbsp olive oil
  • 2 Tbsp red wine vinegar
  • Juice of 1/2 lemon
  • Salt and pepper, to taste
Directions
  1. In a gallon-sized ziplock bag or shallow baking dish, combine the chicken with the buttermilk, garlic, and spices.  Cover and refrigerate for at least 1 hour or up to overnight.
  2. When ready to cook, preheat the grill to medium-high heat.  Oil the grates and cook the chicken about 7 minutes per side, turning once, or until the internal temperature reaches 165F.  Remove from the heat and cover loosely with foil.  Allow to rest at room temperature about 10 minutes before serving.
  3. While the chicken is cooking, combine the ingredients for the salsa in a medium bowl.  Taste and season with salt and pepper before serving on top of chicken.

Source: Pink Parsley

Monday, August 13, 2012

Recipe Swap: Hawaiian Chicken Sandwiches

Are you feeling too hot to cook?  If so, this edition of A Taste of Home Cooking Recipe Swap will be perfect for you.  I submitted the Korean Style Short Ribs which create melt-in-your-mouth amazingness in the crockpot without heating up the kitchen.

This month, I had the hostess herself, Sarah of A Taste of Home Cooking.  If I didn't know better I'd say that there was a recent obsession with Hawaiian Chicken Sandwiches in the blogging world.  I found it a little ironic that a recent June Recipe Swap recipe was very similar and yet each had their own distinct tastes to them.  It's as if we were to take the famous Shakespeare quote and say "What's in a name?  That which we call a Hawaiian Chicken Sandwich.  By any other name would taste just as delicious." :)

Bloggers LOVE this recipe.  And I can see why.  It's ridiculously simple and utilizes ingredients that you probably have on hand.  Oddly, I realized this is the first chicken "patty" sandwich that we'd ever made and I can assure you it won't be our last.  It really is a nice departure from beef/turkey burgers all summer.  I wasn't sure from the directions which way to halve my chicken.  I ended up cutting it horizontally so that my chicken was really skinny.  I hate trying to wrap my mouth around gigantic sandwiches so this worked to our advantage lol.  We omitted the cheese and mayo to save on calories and added some rings of grilled onion to amp up the flavor.

But which of the Hawaiian Chicken Sandwiches did I like better, you ask?  The Pulled Hawaiian Chicken Sandwich from last time or this Hawaiian Chicken Sandwich?  Well, as I'm a sucker for saucy things, I'd say the Pulled version for its flavor but this one wins for ease.  You can't go wrong with either one!

Don't forget to enter my Beer Flats giveaway and check back later this week for the two-part dessert finale of Emily and my Seasonal Summer Fruit and Veggie Extravaganza!

One Year Ago: Baked Squash and Baked Green Bean Fries

Hawaiian Chicken Sandwiches

Hawaiian Chicken Sandwiches

Yields: 4 Sandwiches

Ingredients
  • 2 large boneless skinless chicken breasts
  • 1 large can pineapple rings (8 rings)
  • 2 Tablespoons soy sauce
  • 2 Tablespoons brown sugar
  • 2 teaspoons Dijon mustard
  • 4 slices provolone cheese (optional)
  • Red onion rings (optional)
  • 4 hamburger buns or kaiser rolls
  • Smear of mayonnaise (optional)
Directions
  1. Pound out the chicken breasts until they are a uniform thickness.  Slice each into two pieces (It wasn't clear which way to cut but I did mine horizontally so that the chicken was nice and thin).
  2. Combine the juice from the pineapple can, soy sauce, brown sugar, and mustard.  Marinate the chicken overnight in the juice mixture.
  3. Prepare your grill.  Grill the chicken for about 15 minutes, flipping once halfway through.  If desired, add the cheese with 3 minutes left.  While the chicken is grilling, add the pineapple rings and onions, turning once.  If desired, smear some mayonnaise on the buns then top with a piece of chicken and two pineapple rings each.
Source: Originally from So Tasty, So Yummy as seen on and submitted by A Taste of Home Cooking

Friday, August 10, 2012

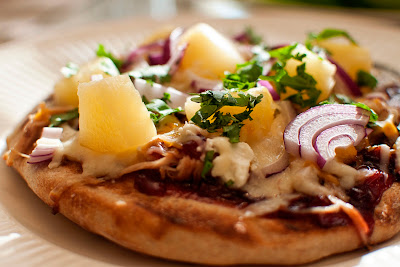
Cherry BBQ Pulled Pork Grilled Pizza

Happy Friday!  I don't know who noticed but last night I spent an extensive portion of my evening giving my blog a face lift.  After not really doing anything to my site for nearly 300 posts (next one!), I was just getting a little sick of the old look.  I changed my blog template (of course keeping my signature and favorite pink color!), moved some content onto their own pages to make the homepage more streamlined, and added better social media sharing/following features to the bottom of each post and the sidebar (please use them!).  I also moved the "print-friendly" button to a more obvious location.  If you haven't used that feature yet, it's a pretty awesome way to cut out all my witty chatter (*sad face*) and just print the recipe and/or photo if you want.  Yah for being green!  I hope all of these little changes help to make your browsing experience on my website a bit better.  Please comment and let me know how I'm doing!

Today we are continuing Emily and my Seasonal Summer Fruit and Vegetable Extravaganza.  We already shared our Watermelon Slush and BLT Corn Salad Wrap starter so onto the main course!  As it was extremely hot out lately, Emily and I thought we'd put our husbands to work on the grill and with the success of my Grilled Steakhouse Pizza in the past, I thought another grilled pizza would be a great addition to our menu.  Plus, Emily and Scott were grilled pizza virgins.

Overall the taste of this pizza was very Summery.  I do wish that the flavor of the cherries came through more but it could have been the result of using some not-so-flavorful cherries that I picked up at the grocery store.  Darn those pretty and highly-shippable fruits that look deceivingly delicious but yet fall flat on flavor!!  Either way, Scott liked the barbecue because it "wasn't overly sweet" and pizza is pretty much the only way he enjoys goat cheese.  Emily's need for carbs, meat, and cheese was definitely satisfied and she scarfed hers down faster than any of the boys!  In all fairness, she is eating for three now...yes, in case I hadn't mentioned, she's pregnant with twins!  Last but not least, my husband's verdict?  "It was yummy."  Ah, a man of few words ;).

Come back next week to see what desserts were made.  One more week until my Beer Flats giveaway ends.  Check out my review and take the time to enter.  It only takes a few seconds!


Cherry BBQ Pulled Pork Grilled Pizza

Cherry BBQ Pulled Pork Grilled Pizza
Photo Credit: Emily H.
Ingredients
  • 1.5 pounds of your favorite pizza dough, shaped into 4 individual sized balls to be stretched and grilled
  • Olive oil for brushing
  • ~1 cup cherry barbecue sauce, recipe follows
  • ~1.5 cups leftover shredded pulled pork, recipe follows
  • Shredded cheddar cheese
  • Shredded mozzarella cheese
  • Crumbled goat cheese
  • Red onion, thinly sliced
  • Pineapple chunks
  • Cilantro, chopped
For the Cherry Barbecue Sauce
  • 1/2 lb cherries, pits removed
  • 3 Tbsp sugar
  • 1/4 cup water
  • 1 cup barbecue sauce
For the Pulled Pork
  • 1 can Dr. Pepper
  • 5-7 lbs pork butt roast
  • 1/4 cup brown mustard
  • Salt and pepper, to taste
Directions
  1. Prepare the Pulled Pork: Liberally season the pork roast with salt and pepper and place the fat-side-up in a crockpot.  Add the mustard and Dr. Pepper to the crockpot and cook on low for 8-10 hours.  Shred the meat with two forks, discarding any bones and fat.
  2. Prepare the Cherry Barbecue Sauce: Roughly chop the cherries into small pieces.  Add them to a small sauce pan along with the sugar and water.  Cook over medium heat for ~20 minutes, until the liquid is thick and the cherries are soft.
  3. Grill the Pizza:  Heat grill to medium-high heat (450F) and generously oil the grate (I use a paper towel wad soaked in oil and held with tongs or a silicone brush
  4. Carefully place individually sized stretched dough rounds onto the grill and cover.  Allow to cook until nicely browned on bottom and large bubbles form on the surface (about 3-4 minutes).  Carefully remove the dough from the grill and with the cooked side facing up, top each pizza with cherry barbecue sauce.  Top with pulled pork then follow with cheddar and mozzarella cheese.  Finish with the red onions, pineapple, and goat cheese.  Carefully return the topped pizzas to the grill and cook until the bottom is browned and cheese is melted (about 4-6 minutes).
  5. Remove pizza from grill. Garnish with cilantro.  Cut and serve immediately.
Source: A combination of ingredients and ideas from Confections of a Foodie Bride and Our Best Bites

Wednesday, July 11, 2012

Grilled Steakhouse Pizza

This pizza is a man's dream.  It is pizza.  And it has steak.  With lots of sauce.  Don't tell me your husband or other men in your life wouldn't go crazy for this.

And, a leftover repurposer's, fast meal, too!  It was a great way for me to use up leftover steak that I had already grilled on a previous night, used pizza dough that I always have frozen on-hand, and made use of the Heinz 57 steak sauce that I bought for the Pulled Hawaiian Chicken Sandwiches.  Win for the husband and win for me!  Of course, if you don't have leftover steak, you can just throw one on the grill, just before/while the pizza grills, too.

I loved all of the flavors in this pizza.  Very bold and manly.  Pioneer Woman originally baked this but I wanted to try grilled pizza and figured why not try it with this recipe since it was like 110 degrees outside.  It worked out fantastically.  Grilled pizza has a little extra oomph of char flavor and will be my cooking method of choice during the hot dog days of summer.  Try it!

By the way, just a couple more days to enter my Daelia's Biscuits for Cheese giveaway!  My husband ate the remainder of my Almond Raisin ones last night and I was so upset when I went to snack on them only to discover they were no more.  It was only in this moment that I realized how much I really loved them!

One Year Ago: Persian Turkey Kofta Kebabs and Tomato Basil Orzo Salad
Two Years Ago: Fajitas
Three Years Ago: Chicken Parmesan Meatball Subs

Edited 7/15/12: A really awesome thing happened on Friday the 13th.  This post was listed as #3 on the FoodBuzz Top 9 list!  What a total honor and thank you!

Grilled Steakhouse Pizza

Grilled Steakhouse Pizza

Ingredients

  • 1/2 Recipe pizza crust
  • 1 Skirt steak or flank steak, grilled to medium rare and cut into thin slices
  • Salt and pepper, to taste
  • 2 Red onions, sliced thin
  • 3 Tablespoons butter
  • 4 Tablespoons balsamic vinegar
  • 1/2 teaspoon Worcestershire sauce
  • 2 cups marinara sauce
  • 12 ounces fresh mozzarella cheese
  • Shaved parmesan cheese
  • 1/2 cup steak sauce (more if desired)
  • Green onions (optional)
Directions
  1. To Bake: Preheat oven to 475 degrees. Arrange rack in the bottom half of the oven.To Grill: Heat grill to medium-high heat (450F) and generously oil the grate (I use a paper towel wad soaked in oil and held with tongs).
  2. Saute red onions in butter and 2 tablespoons balsamic vinegar over medium-low heat until dark and caramelized, about 10-12 minutes. Remove from heat and set aside.
  3. Combine marinara sauce with 2 tablespoons balsamic and Worcestershire sauce. Set aside.
  4. Roll out pizza dough until very thin. If grilling, make 2 smaller individual sized pizzas so that it's easier to handle.  
  5. To Bake: Top with marinara mixture and spread to coat dough. Lay caramelized red onions all over the sauce, then top onions with slices of mozzarella cheese. Bake pizza for 12-15 minutes, or until crust is golden and cheese is bubbly (but watch to make sure it doesn't burn.)
    To Grill: Carefully place dough rounds onto the grill and cover.  Allow to cook until nicely browned on bottom and large bubbles form on the surface (about 3-4 minutes).  Carefully remove the dough from the grill and with the cooked side facing up, top each pizza with marinara mixture.  Lay caramelized red onions all over the sauce, then top with mozzarella cheese.  Carefully return the topped pizzas to the grill and cook until the bottom is browned and cheese is melted (about 4-6 minutes).
  6. Remove pizza from the oven or grill, then drape slices of steak all over the surface. Drizzle the top of the pizza with steak sauce (use squirt bottle if you have one) and top the whole thing with Parmesan shavings. Garnish with sliced green onions, if desired.  Cut and serve immediately.

Source: Pizza recipe from Pioneer Woman.  Grilling directions from Annie's Eats.

Friday, June 29, 2012

Recipe Swap: Pulled Hawaiian Chicken Sandwiches

I'm on a roll, folks!  This week's recipe swap theme was Burgers/Sandwiches.  As usual, visit A Taste of Home Cooking for the full round-up!

I submitted Pork Sandwiches with Cilantro-Jalapeno Slaw and received these awesome Pulled Hawaiian Chicken Sandwiches from one of my favorite bloggers, Nicole at Prevention RD.  Seriously, if you haven't already checked out her site yet, you should.  It's one of my go-to blogs for when I want something a bit healthier and I LOVE that she calculates all the nutrition stats for you.  Oh, and I should also mention that Nicole deemed my (Sugary Sweet) Chili entry the champion of her 2nd Annual Chili Contest which I am completely honored by :).

As for this recipe, it totally met and exceeded my husband and my expectations.  At first I grumbled a bit at the fact that it used grilled chicken (I, like Nicole, assumed the pulled chicken would be a la crockpot like all other pulled meat recipes) and considered slow cooking it instead.  But don't do it.  The grilling adds a wonderful char-grilled smokey flavor that makes this sandwich unique and it's worth the extra effort.  It made a lot so we had the leftovers for lunch in wraps.  This would be a perfect addition to your 4th of July or other summer BBQ.  Classic enough for a traditional BBQ but different enough to surprise and delight.  Great stuff!

Heads up to my readers - by the end of next week, look for my first official product review and a sponsored BLOG GIVEAWAY!  If you're not already, follow me on Facebook or Twitter for an early hint of what it could be ;).

One Year Ago: Red, White, and Blue Cupcakes
Two Years Ago: Firecracker Shrimp (mmm...Sriracha!!)
Pulled Hawaiian Chicken Sandwiches


Ingredients:
  • 1/3 cup Heinz 57 sauce
  • 1 20-ounce can pineapple rings in natural juices
  • 2 Tbsp agave nectar or honey
  • Tabasco sauce, to taste (I used my favorite Asian condiment, Sriracha!)
  • 4 5-ounce boneless, skinless chicken breasts
  • non-stick cooking spray
  • Fresh ground black pepper, to taste
  • 5 whole wheat buns or sandwich rolls
Directions:
  1. Heat grill to medium heat. Place one ring of pineapple into a food processor or blender and process until smooth. Add the Heinz 57, honey, and a couple of dashes of 
  2. hot sauce to the blender/food processor and combine. Remove 3 tablespoons of sauce to use for basting and reserve the rest for serving.
  3. Spray the pineapple rings with non-stick spray and place on the grill. Cook for 5-7 minutes on each side, until the sugars start to caramelize and nice grill marks have developed.
  4. Pound chicken breasts lightly to reach an even thickness. Brush the Hawaiian sauce on one side of the chicken breast. Place on the grill sauce side down and cook until internal temperature reaches 170F (about 6-8 minutes), flipping halfway through. Before flipping the chicken, baste with the remaining Hawaiian sauce.
  5. Remove chicken and pineapple rings from the grill when done. Let chicken stand for 5-10 minutes before shredding with two forks. Add the chicken to a bowl and toss with the remaining Hawaiian sauce. Divide the pineapple rings and Hawaiian chicken between the 5 buns/sandwich rolls and serve warm.
Source: Originally from Confections of a Foodie Bride as submitted by Prevention RD

Monday, June 18, 2012

SRC: Brat Burgers with Drunken Onions

It's time for another Secret Recipe Club (SRC) reveal!  I can't tell you how excited I am to be a part of this club.  It has provided wonderful exposure to some new blogs for me to follow and, I'm sure I've gained a few readers myself (Hello out there!  Please feel free to comment and let me know what you think!).  Reveal day is especially delightful because you never know what someone will have chosen to make!  I love secrets :).

This month I received Debra's blog at Eliot's Eats.  I was impressed by the wide variety of recipes that I found on her blog and love how many of them were family and/or original recipes.  That's refreshing because honestly I feel like sometimes the food blog world is a bit incestuous with popular recipes making their rounds on the blogs that I follow.

I chose this particular recipe because it was one of her originals and the Summer grilling season is in full force.  Plus, I absolutely love the flavor of brats and drunken anything.  Oddly enough I don't really drink alcohol but add it to foods and I'm all about it!  This recipe did not disappoint.  It was wonderfully flavored and not unlike something you'd get at a fancy pants burger joint.  Something as simple as toasting the buns makes homemade burgers a little more special.  Since this recipe makes a lot, I'm also excited to have 4 more burgers in the freezer for when I need a quick meal in the future.

As usual a special thank you to April of the blog Angel's Homestead, our new SRC ring leader and Angela of the blog Big Bear's Wife, our Group C Hostess!

One Year Ago: Banana Sour Cream Pancakes
Three Years Ago: Chicken Gyros with Tzatziki Sauce

Brat Burgers with Drunken Onions

Brat Burgers with Drunken Onions

Ingredients
  • 5 T. olive oil, divided
  • 2 large red onion, cut in half and sliced thin (I used 1 red and 1 sweet yellow)
  • 3 garlic cloves, minced
  • 1 bottle Dunkel (Munich style) beer, or other dark German beer
  • 1 T. red wine vinegar
  • 2 t. Tabasco sauce
  • 1 t. celery seed
  • 1 t. mustard seed
  • 1 1/2 t. fresh ground pepper
  • 1/2 t. grey sea salt
  • 1 lb. fresh Bratwurst
  • 1 lb. ground beef
  • 1 large green bell pepper, seeded and diced
  • Salt and pepper, to taste
  • 6 Kaiser rolls, split
  • 1/4 c. whole grain mustard
Directions
  1. Heat 2 Tablespoons olive oil in a medium sauce pan. Cook onions and garlic for 3 minutes. Add beer, vinegar, Tobasco, celery seed, mustard seed, pepper, and salt and bring to a boil. Reduce to medium and simmer for 30 minutes.
  2. Meanwhile, prepare the brat burgers.  Take brats out of casings and mix with ground beef, bell pepper, and 1 Tablespoon of “Dunkelized” onion sauce. Form into six patties and season with salt and pepper.  (Hint: Use your fingers to make a dent in the center of the pattie to keep it flat after cooking!)
  3. With preheated grill set at 350 degrees, place patties on grill and grill for about 5 minutes on each side.
  4. Brush rolls with remaining olive oil and toast them the last minute of grilling burgers.
  5. To assemble, place about 2 teaspoons of mustard on bottom-half of Kaiser roll. Add burger and top with cooked onions. Top with top-half of roll. Serve.
Source: Eliot's Eats

Monday, August 29, 2011

Grilled Maple-Chili Salmon

This was my play on words for our most recent Dinner Club.  We grilled our salmon up on cedar planks so called it Cedar PLANKed Salmon to go along with the pirate theme.  It was Chris and my first time using cedar planks so we're just glad it didn't catch fire on the the grill :D.  I LOVED the way that this dish turned out.  The flavor was fantastic and I will for sure be making this again.

We bought a gigantic 2.7 pound wild salmon filet from Costco and the maple syrup that I used came from one of our new Dinner Club members, Delia.  She hails from the border of NY and VT so gets some of the best maple syrup.  Scott was skeptical when he saw me drizzling it on as the finishing touch.  I could see it in his eyes lol.  But I think it's safe to say he's converted.  The sweet, smokey, and savory is a wonderful combination.  A total hit!  And if you don't have a cedar plank, no worries, you can do without it and Shawnda from Confections of a Foodie Bride says she and her husband actually prefer it that way.

See the rest of our Pirate themed menu at our Dinner Club blog.  Since we've renewed the club by saying goodbye to two couples due to relocation and welcomed two new ones, we're going to try to make an effort to do a better job of updating the blog :).

Grilled Maple-Chili Salmon


Yields: 3-4 servings

Grilled Maple-Chili Salmon

Ingredients
  • 1 lb salmon, cut into 3-4 fillets
  • 1 tsp chili powder
  • 1/2 tsp paprika
  • 1/2 tsp cumin
  • 1/8 tsp garlic powder
  • 1/8 tsp cinnamon
  • 1/4 tsp salt
  • Fresh ground black pepper
  • 1 Tbsp creole mustard (or any spicy brown mustard)
  • 1 Tbsp olive oil
  • 3-4 tsp maple syrup
Directions

  1. If using, soak the cedar plank per the manufacturer instructions.
  2. Stir together the dry ingredients and then stir in the olive oil and mustard.
  3. Spread the rub over the top and sides of the fillets and let sit while the grill heats.
  4. Preheat grill to medium-high.  Place fish on the soaked plank and cook for ~15 minutes, until the fish flakes and the internal temperature reaches 140.  If not using the plank, place skin side down and cook 8-10 minutes.
  5. Remove from heat and immediately drizzle each fillet with ~1 tsp of maple syrup.
Source: Confections of a Foodie Bride

Tuesday, August 9, 2011

Ultimate Sriracha Burger

I'm still on my spicy kick...I've said it once before and I'll say it again, Sriracha hot sauce is the shizz!  It's like the Frank's Red Hot of the Asian world...but...a million times more delicious.  Spicy, tangy, and sweet....it's perfect on pretty much everything.

I can't say I'm surprised that a burger features this delicious sauce.  It made it onto my list of dinner real fast and as suspected, it was...well, the shizz!  Go make it immediately...especially considering I *know * you don't want to turn on the oven in this record breaking mid-summer heat.  But heat in your mouth is a different story...that's an any-time delight!

Fair warning, it's not for the faint of heart....and it's so delicious I neglected to take a picture.

One Year Ago: Homemade Refrigerator Pickles

Ultimate Sriracha Burger
Printer-Friendly Version

Yields: 4 burgers plus extra sauce...would be great on fries!

Ingredients
  • 1 1/2 lbs. ground grass-fed chuck
  • 2 TBS. soy sauce
  • 5 TBS. Sriracha, divided
  • 2 tsp. freshly ground black pepper
  • 4 slices thick cut bacon
  • 1 large sweet onion
  • 3/4 cup blue cheese dressing
  • 4 brioche buns
  • 4 thick slices Swiss cheese
  • 1 tomato, sliced
  • several handfuls of arugula (omitted...didn't have any on hand)
Directions
  1. In a large mixing bowl, combine the ground beef, soy sauce, 2 1/2 TBS. of the Sriracha, and the pepper. Be careful not to overmix. Form the mixture into 4 patties, and set aside, covered, in the refrigerator.
  2. Preheat grill to medium high heat. In a medium frying pan over medium-low heat, cook the bacon. While the bacon is cooking, peel and quarter the onions. Cut each section into 1/4-inch slices. Once the bacon is cooked through and slightly crispy, remove the slices from the pan, cut each in half crosswise, and drain onto paper towels, reserving the remaining bacon fat in the pan. Cook the sliced onions in the bacon fat over medium-low heat until they caramelize, 20 to 25 minutes.
  3. Grill the burgers, turning once, 4 to 4 1/2 minutes on each side or until a meat thermometer registers 130° to 135°F for medium-rare.
  4. While the burgers are cooking, combine the blue cheese dressing with the remaining 2 1/2 TBS. Sriracha in a small bowl. Lightly toast the buns on the grill during the last minute of cooking time.
  5. Assemble the ultimate burger! Spread the blue cheese mixture on both halves of each hamburger bun. Stack a burger patty, slice of swiss cheese, bacon, caramelized onions, slice of tomato, and a small handful of arugula between each hamburger bun. Open jaw W.I.D.E. and devour!
Source: The Sriracha Cookbook as modified by and seen on Oiishi Food

Monday, August 8, 2011

Jerk Chicken with Mango Cilantro Relish

Just because it's hot outside doesn't mean that's any reason to turn off the heat happening inside of your mouth :).  I mean me personally?  I eat spicy food (and drink HOT soup) year round!  But no worries, the cool of the mango cilantro relish helps quench the fire.  I love all the complex, spice flavors that makes jerk chicken.  This recipe takes me back to the Caribbean and grilling is a summer necessity.

If you are in a pinch, you can make this meal in advance so that it's ready to be thrown on the grill or into the oven at moment's notice.  The relish would be great on other meats such as regular grilled chicken or an accompaniment to fish, used as taco toppings or even as tortilla dip!

One Year Ago: Cinnamon Chocolate Chip Sour Cream Coffee Cake - if you make this you're in for a treat because it's one of my favorite coffee cakes ever!
Two Years Ago: Grands! Taco Melts (AKA Homemade Hot Pockets) - change up the fillings for variety!


Jerk Chicken with Mango Cilantro Relish
Printer-Friendly Version


Ingreidents

For the Chicken
  • 1/2 cup vegetable oil
  • 1 onion, coarsely chopped
  • 2 scallion, coarsely chopped
  • 1 large jalapeno pepper, stem and seeds removed
  • 1 tablespoon fresh ginger, grated
  • 3 cloves garlic, coarsely chopped
  • 1 tablespoon finely chopped fresh thyme (used 1 tsp dried thyme)
  • 2 tablespoons red wine vinegar
  • 1 tablespoon light brown sugar
  • 1/4 teaspoon ground cinnamon
  • 1/4 teaspoon freshly ground nutmeg
  • Pinch ground cloves
  • 1 teaspoon ground allspice
  • 1/2 teaspoon salt
  • 1/4 teaspoon freshly ground black pepper
  • 1 teaspoon fresh lime juice
  • 4 chicken thighs, skin on, bone in
  • 4 drumsticks, skin on
For the Mango Cilantro Relish
  • 2 mangoes, peeled and diced
  • 1/4 cup finely chopped red onion
  • 2 tablespoons chopped cilantro
  • 3 tablespoons lime juice
  • 3 tablespoons fresh orange juice
  • Salt and freshly ground pepper
Directions
  1. To make the Chicken: Puree all the ingredients, except the chicken, in a food processor until almost smooth. Piece the chicken with a fork to make tiny holes. Place the chicken in a large shallow baking dish and rub the marinade into the chicken. Cover and refrigerate for 24 to 48 hours, depending on how intense you want the flavor to be.

    * To make ahead/freezer meal
    - Prepare the chicken as directed above and place in a gallon sized freezer bag to marinate. Seal and freeze chicken. When ready to prepare the chicken, defrost completely and following the cooking directions for either the grill or oven. 
  2. To grill - preheat grill. Grill chicken on each side for 5 to 6 minutes or until cooked through. 
    To bake
    - preheat oven to 350 degrees. Place chicken on baking sheet lined with foil and bake in the preheated oven for 30-35 minutes or until the internal temperature of the chicken reaches 160 degrees.
  3. To make the Relish: Combine the mangoes, onion, cilantro, lime juice, and orange juice in a bowl and gently mix. Season to taste with salt and pepper. This relish can be made ahead.
Source: Bobby Flay as adapted by and seen on Joelen's Culinary Adventures and Macaroni and Cheesecake

Sunday, July 10, 2011

Persian Turkey Kofta Kebabs

This post is for Linda, a girl that I met once through a mutual friend but as I learn more about her I find that she just might be my long-lost twin sister and hope that perhaps we'll get to know each other better.  She recently posted on her facebook that she created a recipe for kofta kebabs and I responded that I actually made some recently too (see the crazy twin thing happening, already?).  Kofta kebabs are essentially log-shaped meatballs on a stick and the flavor they punch are uniquely amazing!

While I have never gone to Persia, kebabs totally take me back to the time I spent in Turkey this Spring.  Turkey is an AMAZING country with beautiful sites (Ephesus is seriously the most well preserved antiquity site I've ever seen!), rich culture (Istanbul has so much to see that we only skimmed the surface in our two days), and best of all, fantastic food.  In every port of call that we had I devoured juicy kebabs, super fresh vegetables, and of course, Turkish Delights (honey pistachio was my absolute favorite!).

My husband and I eating lunch at a carpet making factory in Ephesus, Turkey
I don't remember what these were called but it was grilled meats (chicken, lamb meatballs) served with potatoes and rice pilaf.
A fresh salad served with dressing made of olive oil and lemon
I was *seriously* addicted to this stuff.  Green beans with tomatoes and garlic drizzled with very fresh olive oil.
Turkish greens with Greek yorurt
A variety of Turkish Delights at the Spice Market in Istanbul, Turkey.  They gave away free samples to try to get you to buy some and it was so addicting!
I'm fortunate that I found a local Mediterranean/Lebanese restaurant called Aladdin's Eatery to get my fill but it's nice to know that this is actually a very easy recipe to make at home when I get the urge to be taken back to the memories of our short time in Turkey.

I served my kofta kebabs with a spiced up Greek yogurt sauce (added a drizzle of honey, cumin, chili powder) but I think it would also be fantastic with Tzatziki sauce.  It was accompanied by a side of Tomato Basil Orzo, which I'll share tomorrow :).

One Year Ago: Sauceless Garden Lasagna
Two Years Ago: Chicken Parmesan Meatball Subs

Persian Turkey Kofta Kebabs
Printer-Friendly Version 

 Ingredients
  • 20 oz 93% lean ground turkey
  • 1 small onion, minced
  • 2 cloves garlic. minced
  • 1/4 cup fresh parsley, chopped
  • 2 tbsp bread crumbs
  • 1/4 tsp allspice
  • 1/4 tsp coriander
  • 1/4 tsp paprika
  • 1/4 tsp chili powder
  • salt and fresh pepper (to taste)

Directions
  1. In a large bowl combine the ground turkey, onion, garlic, parsley, breadcrumbs, spices, salt and pepper until evenly blended. Divide into a heaping 1/4 cup portions so you get 12; roll into log shaped ovals. Place on a cookie sheet and refrigerate at least 30 minutes. If using wooden skewers, soak in water at least 30 minutes before grilling.
  2. When ready to eat, preheat grill to high heat. Carefully insert the skewer through the formed meat.  
  3. Grill for 10 to 15 minutes on indirect heat turning occasionally, until meat is no longer pink.
Source: Gina's Skinny Taste
  
Serving Size: 3 kebabs •  Old WW Points: 4 pts • WW Points+: 5 pts
Calories: 185.4 • Fat: 8.3 g • Protein: 22.9 g • Carb: 5.1 g • Fiber: 0.8 g • Sugar: 0.3 g
Sodium: 114.5 mg (without the salt)

Monday, May 2, 2011

Spicy Lime and Honey Wings

Here we are on Day 3 of Cinco Recipes for Cinco de Mayo!  If you've missed Days 1 or 2, no worries, I'll be posting a recap recipe roundup on Thursday which is the day of celebration :).

I'm not sure that chicken wings are exactly Mexican but it does have some Mexican-inspired flavors.  Besides, with the culinary melting pot that is America, everything's a bit fusion nowadays anyway.  The adobo sauce gives it great heat (omit it if you can't handle it) while the lime provides a good sour note (can you say Margaritas?!).  Finally, the honey balances the tartness but watch it on the grill because it will burn more easily.  Oh and don't do like my husband did and throw away the marinade before serving...otherwise you'll have to be flexible and glaze yours with bottled BBQ sauce in a hurry like I did.  Or end up with dry, unappetizing looking wings.  Oops.  Live and learn.

This was the first time that I ever dissected chicken wings.  It wasn't as bad as I thought it would be so that was a pleasant surprise.  Just cut where the joints are and with a good sharp knife, it cuts almost like butter.  I made these as part of my Dinner Club's Tapas themed dinner club.  To be honest, that particular dinner club is the only reason that I have enough recipes to have "planned ahead" and share with you!  Pfft like I'm ever that organized and ahead of the game haha :).  Thank you Emily for taking a picture of my wings since I clearly forgot to take one of my own in my panic to find a quick makeshift glaze.

One Year Ago: Summer Corn and Vegetable Soup
Two Years Ago: Szechwan Chicken...I can't get enough of spicy foods!

Spicy Lime and Honey Wings
Printer-Friendly Version


Ingredients

For the chicken
  • 3 pounds chicken wings/chicken drummettes
  • Kosher salt and freshly ground pepper
  • 3 cloves minced garlic
  • 2 tablespoons olive oil
For the sauce
  • 1 teaspoon grated lime zest (preferably organic)
  • 1 cup fresh lime juice
  • 1/4 cup honey
  • 1 teaspoon ground cumin
  • 1 teaspoon adobo sauce (from a can of chipotle peppers in adobo sauce - optional)
  • Kosher salt and freshly ground pepper
  • Chopped fresh cilantro, for garnish (optional)
Directions
  1. To prepare the wings in the oven: Preheat the oven to 350 degrees F. Toss the wings in a bowl with salt, pepper, minced garlic and olive oil. Arrange on a baking sheet in a single layer. Cook until just cooked through, about 30 minutes. 
  2. Make the sauce: Combine the lime zest and juice, honey, cumin, adobo sauce, 1/2 teaspoon salt and 1/2 tablespoon pepper in a bowl. Pour over the warm wings and let marinate at least 30 minutes.
  3. To prepare the wings on the grill: Preheat a grill to high. Grill the wings until marked, 10 to 15 minutes, turning as needed. Transfer the marinade to a saucepan and cook until slightly thick, about 8 minutes (you can do this on the grill as well). Drizzle or brush the wings with the sauce and top with cilantro, if desired.  Note: If you don't have a grill, you can use a grill pan indoors, bake them in the oven or saute in a little butter in a skillet until warmed through. 
Source: Joelen's Culinary Adventures as adapted from Guy Fieri