Showing posts with label barbeque. Show all posts

Wednesday, November 14, 2012

Savory BBQ Pulled Pork Cinnamon Roll

What I'm about to share with you may sound weird.  In fact, tons of my facebook fans who saw the sneak peek photo said they would have to see and try it to believe it.  But by the end of this post, I'll have you being a believer.  And once I break it down for you, you'll come to understand that what sounds crazy is actually quite genius!

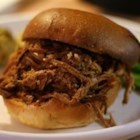
The savory BBQ Pulled Pork Cinnamon Roll.  It is the love child of two American favorites - BBQ Pulled Pork and Cinnamon Rolls.  It is savory with a touch of sweetness.  Consider that cinnamon and brown sugar, the basic components of a traditional cinnamon roll filling, are easily ingredients in a pork entree glaze or bbq sauce, anyway.  Then, consider that a cinnamon roll, is no more than a bread bun that's rolled up all fancy.  Instead of serving pulled pork on a bun, it's rolled up cinnamon bun style!  And then it's drizzled with extra barbecue sauce.  Because no one likes a naked cinnamon roll and it just looks pretty.  Suddenly, what seems like a freak Frankenstein dish is not that mad but instead makes perfect sense!

Once I tried this dish, my mind started racing and considering all of the other savory cinnamon roll possibilities.  I could stuff it with shredded buffalo chicken and either cheddar or blue cheese with a drizzle of ranch or blue cheese dressing.  Or how about that fantastic Hawaiian Pulled Chicken and jazzed up hawaiian bread dough and then finishing with some of that extra sauce?  Yes...I think I shall be trying to bring some of these recipes to reality someday soon.  This recipe opened up my mind to a whole new world of possibilities!

Give it a try, I think you'll like it!

One Year Ago: Roast Beef with Onion Gravy
Three Years Ago: Corn Casserole and Sweet Potato Souffle

Savory BBQ Pulled Pork Cinnamon Roll


Ingredients

For the dough
  • 1/2 cup milk (2%)
  • 1/2 cup butter
  • 1/2 cup warm water
  • 1 packet (2 1/4 tsp) active dry yeast
  • 1/4 cup granulated sugar
  • 2 eggs
  • 4 - 4 1/2 cups all purpose flour, plus more for dusting work surface
For the Filling
  • 2 Tbsp butter, melted
  • 1 tsp cinnamon
  • 1/2 cup brown sugar
  • Leftover BBQ Pulled Pork (suggest 2 recipes of Slow Cooker Pulled Pork)
For Drizzling
  • Additional BBQ sauce
Directions
  1. Heat the milk and butter in s mall saucepan or in the microwave until the butter melts.  Set aside and allow to cool until the mixture is lukewarm (about 100 degrees).
  2. In the bowl of a stand mixer fitted with the paddle attachment, mix together warm water, yeast, sugar, and eggs at low speed until well combined.  Then add the warm milk mixture and 2 cups of flour.  Mix at medium speed until thoroughly blended, about 1 minute.
  3. Switch to the dough hook attachment.  Add another 2 cups of flour and continue to knead at medium speed until dough forms a ball and is smooth, about 10 minutes.  If needed, add additional flour by the tablespoon to make the dough come together.  Cover bowl with a clean, damp kitchen towel and leave in a warm, draft-free spot to rise until doubled in size  (about 1 1/2 to 2 hours).
  4. Meanwhile, combine the brown sugar and cinnamon in a small bowl and set aside.  Generously butter a 9x13 metal baking pan.
  5. After the dough has doubled in size, punch it down and turn it out onto a lightly floured work surface.  Using a rolling pin, roll the dough into a 16 by 12 inch rectangle with the short side facing you.  Brush the melted butter over the surface of the dough.  Then sprinkle the cinnamon sugar mixture.  Finally, spread a healthy layer of pulled pork over the surface of the dough leaving a 1-inch strip on one of the short sides.  Tightly roll the dough into a spiral and pinch the free end to seal.
  6. Using a piece of string or sharp serrated knife, cut the roll into six equal slices and place them swirl side up in the prepared 9x13 pan.  Cover with a clean, damp dish cloth and allow to rise until puffy and almost doubled (about 1 hour).  Near the end of the second rise time, preheat an oven to 350 degrees F.
  7. Bake rolls at 350 degrees F for 40-50 minutes.  Remove from oven and allow to cool in the pan for 10-15 minutes.  Drizzle with your favorite barbecue sauce and serve warm.
Source: Adapted from Food Pusher

Wednesday, August 29, 2012

Loaded Baked Potato Salad

This week I wanted to feature recipes that remind me of Summer.  The Tomato and Corn Pie that I shared on Monday definitely did that.  This one is one that reminds me of picnics and Summer BBQs and hence it was my contribution for our BBQ Themed Dinner Club.

It has all the flavors of loaded baked potatoes but is lightened up a bit by my substitution of Greek yogurt for the sour cream.  Nobody could tell I did this and upon being told it was "healthier", some went for seconds.  I like the way it looks, too.  All those delicious bits of bacon, cheese, and green onions really gives this potato salad a pop of color compared to their rather anemic looking white or yellow run-of-the-mill potato salad.

Make this for Labor Day as Summer brings on its last hurrah!

One Year Ago: Grilled Maple Chili Salmon

Loaded Baked Potato Salad


Loaded Baked Potato Salad
Photo Credit: Emily H.
Yields: 4-6 Servings

Ingredients
  • 1.5 pounds red potatoes (or 4 large Russet or Yukon Gold potatoes)
  • 1/4 cup ranch dressing
  • 1/2 cup plain Greek yogurt
  • 1/2 cup shredded cheddar cheese
  • 1/4 cup freshly chopped chives or green onions, divided
  • 6 strips of bacon (4 for the salad and 1 for topping), cooked and crumbled
  • 1 tsp black pepper
  • Salt, to taste
  • Hot sauce, to taste
Directions
  1. In a small bowl, mix together the ranch dressing and Greek yogurt.  Add half of the chives, cheese, and pepper, stirring until well combined.  Season with salt and hot sauce, to taste.  Let chill in the refrigerator.
  2. Meanwhile, peel and cube potatoes into bite size pieces.  Put in a large pot, cover with water, and boil until fork tender, about 15-20 minutes.  Drain and set aside to steam dry and cool.
  3. Put potatoes in a large bowl or dish and combine with dressing and yogurt mixture.  Top with remaining chives and crumbled bacon.  Chill before serving.
Source: Modified from Dishing with Leslie

Friday, June 29, 2012

Recipe Swap: Pulled Hawaiian Chicken Sandwiches

I'm on a roll, folks!  This week's recipe swap theme was Burgers/Sandwiches.  As usual, visit A Taste of Home Cooking for the full round-up!

I submitted Pork Sandwiches with Cilantro-Jalapeno Slaw and received these awesome Pulled Hawaiian Chicken Sandwiches from one of my favorite bloggers, Nicole at Prevention RD.  Seriously, if you haven't already checked out her site yet, you should.  It's one of my go-to blogs for when I want something a bit healthier and I LOVE that she calculates all the nutrition stats for you.  Oh, and I should also mention that Nicole deemed my (Sugary Sweet) Chili entry the champion of her 2nd Annual Chili Contest which I am completely honored by :).

As for this recipe, it totally met and exceeded my husband and my expectations.  At first I grumbled a bit at the fact that it used grilled chicken (I, like Nicole, assumed the pulled chicken would be a la crockpot like all other pulled meat recipes) and considered slow cooking it instead.  But don't do it.  The grilling adds a wonderful char-grilled smokey flavor that makes this sandwich unique and it's worth the extra effort.  It made a lot so we had the leftovers for lunch in wraps.  This would be a perfect addition to your 4th of July or other summer BBQ.  Classic enough for a traditional BBQ but different enough to surprise and delight.  Great stuff!

Heads up to my readers - by the end of next week, look for my first official product review and a sponsored BLOG GIVEAWAY!  If you're not already, follow me on Facebook or Twitter for an early hint of what it could be ;).

One Year Ago: Red, White, and Blue Cupcakes
Two Years Ago: Firecracker Shrimp (mmm...Sriracha!!)
Pulled Hawaiian Chicken Sandwiches


Ingredients:
  • 1/3 cup Heinz 57 sauce
  • 1 20-ounce can pineapple rings in natural juices
  • 2 Tbsp agave nectar or honey
  • Tabasco sauce, to taste (I used my favorite Asian condiment, Sriracha!)
  • 4 5-ounce boneless, skinless chicken breasts
  • non-stick cooking spray
  • Fresh ground black pepper, to taste
  • 5 whole wheat buns or sandwich rolls
Directions:
  1. Heat grill to medium heat. Place one ring of pineapple into a food processor or blender and process until smooth. Add the Heinz 57, honey, and a couple of dashes of 
  2. hot sauce to the blender/food processor and combine. Remove 3 tablespoons of sauce to use for basting and reserve the rest for serving.
  3. Spray the pineapple rings with non-stick spray and place on the grill. Cook for 5-7 minutes on each side, until the sugars start to caramelize and nice grill marks have developed.
  4. Pound chicken breasts lightly to reach an even thickness. Brush the Hawaiian sauce on one side of the chicken breast. Place on the grill sauce side down and cook until internal temperature reaches 170F (about 6-8 minutes), flipping halfway through. Before flipping the chicken, baste with the remaining Hawaiian sauce.
  5. Remove chicken and pineapple rings from the grill when done. Let chicken stand for 5-10 minutes before shredding with two forks. Add the chicken to a bowl and toss with the remaining Hawaiian sauce. Divide the pineapple rings and Hawaiian chicken between the 5 buns/sandwich rolls and serve warm.
Source: Originally from Confections of a Foodie Bride as submitted by Prevention RD

Wednesday, November 2, 2011

Peach-Whiskey Barbecue Chicken

Well, after so many dessert posts recently it's time to get back to entrees.  I apologize for this awful photo but really, this taste is quite good.  The flavor of the barbecue sauce is extra sweet (and makes a great "gravy" for the mashed potatoes).  And best of all, the meat is fall-off-the-bone-tender after being slow-cooked in the oven for 1 1/2 hours.

Two Years Ago: Buttermilk Cornbread


Peach-Whiskey Barbecue Chicken


Prep Time: 5 minutes
Cook Time: 2 hours
Yields: 6 servings


Ingredients
  • 12 chicken thighs, bone-in, skin-on
  • 2 Tbsp olive oil
  • 2 Tbsp butter
  • 1 yellow onion, diced
  • 1 1/2 cup whiskey
  • 12 oz barbecue sauce
  • 1 jar peach preserves
  • 1/2 cup water
  • 2 Tbsp Worcestershire sauce
  • 4 cloves garlic, peeled
  • 3 green onions, sliced thin
Directions
  1. Preheat oven to 300 degrees.
  2. Heat oil and butter in a dutch oven over medium-high heat.  Place chicken thighs, four at a time, in the pot with the skin side down.  Brown both sides then remove to a plate and repeat until all chicken is browned.  Pour off half the grease then return pan to stove.
  3. Add onions to pan and stir, cooking for 2 minutes.  Pour in whiskey (taking care if you are using an open flame) to deglaze the pan.  Stir and scrape the bottom of the pan, allowing whiskey to reduce for a minute or two.  Pour in barbecue sauce, peach preserves, water, and Worcestershire sauce.  Add garlic cloves and stir until combined.  Return the chicken to the pot, skin side up.  Cover and dutch oven into the oven.  Cook for 1 1/2 hours.
  4. Serve pieces of chicken over a big pile of mashed potatoes.  Garnish with sprinkled green onions.
Source: Pioneer Woman

Tuesday, June 28, 2011

Herbed Potato Salad

Do you cringe at the meer mention of potato salad because it conjures up images of heavy mayonnaise laden caloric nightmares?  Or, do you fear the potato salad because said mayo laden food has been sitting out at the family picnic for who knows how long?  Fear no more, friends.  Fear no more.

Just say no to calorie bombs and food-poisoning threats.  This potato salad is none of that.  In fact, this potato salad's flavor actually comes through more when it's room-temperature rather than cold.  This is the potato salad of the 21st century.  Fresh and light yet still packed with pure flavor.  Use FRESH herbs in this dish and you'll thank me.  It's a winner.

Herbed Potato Salad

Herbed Potato Salad

Ingredients
  • 1 1/2 lb potatoes
  • 2 Tbsp chicken or vegetable broth
  • 1 Tbsp white wine vinegar
  • 1/2 tsp Dijon mustard
  • 3 Tbsp olive oil
  • 2 scallions, finely chopped
  • fresh dill, finely chopped
  • parsley, finely chopped
  • pepper, to taste
  • salt, to taste
  • garlic, minced (optional)
  • fresh lemon juice (optional)
 Directions
  1. Peel, wash and cut the potatoes in bit-size pieces. Boil them in lightly salted water until fork tender, about 8-10 minutes.  Take care not to overcook.
  2. In a large bowl, combine 3 tbsp (extra virgin) olive oil with 1 tbsp white wine vinegar.  If desired, add a squeeze of fresh lemon juice for extra freshness and acidity.  Pour in 2 tbsp chicken or vegetable broth, 1/2 a tsp Dijon mustard, and garlic if desired then whisk away. The vinaigrette will become thicker. Add the finely chopped fresh dill and parsley to the vinaigrette and season with a pinch of salt and black pepper.
  3. Drain the potatoes, let them steam-dry for a few minutes and then add them to the dressing while they’re still hot so they'll take on the flavors. Sprinkle the chopped scallions in there and let the potato salad cool off.  Serve at room temperature or cold by refrigerating until ready to serve. 

Sunday, October 24, 2010

Who Loves Ya Baby Back?

Do you love me?  Because I love you, readers.  And, I love these baby back ribs from the one and only Alton Brown. 

I am dedicating this post to my co-worker Brenda F. who told me that "going on a vacation to Hawaii is no excuse to not blog".  Well, Brenda, I do believe you're correct. 

As I looked back in my archive of food photos I realized I am backlogged through June and to be honest, some of the photos I'm not sure a) what they are and b) what recipe they're from.  Kind of a problem.  Let's also keep in mind that I'm so back-logged that the season has officially changed.  And let's face it, nobody is going to want to cook that delicious berry salad with poppy citrus dressing as the weather turns cooler.  No, it's officially comfort food season, now.  So, I'll do my best to niggle in some of those older recipes where I can but otherwise maybe some of those will make an appearance when it gets warm again...unless someone is just dying to see them all now?  If so, speak now or forever hold your peace.

This is one of those recipes that I think should still apply because 1) it's football season.  And football season = tailgating = copious amounts of MEAT.  2) It's also a recipe that you can cook indoors.  Hey, the long oven cooktime could help add heat to your home at the same time...double duty!  If you're like me, you've problem turned off your A/C by now and also not yet switched on your heat (unless you live in a colder climate).  This means that your house is probably getting just cold enough that you wouldn't mind a little latent heat helping to take off a bit of that chill.

I made 3 slabs of Alton's ribs for my tailgating themed dinner party back in September.  This was my first attempt at ribs and so I was quite nervous given they'd be the main course.  I watched the video episode for this recipe online and that certainly helped.  I'm pleased to announce that they were a hit!  All 3 slabs were devoured even though these little babies are so meaty you only need a few to fill you up. 

Fair warning: if you're expecting your typical BBQ ribs you ought to try a different recipe.  This sauce is different...and in a good way!  Oh and the dry rub?  That stuff is good on all meats and one batch will cover about 4 slabs of ribs (or whatever other meat your heart desires).

Now, because I love you, here's the recipe to some finger lickin' good ribs.

One Year Ago: Chili and Chicken Pot Pie

Who Loves Ya Baby Back?
Printer Friendly Version


Prep Time: 1 hr 10 min
Cook Time: 3 hr 25 min
Yields: 2 slabs of ribs

Ingredients

2 whole slabs pork baby back ribs

Dry Rub*:
  • 8 tablespoons light brown sugar, tightly packed
  • 3 tablespoons kosher salt**
  • 1 tablespoon chili powder
  • 1/2 teaspoon ground black pepper
  • 1/2 teaspoon cayenne pepper
  • 1/2 teaspoon jalapeno seasoning (omitted - couldn't find)
  • 1/2 teaspoon Old Bay Seasoning
  • 1/2 teaspoon rubbed thyme
  • 1/2 teaspoon onion powder
Braising Liquid:

  • 1 cup white wine
  • 2 tablespoons white wine vinegar
  • 2 tablespoons Worcestershire sauce
  • 1 tablespoon honey
  • 2 cloves garlic, chopped
Notes:
*Rub makes multiple batches (for me, covered 3 slabs plus probably enough for 1 more).  Either scale it down to meet your needs or save the rub for other uses.  The rub can be extended/reduced by any amount, as long as the ratio of 8:3:1:1 remains the same.


**Make sure you are using KOSHER salt.  If you are using tablesalt, this should be scaled down to about 1 tablespoon due to different granule size of the salts.  And, if you're like me and are sensitive to salt, you might want to cut down to 2 tablespoons of kosher salt instead of 3.

Directions
  1. Preheat oven to 225 degrees.
  2. In a bowl, combine all dry ingredients and mix well. Place each slab of baby back ribs on a piece of heavy-duty aluminum foil, shiny side down. Sprinkle each side generously with the dry rub. Pat the dry rub into the meat. Refrigerate the ribs for a minimum of 1 hour. In a microwavable container, combine all ingredients for the braising liquid. Microwave on high for 1 minute.
  3. Place the ribs on a baking sheet. Open one end of the foil on each slab and pour half of the braising liquid into each foil packet. Tilt the baking sheet in order to equally distribute the braising liquid. Braise the ribs in the oven for 2 1/2 hours.
  4. After 2 1/2 hours, check ribs for doneness by gently opening foil packet and twisting a bone.  If the bone turns slightly in the socket, it is done.  Otherwise, continue cooking until done.
  5. Place foil packet on top of a medium saucepan.  Cut slits in the middle of the foil packet so that the braising liquid drains into the pan.  Skim out the oil layer.  Bring the liquid to a simmer and reduce by half or until of a thick syrup consistency (this took me about 30 minutes). Brush the glaze onto the ribs.
  6. Place under the broiler just until the glaze caramelizes lightly or finish on the grill. Slice each slab into 2 rib bone portions. Place the remaining hot glaze into a bowl and toss the rib portions in the glaze.
Source: Alton Brown

Sunday, February 28, 2010

Grandpa N's Char Siu Bao (Chinese BBQ Pork Bun) - Trial 1

When I was a young girl, one of my absolute FAVORITE things to eat was my Grandpa N's Char Siu Bao (Chinese BBQ Pork Bun).  I loved them so much that my grandpa would literally bake a whole party tray of like 50 to bring for my birthday parties.  They were divine.  The bread was tender, soft and fluffy, the meat was sweet and salty at the same time with beautiful red coloring, and the glaze on top was both buttery and sugary.  While Chris' favorite Chinese bakery bun is the Bolo Bao with Nai Wong Filling, I go for the Char Siu Bao anyday.

Sadly, when my grandpa passed away, there were no more char siu bao to be had.  The kitchen had closed.  My mom and aunt had a recipe that was supposedly his.  The recipe looked authentic enough...a small scrap of paper with both english and chinese, all crinkled with wear and stained with cooking ingredients but it just didn't taste the same as when Grandpa made it. 


We swear it's because he used lard instead of butter as in the supposed written recipe.  Or maybe it was because he probably really did knead the dough the old fashioned way - by hand.  What also was strange was that no one seemed to have a recipe for the filling, just the bun dough itself...which makes it even harder to try to replicate.  Either way, I asked my mom for the recipe and decided I would make it my life's goal (ok, a bit dramatic, I know...but I really do LOVE these buns!) to try to re-create my grandpa's buns that we all know and love.

This post will document my first trial run.  I made the buns and ended up bringing them with me to my extended family's Chinese New Year celebration so I would have lots of expert critique on them.  The final verdict was that the filling that I had concocted (with the help of the internet and sheer taste and trial during cooking!) was pretty good and authentic.  Where the epic failure was was in the dough bun itself...very dense and hard, not at all like Grandpa's.  Heart wrenching but I won't lie, I didn't have high expectations of myself because the recipe that I was given was poorly written/vague and we all know that grandpa/grandma/mom/etc always has that special touch to make things taste delicious.

So below I will post what I did in Trial Run #1 (I tried to interpret the original written recipe and clarify what I thought it meant) and then I will post what I would do differently next time in Trial #2.  I won't lie, this really might be a life-long pursuit because it is time consuming (4-5 hours dough rising time!) and I got the BBQ pork from my mom who doesn't make it often.  I could get the recipe to roast the pork myself, I suppose, but again, that process itself is a bit time consuming.

Grandpa N's Meat Bun Dough with Christine N's Char Siu Bao Filling - Trial #1
Printer-Friendly Version


Yields: 24 buns

Ingredients

For the Dough
  • 2 packages of yeast (4 ½ tsp)
  • 1 Tbsp sugar
  • 1 c warm water
  • 7 c bread flour
  • 1 c milk
  • 1 c sugar
  • 1 ½ sticks (3/4 c) butter
  • 1 egg
For the BBQ Pork Filling (as Christine made it; No recipe from Grandpa N)
  • 1 Tbsp vegetable oil
  • 1 ½ pounds char siu, cooked and diced (this is a complete guesstimate!  Buy at a Chinese grocery store or Google for a recipe because my mom gave me this pre-cooked!)
  • 1 onion, diced
  • ¼ c dry red wine
  • ¼ c ketchup
  • 1 Tbsp oyster sauce
  • 1 Tbsp low sodium soy sauce
  • 1 ½ Tbsp honey
  • 2 tsp rice vinegar
  • 2 tsp hoisin sauce
  • 1 tsp sesame oil
  • 1 tsp garlic powder
  • 1 tsp onion powder
  • 1 tsp Chinese 5 spice seasoning*
  • ½ tsp ground black pepper
  • Red food coloring, if desired
*Note: DO NOT leave this ingredient out!  During my taste test trials this was the last ingredient that I added and when I did, it was truly the golden ticket to making it taste "right" in my opinion.  Everything before it tasted good but didn't have the correct taste.  If you can't find Chinese 5 spice seasoning, Google has a substitute listed as: 2 teaspoons of Szechuan peppercorns, roasted & ground + 8 star anise, ground + ½ teaspoon ground cloves + 1 tablespoon ground cinnamon + 1 tablespoon ground fennel seeds.  As you can see, a very unique flavor is imparted from this blend.
For the Egg Wash

  • 1 egg
  • 1 Tbsp milk
For Finishing
  • ½ stick (1/4 c) butter, melted
  • 1 ½ Tbsp honey
Directions


For the Dough
  1. In a large mixing bowl, proof the yeast by combining warm water, 1 Tablespoon sugar, and yeast. Mix together and let sit in a warm place until mixture is frothy (forms bubbles on surface).
  2. Combine remaining ingredients and knead (by hand or in stand mixer with dough hook) until smooth and elastic, about 15 minutes. Add more flour by the Tablespoon if dough continues to be too sticky. Cover bowl with a damp cloth and set aside in a warm place and let dough rise for 4-5 hours. While the dough is rising, make filling.
For the Filling
  1. In a large sauté pan, heat vegetable oil over medium high heat. Add onions and cook until translucent and slightly carmelized (browned). Then add cooked char siu pieces and sauté until heated.
  2. Add red wine and cook until reduced by half, about 3 minutes. Add remaining ingredients and stir to combine. If a redder colored filling is desired, add food coloring until desired redness is reached. Continue cooking until heated throughout.
  3. Remove from heat and set aside to cool.
For Making the Buns
  1. Line baking sheets with parchment paper.
  2. After dough has risen, punch down and separate into 24 pieces. Roll each piece between your hands to form a ball.
  3. Add a heaping Tablespoon of cooled filling to the center of the dough ball. Pull edges of dough around filling and pinch to close. Place seam side down onto prepared baking sheets. Continue until all buns have been formed.
  4. Preheat oven to 375 degrees Fahrenheit.
  5. In a small bowl, use a fork and beat together the egg and milk. Gently brush the mixture onto the buns as to not disturb the risen dough.
  6. Bake buns in preheated oven for about 20 minutes, or until tops are lightly golden brown.
  7. While buns are baking, combine melted butter and honey in a small bowl. Brush the mixture generously on top of each warm bun after it has come out of the oven.
  8. Allow buns to cool completely on a wire rack and serve or store in an airtight container.
Source: Meat Bun Dough recipe from Grandpa N (Christine's Grandfather) and Char Siu Filling Recipe a Christine's Kitchen Chronicles Original, inspired by Kiteless on Visual Recipes
What I'd do differently next time:
  1. Substitute 1 stick of butter for vegetable shortening (Crisco).
  2. Change first rise time to about 1-2 hours, or until dough has doubled in size.
  3. Use a rolling, pin, roll each piece of dough into a circle, making the edges thinner than the center. Do not roll too thin or holes may form during baking. Add a heaping Tablespoon of cooled filling to the center of the dough circle. Pull edges of dough around filling and pinch to close. Place seam side down onto prepared baking sheets. Continue until all buns have been formed.
  4. Change second rise time to 4-5 hours (after buns have been filled and formed).  Periodically mist buns with water during this long rise time to ensure that they don't dry out.  This long rise time before baking should result in a lighter, less dense bun.
  5. Aunt Peggy says to consider using the Bolo Bao bun recipe instead of Grandpa's.  Will consider for a future trial run.

Sunday, September 20, 2009

Barbeque Chicken Pizza

Lunches on weekends always seems to be a challenge.  You want to throw something together quickly and without much effort.  Generally I like to reheat leftovers :).  Today, I decided to combine bits and pieces of leftovers to create an all new, original meal.  How about that!  Now, you may customize this to your own needs but this is what I ended up using because as I said earlier, it's what we had "leftover".

BBQ Chicken Pizza
Source: A Christine Original
Serves 2


Ingredients
  • 4 Pillsbury Grands biscuits
  • BBQ Sauce
  • Rotisserie chicken, pulled into bite size pieces
  • 1/4 red onion, sliced thin
  • Cheddar cheese
  • Mozzerella cheese
Directions
  1. Preheat oven to 350*.  Combine biscuits into a single large dough ball.  Stretch dough and spread thin onto a pizza pan or baking sheet.
  2. Spread a thin layer of BBQ sauce onto the dough.  Top with chicken pieces and onion slices.  Last, sprinkle with the cheddar and some mozzerella, to taste.
  3. Bake pizza in oven about 14 minutes or until crust is golden brown and cheese is bubbly. 
  4. Remove from oven.  Cut and serve.  Add some dashes of Tobasco, if desired.  Bon appetite!

Monday, September 7, 2009

Slow Cooker Pulled Pork

Ah the slow cooker.  This is man's gift to the busy working family!  This recipe calls for a tenderloin but you can use much cheaper cuts (such as the shoulder or butt) and it'll yield the same fabulous tasting results.  I've also substituted chicken breast for the pork and it's also very yummy.  Sometimes I'll use diet root beer and I've even used cola before when that's all I had on-hand.  I'm still not sure what the purpose of the pop is but it seems to make it taste good haha!  Give this one a try, it's one of the easiest meals you could possibly make :).

Slow Cooker Pulled Pork
(Source: All Recipes)
PREP TIME
10 Min
COOK TIME
7 Hrs
READY IN
7 Hrs 10 Min

SERVINGS 8

INGREDIENTS (Nutrition)
  • 1 (2 pound) pork tenderloin
  • 1 (12 fluid ounce) can
  •  or bottle root beer
  • 1 (18 ounce) bottle your favorite barbecue sauce
  • 8 hamburger buns, split and lightly toasted

DIRECTIONS
  1. Place the pork tenderloin in a slow cooker; pour the root beer over the meat. Cover and cook on low until well cooked and the pork shreds easily, 6 to 7 hours. Note: the actual length of time may vary according to individual slow cooker.
  2. Drain well.
  3. Stir in barbecue sauce.
  4. Serve over hamburger buns.

Tuesday, May 5, 2009

Sloppy Joes

Chris asked me today why sloppy joes are so sloppy.  I told him it was because he likes to pile the meat high onto his bun!  Or, perhaps I should say he slops the sloppy high on his joe??  Tonight was a pretty simple yet delicious dinner: sloppy joes with a side of chips and baked beans (canned).  When you get home late from work (quarter til 7) and have limited food supply (it's grocery night!), your choices are limited.

PS:  Don't tell Chris that there's mustard in this recipe!  He'll probably refuse to eat it ever again!!  I had to keep him out of the kitchen to add it to the recipe and he ate it unsuspectingly...mission accomplished ;).  Then again, I'm sure he eats foods with mustard and other "allergenic" foods (eggs, mayonaise, cream cheese, sour cream, non-skyline cheddar cheese, etc.) all the time...

Sloppy Joes
(Source: modified from All Recipes)

PREP TIME
10 Min
COOK TIME
20 Min
READY IN
30 Min
SERVINGS  6

INGREDIENTS (Nutrition)
  • 1 pound lean ground beef
  • 1/4 cup chopped onion
  • 1/4 cup chopped green bell pepper
  • 1/2 teaspoon garlic powder
  • 1 teaspoon prepared yellow mustard
  • 2 teaspoons Worcestershire sauce
  • 3/4 cup ketchup
  • 3 teaspoons brown sugar
  • salt to taste
  • ground black pepper to taste
DIRECTIONS
  1. In a medium skillet over medium heat, brown the ground beef, onion, and green pepper; drain off liquids.
  2. Stir in the garlic powder, mustard, ketchup, worcestershire sauce and brown sugar; mix thoroughly. Reduce heat, and simmer for about 20 minutes. Season with salt and pepper.  Serve on hamburger buns