Showing posts with label corn. Show all posts

Monday, November 19, 2012

SRC: Cinnabon Caramel Corn

Oh.my.word!  I just might be in trouble now that I discovered this recipe.  I've always loved gourmet popcorn and for awhile, I spent a small fortune on Dale and Thomas Popcorn.  Now that I tried this recipe, someone's going to have to save me from myself!

For this month's Secret Recipe Club, I was introduced to Veronica's blog, Veronica's Cornucopia.  She makes roughly a 2-to-1 ratio of sweets to meals and sides so I figured sweets were the way to go.  I didn't have to search far because right in her highlighted popular recipes listings I found something that immediately caught my eye - Cinnabon caramel corn.

In making this recipe, I actually got to kill two birds with one stone.  I'd seen recipes for homemade microwave popcorn floating around pinterest for quite a while now.  It is said that all that is needed to create healthy, homemade popcorn was corn kernels, a paper lunch sack, and a microwave.  I followed the directions and held my breath while watching the bag spin round and round on the microwave turn table.  Then, like magic, I heard the kernels start to pop!  Pop, pop, pop pop pop!  Once it was done, I cautiously opened the bag and there they were.  Fresh, fluffy, perfectly cooked popcorn that was made in under 3 minutes without oil, without scary microwave popcorn bag liner chemicals, and without a special machine.  It was amazing!

Now, I could have topped my popcorn with a bit of salt, butter, and/or other seasonings and then stopped there for a pretty healthy, fiber-filled snack.  But, I pushed onward knowing this batch of popcorn had a different destiny.  Dutifully I used my microwave again to prepare the caramel and  then coated my precious popcorn with the mixture.  Then it went into the waiting oven and it got all caramelized and crispy.  With each stir I had to "sample" the warm caramel corn to ensure it was progressing.  Finally, it was done.  Again, I could have stopped right here but no, it needed a bit more to complete its gourmet transformation.  A quick drizzle with the almond bark and then another "sample".  Perfection!  I'm pretty sure I could have stood at my kitchen island and ate the entire pan warm and fresh from the oven.  After it cooled, I "sampled" some more.  Cinnamon and caramel and nuts and chocolate oh my!  Needless to say, I was hooked!

Seeing how easy this recipe was, I promised my husband that I'd make him his own special batch drizzled with his favorite sweets combination, peanut butter and chocolate.  This would make an excellent holiday and/or Christmas gift.  Your friends will think you're such a crafty person and may not believe you when you say that you made it from scratch.  They'll probably even beg you for the recipe ;).

Special thank you to April of the blog Angel's Homestead SRC ring leader and Debbi of the blog Debbi Does Dinner, our Group C Hostess!  Please also check the blog hop to see what everyone else in Group C made this month!

By the way, have you shared then commented on each of my Mac and Cheese Monday posts?  Each week there's a new chance to win either Mac & Cheese by Ellen Brown or Mac and Cheese, Please! by Laura Werlin!  See here for full contest details.  Good luck!
Cinnabon Caramel Corn


Cinnabon Caramel Corn

Ingredients
  • 12 cups Easy Microwave Popcorn (recipe follows)
  • 1 cup roughly chopped pecans 
  • 1 cup brown sugar 
  • 3/4 tsp cinnamon 
  • 1/4 cup Karo syrup (or honey makes a good substitution) 
  • 1 stick (1/2 cup) real salted butter
  • 1/2 tsp baking soda 
  • 1 tsp vanilla 
  • 3 squares almond bark
For the Easy Microwave Popcorn
  • 1/2 cup popcorn kernels, divided
  • 2 brown paper lunch bags
Directions
  1. Place 1/4 cup of popcorn kernels into each bag.  Fold the bag over in half-inch increments, twice.
  2. Place one of the bags in the microwave standing upright and set for 3 minutes (popcorn may be done after 2:30 to 2:45) or use the popcorn button if available.  Listen carefully for kernels to stop popping.  As soon as the popping stops, take the bag out of the microwave.  Repeat with the second bag.
  3. Preheat oven to 250 degrees F.
  4. Place popcorn and chopped pecans in a large bowl and set aside.
  5. Combine brown sugar and cinnamon in a 2 liter capacity microwave safe bowl.  Mix well.  Chop butter into chunks and place on top of the sugar mixture.  Pour corn syrup over the top of everything.  Microwave the mixture on high for 30 seconds and then stir to combine.  Return to microwave and heat for 2 minutes.  Remove and stir again.  Then, return to the microwave for 2 minutes more.  
  6. Remove from the microwave and add in vanilla and baking soda.  Stir to combine.  The mixture will foam and rise.  Pour caramel mixture over popcorn and pecans and stir until well coated.
  7. Spread coated popcorn mixture onto a foil-lined jelly roll pan.  Place in the oven and bake for 30 minutes, stirring every 10 minutes.  Remove from oven.
  8. Melt almond bark according to package instructions.   Using a fork, drizzle all over the popcorn mixture.  
  9. When almond bark is hardened and popcorn is cool, break into chunks and enjoy!
Source: Slightly modified from Veronica's Cornucopia as originally from Our Best Bites; Easy Microwave Popcorn from Good Thymes and Good Food as seen on Prevention RD

Wednesday, September 5, 2012

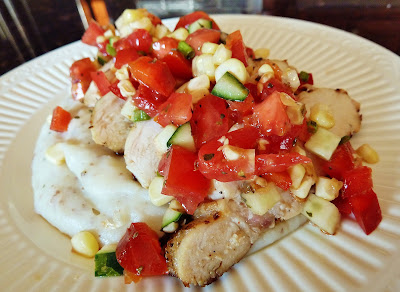
Buttermilk-Grilled Chicken with Garden Vegetable Salsa

Are you always looking for ways to use up your leftover buttermilk like I am?  Lucky for you I have a buttermilk tag on my blog just for this exact purpose!  Of course, you could always "cheat" and make fake buttermilk by adding 1 tablespoon of vinegar or lemon juice to a regular cup of milk and letting it sit for 5 minutes.  This makes it get a bit curdled and sour just like buttermilk.  It works in a pinch but for me, I like the real thing so I buy the jug of buttermilk at the store.

My CSA continues to churn out lots of wonderful garden-fresh veggies and so when I saw this on Josie's blog, I knew it would make the menu sometime this Summer.  Finally the stars aligned and the farm supplied all of the vegetables that I needed to make this recipe (even the mashed potatoes which I made as a "bed" for the chicken and veggies to rest upon).  I gathered some fresh herbs from our work garden and happened to have some buttermilk leftover from when I had made Tomato and Corn Pie (still easily the best dish from the Summer!) and Strawberry Buttermilk Ice Cream.  Perfect.

I've heard of using buttermilk for fried chicken before but never grilled so the concept was intriguing to me.  I found that allowing the chicken to marinate overnight in the buttermilk mixture resulted in meat so juicy and tender after grilling that I about died of happiness.

As a side note, this is my last month of my CSA subscription :(.  But, to preserve some of the fresh flavors of summer, I took on canning 60 POUNDS of tomatoes with my mother-in-law.  I'll post soon about that adventure so stay tuned!

One Year Ago: Oven Baked Sweet Potato Chips

Buttermilk-Grilled Chicken with Garden Vegetable Salsa


Ingredients

For the Chicken
  • 4 boneless, skinless chicken breast halves, trimmed
  • 2 cups low-fat buttermilk
  • 3 cloves garlic, peeled and crushed
  • 1/2 tsp paprika
  • 1/8 tsp crushed red pepper flakes
  • 1 tsp kosher salt
  • 1/2 tsp freshly ground pepper
For the Garden Salsa
  • 1/2 cup finely diced cucumber
  • 1/2 cup finely diced bell pepper
  • 1/2 cup minced scallions
  • 3/4 cup corn, cut from the cob (about 1-2 ears)
  • 2 medium tomatoes, cored, seeded, and diced
  • 1/4 cup minced fresh herbs (such as basil, chives, oregano, and parsley)
  • 2 Tbsp olive oil
  • 2 Tbsp red wine vinegar
  • Juice of 1/2 lemon
  • Salt and pepper, to taste
Directions
  1. In a gallon-sized ziplock bag or shallow baking dish, combine the chicken with the buttermilk, garlic, and spices.  Cover and refrigerate for at least 1 hour or up to overnight.
  2. When ready to cook, preheat the grill to medium-high heat.  Oil the grates and cook the chicken about 7 minutes per side, turning once, or until the internal temperature reaches 165F.  Remove from the heat and cover loosely with foil.  Allow to rest at room temperature about 10 minutes before serving.
  3. While the chicken is cooking, combine the ingredients for the salsa in a medium bowl.  Taste and season with salt and pepper before serving on top of chicken.

Source: Pink Parsley

Monday, August 27, 2012

Tomato and Corn Pie

So what did you think of last week?  It got a bit weird around here as I shared 3 different sweet recipes in a row.  I don't think that's every happened before outside of an Emily baking Extravaganza (see Apples or Summer Fruits and Veggies themes) or holiday time.  But now back to regular old food around here...my waistline really can't handle anymore desserts for a little while!

It's sad but true, summer is officially coming to an end soon.  Kids are returning or have already returned to school, pools are on their last week of being open, and summer's fruit and vegetable bounty will soon be gone.  But before that all happens, I highly encourage you to capture all the splendor of summer by making this savory pie.

This recipe is not especially difficult to make but it is a bit time consuming.  But the moment that you bite into it, you are rewarded for your hard work.  This was simply put, the freshest, most delicious dish I'd eaten all summer.  It was bursting with amazing flavors and I was so glad that I made it.

One Year Ago: Mushroom Bolognese
Two Years Ago: Blueberry Almond Cake with Lemon Drizzle

Tomato and Corn Pie


I'm sorry for this really awful photo.  I got a late start and it was quite dark by the time I had the pie done and snapped this shot.  It tastes infinitely better than I make it look.  The flavor truly took me by surprise!
Ingredients

For the Crust:
  • 2 cups all-purpose flour
  • 1 Tbsp baking powder
  • 3/4 tsp salt
  • 6 Tbsp cold unsalted butter, cut into 1/2 inch cubes
  • 3/4 cup buttermilk
  • 2 Tbsp butter, melted
For the Pie
  • 1 3/4 lb tomatoes
  • salt
  • 2/3 cup mayonnaise (light is fine) or Greek yogurt
  • 2 cups (8 oz) shredded sharp cheddar cheese
  • 1/2 cup shredded parmesan cheese
  • 2 cloves garlic, minced
  • 1/4 cup fresh basil, chopped
  • 1 Tbsp fresh chives or green onions, sliced
  • 2 Tbsp fresh lemon juice
  • Freshly ground black pepper
  • 1 1/2 cups fresh corn (from 2-3 ears)
Directions
  1. To make the crust: Whisk together flour, baking powder, and salt in a bowl.  Blend in cold butter with your fingertips, pastry blender, or two forks until it resembles coarse meal.  Add the buttermilk and stir until the mixture forms a dough.  Gather into a ball.
  2. Divide the dough in half and on a well-floured counter, roll out once piece into a 12-inch round.  Roll the dough around the rolling pin and transfer to the pie plate.  Pat the dough in with your fingers and trim any overhang.  Put the pie plate into the refrigerator to chill while preparing the filling.  Flatten the second dough bough into a disc then wrap in plastic wrap and chill as well.
  3. Bring a large pot of water to a boil.  Prepare a large bowl of ice water.  Add the tomatoes to the boiling water and cook for about 10 seconds before transferring tomatoes with a slotted spoon to the ice water.  When cool enough to handle, peel the skins from the tomatoes.
  4. Line a baking sheet with a double-layer of paper towels.  Cut the tomatoes into 1/4-inch thick slices and arrange in a single layer on the paper towels.  Sprinkle generously with salt and allow to stand at room temperature for 20-30 minutes.  Blot the tomatoes with more paper towels to remove excess moisture.
  5. Meanwhile, preheat the oven to 400F.
  6. Mix together the mayonnaise (or Greek yogurt), cheese, garlic, and lemon juice.  Season with salt and pepper to taste.
  7. Remove the pie crusts from the refrigerator.  Layer half of the tomatoes on the bottom of the pie and gently remove extra seeds from about 1/2 to 2/3 of the tomatoes (leave some for flavor!).  Scatter half of the corn on top of the tomatoes then drop spoonfuls of the cheese mixture over the top.  Sprinkle with half of the basil and chives.  Repeat the layers: tomatoes, corn, cheese, herbs.
  8. On a well-floured surface, roll the second pie crust into a 12-inch circle.  Fit it over the filling and pinch the edges of the two crusts together to form a fluted edge or use the tines of a fork to seal together.  Use a small knife to cut 4 slits on the top of the crust then brush with melted butter.
  9. Place a cookie sheet on the rack below where you will place the pie to catch any filling that may boil over.  Bake pie until crust is golden and the filling is bubbling, about 30-35 minutes.
  10. Allow to cool 10-15 minutes before cutting into slices and serving.
Source: Originally from Christ Church Cooks and Gourmet as seen on Pink Parsley

Wednesday, August 8, 2012

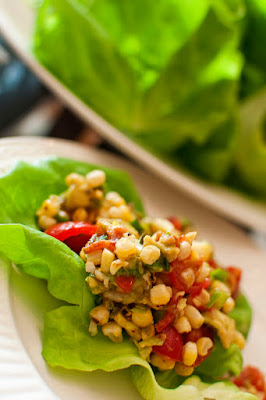
BLT Corn Salad Wrap

And so continues Emily and my Summer Seasonal Fruit and Veggies Extravaganza.  We followed our refreshing Watermelon Slush mocktails with another refreshing, barely cooked dish.  

Emily and I must have been on the same wavelength because this recipe was on both of our radars.  I like how we often think alike when it comes to food  :).  Summer tomatoes and corn are no brainers to include in this theme and having the boys give the corn some charred flavor on the grill keeps things cool in the kitchen.  Add avocado and bacon then serve it in a lettuce leaf and you have yourself a deliciously fresh finger food!

On Thursday you get a bonus post for the week- another product review+giveaway!  Then, on Friday you get the main course from Emily and my Summer Seasonal Fruit and Veggie Extravaganza before we finish off with two desserts next week.

Can't get enough lettuce wraps?  Try this Chorizo and Sweet Potato Lettuce Wrap or Asian Lettuce Wrap!


BLT Corn Salad Wrap

BLT Corn Salad Wrap
Photo Credit: Emily H.

Yields: 5 cups of corn mixture

Ingredients
  • 3 ears of corn, shucked of their husks and silk
  • 1 cup cherry tomatoes, sliced in half
  • 1/2 cup chopped green onions
  • 1 avocado, diced
  • 3 sliced crisp cooked bacon, diced
  • juice of 1 lime
  • about 1 tablespoon olive oil
  • salt and pepper to taste
  • a good sprinkling of chili powder and smokey paprika
  • butter lettuce or iceberg lettuce leaves
  • hot sauce and sour cream for topping
Directions
  1. Over a gas burner or grill, char raw shucked corn.  Rotate corn until cob is charred on all sides.  Allow corn to cool before slicing corn kernels from the cob.
  2. Add corn kernels to a medium bowl.  Add sliced cherry tomatoes, green onion, diced avocado, and diced bacon.  Squeeze in lime juice.  Add olive oil, salt, pepper, and slices.  Stir to combine.  Taste and adjust seasoning as needed.
  3. Rinse and clean individual lettuce leaves.  Serve alongside a bowl of corn salad.  To serve, scoop corn salad into lettuce leaves, top with hot sauce, sour cream, fold up like a taco and enjoy!
Source: Joy the Baker

Photobucket
This recipe was a Tasty Treasure at Fantastical Sharing of Recipes!

Wednesday, August 1, 2012

Creamed Corn

This. Is. Bliss.  And, there's not much more that screams "summer" to me than sweet corn.  I'm saddened by the corn crop shortage this year and thus higher-than-normal pricing but if you can manage to get some good corn this year, you should give this recipe a try.

I used to eat and love the type of creamed corn that was swimming in butter or *gasp* even the stuff that comes from a can.  It wasn't until I tried this recipe that I realized creamed corn could be so much more.  This recipe opened my eyes to how creamed corn should taste.  And it was worth risking the possibility of running into an icky worm in the tip of my organically grown CSA corn to access its freshness at its very peak.

The sweet corn flavor shines through and the cream and butter play supporting roles.  It's not thick with creamy texture but rather, a subtle creamy flavor.  Fresh basil kicks it up a notch to gourmet territory.  Even if you have an aversion for the canned stuff, you just might fall in love with this fresh, homemade version.

One Year Ago: Bob's Mexican Stuffed Chicken

Creamed Corn


Ingredients

  • 8 ears of corn, husked
  • 2 Tbs butter, divided
  • 1/2 cup finely chopped Vidalia onion
  • 3/4 cup heavy cream
  • 1 tsp sugar
  • 2 Tbs minced fresh chives
  • 1 Tbs minced fresh basil
  • kosher salt and freshly ground black pepper
Directions

  1. Cut the tip off of each cob of corn, and stand in a shallow bowl.  Use a knife to remove the kernels by slicing downward.
  2. Over another bowl, use the back of a spoon scrape the kernels clean of the pulp.
  3. In a large skillet, melt 1 tablespoon of the butter.  Add the onion and cook until just softened, 3-4 minutes.  Add the corn kernels, pulp, and 3/4 cup water.  Bring to a boil.  Reduce the heat, cover, and simmer until the corn is tender, 10 to 15 minutes.  Add the cream and sugar, and bring to a simmer.  Cook until the cream has thickened, 4 to 6 minutes.  Use an immersion blender to puree part of the corn - just pick 5-6 spots in the pan to puree.  Add the remaining tablespoon of butter, the chives, and the basil.  Season with salt and pepper to taste, and serve.

Source: Adapted by and as seen on Pink Parsley from Martha Stewart

Thursday, July 19, 2012

Cold Avocado Soup with Sweet Corn and Bacon

I don't know about you but for us in Ohio, it's been hot hot HOT outside.  Generally this summer it's been over 90 degrees most days.


When I saw this recipe, I kept going back and forth on whether or not to make it.  I love avocados but have never made a cold soup before and knew my husband would reject it because well...it's green.  But, I went with it and am so glad that I did.  This soup is plain addicting.  I loved the creamy texture and light avocado flavor.  The corn and bacon topping just brings it to a whole new level.  I mean really.  How can you go wrong with bacon?  Don't skip the topping because it gives the soup life but I personally enjoyed it more when that too was chilled vs. warm.  This soup was so refreshing to eat after a hot day and stayed good in the fridge for a few days afterward making a wonderful post-workout meal.


This post was bumped up by request of Whitney and I hope you all enjoy it!  If there are recipes you'd wish to see on my blog or want to help me prioritize what's posted next, come join the discussion on my facebook fan page.


Cold Avocado Soup with Sweet Corn and Bacon


Ingredients
For the Soup:
  • 2 ripe Haas avocados
  • 1 cup vegetable broth
  • 1 tablespoon lime juice
  • 2 tablespoons sour cream, creme fraiche, Greek yogurt, or milk (optional if you’re vegan)
  • 3/4 teaspoon salt
  • Dash of cayenne pepper
  • Pepper, to taste
  • 1 1/4 to 1 1/2 cups water
For the Topping:
  • 1 tablespoon olive oil
  • 1 small yellow onion, diced
  • 2 ears fresh corn, sliced from the cob
  • 1/2 jalapeno pepper, de-seeded and diced
  • 4 slices cooked bacon, chopped (optional if you’re vegan)
  • small handful fresh parsley leaves, chopped
  • salt and pepper to taste
Directions
  1. To make the soup, place avocado flesh in a blender along with vegetable broth, lime juice, sour cream (if using), cayenne, and salt.  Blend until the avocados are creamy.  Remove the center from your blender lid, and while blending, slowly add the water.  Soup will be done when smooth, with your desired consistency.  Feel free to add a touch more water if you prefer a thinner soup.  Taste and add salt and pepper as necessary.  Place in a container in the fridge while you make the topping.
  2. To make the topping, heat olive oil in a skillet over medium heat.  Add onion and cook until translucent and browned, about 5 minutes.  Add corn and jalapeno and cook for 3 minutes more.  Add sliced bacon and parsley.  Cook until everything is warmed and just browned.  Add salt and pepper to taste.  If desired, chill the topping before serving.
  3. Pile about 1/2 cup of warm topping into a bowl.  Pour cold soup around the topping.  Serve and enjoy.  Soup lasts up to three days in and airtight container in the fridge. 
Source: Joy the Baker

Wednesday, June 27, 2012

Summer Corn Fettuccine

Apparently this is one of those recipes that you either love or hate.  Chris found it to be very strange and I'll admit that at first, I wasn't really a fan either.  But, by the time I was reaching the end of my plate, I found myself yearning for more and wanting to lick the plate.

The contrast between the sweet corn and the salty bacon with accents of parmesan and fresh basil kind of blows your mind once you temper it into accept something other than the expected pasta sauces.  This must be why this particular recipe took the blogging world by storm and fueled a great debate.

Love it or not?  Leave your comments below!


One Year Ago: Herbed Potato Salad (Look ma!  No mayo so perfect for your 4th of July/Summer BBQ!)


Summer Corn Fettucine


Ingredients
  • 1 pound fettuccine
  • 6 slices bacon, chopped
  • 6 ears corn on the cob, shucked
  • 1 onion, finely chopped
  • 12-oz mushrooms, sliced 
  • Freshly ground black pepper
  • 1 cup half-and-half
  • 1/2 cup chicken stock
  • 2 tablespoons fresh thyme leaves, chopped
  • A few dashes of hot sauce
  • 1 cup grated parmesan cheese, divided
  • 1/2 cup sweet basil leaves, cut in a chiffonade
Directions
  1. Cook pasta according to package directions. Drain and set aside. 
  2. Meanwhile, heat a large skillet over medium-high heat. Add the bacon and cook for a few minutes until rendered and crisp. 
  3. Put a small bowl inverted into a large bowl, steady the corn cobs on the smaller bowl and cut the kernels off the ears. Add three-quarters of the scraped corn and any corn liquid to the pan with the bacon. Add the onions and mushrooms and liberally season with salt and pepper to taste. Cook until the vegetables are tender, 5 to 6 minutes.
  4. dd the remaining corn and half-and-half to a food processor or blender and puree until smooth. Pour the stock into the corn and vegetables and simmer over low heat for a minute to reduce. Stir in the thyme and corn-cream mixture and cook for 3 to 4 minutes, stirring frequently, to thicken. Add the hot sauce and season with salt and pepper to taste.
  5. Add the pasta to the sauce just before serving and toss with Parmesan cheese. Top with basil and serve.
Source: Originally from Cassie Craves and Evil Chef Mom as seen on and adapted by A Taste of Home Cooking

Thursday, June 21, 2012

Chorizo and Sweet Potato Lettuce Wraps

Yum yum and another YUM!  Every once in awhile you make a recipe that is so ridiculously good that you feel like you need to drop everything and share it with the world.  This was one of those recipes for me.

I'm sure everyone's familiar with the Asian Lettuce Wraps that are available at places such as P. F. Chang's and I even shared a similar version of that on my blog here.  But this.  This was even more flavorful, even more amazing.  

The cool, crisp lettuce leaves contrast nicely with the slightly spicy chorizo and smoky roasted corn and sweet potatoes.  The color is also quite vivid and gorgeous.  Now, in my case, my husband accidentally picked up Oriental sweet potatoes which I guess are white unlike normal orange sweet potatoes so ours wasn't quite as colorful.  Still delicious and the leftovers became filling for regular flatbread wraps for lunches the rest of the week.  Personally, I preferred the dish without the sauce but it adds another layer of cool creaminess to the meal.  I kind of forgot about the feta, too.  The tang of that would have been a nice addition if you have it but I don't think we missed much by not having it.

One Year Ago: Singapore Mei Fun
Two Years Ago: Orange Berry Muffins

Chorizo and Sweet Potato Lettuce Wraps

Chorizo and Sweet Potato Lettuce Wraps

Ingredients

For the Chorizo Sweet Potato Filling
  • 2 medium sweet potatoes, peeled and cut into 1/2-inch cubes
  • 1 cup frozen or fresh corn
  • 3 Tablespoons canola, divided
  • 2 teaspoons ground cumin
  • pinch of cayenne
  • pinch of sugar
  • kosher salt
  • 1 cup chopped white onion
  • 10-12 ounces chorizo, casings removed (soy or pork both work!)
  • juice from 1 lime
  • 1/2 cup chopped fresh cilantro
For the Cilantro Cream
  • 1 cup  Greek yogurt 
  • 2 T freshly squeezed lime juice
  • 2 T chopped fresh cilantro
  • pinch of salt
To Assemble
  • 1 head of leaf lettuce (green, red, butter, or Bibb), leaves separated, washed, and dried
  • 1 cup crumbled feta
  • Additional lime wedges, for garnish
Directions
  1. Preheat oven to 450 degrees. Place sweet potato cubes and corn on a large rimmed baking sheet. Drizzle with 2 T of the oil and sprinkle with cumin, cayenne, sugar, and a good pinch of salt. Use your hands to toss the vegetables and coat them well with the oil and spices.  Spread them into a single layer and roast for 15-20 minutes, stirring a couple of times during roasting, until the potatoes are tender browned in spots.
  2. Meanwhile, heat the remaining tablespoon of oil in a large skillet over medium heat. Saute the onion, stirring occasionally, until golden brown, about 8-10 minutes. Add the chorizo, breaking up the clumps with the woolens spoon.   Stir and cook until the chorizo is browned and cooked through, about 5-8 minutes. Add the sweet potato mixture to the skillet, then stir in the lime juice and cilantro.  Taste and season with additional salt if necessary.
  3. As the chorizo mixture is cooking, combine the sour cream, lime juice, and chopped cilantro in a small bowl. Stir to combine, adding a pinch of salt to taste.
  4. Assemble the wraps by putting a couple spoonfuls of filling into the middle of a lettuce leaf. Drizzle with the cilantro cream sauce and sprinkle with feta.  Serve with extra lime wedges.
Source: As adapted by and seen on Pink Parsley from Perry's Plate

Monday, April 30, 2012

Southwestern Stuffed Sweet Potatoes

Look what I have for you today...ANOTHER "stuffed" recipe!  You'd think I have a slight obsession but oddly enough, I had this recipe chosen for our Cinco de Mayo themed Dinner Club well before any of the other stuffed recipes were planned for my blog postings.

I've seen this recipe called several things: Healthy Mexican Stuffed Sweet Potatoes, Mexican-Inspired Stuffed Sweet Potatoes, and Southwestern Stuffed Sweet Potatoes.  It's a mouthful to type or say.  So, let's just put aside our differences and as in the age old potAYto versus potAHto argument we'll just call them "delicious".

You will have leftover filling.  That is, unless you're like me and start eating it by the spoonful.  But, if you do happen to have some left, I hear they make an awesome quesadilla filling!

Look for my other Cinco de Mayo Dinner Club dish later this week!

One Year Ago: Guacamole
Two Years Ago: Summer Corn and Vegetable Soup

Southwestern Stuffed Sweet Potatoes

Photo Credit: Emily H.

Ingredients
  • 3 medium sweet potatoes
  • 1 (15 oz) can corn, or 1.5 cups frozen corn, rinsed and patted dry
  • Salt, to taste
  • 2 tsp ground cumin
  • 1 tsp chili powder
  • 1/2 tsp Mexican oregano (optional)
  • 1 Tbsp olive oil
  • 1/2 yellow onion, diced
  • 1 (15 oz) can black beans, rinsed and drained
  • 1/2 c cilantro, chopped
  • 1 oz cream cheese (light is fine)
  • 1/4 c sour cream (light is fine), plus more for serving
  • 1 to 3 chipotle peppers in adobo sauce, minced or pureed (adjust to your spice tolerance)
  • 6 Tbsp shredded Mexican cheese (or other preferred flavor)
Directions
  1. Preheat oven to 350 degrees F. Place sweet potatoes on a baking sheet and bake for 50 to 60 minutes, or until fork tender. Remove from the oven and allow to set until cool enough to handle.
  2. While the sweet potatoes are cooling, saute the corn in a dry heavy skillet over medium high heat. Sprinkle with salt, cumin, chili powder and Mexican oregano. Cook until the corn is roasted and browned (about 7 to 10 minutes). Transfer to a small bowl; set aside.
  3. Wipe the skillet clean and heat the olive oil. Add the onions and cook until just translucent and tender. Transfer to the bowl with the corn. Add the black beans and cilantro to the onion and corn. Gently stir to mix.
  4. Cut the cooled sweet potatoes in half, lengthwise. Scoop the flesh into a large mixing bowl, leaving the skins intact (leaving a thin layer of potato helps to hold the skin together.) Add the cream cheese, sour cream, chipotle pepper(s) and salt to the mixing bowl with the sweet potatoes. Mash with a potato masher or blender to desired texture. Gently stir in the roasted corn, onions, black beans and cilantro mix.
  5. Preheat the broiler. Fill each potato skin with the mashed potato mixture, topping each with 1 Tablespoon of cheese. Broil for 5 minutes, or until cheese is melted and hot. Serve immediately with a dollop of sour cream, if desired.
Source: As seen on and adapted by Pennies on a Platter from Pinch of Yum

Thursday, April 29, 2010

Summer Corn and Vegetable Soup

It may not be summer but I say this soup is also perfect for Spring!  It's a light and healthy soup that makes a great meal.  The ingredients are very simple but very colorful (and colorful means healthy!).  It formed a serious symphony of mouthwatering flavor when you eat (or is it drink?...depends on if you're Asian or not haha!) this soup! 

I thought when I read the recipe that it sounded pretty good but when I tried it...wow was honestly blown away!  The picture isn't so pretty because it was in the process of cooking versus plated but don't let that keep you from trying this one.  My vegetarian friends, you know the drill: swap out the chicken broth for veggie broth and then you're golden.

One ingredient that was completely new to me was hominy.  I found both the yellow and white variety in the canned vegetable aisle near the canned corn.  I opted for the yellow one to use in my soup.  Corn seems to be the closest relative to this veggie but it's a very different texture because it's soft and kind of a bit...fluffy?  When I researched it, it said something about it being soaked in lye??  Sounds scary.  Tastes delicious.  If you absolutely cannot find hominy, I suppose you can just leave it out or sub a can of corn but it won't have the same texture and fillingness when you eat it.  So guy find and buy that hominy, will ya? :)

I can definitely see me making this soup again in the future...perhaps when my CSA share starts to roll in? Then it'll truly be Summer :).

One Year Ago: Szechwan Chicken

Summer Corn and Vegetable Soup
Printer-Friendly Version


Ingredients
  • 4 c. fresh corn kernels or 1 (16-oz.) package frozen, thawed
  • 2 c. lowfat or nonfat milk
  • 1 TBSP olive oil
  • 2 cloves garlic, minced
  • 1 large onion, diced (about 2 c.)
  • 1 medium red bell pepper, seeded and diced (about 1 c.)
  • 1 medium zucchini, (about 1/2 lb.) diced
  • 2 c. low-sodium chicken or vegetable broth
  • 1 (15.5 oz.) can yellow or white hominy, drained
  • 2 plum tomatoes, seeded and diced
  • 3/4 tsp. salt, plus more to taste
  • freshly-ground black pepper, to taste
  • 1/2 c. fresh basil leaves, cut into ribbons
Directions
  1. Heat the oil in a large soup pot over a medium-high heat. Add the garlic, onion, bell pepper, and zucchini and cook, stirring until the vegetables are tender, about 5 minutes.
  2. Add the hominy and the broth and bring to a boil.
  3. Meanwhile, put the thawed corn and milk into a blender or food processor, until smooth.
  4. Add the pureed corn and tomatoes and cook until warmed through, but not boiling. Add the salt and season with pepper. Serve garnished with the basil ribbons.
Source: As seen on and adapted by Apple A Day, Originally from Ellie Krieger, The Food You Crave

Thursday, March 4, 2010

Jalapeno Cornbread Whoopie Pies

Mmm this was the perfect accompaniment to my mother in law, Mary Lynn's, Chili.  Once I saw this recipe, I knew it was a match made in heaven.  Chris ate the bread plain because he won't touch cream cheese with a 10 foot pole and I made the filling with all neufchatel cheese (reduced fat cream cheese) instead of a blend because I didn't want to spend the extra money on goat cheese.  I bet it would have been even more awesome with the goat cheese...

Anyway, I've experimented quite a bit now in the sweet-type whoopie pies so this was a nice change from the ordinary.  Since it was just the two of us, I halved the recipe and it was just enough for 2 meals of chili and jalapeno cornbread whoopie pie accompaniments.  For simplicity, I used about 2 Tablespoons of canned diced jalapeno peppers.  In the future, I'd add more peppers or a splash of Tabasco for more kick.  You know I like it spicy!

Rather go with the traditional sweet whoopie pies?  Try one of these - one for every season!:
Or, try this regular Buttermilk Cornbread recipe if you want a no-frills cornbread.

Jalapeno Cornbread Whoopie Pies
Printer-Friendly Version


Yields: 10-12 assembled pies

Ingredients

For the Cornbread

  • 1 1/4 cups all-purpose flour
  • 1 cup cornmeal
  • 1/4 cup packed brown sugar
  • 2 teaspoons baking powder
  • 1 teaspoon salt
  • 1 cup buttermilk, at room temperature
  • 4 tablespoons unsalted butter , at room temperature (used 2 Tbsp salted, 2 Tbsp unsalted)
  • 1 large egg, at room temperature
  • 2 jalapeño chiles, seeded and finely chopped (used about 2 Tbsp canned diced jalapenos)
For the Cheese Filling

  • 6 slices bacon
  • 4 ounces soft fresh goat cheese, at room temperature (omitted)
  • 4 ounces cream cheese, at room temperature (used neufchatel cheese and doubled it to accomodate lack of goat cheese)
  • 2 tablespoons milk
  • 1 tablespoon chopped fresh scallions
Directions

To Make the Jalepeno Cornbread
  1. Position a rack in the center of the oven and preheat the oven to 375 degrees. Line two baking sheets with parchment paper.
  2. In a medium bowl, stir together the flour, cornmeal, brown sugar , baking powder, and salt. In the work bowl of a stand mixer fitted with the paddle attachment, beat together the buttermilk, butter, and egg on low speed until just combined. Increase the speed to medium and beat until thoroughly combined, about 3 minutes. Add the flour mixture and the chopped jalapeno to the batter and beat on low until just combined.
  3. Using a spoon, drop about 2 tablespoons of batter onto one of the prepared baking sheets and repeat, spacing them at least 2 inches apart. Bake one sheet at a time for about 12 minutes each or until the cornbread begin to brown around the edges. While the cornbread is cooking, prepare the cheese filling using the instructions below.  After the cornbread is cooked, remove from the oven and let the them cool in the pan for about 5 minutes before transferring them to a rack to cool completely.
To Make the Cheese Filling
  1. While the cornbread is baking, in a medium skillet, cook the bacon over medium heat until crisp. Using a slotted spoon, transfer to a paper-towel-lined plate to drain and cool. When cool, crumble into small pieces.
  2. In the work bowl of a stand mixer fitted with the paddle attachment, beat together goat cheese (if using), cream cheese and milk on low speed until just combined. Increase the speed to medium and beat until smooth and creamy, about 3 minutes. Add the crumbled bacon and the scallions and beat on low until combined.
To assemble
  1. Spread filling onto the flat side of one cake using a knife or spoon. Top it with another cake, flat-side down. Repeat with the rest of the cakes and filling. You can also use a pastry bag with a round tip to pipe the filling onto the cakes, which will give you a smoother, neater presentation.
Source: Modified from the Star Telegram newspaper, as modified and seen on Sing for Your Supper

Thursday, January 21, 2010

Corn and Avocado Salsa

I made this to accompany our Copycat Chipotle Chicken Burrito Bols and to use up the leftover avocado from when I made sushi for Dinner Club (yes, I'm that behind on posting recipes!). 

While it wasn't quite like Chipotle's corn salsa nor was it supposed to be, it tasted delicious and was a great chunky dip for our tortilla chips.  It's a nice change from your traditional tomato salsa and filled with fiber from the corn and black beans.  In fact, there aren't ANY tomatoes in this one!  Oh, and it has more CILANTRO.  Yum!  I actually forgot to buy a red pepper so there wasn't any in mine but I can imagine it would be awesome in this salsa. 

A couple of words of caution - maybe cut back a little bit on the lime if you're using a lot of this over the Cilantro Lime Rice because it was a bit too tart and limey for my tastes.  Or maybe I just use a lot of salsa... :).  Also, this makes a lot (about 1 quart or 4 cups).  So unless you're making this for a crowd, you may want to scale this recipe down.

Corn and Avocado Salsa
Printer-Friendly Version


Ingredients
  • 3 ears fresh corn, husks and silks removed (Used 15-oz can of corn, drained)
  • 1 can black beans, drained and rinsed
  • 2 avocados- peeled, pitted, and cubed
  • 1/4 large red onion, finely diced
  • 1 red bell pepper
  • 1 Tbsp garlic, minced
  • 1/2 Tbsp ground cumin
  • 1 tsp crushed red pepper flakes
  • ¼ cup chopped fresh cilantro
  • 1/3 cup red wine vinegar
  • 2 Tbsp olive oil
  • ¼ cup fresh lime juice (roughly 2 limes)
  • Salt and Black pepper, to taste
Directions

  1. Place the corn in a large pot with enough water to cover, and bring to a boil. Cook until kernels are tender but crisp, about 5 minutes. Drain, and cool in cold water. Use a knife to scrape kernels from the cobs.  Place kernels in a medium bowl.
  2. Stir in avocados, red onion, bell pepper, and garlic.   Add cumin, red pepper flakes, and cilantro.  Mix in vinegar, olive oil, and lime juice. Season with salt and pepper.
  3. Put mixture in refrigerator and allow flavors to meld for at least 30 minutes.
Source: All Recipes as seen on The Piggly Wiggly Blog

Sunday, December 6, 2009

Chinese Chicken Corn Soup

I don't cook much Chinese food even though I'm Chinese.  And, probably have mentioned it before that I don't even really like rice all that much...I guess you could say I'm a bit strange like that.  Anyway, this is a favorite of mine when we go to restaurants and since my family doesn't so much keep written recipes I was on my own for this one given some inspiration from the internet and my recollection of how it should taste.  I hope you enjoy this original.

Chinese Chicken Corn Soup
Printer-Friendly Version


Cook Time: About 30 minutes
Yields: About 6 bowls?

Ingredients
  • 2 (14 ounce) cans reduced sodium chicken broth
  • 1/2 cup water
  • 2 boneless chicken breasts
  • 1/4 teaspoon onion powder
  • 1/4 teaspoon garlic powder
  • 1/4 teaspoon ground white pepper
  • 2 tablespoons cornstarch
  • 2 (14.75 ounce) cans cream-style corn
  • 1 teaspoon sesame oil
  • 2 egg whites 
  • Green onions, sliced
Directions
  1. In a medium stock pot combine water, broth, and chicken.  Bring to a boil then reduce heat and add onion powder, garlic powder, and pepper.  Simmer about 20 minutes or until chicken is no longer pink. 
  2. Remove chicken from pot and allow to cool slightly.  When chicken is cool enough to handle, shred or cut into bite size pieces.
  3. While the chicken is cooling, in a small bowl mix together the corn starch and about 1/4 cup of the broth.  Mix until no lumps remain and then add the cornstarch mixture to the stock pot.  Bring mixture back to boil and stir constantly until well mixed.
  4. Add the creamed corn and chicken pieces to the broth then season soup with sesame oil.
  5. Reduce heat and slowly add egg white while swirly the soup with a fork to break the egg pieces apart.  The eggs should cook and form strings similar to egg drop soup.
  6. Serve hot and garnish with green onions.  
Source: A Christine's Kitchen Chronicles Original

Sunday, November 15, 2009

Corn Casserole

I made this for a dinner club that Chris and I were a part of.  We were in charge of bringing a side and the theme this month was "Holiday Favorites".  This was added to the menu the morning of...because people in the club are total overachievers I felt that I had to bring a 2nd side dish as to not be shamed.  I was between this and homemade macaroni and cheese.  Our friends Sig and Kristen helped me decide which to make :).

Having not made this recipe before it was a slight risk bringing it to a dinner party but it looked easy enough, had rave reviews, and Paula (with her loads of butter!) can't steer you wrong.  I'll admit that I probably shamed Paula as I did not use the full amount of butter nor cheese and did use reduced fat sour cream.  I don't think anyone could tell ;). 

This was pretty good and was well received (only a single bite left in the pan!).  Sweet Potato Souffle is still my favorite holiday side dish...along with my Grandpa's stuffing...omg.  My mouth is watering for Thanksgiving already!

Corn Casserole
Printer-Friendly Version


Prep Time: 13 mins
Cook Time: 55mins
Yield: 6-8 Servings

Ingredients
  • 1 (15 1/4-ounce) can whole kernel corn, drained
  • 1 (14 3/4-ounce) can cream-style corn
  • 1 (8-ounce) package corn muffin mix (recommended: Jiffy)
  • 1 cup sour cream
  • 1/2 cup (1 stick) butter, melted
  • 1 to 1 1/2 cups shredded Cheddar
Directions
  1. Preheat oven to 350 degrees F.
  2. In a large bowl, stir together the 2 cans of corn, corn muffin mix, sour cream, and melted butter.
  3. Pour into a greased 9 by 13-inch casserole dish.
  4. Bake for 45 minutes, or until golden brown.
  5. Remove from oven and top with Cheddar.
  6. Return to oven for 5 to 10 minutes, or until cheese is melted.
  7. Let stand for at least 5 minutes and then serve warm.
Source: Paula Deen

Sunday, October 18, 2009

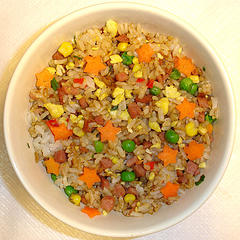
Christine's Fried Rice

I found another use for that leftover turkey.  I must admit (and hang my head in shame) that until this past week I have NEVER made fried rice before!  I know...what kind of Chinese person am I?!  But, I had tons of leftover refrigerated rice from our dinner party and also leftover turkey from another night's dinner and so a creative solution was born!  Everybody in the know knows that they key to great fried rice is that it's nice and cold/refrigerated so this was a perfect use!  I would have loved to use Momma L's recipe for fried rice but alas, most things like this (and most family Chinese food recipes in general) do not have written recipes.  And so I searched the internet for a point to begin and then found the inspiration from the inner Momma Louie in myself to create this original recipe.  I thought it turned out very good for my first attempt and I hope you enjoy it

Christine's Fried Rice
Printer-Friendly Version


INGREDIENTS
  • 2 c. white rice (uncooked)
  • 1/2 small onion, diced
  • 1 1/2 c. frozen mixed vegetables
  • 1 c. various cooked meat (ham, chicken, turkey, shrimp, etc.), diced 
  • 2 Tbsp. vegetable oil
  • 2 eggs (optional)
  • Oyster sauce, to taste (start with about 1 tsp.) 
  • Reduced sodium soy sauce, to taste
  • Seasoning salt, to taste
  • Garlic powder, to taste
  • Pepper, to taste 
  • Drizzle of sesame oil (optional)
DIRECTIONS
  1. Make rice in a rice cooker per your unit's directions then put in refrigerator until well cooled.  Day old rice works best! 
  2. In a small bowl, thaw frozen vegetables by adding some water.  Drain and set aside.
  3. Heat wok over high heat. Pour in oil, then stir in onions, mixed vegetables, and meat; cook until onions are translucent and meat is heated.
  4. If desired, crack in eggs, stirring quickly to scramble eggs with vegetables and meat.
  5. Stir in cooked cooled rice. Shake in oyster sauce, soy sauce, and seasonings tossing rice to coat.  Heat until rice is warmed.  Taste and adjust seasonings as necessary. 
  6. Drizzle with sesame oil if desired and toss again.  Serve hot.
Source: A Christine's Kitchen Chronicles original inspired by Momma L. and the internet

Tuesday, May 12, 2009

Mexican Chicken and Rice Casserole

Another new recipe...trying to use up the canned chicken that my mom had given me a couple months ago.  This recipe was easy enough (came mostly from cans!) and pretty healthy (only 216 calories, 3g of fat per serving!  let's not forget it also gives you 4g fiber).  The original recipe called for cooking in a Dutch Oven but I don't have one of those.  Instead of dirtying another dish to bake in the oven I opted to cook the whole dish on the stove and it worked out fine.  Just make sure you have a big enough pan because it makes A LOT!  I added tabasco sauce and a sprinkling of Mexican style cheese to mine after I dished it out as a personal preference.

Mexican Chicken and Rice Casserole
(Source: modified from All You magazine)

Prep: 15 min.
Cook: 30 min.
Serves: 8
Cost per serving: $1.41

Ingredients
  • 1 Tbsp. vegetable oil
  • 1 red onion, chopped
  • 1 tsp. garlic, minced
  • 1 Tbsp. chili powder
  • 1 Tbsp. cumin
  • 2 cups uncooked white rice
  • 1 14.5-oz. can low-sodium chicken broth
  • 1 14.5-oz. can diced tomatoes with jalapenos
  • 1 15.5-oz. can black beans, drained and rinsed
  • 1 14.5-oz. can whole-kernel corn, drained
  • 1 4.5-oz. can chopped green chilies
  • 1 12.5-oz. can chicken breast in water, drained
  • Salt and pepper, to taste
  • 1 tsp. dried parsley
  • Tabasco sauce (optional)
  • Mexican style cheese (optional)

Directions
1. In a large saute pan over medium heat, warm oil. Add garlic and onion and saute until softened and translucent, 5 to 7 minutes. Add chili powder and cumin; stir for 1 minute. Add rice; cook, stirring, for 2 minutes. Stir in 2 cups water, broth, tomatoes, beans, corn, chilies and chicken, season with parsley, salt and pepper and bring to a boil. Reduce heat and simmer uncovered until rice is tender and liquid has been absorbed, 25 to 30 minutes.  Stir occasionally.
2. Remove from heat and let stand, covered, for 5 minutes. Fluff rice with a fork, check and adjust seasoning and serve.  Sprinkle with cheese and tabasco sauce, if desired.