Thursday, December 24, 2009

Vanilla-Peppermint Cupcakes

Like many people these days, I have a love of cupcakes.  Individually portioned cakey, frostingy goodness...what's not to love?  Every year I decorate our tree with candy canes and usually end up throwing them away at the end of the holidays.  Wasteful, I know.  So this year, I decided to try something different and used the candy canes to MAKE food with...genius, I know.  The first round of candy canes were crushed so that I could coat my Peppermint Truffles in festive peppermint goodness :).

This second recipe that I tried comes from a bakery called Sprinkles.  Yes, I bet you've heard of them before because they basically invented the whole cupcake craze as we know it today.  But, at $3.25 each or $36/dozen it'd be an expensive (and gut busting) habit to have.  So imagine my suprise when I found a recipe to their famous Vanilla-Peppermint Cupcakes on Oprah's website!

After doing some reasearch, I realized the importance of using room temperature baking goods when the recipe specifies.  I always thought it was just to make life more difficult but really it's because room temperature butter creams easier and room temperature eggs fluff up more, resulting in a light and airy cake.  While frosting these puppies, I learned just how delicate they really are!  Definitely following  baking instructions to a T from now on!  By the way, I also might halve the frosting recipe next time as even when I felt like I was frosting each cupcake with a lot, I  still had tons leftover!  For now, I'll leave the recipe as it was originally written...it's for the frosting lovers (like my husband!) out there!

So take a look at my finished product below and for those that were my taste testing guinea pigs, leavea comment.  Think I can sell my cupcakes?  I'll take cash, check, or credit card - thanks!

Vanilla-Peppermint Cupcakes
Printer-Friendly Version


Yields: 1 Dozen

Ingredients

For the Cupcake
  • 1 1/2 cups all-purpose flour , sifted
  • 1 tsp. baking powder
  • 1/4 tsp. coarse salt
  • 1/2 cup whole milk , room temperature
  • 1 tsp. pure vanilla extract
  • 1 tsp. peppermint extract
  • 1/2 cup (1 stick) unsalted butter , room temperature
  • 1 cup sugar
  • 1 large egg , room temperature
  • 2 large egg whites , room temperature
For the Frosting
  • 1 cup (2 sticks) unsalted butter , firm but not cold
  • 1/8 tsp. salt
  • 3 1/2 cups confectioners' sugar , sifted
  • 1/2 tsp. vanilla extract
  • 1/2 tsp. peppermint extract
  • 1/2 tsp. milk
Directions

To make cupcakes:
  1. Preheat oven to 350°. Line a 12-cup muffin tin with cupcake liners; set aside.
  2. In a medium bowl, whisk together flour, baking powder and salt; set aside.
  3. In a small bowl, mix together milk and extracts; set aside.
  4. In the bowl of an electric mixer fitted with the paddle attachment, cream butter on medium-high speed, until light and fluffy. Gradually add sugar and continue to beat until well combined and fluffy. Reduce the mixer speed to medium and slowly add egg and egg whites until just blended.
  5. With the mixer on low, slowly add half the flour mixture; mix until just blended. Add the milk mixture; mix until just blended. Slowly add remaining flour mixture, scraping down sides of the bowl with a spatula, as necessary, until just blended.
  6. Divide batter evenly among prepared muffin cups. Transfer muffin tin to oven and bake until tops are just dry to the touch, 22 to 25 minutes. Transfer muffin tin to a wire rack and let cupcakes cool completely in tin before icing.
To make frosting:
  1. In the bowl of an electric mixer fitted with the flat beater, beat the butter and salt on medium speed until light and fluffy, about 2 minutes.
  2. Reduce the speed to low, gradually add the confectioners' sugar and beat until incorporated. Add the extracts and milk and beat until smooth and creamy. Do not overmix or the frosting will incorporate too much air; it should be creamy and dense, like ice cream. Add additional milk, 1 teaspoon at a time, if frosting does not have a spreadable consistency.
To frost:
  1. Scoop a generous amount of frosting on top of a cooled cupcake (used a heaping tablespoon...apparently this wasn't generous enough!). Hold the cupcake in one hand and with the other hand use a small offset spatula to smooth the frosting over the entire top of the cupcake. To achieve the Sprinkles look, use the length of the spatula to create large swirls around the circumference of the cupcake. Or for a more homespun and rustic quality, use the tip of the spatula to create small ridges and waves in the frosting.
  2. Be careful to handle the cupcake with care and not grip it too tightly, which can crush the delicate cake. In general, the less the cupcake is handled, the better. An experienced Sprinkles froster can frost a cupcake with only a few turns of the spatula!
  3. Top with crushed candy canes!
Source: Candace Nelson, owner of Sprinkles Cupcakes; as seen on Oprah

Wednesday, December 23, 2009

Chicken Tikka Masala and Naan

I <3 Indian Food...and over the years I've converted Chris, too!  Our favorite Indian Restaurant ever is Ambar India in Clifton.  My cousins Jim and Kat say that it's the best they've had too...it pleases even foodie New Yorkers!  I think that Ambar and Wok Inn Express (my Aunt's restaurant in St. Benard) are the 2 things we miss most about living in Clifton.  While this wasn't quite Ambar, I thought it was quite good!  It took way more effort than I'd like and so I'd rather drive 25 mins to go to Ambar or order from another Indian restaurant in a fix but it was the pride in knowing that I COULD make Indian food that made it worth it to me.

Chris' favorite Indian dish is Chicken Makhani (Indian Butter Chicken).  Sometimes, restaurants don't serve that dish and they suggest Chicken Tikka Masala instead.  The two seem to be very similar except that Chicken Makhani is sweeter and at Ambar has nuts and raisins (not sure if this is universal?).  So, I took the liberty to modify this recipe to make it closer to Makhani vs.Tikka Masala...call it a hybrid if you will.  That's the beauty of cooking is sometimes you just find yourself inspired to give a recipe your own touch :).

As a side note, I was so excited that this recipe used ground cardamom.  After having invested in this interesting spice to make Finn Nisu Bread (or Misua as my in-laws know it as), it's just been sitting in my spice cabinet waiting to be used again.  Regarding the Garam Masala...it's apparently a very common sweet/savory spice that's used in Indian food.  Since I didn't want to invest in yet ANOTHER spice not knowing if I'd ever use it again, I decided to Google for substitutes.  I also considered knocking on our neighbor's door to see if I could "borrow a tsp of spice" (they're both Indian on either side...and it's like borrowing a cup of sugar lol!).

Now, it may not be the prettiest  looking food but I assure you it was tasty.  (Yeah, just ignore the bite taken out of my naan...Chris suggested I take a photo for my blog AFTER I started eating!  I'm surprised  more wasn't gone as the aroma during cooking was devine!).  Since our grill is covered for the winter, I made the naan on an open George Foreman and then kept it warm in the oven since I could only make 2 at a time.  Thank goodness I halved the naan recipe...but even then there was so much excess!  At least I don't have to ration it like at Ambar where each piece of  plain naan is like $2.50.  There was plenty to go around and this naan had GARLIC (an upcharge at Ambar)!  Nothing like sopping up the curry sauce with some fresh naan...mmm!


Chicken Tikka Masala
Printer-Friendly Version

Marinade
  • 1 cup plain yogurt
  • 2 tablespoons lemon juice
  • 2 teaspoons ground cumin
  • 2 teaspoons ground cardamom
  • 1 teaspoon red pepper flakes
  • 1 teaspoon salt
  • 1 teaspoon grated fresh ginger (omitted)
  • 1 1/2 pounds boneless, skinless chicken breast cut into large cubes
Sauce
  • 1 tablespoon butter
  • 2 tablespoons flour
  • 2 cloves garlic, minced
  • 1 jalapeño chili, minced (used 2 oz canned diced jalepenos; adjust heat to your preferences)
  • 1/4 cup sugar
  • 2 teaspoons ground coriander
  • 1 teaspoon cumin
  • 1 teaspoon paprika
  • 1 teaspoon garam masala (Googled for a substitute and used 1/4 tsp ground cumin + 1/4 tsp ground coriander + 1/6 tsp ground pepper + 1/6 tsp ground cardamom + 1/6 tsp all spice)
  • 1/2 teaspoon salt
  • 1 8 oz. can tomato sauce
  • 1 1/2 cups half-and-half
  • 1/4 cup peanuts
  • 1/4 cup raisins
  • 1/2 cup chopped cilantro
Directions
  1. Combine everything on the marinade list, including the chicken. Marinate in a plastic Ziploc gallon bag in the fridge for at least 2 hours (overnight is better.)
  2. If you have a gas grill or grill pan, grill the chicken until slightly undercooked. If you have a charcoal grill, thread the chicken onto skewers first. (Or, use a skillet like I did...)
  3. Set the lightly grilled chicken aside on a plate. Melt the butter in a large deep skillet over medium heat then add the flour. Add the garlic and jalapeño, and stir for a minute. Stir in the seasonings, sugar, and salt. Add the tomato sauce, and stir for one minute. Add the half-and-half, peanuts, and raisins, and simmer until the sauce thickens.
  4. Add the chicken to the sauce (remove it from the skewers if you did this) and let simmer for a couple of minutes. Serve with basmati rice and naan.
Source: modified from What's for Dinner, as seen on A Taste of Home Cooking

Naan
Printer-Friendly Version

Prep Time: 30 Min
Cook Time: 7 Min
Ready In: 3 Hrs
Yields: 14 Pieces

Ingredients
  • 1 (.25 ounce) package active dry yeast
  • 1 cup warm water
  • 1/4 cup white sugar
  • 3 tablespoons milk
  • 1 egg, beaten
  • 2 teaspoons salt
  • 4 1/2 cups bread flour
  • 2 teaspoons minced garlic (optional)
  • 1/4 cup butter, melted
Directions
  1. In a large bowl, dissolve yeast and sugar in warm water. Let stand about 10 minutes, until frothy. Stir in milk, egg, salt, and enough flour to make a soft dough. Knead for 6 to 8 minutes on a lightly floured surface, or until smooth. Place dough in a well oiled bowl, cover with a damp cloth, and set aside in a warm place (used warm oven) to rise. Let it rise 1 hour, until the dough has doubled in volume.
  2. Punch down dough, and knead in garlic. Pinch off small handfuls of dough about the size of a golf ball. Roll into balls, and place on a tray. Cover with a towel, and allow to rise until doubled in size, about 30 minutes.
  3. During the second rising, preheat grill to high heat.
  4. At grill side, roll one ball of dough out into a thin circle. Lightly oil grill. Place dough on grill, and cook for 2 to 3 minutes, or until puffy and lightly browned. Brush uncooked side with butter, and turn over. Brush cooked side with butter, and cook until browned, another 2 to 4 minutes. Remove from grill, and continue the process until all the naan has been prepared.  Store cooked naan in a warm oven while cooking the rest, if desired.
Source: All Recipes

Monday, December 21, 2009

Assorted Truffles

Oh.my.god.  These are DELICIOUS!  Rich and melt-in-your-mouth...look and taste like the pros made them...and probably a bazillion calories (so good thing you can only eat a little before the richness is too much!).  But here's the kicker...truffles are actually really EASY to make!  I was pleasantly surprised :).  I'm pretty sure that these and cakeballs will be staple desserts year round.  The beauty of it is that the possibilities are endless and can be changed to match the season.  I considered doing egg nog truffles (substitute the heavy cream with egg nog and spike it with rum) and strawberry (add strawberry preserves) but those got the axe because I don't like egg nog and strawberry felt to Spring for me.  Perhaps Strawberry for Valentine's Day ;).

What follows is a picture of my finished truffles and rough estimates of the flavorings and toppings that I added to create each. 

Family - Be prepared for these delicious morsels to rock your world on Christmas Day.  PS:  Stephen I took special care to make sure that the flavors stayed separated during the making process and there was minimal chance of nut contamination!

Assorted Truffles
Printer-Friendly Version


Ingredients
  • 1 cup heavy cream
  • 12 ounces bittersweet chocolate, chopped
  • 1/4 cup sugar
For the Chocolate: cocoa powder for topping

For the Peppermint Crunch: 1/2 tsp peppermint extract for ganache; 1/2 cup crushed peppermint candy canes for topping

For the French Vanilla Coffee: 1 1/2 tsp powdered Folgers French Vanilla Cappucino mix OR 3/4 tsp instant coffee + 1/2 tsp vanilla extract for ganache; powdered sugar for topping

For the Peanut Butter Chocolate: 1 Tbsp peanut butter for ganache; 1/2 cup crushed peanuts for topping

Directions
  1. Bring the cream and sugar to a boil over low heat, pour over the chocolate and stir until smooth.
  2. Separated mine into different bowls; one for each flavor.
  3. Add respective flavoring to ganache and then cover and refrigerate for at least 4 hours (or overnight)
  4. Use melon ball scoop or spoon to scoop out some ganache.  Roll (using fingertips) into walnut size balls.  (You don't want to handle  the ganache too much because it will melt and make your hands a mess.  It's okay at this point to be a bit misshapen because you can reshape it after it's rolled in the topping.)
  5. Optional: If desired, freeze balls at this point and then prepare chocolate coating in double broiler.  To coat, dip ball in chocolate using a fork.  Sprinkle desired topping over tuffle and then place on a wax paper lined cookie sheet and put in fridge to set.
  6. Roll in desired topping and chill until ready to serve.
Source: A Christine's Kitchen Chronicles Original inspired by Sing For Your Supper

Tacos in Pasta Shells

I'm a little behind on posting recipes.  This one was made for dinner last week.  Wanted Mexican but didn't want to go the old stand-by Taco Salad route.  This one sounded interesting so thought I'd give it a try. I figured anything pasta has to be good :).  It was pretty good but a little more effort than I would have liked so probably wouldn't make the regular rotation.  Still looking for that perfect weeknight Mexican dinner!

Tacos in Pasta Shells
Printer-Friendly Version


Prep Time: 30 Min
Cook Time: 30 Min
Ready In: 1 Hr 
Yields: 6 Servings

Ingredients

  • 1 1/4 pounds lean ground beef
  • 1/2 (8 ounce) package cream cheese
  • 1 teaspoon salt
  • 1 teaspoon chili powder
  • 18 jumbo pasta shells
  • 2 tablespoons butter, melted
  • 2 cups salsa, divided
  • 1 cup shredded Cheddar cheese
  • 1 cup shredded Monterey Jack cheese
  • 1 1/2 cups crushed tortilla chips (omitted)
  • 1 cup sour cream (used non-fat plain yogurt)
  • onions, diced (optional)
  • black olives, sliced (optional)
  • tomatoes, diced (optional)
  • jalepenos, sliced (optional)
  • lettuce, sliced (optional)
Directions

  1. In a large skillet, brown beef over medium heat until no longer pink; drain. Add cream cheese, 1/2 cup salsa, salt and chili powder; mix and simmer for 5 minutes.
  2. Meanwhile, bring a large pot of lightly salted water to a boil. Add pasta and cook for 8 to 10 minutes or until al dente; drain. Toss cooked shells in butter.
  3. Preheat oven to 350 degrees F (175 degrees C).
  4. Pour about 1/2 cup of salsa into botom of 9x13 baking dish.  Fill shells with beef mixture and arrange in baking dish; pour remaining salsa over shells. Cover with foil and bake in preheated oven for 15 minutes.
  5. Remove dish from oven and top with Cheddar cheese, Monterey Jack cheese and tortilla chips; return dish to oven to cook for 15 minutes more.
  6. Top with miscellaneous taco toppings and serve.
Source: Modified from All Recipes

Thursday, December 17, 2009

Christmas Sandwich Cremes

I had some cream leftover after making the Caramel Apple Cheesecake Pie and even a Penne a la Vodka dinner so I decided to make some Christmas cookies.  Turns out that I had copied a recipe from Chris' mom that I liked and used cream so it was a perfect use of my leftover cream and leftover butter.  My favorite part about this cookie is how it's bite sized and it just melts in your mouth! 

I didn't have a rolling pin or a round cookie cutter/small glass so I ended up just rolling balls and smooshing them down.  They didn't end up being perfect looking for this reason but it makes it look more homemade :).  I brought a lot of the cookies to work for my co-workers to eat (so Chris and I wouldn't eat them all!).  They were gone by noon so I'd say the verdict is it was good!

Christmas Sandwich Cremes
Printer-Friendly Version


Yields: 4 dozen cookies

Ingredients

COOKIES
  • 1 cup butter, softened
  • 1/3 cup heavy whipping cream
  • 2 cups all-purpose flour
  • Sugar
FILLING:

  • 1/2 cup butter, softened
  • 1-1/2 cups confectioners' sugar
  • 2 teaspoons vanilla extract
  • Food coloring
Directions

  1. In a small bowl, combine the butter, cream and flour. Cover and refrigerate for 2 hours or until dough is easy to handle.
  2. Divide into thirds; let one portion stand at room temperature for 15 minutes (keep remaining dough refrigerated until ready to roll out). On a floured surface, roll out dough to 1/8-in. thickness. Cut with a 1-1/2-in. round cookie cutter. Place cutouts in a shallow dish filled with sugar; turn to coat. Place on ungreased baking sheets. Prick with a fork several times. Bake at 375° for 7-9 minutes or until set. Cool on wire racks.
  3. For filling, in a small bowl, cream butter and sugar until light and fluffy. Add vanilla. Tint with food coloring. Spread about 1 teaspoon filling over half of the cookies; top with remaining cookies.
Source: Country Woman November/December 1998, p40 as seen on Taste of Home and Mary Lynn's recipe box

Wednesday, December 16, 2009

Chicken Noodle Soup

After making Roast Chicken for dinner I decided to save the carcass.  At first I intended to give it to my mom but I forgot to bring it when I went to visit over the weekend.  So, I decided I'd use it myself to create some Chicken Noodle Soup.  I started out with the intent of making Chris' Grandma B's recipe but then as I tasted the broth created by the carcass I decided it would be a shame to cover up all that wonderful natural chicken flavor with fake chicken.  This resulted in my winging the recipe (no pun intended).  Here's another original recipe.  Nothing like a steamy bowl of Chicken Noodle Soup to feed the soul!

Chicken Noodle Soup
Printer-Friendly Version


Ingredients
  • 1 picked over 3-4lb roasted chicken carcass with bits of meat and skin attached
  • 1 1/2 - 2 cups chicken, cut into bite size pieces
  • Cold water
  • 1/2 onion, diced
  • 3-4 carrots, sliced
  • 3-4 stalks cerelry, sliced
  • 1 Tbsp garlic, minced
  • 1/2 tsp dried oregano
  • 1/2 tsp dried savory
  • 1/2 tsp celery salt
  • salt and pepper, to taste
  • 1/2 lb egg noodles
Directions
  1. Place chicken carcass in large stockpot.  Add enough cold water to cover the carcass.  Bring to a boil then reduce heat and simmer gently for at least 1 hour (longer for a stronger broth).  Discard bones and if desired, strain broth through a mesh sieve to remove smaller particles.
  2. Add remaining ingredients to stock pot and continue to simmer for another 20 minutes or until carrots are tender.  Taste and adjust salt and pepper as needed.
  3. In a separate pot, boil egg noodles according to package directions.  Drain and set aside.
  4. When ready to serve, put some noodles in a bowl and then ladle soup over the top.
Source: A Christine's Kitchen Chronicles Original

Monday, December 14, 2009

Foodie Blog Roll

I've added my favorite food blogs to the list on the right.  I am much inspired by these blogs and hope you will be too!  Please feel free to add me to your food blog roll and if you think you have a Food Blog that you think i'd enjoy, please leave a comment so I can check you out!

Sunday, December 13, 2009

Caramel Apple Cheesecake Pie

Yes, it's as delicious as the title makes it sound...it is an apple pie, it is cheesecake, it is awesome!

Be sure to put aside a good chunk of time to make this. Quite possibly the most complex dessert I've ever made as every component was made from scratch.  Sure, you can use store bought crust, store bought apple pie filling, store bought cheesecake mix, store bought whipped cream, and store bought caramel...but that defeats the purpose!  It was oh so worth the effort and the calories!!!  And I can't believe how pretty it ended up looking (yup, that's my actual pie in that pic down there) :).

This was complimented deliciously at dinner club with Emily's homemade Caramel Apple Ice Cream (which, the pairing was not at all coordinated...great minds just think alike!).

Caramel Apple Cheesecake Pie
Printer-Friendly Version


Ingredients:

For the crust:
  • 1½ cups graham cracker crumbs (About 21 graham crackers, crushed)
  • 3 tbsp. sugar
  • ½ tsp. cinnamon
  • 5 1/3 tbsp. unsalted butter, melted
  • ½-¾ cup caramel (store bought or recipe below)
  • 1 cup chopped pecans
For the caramel:
  • 8 tbsp. unsalted butter
  • ½ cup heavy cream
  • 1 cup packed light brown sugar
For the apple filling:
  • 5 tbsp. unsalted butter
  • ½ cup light brown sugar, tightly packed
  • ¼ tsp. salt
  • 1 tsp. cinnamon
  • 5-6 Granny Smith apples, peeled, cored and thinly sliced
For the cheesecake:
  • 8 oz. cream cheese
  • ¼ cup sugar
  • 1 tsp. vanilla extract
  • 1 large egg
  • 1 tbsp. freshly squeezed lemon juice
For the topping:
  • ¾ cup heavy cream
  • 3-4 tbsp. confectioners' sugar
  • ¼-½ cup caramel (store bought or recipe below)
  • Chopped pecans
Directions:
  1. To make the caramel sauce, combine the butter, heavy cream and brown sugar in a medium heavy-bottomed saucepan over medium-high heat. Bring the mixture to a boil, stirring constantly. Once it reaches a boil, lower the heat to medium and continue to boil until the mixture is thickened, about 8 minutes. Remove from heat and let cool.
  2. To make the crust, preheat the oven to 375° F. Line the bottom of a 9-inch round springform pan with parchment paper. In a medium mixing bowl, combine the graham cracker crumbs, sugar, cinnamon and melted butter. Toss with a fork until all the crumbs are moistened and the ingredients are evenly mixed. Transfer the mixture to the prepared springform pan and press the crumbs in an even layer over the pan bottom and about half to two-thirds of the way up the sides of the pan. Bake for 6-8 minutes, until golden in color. Let cool for about 10 minutes. Pour a layer of caramel into the bottom of the crust and sprinkle evenly with the chopped pecans. Refrigerate the crust while you prepare the filling.
  3. To make the apple filling, melt the butter in a large skillet over medium heat. Mix in the brown sugar, salt and cinnamon and cook for 1 minute, until bubbling. Mix in the apple slices and toss well to coat. Cook over medium to medium-high heat until tender and most of the liquid has been reduced, about 15-20 minutes. Let cool for a few minutes and pour into the prepared pie shell. Set aside.
  4. Reduce the heat of the oven to 350° F. To make the cheesecake layer, combine the cream cheese and sugar in the bowl of an electric mixer and beat on medium speed until smooth, about 1 minute. Mix in the vanilla, egg and lemon juice until fully incorporated and smooth, 1-2 minutes. Spread the cheesecake filling into an even layer over the top of the cooked apples in the crust. Bake until a knife inserted in the center comes out clean, about 30 minutes. Remove from the oven, transfer to a wire rack and let cool to room temperature. Refrigerate for at least 4 hours.
  5. To serve, carefully remove the sides of the springform pan. In the bowl of an electric mixer fitted with the whisk attachment, beat the heavy cream and confectioners' sugar on medium-high speed until stiff peaks form (being careful not to overbeat.) Spread gently over the top of the chilled cheesecake layer. Top with dollops of caramel sauce and swirl with a knife to create a marbled effect. Sprinkle with a handful of chopped pecans if desired. Slice with a long, thin knife to serve.
Source: Annie's Eats

Iced Sugar Cookies

I've never made Holiday cookies and so I wanted to try my hand at them.  I brought a plate full to dinner club, despite the fact that they didn't fit the apple theme...well...apple colored, maybe :).  These were supposed to be cut-out sugar cookies but I was having technical difficulties so they became round cookies instead.  Tasted delicious either way.  A nice soft sugar cookie with beautiful shiny icing!  I had fun playing with different decorations, as you'll see below  :).

Iced Sugar Cookies
Printer-Friendly Version


Yields: About 48 cookies (2.5 to 3 inches diameter)

Ingredients

For the cookies:
  • 1 1/2 cups butter, softened
  • 2 cups white sugar
  • 4 eggs
  • 1 tsp vanilla extract
  • 5 cups all purpose flour
  • 2 tsp baking powder
  • 1 tsp salt
For the icing:
  • 4 cups powdered sugar
  • 1/4 cup milk
  • 1/4 cup corn syrup
  • 1 tsp almond extract (used vanilla extract because my brother is allergic)
  • Assorted food coloring
Directions
  1. To make the cookies - In a large bowl, cream together butter and sugar until smooth.  Beat in eggs and vanilla.  Stir in flour, baking powder, and salt.  Cover and chill dough at least one hour (but overnight is best).  Preheat oven to 400 degrees.  Using hands, rolldough between hands to create balls about 1 to 1.5 inches thick.  Place ball on ungreased cookie sheet (I used parchment paper) and flatten ball to about 1/4" to 1/2" thick.  Bake 6-8 minutes.  Cool completely before frosting.
  2. To make the icing - In a medium bowl add milk then mix in powdered sugar.  Stir until smooth.  Using an electric mixer, beat in corn syrup and almond extract until smooth and glossy.  Icing should be pretty thick so it doesn't run off cookie but if you find icing is too thick to dip, add more corn syrup.  Divide into bowls and add desired food coloring to each.  Dip front of cookies into icing and lay flat to dry until icing has hardened.
Source: cookies and icing recipes modified from All Recipes

Friday, December 11, 2009

Spicy Rapid Roast Chicken

I took the day off of work today because I had 7 vacation days left and only need 6 days to do the 2 full weeks of Holiday stretch.  This Friday happened to work better for me than next to take off and it also gave me the chance to do most of my Christmas shopping.  As I was running my errands and making a nice dinner I realized this is what it must be like to be a Homemaker/SAHM (Stay at Home Mom...without the kids part ha!).  It was kind of nice for a change of pace but I could see how it would wear its novelty out eventually.

For tonight's dinner, I chose to do a roasted chicken.  Kroger sells whole chickens for $0.88lb which makes it an inexpensive meal.  It was dee-lish!  And, it only took like an hour to cook which means with a little overnight prep, it could be a regular week night meal if we so choose.  Rapid roast, indeed!  I have quite of bit of meat leftover and was thinking of either making more chicken pot pie, chicken a la king, or Chinese congee (or jook as my family likes to call it).  I even saved the carcass...which I'll probably give to mom and have HER make me jook instead lol.

Spicy Rapid Roast Chicken
Printer-Friendly Version


Prep Time: 15 Min
Cook Time: 1 Hr
Ready In: 1 Hr 30 Min
Yields: 8 Servings

Ingredients
  • 1 (3 pound) whole chicken
  • 1 tablespoon olive oil
  • 1/2 teaspoon salt
  • 1/2 teaspoon ground black pepper
  • 1/2 teaspoon dried oregano
  • 1/2 teaspoon dried basil
  • 1/2 teaspoon paprika
  • 1/4 teaspoon cayenne pepper
Directions
  1. Preheat oven to 450 degrees F (230 degrees C).
  2. Rinse chicken thoroughly inside and out under cold running water and remove all fat. Pat dry with paper towels.
  3. Put chicken into a small baking pan. Rub with olive oil. Mix the salt, pepper, oregano, basil, paprika and cayenne pepper together and rub underneath and outside chicken skin.
  4. Roast the chicken in the preheated oven for 20 minutes.
  5. Lower the oven to 400 degrees F (205 degrees C) and continue roasting 40 minutes, to a minimum internal temperature of 180 degrees F (85 degrees C).
  6. Let cool 10 to 15 minutes and serve.
Source: Modified from All Recipes

Tuesday, December 8, 2009

Banana Pancakes

Sometimes you just feel like having breakfast for dinner...

I had some overripe bananas and didn't want to make the same old banana bread or muffins.  There was a banana caramel cupcake recipe that sounded appealing from Annie's Eats but that sounded too ambitious for tonight...and cupcakes can't be eaten as a full meal!  So, banana pancakes for dinner, it was.

Banana Pancakes
Printer-Friendly Version


Prep Time: 5 Min
Cook Time: 10 Min
Ready In: 15 Min
Yields: 12 Pancakes

Ingredients
  • 1 cup all-purpose flour
  • 1 tablespoon white sugar
  • 2 teaspoons baking powder
  • 1/4 teaspoon salt
  • 1 egg, beaten
  • 1 cup milk
  • 2 tablespoons vegetable oil
  • 2 ripe bananas, mashed
Directions
  1. Combine flour, white sugar, baking powder and salt. In a separate bowl, mix together egg, milk, vegetable oil and bananas.
  2. Stir flour mixture into banana mixture; batter will be slightly lumpy.
  3. Heat a lightly oiled griddle or frying pan over medium high heat. Pour or scoop the batter onto the griddle, using approximately 1/4 cup for each pancake. Cook until pancakes are golden brown on both sides; serve hot.
Source: All Recipes

Sunday, December 6, 2009

Chinese Chicken Corn Soup

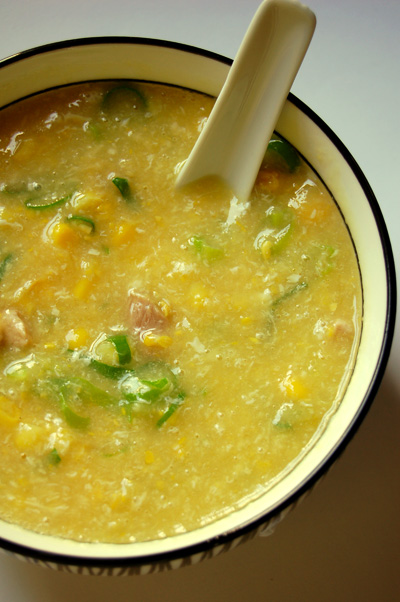
I don't cook much Chinese food even though I'm Chinese.  And, probably have mentioned it before that I don't even really like rice all that much...I guess you could say I'm a bit strange like that.  Anyway, this is a favorite of mine when we go to restaurants and since my family doesn't so much keep written recipes I was on my own for this one given some inspiration from the internet and my recollection of how it should taste.  I hope you enjoy this original.

Chinese Chicken Corn Soup
Printer-Friendly Version


Cook Time: About 30 minutes
Yields: About 6 bowls?

Ingredients
  • 2 (14 ounce) cans reduced sodium chicken broth
  • 1/2 cup water
  • 2 boneless chicken breasts
  • 1/4 teaspoon onion powder
  • 1/4 teaspoon garlic powder
  • 1/4 teaspoon ground white pepper
  • 2 tablespoons cornstarch
  • 2 (14.75 ounce) cans cream-style corn
  • 1 teaspoon sesame oil
  • 2 egg whites 
  • Green onions, sliced
Directions
  1. In a medium stock pot combine water, broth, and chicken.  Bring to a boil then reduce heat and add onion powder, garlic powder, and pepper.  Simmer about 20 minutes or until chicken is no longer pink. 
  2. Remove chicken from pot and allow to cool slightly.  When chicken is cool enough to handle, shred or cut into bite size pieces.
  3. While the chicken is cooling, in a small bowl mix together the corn starch and about 1/4 cup of the broth.  Mix until no lumps remain and then add the cornstarch mixture to the stock pot.  Bring mixture back to boil and stir constantly until well mixed.
  4. Add the creamed corn and chicken pieces to the broth then season soup with sesame oil.
  5. Reduce heat and slowly add egg white while swirly the soup with a fork to break the egg pieces apart.  The eggs should cook and form strings similar to egg drop soup.
  6. Serve hot and garnish with green onions.  
Source: A Christine's Kitchen Chronicles Original

Tuesday, December 1, 2009

Cincinnati Style Chili

Anybody that knows me would know that I am a HUGE fan of Skyline Chili.  Eating Skyline is seriously a ritual for me: While waiting for my order to arrive, dash a bit of hot sauce on the oyster crackers and eat a few.  The 3-way quickly arrives (sometimes half vegetarian (black beans & rice mixture)...which often confuses the waitresses!) and I first eat the shredded cheese off the top until a thin melty layer remains, then cover the dish with lots of hot sauce, then cut the noodles into a column followed buy cutting that column into a row, eat a square of delishness, repeat until all that remains is a bit of chili juice on the plate.  Ahhh.  Heaven. 

I always joke that one reason that I could never move away from Cincinnati would be that I would have Skyline withdrawal.  Sure, you can buy Skyline in a can or frozen but it's not the same.  Even further off from the real deal but still good in its own way is the powdered Cincinnati-style chili mixes.  There's something about the consistency of the chili at the restaurant (velvety smooth and not too runny!) and the huge and flavorful mound of Skyline cheese (yes, I swear they have their own special cheese!) that really makes the dish.

Tonight, I tried my hand at making Cincinnati Style Chili from scratch.  I found several recipes and this just might be a series of posts until my quest for the best recipe is complete.  (If you have one you love, please share!).  This particlar one was good but not GREAT.  Very similar to the Cincinnati-Style (Blue) Powder packets that you can buy in the local groceries but with a weaker spice in my opinion.  Definitely NOT Skyline.  Alas, that secret recipe lies with the Lambrinides Family...if only I had thought of asking them to share it with me when they were my parent's neighbors!

Brief tutorial for Cincinnati Chili Virgins (ha, no pun intended!):
One-way: Chili only
Two-Way: Spaghetti noodles topped with chili.
Three-Way: Spaghetti noodles, chili, finely shredded mild cheddar cheese
Four-Way: Spaghetti, chili, cheese, and red kidney beans OR finely chopped white onions
Five-Way: Spaghetti, chili, cheese, beans AND onion.
Coney: Mini hot dog in a bun with chili; mustard and onions optional.
Cheese Coney: Mini hot dog in a bun with chili and shredded cheddar cheese; mustard and onions optional.
Pizza: Not really a traditional usage but sometimes I like to mix things up a bit.  You can use a regular pizza dough and top it with chili for the sauce.  Top with cheddar cheese, onions, and cut up hot dog pieces.


Cincinnati Style Chili
Printer-Friendly Version


Photo credit: Delicious Melicious

Yields: 6 pints

Ingredients:
  • 3 lbs. lean hamburger, DO NOT BROWN!
  • 2 qts. water
  • 2 lg. onions, finely chopped
  • 29 oz. can tomato sauce
  • 1/2 tsp. allspice
  • 1/2 tsp. crushed red pepper
  • 1/2 tsp. garlic powder
  • 1/2 tsp. ground cloves
  • 1/2 tsp. ground cumin
  • 5 tbsp. chili powder
  • 2 tbsp. vinegar
  • 2 tsp. cinnamon
  • 3 tsp. Worcestershire sauce
  • 1/2 oz. unsweetened baking chocolate squares (or 1/2 Tbsp cocoa powder)
  • 1 1/2 tsp. salt
  • 10 drops Tabasco sauce
Directions:
  1. In a large pot whisk together hamburger, water and onions until beef is broken up; Turn stove on and bring to a boil then simmer for 30 minutes.
  2. Then add remaining ingredients. Simmer for 2 or 3 hours, uncovered.
  3. Serve it your way, as per tutorial above.
Source: Modified from Delicious Melicious

Friday, November 27, 2009

Broccoli Salad

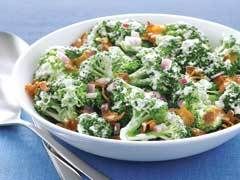
This recipe is being posted at the request of my cousin Kat.  My mom made it for Thanksgiving and so she asked that it be posted.  I like to think that it's slightly healthy because it's broccoli but let's be honest...it's slathered in miracle whip and garnished with cheese cubes and bacon.  I use fat free/light miracle whip but still...negation of the healthy factor!  I love this recipe but normally reserve it for the summer/picnicing months so had she not requested it, this recipe would have taken at least another 6 months or so to be shared with you all :).  Since Chris does not eat Miracle Whip, he doesn't partake in this dish and hence another reason I don't personally make this one often (will usually opt for the Pasta Salad instead).  Anyway, here you go.  Enjoy!

Broccoli Salad
Printer-Friendly Version


Ingredients

Salad
  • 1/2 lb. bacon, fried crisp and crumbled
  • 1/2 cup cheddar cheese, cubed
  • 1 medium onion, chopped
  • 1 head fresh broccoli, florets cut into bite size pieces
Dressing
  • 1/4 cup sugar
  • 1 Tablespoon white vinegar
  • 1/2 cup Miracle Whip
Directions
  1. In a small bowl, mix together dressing ingredients.  Cover and refridgerate until ready to serve.
  2. In a large bowl, toss together salad ingredients.  When ready to serve, add dressing and toss to coat.
Source: Mary Lynn N. (Chris' Mom)

Pumpkin Fluff Dip

In addition to my Mac and Cheese potluck contribution for Thanksgiving I always try to bring either an appetizer or a dessert.  My family's Thanksgiving celebration is never in short supply of food and we graze all day so these types of dishes work well.  I chose this dip because of its ease of preparation and the fact that it would be a relatively light dish compared to everything else we'd be eating all day.  According to the directions, this is best prepared the night before because it helps the flavors to meld and yields a smoother texture (allows the pudding granules to fully dissolve).  It turned out well and was well received!  I think if I make it again, I might try cheesecake flavored pudding to give it a slight twist.  Yum!

Pumpkin Fluff Dip
Printer-Friendly Version


Prep Time: 5 Min
Ready In: 5 Min
Yields: 32 Servings

Ingredients
  • 1 (16 ounce) container whipped topping, thawed
  • 1 (5 ounce) package instant vanilla pudding mix
  • 1 (15 ounce) can solid pack pumpkin
  • 1 teaspoon pumpkin pie spice
Directions

  1. In a large bowl, mix together instant vanilla pudding mix, pumpkin and pumpkin pie spice.
  2. Fold in the whipped topping.
  3. Chill in the refrigerator until serving.  Overnight is best to let flavor and textures meld, if you have time.  Serve with (cinnamon) graham cracker sticks and sliced green apples.
Source: All recipes

Baked Mac and Cheese

After searching the internet high and low I found a recipe that, based on reviews and a great comparison by Annie, I thought might meet my food family's expectations for a potlucked Thanksgiving dish.  I love cheese.  Sadly, by the time we were ready to serve, this wasn't as hot as I would have liked to have served it but still pretty good.  I doubled the recipe to serve our enormous crowd.

Baked Mac and Cheese
Printer-Friendly Version


Prep Time: 15 minutes
Cook Time: 20 minutes
Ready In: 35 minutes

Ingredients:
  • 4 cups uncooked macaroni
  • 4 tbsp. butter
  • 1/4 cup all-purpose flour
  • 2 1/2 cups whole milk
  • 2 tsp. dry mustard
  • 1 egg, beaten
  • 1 lb. cheese, grated (I used all sharp and mild cheddar, but I’m sure a combination would be great too)
  • 1/2 tsp. salt
  • 1/4 tsp. garlic powder
  • 1/4 tsp. onion powder
  • 1/2 tsp. ground black pepper
  • Dashes of cayenne, paprika, thyme, onion powder, and garlic powder (optional) – (I used all of them)
Directions:
  1. Preheat the oven to 350 degrees F.
  2. Cook macaroni according to package directions until slightly firm (about 5 minutes - undercook the macaroni!). Drain and set aside.
  3. In a large pot, melt the butter over medium-low heat. Whisk in the flour and cook the mixture for five minutes, whisking constantly and being careful not to burn.
  4. Add the milk to the pot, stir in the dry mustard, and whisk until smooth. Cook the mixture for five minutes until very thick. Reduce the heat to low.
  5. Add the beaten egg to a small bowl. Take 1/4 cup of the warm sauce and slowly pour it into the beaten egg, whisking constantly to avoid scrambling the egg. Whisk until smooth. Pour the tempered egg mixture back into the sauce, whisking constantly. Stir until smooth.
  6. Mix in the cheese, reserving a handful for topping, and stir until completely melted. Add in salt and other seasonings. Taste and adjust seasonings accordingly.
  7. Add the drained cooked macaroni to the pot and mix well.
  8. Pour the mixture into a baking dish, top with reserved cheese, and bake for 20-25 minutes or until golden and bubbly on top.
Source: Pioneer Woman, modified from as see on Annie's Eats

Sweet Bacon Wrapped Pork Loin

Sorry, a little behind on posting recipes this past week with all the Holiday preparations ahead.  I  had bought a nice pork loin on sale at Kroger this week and had some bacon leftover from when I made the Loaded Baked Potato Soup so this is what my search yielded.  I thought it was really tasty but was annoyed that it took wayyy longer than anticipated to cook.  I used a 1lb roast and in theory it should have been ready in like 20-30 mins but it took at least a good hour.  I kept all of the sauce ingredients the same ratio as the original recipe despite my smaller cut of meat and marinated it overnight instead of just pouring the sauce over the meat before cooking.  Anyway, yummy goodness  either way.

Sweet Bacon Wrapped Pork Loin
Printer-Friendly Version


Prep Time: 20 Min
Cook Time: 60 Min
Ready In: 1 Hr 20 Min
Yields: 8 Servings

Ingredients
  • 1 (3 pound) boneless pork loin
  • salt and pepper to taste
  • 8 slices bacon
  • 2 tablespoons honey
  • 2 tablespoons balsamic vinegar
  • 2 tablespoons dry red wine
  • 1 sweet onion, minced (used a generous sprinkle dried)
  • 1 tablespoon chopped fresh rosemary (used 1/3 Tablespoon dried)
  • 2 tablespoons golden raisins (omitted)
Directions
  1. Combine honey, balsamic vinegar, wine, onion, rosemary, salt, and pepper.  Add pork loin and marinate overnight.
  2. Preheat oven to 375 degrees F (190 degrees C). Line a shallow roasting pan with aluminum foil.
  3. Remove pork loin from marindade and wrap the bacon slices around the pork loin and secure with toothpicks.
  4. Preheat a large skillet over medium-high heat, then add the pork loin. Cook until golden brown on all sides, about 10 minutes, then place onto roasting pan. Pour sauce over pork loin.
  5. Roast the pork loin in preheated oven for 15 minutes, then sprinkle with raisins. Continue cooking until the internal temperature of the pork loin reaches 160 degrees F (70 degrees C), about 40 minutes more (20-30 minutes per pound). Remove from the oven, and allow to rest for 5 minutes before removing toothpicks and slicing.
Source: modified from All Recipes

Sunday, November 22, 2009

Loaded Baked Potato Soup

I was torn on what soup to make next so I posed a poll on a local message board that I frequent.  For awhile, Zuppa Toscana was winning but in the end, Loaded Potato Soup edged out for the win.  I'm glad it did because this was fabulous.  Definitely worth keeping in the soup files :).  It made for a quick lunch (I'm pretty sure peeling the potatoes was what took the longest!  I'm a slow peeler!) and some leftovers for the week.  Mmm mmm good...and  much better than Campbell's hehe!

Loaded Baked Potato Soup
Printer-Friendly Version


Prep Time: 10 mins
Cook Time: 20 mins
Ready In: 30 mins
Yields: 4 Servings

Ingredients

  • 5 bacon strips, diced
  • 1 small onion, chopped
  • 2 cloves garlic, minced
  • 4 tablespoons all-purpose flour
  • 1 teaspoon dried basil
  • 1/2 teaspoon pepper
  • 4 cups (2 cans) chicken broth
  • 2-3 large baked potatoes, peeled and cubed
  • 1 cup half-and-half cream (used 1 cup evaporated 2% milk; regular milk would also work)
  • 1/2 teaspoon hot sauce
  • 1 cup shredded cheddar cheese
  • Salt, to taste
  • Green onions or chives, sliced
  • Sour cream (optional)
Directions

  1. In a large saucepan, cook bacon until crisp. Drain, reserving about 1 tablespoon of drippings. Set bacon aside on papertowel covered plate to drain.
  2. Saute onion and garlic in the drippings until tender, taking care so  that garlic does not burn. 
  3. Stir in flour, salt, basil and pepper; mix well.
  4. Gradually add broth. Bring to boil; boil and stir for 2 minutes.
  5. Add most of the potatoes (reserve some in case mixture is too thin), cream or milk, cheese, and hot pepper sauce; heat through but DO NOT BOIL, stir continuously.  If mixture is too thin, mash some of the potatoes and add to broth or add some potato flakes.  If mixture is too thick, add more liquid (broth, cream, milk, or water).
  6. Garnish with bacon, sour cream, green onions, and additional cheese, if desired.
Source: modified from All Recipes

Saturday, November 21, 2009

Milky Way Cake

I "built" this cake for my brother's birthday.  One of his favorite candy bars is Milky Way and I happened to have an entire bag of fun-size Milky Ways leftover from Halloween so I googled "Milky Way Cake".  I got a lot of hits for this recipe by Paula Deen and I know she's the Queen of Butter but omigod there are 3 sticks of butter in the cake and another stick in the frosting!!!  Add to that tons of candy and shoot this is just beyond unhealthy lol!

Anyway, I didn't make the frosting this time but will include the original recipe.  Once I saw that it had sugar boiling directions (similar to my failed fudge) I decided that I didn't yet have enough courage to give it a try.  So, I bought a can of Duncan Hines Whipped Chocolate Frosting.  I also omitted all of the nuts because my brother is allergic but I bet those and the frosting would have been a delicious addition.  My fun size bag was about 3oz short on the total amount of Milky Ways but I figured it was good enough.  I made a 2-layer cake instead of 3 because I only own 2 round cake pans...just add some additional baking time.  I also broke out the big guns to make this cake...the new red Kitchen Aid Professional Stand Mixer that my parents bought me for our housewarming party.

Here are some pictures of my actual cake and a picture with my brother...


Milky Way Cake
Printer-Friendly Version

Photo Credit: Love at First Bite


Yields: 16-20 servings

Ingredients

For Cake:
  • Confectioners' sugar or cocoa  powder, for dusting pans
  • 8 (1 3/4 ounce) Milky Way bars
  • 1 1/2 cups butter
  • 2 cups granulated sugar
  • 4 eggs, well beaten
  • 2 1/2 cups all-purpose flour
  • 1/4 teaspoon baking soda
  • 1 1/4 cups buttermilk
  • 1 cup chopped pecans
  • 1 teaspoon vanilla extract
For Icing:
  • 2 1/2 cups granulated sugar
  • 1 cup evaporated milk
  • 1 cup marshmallow cream
  • 1/2 cup butter
  • 6 ounces chocolate chips
  • 1 cup chopped pecans
Directions
  1. Preheat the oven to 325ºF. Grease three 9-inch cake pans and dust them with confectioner's sugar. To make the cake, melt the Milky Way bars with 1 stick of butter. Remove from heat and let cool.
  2. Cream the remaining 2 sticks of butter with the granulated sugar. Add the beaten eggs and the cooled chocolate mixture. Sift the flour and the baking soda together. Alternately add the flour and buttermilk to the batter, blending well. Add the nuts and vanilla.
  3. Divide the batter among the prepared pans and bake for 30-40 minutes or until the cake is firm to the touch. Cool for 5 minutes, remove from the pans and place on cooling racks.
  4. While the cake cools prepare the icing. Combine the sugar and milk in a heavy saucepan. Cook to the soft-ball stage (234 degrees on a candy thermometer). Remove the pan from the heat and add the marshmallow cream, butter and chocolate chips, stirring until melted. Add the pecans. When the cake has cooled completely, frost each layer, sides and top of the Milky Way Cake.
Source: Paula Deen as seen on Love at First Bite

Thursday, November 19, 2009

Classic Pot Roast

I'll be honest, I was a bit disappointed with this recipe.  Maybe it was the cut of meat that I had bought (it was labled as being for a pot roast!) or I just did something wrong but the gravy that this created was so oily it just turned me off...and made my stomach hurt!  Not what I was expecting from a Cooking Light recipe :(.  I also found it to be rather bland...something was definitely missing even though I even used fresh thyme leaves from the plant my Aunt Ying gave us for our housewarming and freshly ground pepper and sea salt.  I much prefer my other Crockpot Pot Roast recipe (which, I'll probably make sometime this winter and post...or if you really want it now, leave a comment).  It was more complicated than my other recipe, too (I even did the crockpot version that Sara developed!).  The flouring and searing of the roast didn't seem to add anything versus the recipe I typically use. 

Net, I probably won't be making this one again but here it is for those who are interested.

Classic Pot Roast
Printer-Friendly Version


Yield:
10 servings (serving size: 3 ounces roast, about 3/4 cup vegetables, and about 3 tablespoons cooking liquid)

Ingredients:
  • 1 tsp olive oil
  • 3-lb boneless chuck roast, trimmed
  • 1 tsp kosher salt
  • 1/4 tsp freshly ground black pepper
  • Flour
  • 2 cups coarsely chopped onion
  • 1 cup dry red wine
  • 4 thyme sprigs
  • 3 garlic cloves, chopped
  • 14-oz can fat-free, less-sodium beef broth
  • 1 bay leaf
  • 4 large carrots, peeled and cut diagonally into 1-inch pieces (used about 3/4 of a small bag of baby carrots)
  • 2 pounds Yukon gold potatoes, peeled and cut into 2-inch pieces
  • Fresh thyme leaves (optional)
Directions:

Oven method:

  1. Preheat oven to 350º.
  2. Heat olive oil in a large Dutch oven over medium-high heat. Sprinkle chuck roast with salt and pepper, and evenly coat the roast with flour.
  3. Add roast to pan; cook 5 minutes, turning to brown on all sides. Remove roast from pan.
  4. Add onion to pan; sauté 8 minutes or until tender.
  5. Return browned roast to pan.
  6. Add the red wine, thyme sprigs, chopped garlic, beef broth, and bay leaf to pan; De-glaze pan and bring to a simmer.
  7. Cover pan and bake at 350° for 1-1/2 hours or until the roast is almost tender.
  8. Add carrots and potatoes to pan. Cover and bake an additional 1 hour or until vegetables are tender.
  9. Remove thyme sprigs and bay leaf from pan; discard.
  10. Shred meat with 2 forks.
  11. Serve roast with vegetable mixture and cooking liquid.
  12. Garnish with thyme leaves, if desired.
Slow Cooker method:
  1. Place chopped vegetables (carrots and potatoes) into the bottom of your slow cooker.
  2. Follow steps #1-#6.
  3. Place crusted pot roast into your slow cooker on top of your vegetables.
  4. Pour the red wine mixture on top of your pot roast.
  5. Cook the roast on LOW for 7-8 hours or HIGH for 3-4 hours.
Source: Cooking Light October 2006 as seen on The Piggly Wiggly

Sunday, November 15, 2009

Peanut Butter Cup Brownies

Since Chris was busy working all day I still have the itch to cook stuff out of sheer boredom, I decided to make some homemade brownies.  Normally I would just make his Grandma B's Brownies but  I didn't have the Hershey syrup on hand and was too lazy to go to the store.  I found what seemed like an easy and delicious looking recipe on a blog and then decided heck, we have 3 bags of Reese Cups leftover from Halloween so I'll throw some of those in too.  I also only had semi-sweet chocolate chips and salted butter on hand so I adjusted the added salt and sugar appropriately.  If I've learned anything in my ameteur cooking trials, it's that you can substitute and adjust to your personal tastes and it won't be the end of the world :).

For whatever reason I had to bump up the heat to 350 degrees after the 35 mins had elapse and let it bake an extra 5-8 minutes...maybe because of the added reese cups adding moisture to the batter?  If you try this yourself, I suggest starting at the original directions and seeing if maybe my baking times and temperatures were a fluke (please leave me a comment and let me know!).  At any rate, these things were amazing!!  (And I don't even really care for peanut butter cups, that much!).  For those that don't like or are allergic to nuts, you can omit the PB cups and it'd be your classically delicious brownie.

Peanut Butter Cup Brownies
Printer-Friendly Version


Ingredients
  • 1¼ cups (5 ounces) cake flour
  • ½ teaspoon salt (omit if using salted  butter)
  • ¾ teaspoon baking powder
  • 6 ounces unsweetened chocolate, chopped fine
  • 12 tablespoons (1½ sticks) unsalted butter, cut into six 1-inch pieces
  • 2¼ cups (15¾ ounces) sugar (reduce to 2 cups if using semi-sweet chocolate chips)
  • 4 large eggs
  • 1 tablespoon vanilla extract
  • ~10 regular sized Reese's Peanut Butter Cups, broken into bite size pieces
Directions
  1. Adjust oven rack to middle position; heat oven to 325 degrees.
  2. Whisk to combine flour, salt, and baking powder in medium bowl; set aside.
  3. Melt chocolate and butter in large heatproof bowl set over saucepan of almost-simmering water, stirring occasionally, until smooth. (Alternatively, in microwave, heat butter and chocolate in large microwave-safe bowl on high for 45 seconds, then stir and heat for 30 seconds more. Stir again, and, if necessary, repeat in 15-second increments; do not let chocolate burn.)
  4. When chocolate mixture is completely smooth, remove bowl from saucepan and gradually whisk in sugar. Add eggs on at a time, whisking after each addition until thoroughly combined. Whisk in vanilla. Add flour mixture in three additions, folding with rubber spatula until batter is completely smooth and homogeneous.  Fold peanut butter cup pieces into batter.
  5. Transfer batter to greased 9x13 pan; using spatula, spread batter into corners of pan and smooth surface. Sprinkle toasted nuts (if using) evenly over batter and bake until toothpick or wooden skewer inserted into center of brownies comes out with few moist crumbs attached, 30 to 35 minutes.  (You may need to test a couple spots just in case you hit a Reese Cup!  Too short will result in gooey fudgey brownies; too long will result in a dry cakey brownie.)
  6. Cool brownies then cut into 2-inch squares and serve.
Source: Brownie base from Cook's Illustrated as seen on The Way the Cookie Cumbles; Image from Duncan Hines...mine looked yummier and more homemade lol!

Sweet Potato Souffle

Here is the other side dish (in addition to the Corn Casserole) that I made for our Holiday Favorites themed dinner club.  This one is truly a holiday favorite in my family as it a staple at Thanksgiving.  I'd never personally made it prior to yesterday and yet eat it annually.  I have to say that the smell of it baking and then transporting it 30 minutes in the car was nearly torture!  It comes from a local dinner theater and is so sweet that it's almost like a dessert.  Even though it's not a true family recipe, it practically is to me so I'm adding that as a tag in this entry hehe :).  For my personal tastes, I'd consider reducing the amount of total sugar in the recipe but it seemed to go well with the dinner club.  Again, only a single serving  left in the pan.

To transport our hot side dishes to our friend's house (about 30 minutes away), I had to ask Google for some advice.  I ended up using the cardboard box and clean bath towel trick and it worked like a charm.  The dishes were still surprisingly very hot when we were ready to serve it...an hour after taking it out of the oven!  So, take the dishes out of the oven, let it cool enough so it doesn't burn holes and put a lid on it.  Wrap the dish in a clean bath or beach  towel, put in a box, and you're off!

Sweet Potato Souffle
Printer-Friendly Version


Prep Time:  30 mins
Cook Time: 45 mins
Yields: 6-8 Servings

Ingredients

Sweet Potato Mixture
  • 4 cups mashed sweet potatoes (canned or about 2lbs fresh)
  • 1 cup sugar
  • 1/2 cup milk
  • 2 eggs
  • 1/2 tsp. salt
  • 1/3 stick butter or margarine (melted)
  • 1 tsp. vanilla
Topping
  • 1 cup brown sugar
  • 1/2 cup flour
  • 1/3 cup butter or margarine (melted)
  • 1 cup pecan pieces
Directions
  1. If using fresh sweet potatoes: Scrub skins well.  Add sweet potatoes to a large pot and cover with water.  Bring pot to a boil then let boil about 20 minutes.  Drain pot and allow potatoes to cool slightly.  When cool  enough to handle, peel skins (should easily come off using hands) and then return to pot and mash.
  2. While sweet potatoes are cooking, prepare topping: Mix all ingredients together in a bowl and set aside. Preheat oven to 350 degrees.
  3. Mix together sweet potato ingredients until well combined.  If sweet potatoes are still hot, be sure to add milk before eggs to cool the mixture slightly and prevent eggs from cooking.
  4. Grease a large casserole dish and pourin sweet potato mixture.  Sprinkle topping evenly over the sweet potato mixture.
  5. Bake for 45 - 55 minutes uncovered.
Source: La Comedia Dinner Theater

Corn Casserole

I made this for a dinner club that Chris and I were a part of.  We were in charge of bringing a side and the theme this month was "Holiday Favorites".  This was added to the menu the morning of...because people in the club are total overachievers I felt that I had to bring a 2nd side dish as to not be shamed.  I was between this and homemade macaroni and cheese.  Our friends Sig and Kristen helped me decide which to make :).

Having not made this recipe before it was a slight risk bringing it to a dinner party but it looked easy enough, had rave reviews, and Paula (with her loads of butter!) can't steer you wrong.  I'll admit that I probably shamed Paula as I did not use the full amount of butter nor cheese and did use reduced fat sour cream.  I don't think anyone could tell ;). 

This was pretty good and was well received (only a single bite left in the pan!).  Sweet Potato Souffle is still my favorite holiday side dish...along with my Grandpa's stuffing...omg.  My mouth is watering for Thanksgiving already!

Corn Casserole
Printer-Friendly Version


Prep Time: 13 mins
Cook Time: 55mins
Yield: 6-8 Servings

Ingredients
  • 1 (15 1/4-ounce) can whole kernel corn, drained
  • 1 (14 3/4-ounce) can cream-style corn
  • 1 (8-ounce) package corn muffin mix (recommended: Jiffy)
  • 1 cup sour cream
  • 1/2 cup (1 stick) butter, melted
  • 1 to 1 1/2 cups shredded Cheddar
Directions
  1. Preheat oven to 350 degrees F.
  2. In a large bowl, stir together the 2 cans of corn, corn muffin mix, sour cream, and melted butter.
  3. Pour into a greased 9 by 13-inch casserole dish.
  4. Bake for 45 minutes, or until golden brown.
  5. Remove from oven and top with Cheddar.
  6. Return to oven for 5 to 10 minutes, or until cheese is melted.
  7. Let stand for at least 5 minutes and then serve warm.
Source: Paula Deen

Thursday, November 12, 2009

Spinach Sausage and Cheese Manicotti

This is a favorite recipe of mine and I'm surprised that it took so long for me to share it with you all!  I'm sorry that you have been so deprived!  This is the first time that I made it with homemade sauce (the Marinara Magnifica)...soooooo much better than jarred sauce!!!  Since the manicotti cooks in the sauce, it's very important that you like...no...LOVE the sauce that it's prepared in.  It's an easy meal to make ahead and then refrigerate.  When you get home from work, pop it in the oven and you've got yourself a hot homemade meal.  Leftovers freeze well, too!  I served this with some steamed brocolli (lightly seasoned with a bit of olive oil butter and seasoning salt) and some Minestrone Soup that I made previously and had frozen the leftovers.  Mary Lynn said that the dinner tasted like Olive Garden...bless her kind words.  Mangia!


Spinach Sausage and Cheese Manicotti
Printer-Friendly Version


Prep Time: 20 minutes
Cook Time: 45 minutes
Ready In: 1 hour 5 minutes
Serves 6

Ingredients
  • 1 (15 oz) container ricotta cheese
  • 1 (10 oz) package frozen chopped spinach, thawed and squeezed dry 
  • 1/2 lb. ground italian sausage
  • 1/4 tsp crushed red pepper flakes
  • 2 tsp garlic, minced
  • 1/2 cup onions, minced
  • 1 egg
  • 1 tsp dry parsley
  • 1 tsp dry basil
  • 1/2 tsp ground pepper
  • 1/4 tsp garlic powder
  • 1/4 tsp onion powder
  • 2 cups shredded italian cheese, divided
  • 2 (26 oz) jars spaghetti sauce (or about 5-6 cups of homemade sauce)
  • 1 1/2 cups water
  • 1 (8 oz) package manicotti shells
Directions
  1. Preheat oven to 350 degrees F (175 degrees C).
  2. In a large skillet over medium high heat, brown italian sausage with minced garlic and red pepper flakes.  Drain grease and return to pan.  Set aside to cool.
  3. In a large bowl, combine ricotta, spinach, onion and egg. Season with parsley, basil, pepper, garlic powder, and onion  powder. Add cooled sausage mixture.  Mix in 1 1/4 cup cheese.
  4. In a separate bowl, stir together spaghetti sauce and water.
  5. Spread 1 cup sauce in the bottom of a 9x13 inch baking dish.
  6. Using a flatware teaspoon or piping bag, stuff uncooked manicotti shells with ricotta mixture, and arrange in a single layer in the dish. Cover with remaining sauce. (If preparing in advance, cover with foil and refrigerate.  Remove from refrigerator 30 minutes before baking or go straight from fridge to oven but add additional baking time.)
  7. Bake uncovered in preheated oven for 45 to 55 minutes, or until noodles are soft and sauce is bubbly.  Top with remaining cheese during last 15 minutes of baking time.
Source: Modified from All Recipes

Wednesday, November 11, 2009

Beach Shrimp

Okay yes Summer is over and there isn't a beach within hundreds of miles from here but I had this recipe bookmarked and wanted to deviate from chicken and ground beef.  The real reason that it's called "beach shrimp" is that the directions are made for making on the beach in a disposable roasting pan for easy cleanup.  I'm glad I gave this one a try because it was very yummy!  I used fat free italian and cut the butter in half to make it healther.  Served it over vermicelli noodles and topped it with some shredded italian style cheese.  So simple and tasty!

Beach Shrimp
Printer-Friendly Version


Prep time: 10 minutes
Cook time: 25 minutes
Serves 6-8

Ingredients
  • 3 pounds unpeeled, large raw shrimp*
  • 1 (16-oz.) bottle Italian dressing
  • 1 1/2 tablespoons freshly ground pepper*
  • 2 garlic cloves, pressed
  • 2 lemons, halved
  • 1/4 cup chopped fresh parsley
  • 1/2 cup butter, cut up
*3 lb. frozen peeled, large raw shrimp, thawed according to package directions, may be substituted. Prepare recipe as directed, reducing pepper to 1/2 tsp.

Preparation

  1. Place first 4 ingredients in a 13- x 9-inch baking dish, tossing to coat. Squeeze juice from lemons over shrimp mixture, and stir. Add lemon halves to pan. Sprinkle evenly with parsley; dot with butter.
  2. Bake at 375° for 25 minutes, stirring after 15 minutes. Serve in pan.
Source: Southern Living, June 2007 as seen on The Piggly-Wiggly

Tuesday, November 10, 2009

Home Fries

I love breakfast.   Breakfast, brunch, brinner...gotta have it all.  Tonight I used some of my wheat english muffins and sausage patties to make little breakfast sandwiches.  I then searched my arsonal of cooking blogs that I follow for the perfect side...home fries!  I'll admit this took a bit more work than I would have guessed but the end result was delicious.  Shout out to my in-laws who were so kind as to give me a couple potatoes so I didn't need to buy a giant bag nor get ripped off by buying single potatoes.

Home Fries
Printer-Friendly Version


Ingredients:
  • 1 1/2 pounds Yukon Gold potatoes, scrubbed and cut into 1/2-inch to 3/4-inch cubes
  • 4 tablespoons salted butter
  • 1 onions, finely chopped
  • Salt and pepper to taste
  • Seasoning of your choice: Garlic powder or salt work great, as does smoky Spanish paprika or chopped chives
Directions
  1. Arrange potatoes in large microwave-safe bowl, top with 1 tablespoon butter, and cover tightly with plastic wrap. Microwave on high until edges of potatoes begin to soften, 5 to 7 minutes, shaking bowl (without removing plastic) to redistribute potatoes halfway through cooking.
  2. Meanwhile, melt 1 tablespoon butter in large regular or nonstick skillet over medium heat. Add onion and cook until softened and golden brown, about 6 minutes. Transfer to small bowl.
  3. Melt remaining 2 tablespoons butter in now-empty skillet over medium heat. Add potatoes and pack down with spatula. Cook, without moving, until underside of potatoes is brown, 5 to 7 minutes.
  4. Turn potatoes, pack down again, and continue to cook until well browned and crisp, 5 to 7 minutes.
  5. Reduce heat to medium-low and continue cooking, stirring potatoes every few minutes, until crusty and golden on all sides, 9 to 12 minutes.
  6. Stir in onion, seasonings of your choice and salt and pepper to taste (I used seasoning salt and chives) .
Source: Smitten Kitchen

Monday, November 9, 2009

Chicken Parmesan

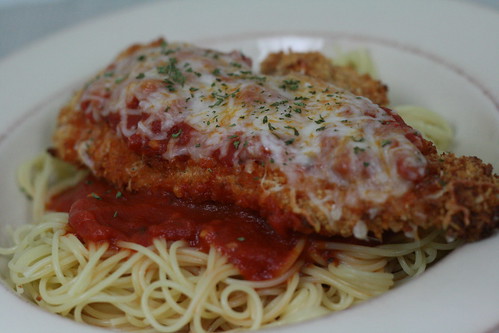
Chris is very predictable when it comes to ordering from a restaurant.  O'Charley's - Chicken Tenders, Red Lobster - Popcorn Shrimp, Applebee's - Boneless BBQ Wings, Any Italian Restaurant - Chicken Parmesan.  Sadly, I've yet to find a recipe for chicken parmesan at home that I'm satisfied with.  I think a lot of that has to do with the fact that I refuse to fry the chicken and let's face it...fried stuff just tastes better!  This one sounded promising and has been the best one that I've made in the nearly 6 years I've been trying...but still not as good as the restaurants.  Perhaps one day I'll just break down and do a fried version.  I used the marinara that I made over the weekend and it was gooooood.

Chicken Parmesan
Printer-Friendly Version


Photo Credit: Annie's Eats


Ingredients:
  • 1 1/2 cups panko breadcrumbs (I only had regular Italian style breadcrumbs on hand but I still toasted them...I KNOW the panko would have been better!)
  • 1 tbsp. olive oil
  • 1/2 cup grated Parmesan cheese, plus extra for serving
  • 1/2 cup all-purpose flour
  • 1 1/2 tsp. garlic powder
  • salt and pepper
  • 3 large egg whites (I used 1 whole egg out of laziness...seemed to work fine)
  • 1 tbsp. water
  • vegetable cooking spray
  • 2 large boneless, skinless chicken breasts, butterflied and cut into halves (4 pieces total)
  • 2 cups marinara sauce, warmed
  • about 1/2 cup shredded mozzarella cheese
  • 1 tbsp. minced fresh basil
Directions:
  1. Adjust an oven rack to the middle position. Preheat the oven to 475 degrees F.
  2. Combine the breadcrumbs and oil in a 12-inch skillet and toast over medium heat until golden, stirring often, about 10 minutes. Spread the breadcrumbs in a shallow dish and allow to cool slightly; when cool, stir in the Parmesan.
  3. In a second shallow dish, combine the flour, garlic powder, 1 tablespoon salt, 1/2 teaspoon pepper together. In a third shallow dish whisk together the egg whites and water.
  4. Line a rimmed baking sheet with foil and spray the foil with vegetable oil spray. Pat the chicken dry with paper towels, then season with salt and pepper. Lightly dredge each chicken piece in the flour to coat completely, shaking off the excess. Then dip into the egg whites and finally coat with the breadcrumb mixture. Press on the breadcrumbs to make sure they adhere. Place the chicken pieces on the prepared baking sheet.
  5. Bake until the chicken is no longer pink and feels firm when pressed with a finger, about 15 minutes.
  6. Remove the chicken from the oven. Spoon 2 tablespoons of marinara sauce over the top of each piece of chicken and top with 2 tablespoons of the shredded mozzarella.
  7. Return the chicken to the oven and continue to bake until the cheese is melted, about 5 minutes.
  8. Sprinkle with the fresh basil and serve as desired, with extra Parmesan and marinara sauce.
Source: Cook's Illustrated, October 2006 as seen on Annie's Eats

Saturday, November 7, 2009

Marinara Magnifica

Wow!  I totally get why they call this "magnifica"! It is magnificent!  This just might become my new go-to sauce and I'm excited that this turned out so well given my recent fudge failure.  What's even better is the fact that I got a lot of the tomato supplies for cheap during the Kroger Megasale :).  Sometimes I think I must have been Italian in a previous life because I LOVE Italian food so much!  This recipe makes a lot of sauce so in addition to eating it in it's yummy pure form over noodles, be prepared to either use it in recipes in place of jarred sauce or freezing it.  I'm thinking about using this on my Manicotti and maybe also some Chicken Parmesan this upcoming week...mmmm salivating just thinking about it.

I used a 2003 Shiraz for the wine (compliments of Justin from when Chris moved into the CONDO!...yeah, it's that old...because we don't exactly drink wine!  I literally had to dust it off from the shelf and then had to get Chris to help uncork it because I had NO idea what I was doing haha!) and probably added a splash more than what the recipe called for.  I know nothing about wine but from what I understand, any red wine will do as long as it is dry.  Sweet will also work but isn't ideal because it will impart a different flavor, I guess.  Carmelizing the onions?  Heavenly.  I also added an extra dash of basil, red pepper, and of course more garlic...but it's a personal preference and I think this recipe actually would have been great without my additions.

Here are some ways you can use your Marinara Magnifica:
Marinara Magnifica
Printer-Friendly Version
Yield: 9 cups (serving size: 1 cup)


Photo Credit: Cooking Light


 Ingredients
  • 1 tablespoon olive oil
  • 6 cups chopped onion (about 3 medium)
  • 1 tablespoon sugar
  • 1/2 cup dry red wine
  • 1 tablespoon extravirgin olive oil
  • 2 teaspoons dried oregano
  • 1 teaspoon salt
  • 1/2 teaspoon dried thyme
  • 1/2 teaspoon dried marjoram
  • 1/2 teaspoon dried basil
  • 1/2 teaspoon freshly ground black pepper
  • 1/4 teaspoon crushed red pepper
  • 6 garlic cloves, crushed
  • 2 (28-ounce) cans crushed tomatoes, undrained
  • 2 (14.5-ounce) cans diced tomatoes, undrained
  • 2 (6-ounce) cans tomato paste
Directions
  1. Heat oil in a Dutch oven or large stock pot over medium heat; add onion and sugar. Cook 30 minutes or until golden, stirring occasionally.
  2. Stir in wine; cook 1 minute.
  3. Add remaining ingredients; bring to a boil. Reduce heat, and simmer 3 hours, stirring occasionally.
Nutritional Information
  • Calories:169 (20% from fat)
  • Fat:3.8g (sat 0.5g,mono 2.3g,poly 0.6g)
  • Protein:5.3g
  • Carbohydrate:30.9g
  • Fiber:6.5g
  • Cholesterol:0.0mg
  • Iron:2.9mg
  • Sodium:960mg
  • Calcium:131mg
Source: Cooking Light, August 2004