Friday, August 31, 2012

Strawberry Buttermilk Ice Cream

Summer just really wouldn't be complete without ice cream.  I gave my facebook fans a chance to pick which recipe I would post today and Jaida of Sweet Beginnings voted for the dessert option while my normally sweets-loving friend Brenda wanted me to do the savory entree.  Secretly though, I think Brenda wanted to see the dessert recipe first, too.  And seeing as it is Friday, I thought it would be nice to close out this week's posting with a dessert, just like you would with a multi-course meal.

I made this recipe for my friend JJ's birthday.  He had recently been in Japan for an extended business trip and one of his first weekends back was his birthday.  Knowing that he probably wouldn't have food at home nor go shopping or even cook for awhile (because he's a bachelor), I gave him some food as a welcome home gift the night we picked him up from the airport.  This ice cream was my birthday "present" to him.  I chose it because he loves ice cream and he always asked me in the past to make him homemade strawberry ice cream.

How was it, you ask?  I loved the added tang from the buttermilk.  It really complemented the fresh fruit flavor.  To be honest, I kind of didn't want to give him the ice cream once I had tried it.  This one is a keeper!

Strawberry Buttermilk Ice Cream


Strawberry Buttermilk Ice Cream

Ingredients

  • 3/4 lb strawberries, hulled and sliced
  • 3/4 cup sugar, divided
  • 1 Tbsp kirsch or vodka (optional)
  • 1 cup heavy cream
  • 6 egg yolks, lightly whisked in a medium bowl
  • 1 cup buttermilk
Directions
  1. Before you start, make sure you freeze your ice cream maker overnight.
  2. Combine the strawberries, 1/4 cup of the sugar, and kirsch or vodka (if using) in a medium bowl.  Set aside and let the sugars cause the strawberries to soften and release the juices, about 1/2 hour.
  3. In a medium saucepan over medium heat, scald the cream and dissolve the remaining 1/2 cup sugar.  Pour a bit of the cream mixture into the lightly whisked yolk to temper (or warm) the eggs.  Add the remaining hot cream, whisking constantly to combine.  Pour the custard mixture back into the saucepan.  Cook custard until just thickened, whisking constantly, about 4-5 minutes.  Using a fine wire mesh, strain the custard into a medium bowl.
  4. In a blender, puree the macerated strawberry mixture until smooth.
  5. Combine the custard mixture and the pureed strawberries.  Cover and refrigerate until cold, at least two hours but ideally overnight.
  6. Just before churning, add the cup of cold buttermilk and stir to combine.  Churn the ice cream according to your manufacturers instructions.  For a harder, more scoopable consistency, transfer ice cream to a freezer safe container and freeze for at least 1 hour before serving.
Source: As adapted by and seen on Stresscake from The Perfect Scoop by David Lebovitz

Wednesday, August 29, 2012

Loaded Baked Potato Salad

This week I wanted to feature recipes that remind me of Summer.  The Tomato and Corn Pie that I shared on Monday definitely did that.  This one is one that reminds me of picnics and Summer BBQs and hence it was my contribution for our BBQ Themed Dinner Club.

It has all the flavors of loaded baked potatoes but is lightened up a bit by my substitution of Greek yogurt for the sour cream.  Nobody could tell I did this and upon being told it was "healthier", some went for seconds.  I like the way it looks, too.  All those delicious bits of bacon, cheese, and green onions really gives this potato salad a pop of color compared to their rather anemic looking white or yellow run-of-the-mill potato salad.

Make this for Labor Day as Summer brings on its last hurrah!

One Year Ago: Grilled Maple Chili Salmon

Loaded Baked Potato Salad


Loaded Baked Potato Salad
Photo Credit: Emily H.
Yields: 4-6 Servings

Ingredients
  • 1.5 pounds red potatoes (or 4 large Russet or Yukon Gold potatoes)
  • 1/4 cup ranch dressing
  • 1/2 cup plain Greek yogurt
  • 1/2 cup shredded cheddar cheese
  • 1/4 cup freshly chopped chives or green onions, divided
  • 6 strips of bacon (4 for the salad and 1 for topping), cooked and crumbled
  • 1 tsp black pepper
  • Salt, to taste
  • Hot sauce, to taste
Directions
  1. In a small bowl, mix together the ranch dressing and Greek yogurt.  Add half of the chives, cheese, and pepper, stirring until well combined.  Season with salt and hot sauce, to taste.  Let chill in the refrigerator.
  2. Meanwhile, peel and cube potatoes into bite size pieces.  Put in a large pot, cover with water, and boil until fork tender, about 15-20 minutes.  Drain and set aside to steam dry and cool.
  3. Put potatoes in a large bowl or dish and combine with dressing and yogurt mixture.  Top with remaining chives and crumbled bacon.  Chill before serving.
Source: Modified from Dishing with Leslie

Monday, August 27, 2012

Tomato and Corn Pie

So what did you think of last week?  It got a bit weird around here as I shared 3 different sweet recipes in a row.  I don't think that's every happened before outside of an Emily baking Extravaganza (see Apples or Summer Fruits and Veggies themes) or holiday time.  But now back to regular old food around here...my waistline really can't handle anymore desserts for a little while!

It's sad but true, summer is officially coming to an end soon.  Kids are returning or have already returned to school, pools are on their last week of being open, and summer's fruit and vegetable bounty will soon be gone.  But before that all happens, I highly encourage you to capture all the splendor of summer by making this savory pie.

This recipe is not especially difficult to make but it is a bit time consuming.  But the moment that you bite into it, you are rewarded for your hard work.  This was simply put, the freshest, most delicious dish I'd eaten all summer.  It was bursting with amazing flavors and I was so glad that I made it.

One Year Ago: Mushroom Bolognese
Two Years Ago: Blueberry Almond Cake with Lemon Drizzle

Tomato and Corn Pie


I'm sorry for this really awful photo.  I got a late start and it was quite dark by the time I had the pie done and snapped this shot.  It tastes infinitely better than I make it look.  The flavor truly took me by surprise!
Ingredients

For the Crust:
  • 2 cups all-purpose flour
  • 1 Tbsp baking powder
  • 3/4 tsp salt
  • 6 Tbsp cold unsalted butter, cut into 1/2 inch cubes
  • 3/4 cup buttermilk
  • 2 Tbsp butter, melted
For the Pie
  • 1 3/4 lb tomatoes
  • salt
  • 2/3 cup mayonnaise (light is fine) or Greek yogurt
  • 2 cups (8 oz) shredded sharp cheddar cheese
  • 1/2 cup shredded parmesan cheese
  • 2 cloves garlic, minced
  • 1/4 cup fresh basil, chopped
  • 1 Tbsp fresh chives or green onions, sliced
  • 2 Tbsp fresh lemon juice
  • Freshly ground black pepper
  • 1 1/2 cups fresh corn (from 2-3 ears)
Directions
  1. To make the crust: Whisk together flour, baking powder, and salt in a bowl.  Blend in cold butter with your fingertips, pastry blender, or two forks until it resembles coarse meal.  Add the buttermilk and stir until the mixture forms a dough.  Gather into a ball.
  2. Divide the dough in half and on a well-floured counter, roll out once piece into a 12-inch round.  Roll the dough around the rolling pin and transfer to the pie plate.  Pat the dough in with your fingers and trim any overhang.  Put the pie plate into the refrigerator to chill while preparing the filling.  Flatten the second dough bough into a disc then wrap in plastic wrap and chill as well.
  3. Bring a large pot of water to a boil.  Prepare a large bowl of ice water.  Add the tomatoes to the boiling water and cook for about 10 seconds before transferring tomatoes with a slotted spoon to the ice water.  When cool enough to handle, peel the skins from the tomatoes.
  4. Line a baking sheet with a double-layer of paper towels.  Cut the tomatoes into 1/4-inch thick slices and arrange in a single layer on the paper towels.  Sprinkle generously with salt and allow to stand at room temperature for 20-30 minutes.  Blot the tomatoes with more paper towels to remove excess moisture.
  5. Meanwhile, preheat the oven to 400F.
  6. Mix together the mayonnaise (or Greek yogurt), cheese, garlic, and lemon juice.  Season with salt and pepper to taste.
  7. Remove the pie crusts from the refrigerator.  Layer half of the tomatoes on the bottom of the pie and gently remove extra seeds from about 1/2 to 2/3 of the tomatoes (leave some for flavor!).  Scatter half of the corn on top of the tomatoes then drop spoonfuls of the cheese mixture over the top.  Sprinkle with half of the basil and chives.  Repeat the layers: tomatoes, corn, cheese, herbs.
  8. On a well-floured surface, roll the second pie crust into a 12-inch circle.  Fit it over the filling and pinch the edges of the two crusts together to form a fluted edge or use the tines of a fork to seal together.  Use a small knife to cut 4 slits on the top of the crust then brush with melted butter.
  9. Place a cookie sheet on the rack below where you will place the pie to catch any filling that may boil over.  Bake pie until crust is golden and the filling is bubbling, about 30-35 minutes.
  10. Allow to cool 10-15 minutes before cutting into slices and serving.
Source: Originally from Christ Church Cooks and Gourmet as seen on Pink Parsley

Friday, August 24, 2012

Recipe Swap: Zucchini Brownies

Today I'm thrilled to be sharing a Blogger's Choice Recipe Swap from a fellow Cincinnati suburbanite blogger, Melissa of Delicious Meliscious.  A long long time ago I had tried and posted about a Cincinnati-Style Chili which I had found through her blog.

For this swap, I wasn't sure what to choose.  The original plan was actually her Uno's Deep Dish Pizza but that was axed when I realized I didn't have enough yeast and had already done my grocery shopping for the week.  I also considered this English Muffin Bread with Strawberry Butter but darnit again with the yeast!  I never realized just how much I use/love yeasted recipes until this little delimma!  But then Tuesday rolled around and in my CSA box was a single small zucchini and a larger yellow summer squash.  It was a sign and I was being beckoned.  I was to make these Zucchini Brownies.

I had previously made this version of zucchini brownies on All Recipes which doesn't include any eggs and is super fudgey and topped with a chocolate frosting.  That recipe made me a believer and I remember I ended up raving about the recipe on the cooking message board after my first bite.  And yet...I never shared it on here...oops.  Sorry about that.  If you've never made zucchini brownies before, they're quite delightful and a nice change of pace from the (wonderful but completely overused) zucchini bread.  You can hardly taste the zucchini in them (and if you shred them finely, the visible evidence is all but obliterated) but can rest easy knowing they're loaded with lots of fiber.  

I didn't have enough zucchini so subbed some of the summer squash which worked out nicely.  This particular recipe was nice too because it used ZERO oil, butter, or other added fat AND used whole wheat flour.  The flavor of the cardamom was interesting and loved all the melty chocolate chips scattered within the brownie.  I have to admit though, that I prefer a dense, fudgey brownie and therefore the All Recipes version wins out for me...the frosting on that one also probably helped haha.

Yes, this was probably the most healthy brownie I've ever eaten but you would be none the wiser ;).  So go ahead and use that bumper crop or happily accept your neighbors extras and turn it into a chocolatey, cake-like, beautiful thing.

One Year Ago: Greek Salsa and Fussili a la Crazy Bastard

Zucchini Brownies


Ingredients
  • 2 eggs
  • 1 Tbsp vanilla extract
  • 1 c (200g) sugar
  • 1/4 tsp salt
  • 1/4 c (60 mL) applesauce
  • 1 c (150g) whole wheat flour
  • 1/4 c (45g) unsweetened cocoa powder
  • 1 1/2 tsp baking soda
  • 1 tsp cinnamon
  • 1/4 tsp ground cardamom
  • 2 c (~300 to 320g) grated zucchini
  • 1 1/2 c semi-sweet chocolate chips
  • Powdered sugar for dusting (optional)
Directions
  1. Preheat oven to 350F (175C).
  2. In a mixing bowl, combine eggs, vanilla, sugar, salt, and applesauce.
  3. Sieve the flour and cocoa powder into another bowl.  Add the baking soda, cinnamon, and cardamom.  Mix well.
  4. Add the wet mixture to the dry flour mixture and combine until well mixed.  Add the grated zucchini and chocolate chips.  Mix again.
  5. Pour the batter into a greased 8"x8" (20x20 cm) pan and bake for 30-40 minutes, or until a toothpick inserted into the center comes out somewhat clean (note: because there are chocolate chips in it, you may get some melted chocolate on your toothpick!).
  6. Allow to cool completely in the pan.  Dust with powdered sugar, if desired.
Source: Baltic Maid as seen on Delicious Melicious

Wednesday, August 22, 2012

S'mores Pizza with Graham Cracker Cookie Crust

S'mores seem to be all the craze these days and after posting a photo of this creation on my facebook page this weekend, Kathy and Whitney pretty much DEMANDED that this recipe be posted immediately.  But, since Monday was Secret Recipe Club reveal day for me, we compromised and settled for Wednesday to post this recipe.  That'd be today and what a lucky day it is for you since normally I wouldn't post so many dessert recipes so close together (in case you haven't noticed, I do mostly savory recipes)!

I think people are familiar with the concept of Fruit Pizzas and this is a similar idea but with all the flavors of S'mores.  Now, I've seen S'mores Pizza recipes on the internet before but they all seem to incorporate a chocolate chip cookie dough or regular pizza crust topped with graham crackers.  I've also seen homemade Graham Cracker recipes floating around, too.  So why oh why has nobody COMBINED the two recipes together yet so that the crust itself is a graham cracker cookie??  Or if someone has thought of this before, I haven't seen it.  Either way, let me feel special for feeling like I invited the idea ;).

I wasn't sure how much cookie dough I would need for the crust so I just went with an entire recipe worth.  I prefer a soft cookie with slightly crunchy exterior.  The cookie crust worked out perfectly for me as written - just like I had envisioned.  I'd venture to say it was about 1/4 inch thick after it was baked.  If you like your cookies really crunchy like a real graham cracker, perhaps use 1/2 - 3/4 of the dough, spread it thinner, and/or bake it longer....play with the idea and let me know what works since I haven't tested this myself!

I LOVED this dessert pizza.  I seriously went back for seconds...and then thirds.  We left the pizza outside in the sun while we played outside and this kept it nice and gooey...the best way to enjoy s'mores!  I was also amazed at how quickly the marshmallows toasted in the oven under the broiler (just 5 quick minutes!).  I might toast marshmallows this way just to eat.  Mmmm...gooey marshmallow centers with toasty outsides.  I'm salivating just thinking about this pizza.  Good thing we ate it all or I'd be going for fourths!

Enjoy, friends!

S'mores Pizza with Graham Cracker Cookie Crust


S'mores Pizza with Graham Cracker Cookie Crust
Wow iPhone photos are actually pretty good!  Natural lighting really is the key to a quality photo!  I only wish that I was able to take advantage of it more often but my day job usually gets in the way of that...
Ingredients

For the Graham Cracker Cookie Crust
  • 2 cups plus 2 Tablespoons (300g) all-purpose flour
  • 1/2 cup (75g) whole wheat flour or whole wheat pastry flour
  • 1 cup (176g) brown sugar, lightly packed
  • 1 teaspoon (6g) baking soda
  • 3/4 teaspoon (4g) kosher salt
  • 7 Tablespoons (100g) unsalted butter, cut into cubes and frozen (at least 20-30 minutes)
  • 1/3 cup (114g) mild-flavored honey
  • 5 Tablespoons (77g) milk, whole preferred
  • 2 Tablespoons vanilla extract
For Topping the Pizza
  • 1 cup bittersweet chocolate chips
  • 1 Hershey's milk chocolate candy bar, cut into bite sized pieces
  • 2 1/2 cups marshmallows (mini or regular sized cut into small pieces)
Directions
  1. Preheat oven to 350 degrees.  Cut a piece of parchment paper to fit a 14" round pizza pan.  Hint: I tore off a piece of parchment big enough to fit the pan then laid it on top of the pan and ran my fingernail around the inner edge of the pizza pan to get the correct size.  Then, I just cut along the crease marks!
  2. Make the graham cracker cookie dough crust, combine the flours, brown sugar, baking soda, and salt in the bowl of a food process fitted with the metal blade.  Pulse to blend.  Add in the butter, pulsing in short bursts until the mixture resembles coarse meal.  If you don't have a food processor, you can also use a mixer, pastry cutter, or in a real pinch - two forks.  
  3. In a liquid measuring cup, combine the honey, milk, and vanilla.  Whisk to blend.  Add the liquid to the bowl of the food processor and process just until the dough has come together.  The mixture will be fairly sticky.  
  4. Form the dough into a ball and press it into the prepared pizza pan.  It doesn't have to be perfectly even because the dough will spread as it bakes.  Bake for 18-23 minutes or until cookie is evenly browned and just crisped.  Remove from oven.  Switch your oven to the broiler and if necessary, move the rack to the highest position.
  5. Top the hot pizza with chocolate chips, chopped candy bar, and marshmallows.  Feel free to use more or less of each to suit your tastes.  Put the topped pizza back into the oven for about 5 minutes until marshmallows are toasted.  Watch carefully and take care not to burn it...mine honestly got a bit more toasty than I personally intended!
  6. Slice into pizza wedges and serve warm to enjoy.  If you're like me, serve outside in the summer sun so it stays gooey longer...that is, if it even lasts that long.  You're welcome!
Source: Inspired by Fake Ginger and Graham Cracker Cookie Crust from Annie's Eats

Monday, August 20, 2012

SRC: Homemade Nutella

It's that time of the month again!  This month for Secret Recipe Club (SRC) I received Heidi's blog, Heidi's World.  She is Danish and so it was my first adventure with a foreign blog.  I was excited!

Since most of the world other than the US cooks by weight, I was grateful to have my food scale.  But, since I realize not all of you may have one (highly recommend to get, though!), I did my best to translate the recipe into volumetric cups based on the ingredients that I used.  Please realize though that depending on the particle size of what you're measuring, you could actually end up with more or less of the item than intended because of packing, though.

I was intrigued by her recipes which included many unfamiliar things (such as these Moink Balls - Meatballs wrapped in bacon, grilled and then brushed with BBQ sauce...sounds like a Summer cookout winner to me and almost made those!).  Ultimately, I went with a homemade version of Nutella.  If you don't know what Nutella is, surely you've been living under a rock all of these years.  It is chocolate hazelnut spread and somehow passes as dessert for breakfast when you smear it on your toast.  Every time I think of Nutella now I think of the woman that sued them because she was "deceived" into thinking it was a healthy breakfast food for her child.  Really, it's quite laughable to think this given it's CHOCOLATE but hey, that's how Nutella markets themselves with their "breakfast never tasted this good!" slogan.  I'm not sure if this is necessarily healthier than the real stuff but at least you know exactly what is going into it.

I haven't had Nutella in a long while but from what I can remember, this is good!  I mean really, can you go wrong with chocolate and nuts?  I think not.  When it was hot, it was quite soupy and I thought surely I must have read something wrong (it wouldn't be the first time).  But, it does get nice and thick as it cools and sets so don't fret!  I personally would like a thicker spread and more hazelnut flavor so have adjusted those ingredients, accordingly.  This recipe made a lot and is supposed to last 2 weeks in the fridge (if it lasts that long).  I think mine might become ingredients for other things...possibly more recipes to come?

As usual a special thank you to April of the blog Angel's Homestead, SRC ring leader and Debbi of the blog Debbi Does Dinner, our new Group C Hostess!

Homemade Nutella


Homemade Nutella

Ingredients
  • 75g (3/4 cup) pre-chopped hazelnuts
  • 150g (~1 cup) good chocolate, chopped (I used Ghirardelli semi-sweet chocolate chips)
  • 30g (2 Tbsp) butter
  • 1 1/4 cups heavy cream
  • 2 Tbsp powdered sugar
  • Salt, to taste
Directions
  1. In a microwave safe dish, toast hazelnuts in the microwave for about 1 minute.  Ground them up finely using a food processor.  For a chunkier spread, process for less time but keep it going longer until the oils are released and it forms a nut butter if you want it nice and smooth like real Nutella.
  2. Heat the cream in a small saucepan on the stove.  Pour in the chopped chocolate pieces and stir until the chocolate has melted.  Add the butter and stir until melted.  Add the nuts, powdered sugar, and salt.  Stir until well combined.
  3. Transfer the mixture to a glass jar and close immediately.  Put in the refrigerator and allow to set.  Can be stored for 14 days in the refrigerator.  You may need to allow it to come to room temperature a bit before becoming spreadable again.
Source: Re-written from Heidi's World

Paper Cuts by Paper Crazy Girl

Happy Monday!  Did you enjoy your weekend?  I know I did.  We were blessed with the most perfect weather for our outdoor dinner party.  Not too hot, not too cold...just right!

I'm going to share a recipe with you later today (check back a noon for another Secret Recipe Club reveal!) but in the mean time, I wanted to share something a little off topic but still very cool.  My friend Kristine, lives in Japan and has this awesome talent to create intricate cut designs out of paper.  She recently started an Etsy shop and would love if you'd check out her work!

Seriously, these are all made out of just PAPER!

I'm completely blown away by this horse-drawn carriage.  How absolutely magical!
My Asian friends would recognize this character, Old Master Q (Lo Fu Gee / Lao Fu Zi)
Buy this Warrior Pose card from her shop right now!

Visit Kristine's shop, Paper Crazy Girl, to purchase some really cool, one-of-a-kind hand-crafted arts.

Saturday, August 18, 2012

WINNER of Beer Flats Giveaway


Before I jump straight into announcing the winner I just wanted to say thanks to Daelia's Beer Flats for sponsoring another giveaway.  Also, thank you to my readers who follow along and enter.

Time to announce the WINNER!  Drum roll please....

Today's winner is...

Lucky commenter #8, Samantha! 


Samantha, please email me at christineskitchenchronicles@gmail.com with your name and address by 12:00PM (noon) on Monday, 8/20/12 so we can get you your Beer Flats right away!  If I don't hear back from you by the deadline stated, I'll be forced to draw another name.

Congratulations, Samantha!

Friday, August 17, 2012

White Chocolate Layer Cake with Blueberry Curd Filling

Okay I'm slacking, I'm sorry.  Normally I write these posts in advance and schedule them to go live in the mornings but when I got into work today I realized that not only did I not schedule this post but I hadn't even written it yet!  Yikes!  I guess that's what happens when you're busily trying to can 21 pounds of tomatoes or buy 1/16th of a cow (more on both of those at a later date).

So here we are, the grand finale of Emily and my Summer Seasonal Fruits and Veggies Extravaganza.  So far we've already shared the following:
And now, without further delay than I've already caused today, here's the final course, a layer cake filled with  vibrant blueberry curd!

For those of you that follow me on facebook or twitter you probably saw me post something a few weeks ago when this was all happening about my little butter mishap.  Somehow I had completely managed to misread the instructions and put just 1/2 stick of butter in the frosting instead of 1/2 POUND.  Yep...that's only 1/4 of what was necessary and would totally explain why the texture of my frosting was marshmallow fluffy and a bit weird.  All in all, it didn't affect the overall flavor of the cake but apologize for the presentation since the frosting was a shapeless goop!

Flavorwise, this was really good.  I loved the flavor of the blueberry curd, especially.  And the petite 6" cake size was the perfect way to end our Extravaganza evening!  Looking at the directions is daunting (and I'm sure you can see how I easily misread the butter content!) but no step is particularly difficult.

I hope you enjoyed this series (also check out our last one on Apples!).  Emily and I really look forward to doing them so if you have suggestions for themes or even recipes you'd like to see made in the future, please let us know.  She might be quite busy soon with the pending arrival of twins and all but we'll do our best!  After all, a girl has still got to eat!

PS: Last day to enter the Beer Flats giveaway!  Ends tonight.  Commenting takes just a few seconds and your chances to win are just 1 (or more if you do additional entries)  in 14 right now!

White Chocolate Layer Cake with Blueberry Curd Filling

White Chocolate Layer Cake with Blueberry Curd Filling
Photo Credit: Emily H.
Ingredients

For the Cake
  • 4 oz white baking chocolate, chopped
  • 1 cup + 2 Tbsp flour
  • 1 tsp baking powder
  • 1/8 tsp salt
  • 5 Tbsp butter, softened
  • 1/2 cup + 2 Tbsp sugar
  • 2 eggs
  • 3/4 tsp vanilla
  • 1/2 cup + 2 Tbsp milk
For the Swiss meringue buttercream
  • 2 oz egg whites (1-2 large egg whites or about 1/4 cup)
  • 1/2 cup granulated sugar
  • 1/2 lb unsalted butter, room temperature (see, it DOES say pound, NOT stick...oops!)
  • 2 tsp lemon extract, almond extract, orange extract, or vanilla extract
For the Blueberry curd
  • 1 cup blueberries
  • 1 Tbsp water
  • 1 cup sugar
  • 1/4 cup butter
  • 3 eggs, lightly beaten
For decorating
  • Swiss meringue buttercream
  • 1 cup blueberry curd
  • 2 oz white chocolate shavings/curls for garnish
  • Blueberries for garnish
Instructions

To Make the Cake
  1. Preheat oven to 350 F.  Grease and lightly flour two 6-inch round cake pans.  Line bottoms of pans with parchment paper.
  2. In a medium saucepan, cook and stir the white chocolate over low heat until melted.
  3. In a medium bowl, combine flour, baking powder, and salt and set aside.
  4. In a large bowl, beat the butter with mixer on medium to high speed for 30 seconds.  Gradually add the sugar, beating until combined.  Add eggs one at a time, beating after each addition.  Beat in the vanilla.  Alternately add flour mixture and milk to butter mixture, beating on low speed after each addition until just combined.  Beat in melted white chocolate just until combined.
  5. Spread batter into the prepared cake pans.  Bake 30 minutes of until a toothpick inserted into the centers comes out clean.  Meanwhile, prepare the blueberry curd and buttercream.  Cool the cake layers in the pans on wire racks for 10 minutes.  Remove layers from pans and peel off parchment paper.  Cool completely on the wire racks.
To Make the Blueberry Curd
  1. Put blueberries and water in saucepan and cook over low heat until blueberries are very soft, about 10 minutes.
  2. Press the mixture through a fine mesh sieve and put the resulting liquid back into the saucepan off of the heat.  Stir everything together and cook on medium-low heat, stirring constantly until mixture is thickened, about 5 minutes.  The curd will continue to thicken as it cools.
To Make the Swiss Meringue Buttercream
  1. Lightly whisk egg whites and sugar together over simmering water until egg white mixture is hot to touch or candy thermometer reads 140F (60C)
  2. Pour hot whites into a room temperature bowl and whip with whisk attachment of electric mixer on medium-high speed until double in volume.  The meringue should not move around in the bowl.  Meanwhile, cut up butter into 2-inch pieces.  (The butter should be slightly moist on the outside but cold inside.)
  3. Attach the paddle attachment to your mixer.  Add half the butter into the bowl and pulse the mixer until the meringue has covered the butter completely, forcing the butter to the bottom of the bowl.  Add the remaining butter and pulse several more times.  Slowly increase the mixer's speed, starting with the lowest speed and continuing to increase the speed every 10 seconds until you read medium-high speed.
  4. Continue to beat until the mixture looks light and fluffy.  Stop the mixer and scrape the bowl.  Reduce speed to low.  Add flavoring and continue to beat on low speed for 45 seconds.  Then beat on medium-high speed for an additional 45-60 seconds.
To Assemble the Cake
  1. Use a long serrated knife to cut each layer in half horizontally.  Place one layer, cut side up, on a serving plate.
  2. Spread 1/3 of the filling on the first layer.  Top with second layer; spread with 1/3 of the filling.  Top with the third layer and spread with the remaining filling (reserve a couple tablespoons if you want a swirl on top like I did).  Top with the fourth layer, cut side down.
  3. Frost cake with buttercream and decorate with chocolate shaving and blueberries.  To create a swirl as I did, put reserved dallop of blueberry curd on frosting and use a knife to swirl.
Source: As seen on Beantown Baker as components are originally from - Cake from Better Homes and Gardens, Blueberry Curd from Fake Ginger, Swiss Meringue Buttercream from Epicurious

Wednesday, August 15, 2012

Black Raspberry Frozen Yogurt

And we're back with the desserts from Emily and my Seasonal Summer Fruit and Vegetable Extravaganza!  We made two desserts and I wasn't sure which to share first so I asked my friend Jackie.  She picked this one to share with you first.  

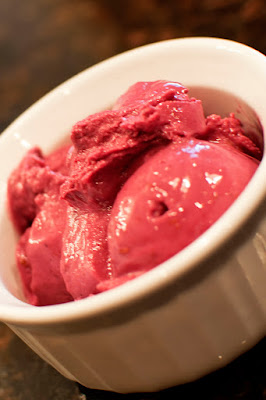
This healthy froyo was extremely simple and extremely DELICIOUS!!  It was my favorite recipe from the whole night.  The flavor is fresh, the texture was creamy (except for the seeds which I completely forgot to strain out...oops!), and the color was vibrantly spot-on to Graeter's Black Raspberry Chip Ice Cream which made it all the more visually appealing.  By the way, did I mention that if you make it with fat free yogurt (I love Fage 0% Greek Yogurt), that there's only about 2g of fat in the whole batch?  And that fat comes from the raspberries...who would have known that those contained fat??

To recap the Seasonal Summer Fruit and Veggies Extravaganza so far: Watermelon Slush, BLT Corn Salad Wraps, and Cherry BBQ Pulled Pork Grilled Pizza. Check back on Friday for the final dessert course and recap of our latest Extravaganza.  

Only a couple more days left to enter my Beer Flats giveaway so make sure to enter now.  Your chances of winning are pretty high!


Black Raspberry Frozen Yogurt

Black Raspberry Frozen Yogurt
Photo Credit: Emily H.
Yields: 1 quart

Ingredients
  • 2 cups Greek yogurt (whole milk preferred to help keep from freezing rock solid but we used fat free and ate it fresh - it was fine)
  • ¾ cups sugar
  • 2 cups fresh or frozen raspberries
  • 1 tsp. freshly squeezed lemon juice
  • 1-2 tbsp. vanilla extract
Directions
  1. Combine the yogurt, sugar, berries, and lemon juice in a blender or food processor.  Blend until smooth.  Press the mixture through a fine mesh sieve to remove the seeds.  Stir in the vanilla.
  2. Freeze the mixture in an ice cream maker according to the manufacturer’s instructions.
Source: As seen on and adpated by Annie's Eats from The Perfect Scoop by David Lebovitz

Monday, August 13, 2012

Recipe Swap: Hawaiian Chicken Sandwiches

Are you feeling too hot to cook?  If so, this edition of A Taste of Home Cooking Recipe Swap will be perfect for you.  I submitted the Korean Style Short Ribs which create melt-in-your-mouth amazingness in the crockpot without heating up the kitchen.

This month, I had the hostess herself, Sarah of A Taste of Home Cooking.  If I didn't know better I'd say that there was a recent obsession with Hawaiian Chicken Sandwiches in the blogging world.  I found it a little ironic that a recent June Recipe Swap recipe was very similar and yet each had their own distinct tastes to them.  It's as if we were to take the famous Shakespeare quote and say "What's in a name?  That which we call a Hawaiian Chicken Sandwich.  By any other name would taste just as delicious." :)

Bloggers LOVE this recipe.  And I can see why.  It's ridiculously simple and utilizes ingredients that you probably have on hand.  Oddly, I realized this is the first chicken "patty" sandwich that we'd ever made and I can assure you it won't be our last.  It really is a nice departure from beef/turkey burgers all summer.  I wasn't sure from the directions which way to halve my chicken.  I ended up cutting it horizontally so that my chicken was really skinny.  I hate trying to wrap my mouth around gigantic sandwiches so this worked to our advantage lol.  We omitted the cheese and mayo to save on calories and added some rings of grilled onion to amp up the flavor.

But which of the Hawaiian Chicken Sandwiches did I like better, you ask?  The Pulled Hawaiian Chicken Sandwich from last time or this Hawaiian Chicken Sandwich?  Well, as I'm a sucker for saucy things, I'd say the Pulled version for its flavor but this one wins for ease.  You can't go wrong with either one!

Don't forget to enter my Beer Flats giveaway and check back later this week for the two-part dessert finale of Emily and my Seasonal Summer Fruit and Veggie Extravaganza!

One Year Ago: Baked Squash and Baked Green Bean Fries

Hawaiian Chicken Sandwiches

Hawaiian Chicken Sandwiches

Yields: 4 Sandwiches

Ingredients
  • 2 large boneless skinless chicken breasts
  • 1 large can pineapple rings (8 rings)
  • 2 Tablespoons soy sauce
  • 2 Tablespoons brown sugar
  • 2 teaspoons Dijon mustard
  • 4 slices provolone cheese (optional)
  • Red onion rings (optional)
  • 4 hamburger buns or kaiser rolls
  • Smear of mayonnaise (optional)
Directions
  1. Pound out the chicken breasts until they are a uniform thickness.  Slice each into two pieces (It wasn't clear which way to cut but I did mine horizontally so that the chicken was nice and thin).
  2. Combine the juice from the pineapple can, soy sauce, brown sugar, and mustard.  Marinate the chicken overnight in the juice mixture.
  3. Prepare your grill.  Grill the chicken for about 15 minutes, flipping once halfway through.  If desired, add the cheese with 3 minutes left.  While the chicken is grilling, add the pineapple rings and onions, turning once.  If desired, smear some mayonnaise on the buns then top with a piece of chicken and two pineapple rings each.
Source: Originally from So Tasty, So Yummy as seen on and submitted by A Taste of Home Cooking

Friday, August 10, 2012

Cherry BBQ Pulled Pork Grilled Pizza

Happy Friday!  I don't know who noticed but last night I spent an extensive portion of my evening giving my blog a face lift.  After not really doing anything to my site for nearly 300 posts (next one!), I was just getting a little sick of the old look.  I changed my blog template (of course keeping my signature and favorite pink color!), moved some content onto their own pages to make the homepage more streamlined, and added better social media sharing/following features to the bottom of each post and the sidebar (please use them!).  I also moved the "print-friendly" button to a more obvious location.  If you haven't used that feature yet, it's a pretty awesome way to cut out all my witty chatter (*sad face*) and just print the recipe and/or photo if you want.  Yah for being green!  I hope all of these little changes help to make your browsing experience on my website a bit better.  Please comment and let me know how I'm doing!

Today we are continuing Emily and my Seasonal Summer Fruit and Vegetable Extravaganza.  We already shared our Watermelon Slush and BLT Corn Salad Wrap starter so onto the main course!  As it was extremely hot out lately, Emily and I thought we'd put our husbands to work on the grill and with the success of my Grilled Steakhouse Pizza in the past, I thought another grilled pizza would be a great addition to our menu.  Plus, Emily and Scott were grilled pizza virgins.

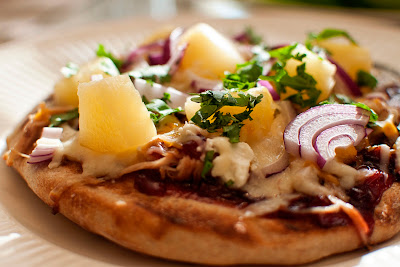
Overall the taste of this pizza was very Summery.  I do wish that the flavor of the cherries came through more but it could have been the result of using some not-so-flavorful cherries that I picked up at the grocery store.  Darn those pretty and highly-shippable fruits that look deceivingly delicious but yet fall flat on flavor!!  Either way, Scott liked the barbecue because it "wasn't overly sweet" and pizza is pretty much the only way he enjoys goat cheese.  Emily's need for carbs, meat, and cheese was definitely satisfied and she scarfed hers down faster than any of the boys!  In all fairness, she is eating for three now...yes, in case I hadn't mentioned, she's pregnant with twins!  Last but not least, my husband's verdict?  "It was yummy."  Ah, a man of few words ;).

Come back next week to see what desserts were made.  One more week until my Beer Flats giveaway ends.  Check out my review and take the time to enter.  It only takes a few seconds!


Cherry BBQ Pulled Pork Grilled Pizza

Cherry BBQ Pulled Pork Grilled Pizza
Photo Credit: Emily H.
Ingredients
  • 1.5 pounds of your favorite pizza dough, shaped into 4 individual sized balls to be stretched and grilled
  • Olive oil for brushing
  • ~1 cup cherry barbecue sauce, recipe follows
  • ~1.5 cups leftover shredded pulled pork, recipe follows
  • Shredded cheddar cheese
  • Shredded mozzarella cheese
  • Crumbled goat cheese
  • Red onion, thinly sliced
  • Pineapple chunks
  • Cilantro, chopped
For the Cherry Barbecue Sauce
  • 1/2 lb cherries, pits removed
  • 3 Tbsp sugar
  • 1/4 cup water
  • 1 cup barbecue sauce
For the Pulled Pork
  • 1 can Dr. Pepper
  • 5-7 lbs pork butt roast
  • 1/4 cup brown mustard
  • Salt and pepper, to taste
Directions
  1. Prepare the Pulled Pork: Liberally season the pork roast with salt and pepper and place the fat-side-up in a crockpot.  Add the mustard and Dr. Pepper to the crockpot and cook on low for 8-10 hours.  Shred the meat with two forks, discarding any bones and fat.
  2. Prepare the Cherry Barbecue Sauce: Roughly chop the cherries into small pieces.  Add them to a small sauce pan along with the sugar and water.  Cook over medium heat for ~20 minutes, until the liquid is thick and the cherries are soft.
  3. Grill the Pizza:  Heat grill to medium-high heat (450F) and generously oil the grate (I use a paper towel wad soaked in oil and held with tongs or a silicone brush
  4. Carefully place individually sized stretched dough rounds onto the grill and cover.  Allow to cook until nicely browned on bottom and large bubbles form on the surface (about 3-4 minutes).  Carefully remove the dough from the grill and with the cooked side facing up, top each pizza with cherry barbecue sauce.  Top with pulled pork then follow with cheddar and mozzarella cheese.  Finish with the red onions, pineapple, and goat cheese.  Carefully return the topped pizzas to the grill and cook until the bottom is browned and cheese is melted (about 4-6 minutes).
  5. Remove pizza from grill. Garnish with cilantro.  Cut and serve immediately.
Source: A combination of ingredients and ideas from Confections of a Foodie Bride and Our Best Bites

Thursday, August 9, 2012

Product Review and Giveaway: Daelia's Beer Flats

Remember the good people at Daelia's that gave me those incredibly delicious Biscuits for Cheese to review and giveaway?  Well, they added some new products to their lineup last month and they sent me some to review.  Furthermore, one of you lucky readers get another chance to win some free yummies, too!

This product is called Beer Flats and they come in two flavors: Porter and Pilsner.  These are artisanal flatbread crackers that are made with whole grains, craft beer, and butter.  They are suggested to be served with cheese, cured meats, and/or dips alongside a good craft beer.  I kept things simple time and served my Beer Flats with pre-made Sabra Classic Hummus (another favorite product of mine...hmmm...think they'll send me some to review, too?) and a block of Maple Cheddar Cheese.

Photo Credit: Emily H.
Let's start with aesthetics.  I like the packaging.  The window makes it easy to see what the product looks like inside before you buy it and the tray keeps the crackers all tidy and helps to prevent breakage (ugh, hate broken crackers!).  The porter is the darker colored cracker while the pilsner is the light one.  Both look quite robust and I love the flecks of bubbly texture and salt.

After tasting Daelia's Biscuits for Cheese which I feel is much more "frou frou" and filled with many different complementing flavors I have to be honest and say that these fell a little flat for me (Oof, forgive the pun!).  
The Pilsner was especially light in flavor on its own with just a hint of sweetness and a bit of buttery flavor.  Very much like a large, plain pita chip and needing a pairing with quite a bit more oomph than what I had offered.  I personally enjoyed the Porter much better.  It had a wonderful rye flavor (did I mention I'm a sucker for rye?) though both Emily and Scott felt the flavor was too pungent (they are non-rye lovers...boo!...no wait...yah!  More for me!).  I would love to serve the Porter in the future with this Hot Reuben Dip that's still on my "to make" list.  I think the flavors would work perfectly together and would be a great twist from the standard Rye bread pairing.  My mouth waters just thinking about this...

So there you have it.  My honest opinion on the latest offering from Daelia's.  If I were you, I'd consider picking up the Porter Beer Flats from your local specialty store or Amazon and making the Hot Reuben Dip for poker night or the big game or something.  Or, you could just enter to win some free Beer Flats here because Daelia's and I love you...

How to Enter

To enter to win a set of four (4) packages of Daelia's Beer Flats (two of each flavor: Porter and Pilsner; Approximate retail value of $32):

MANDATORY: Tell me which flavor of Daelia's Beer Flat you look forward to trying the most and what you'd serve it with.

You can receive UP TO THREE ADDITIONAL ENTRIES to win by doing any or all of the following:
  1. Follow them on twitter @BeerFlats. Come back to let me know you've followed me in an additional comment to score an extra entry.  (The additional comment part is really important!).
  2. Follow me on Twitter @ChrissesKitchen.  Come back to let me know you've followed me in an additional comment to score an extra entry.  If you're already following me, let me know too so my loyal readers get credit!
  3. Tweet the following about the giveaway: “RT @ChrissesKitchen @BeerFlats: #Win Daelia's Beer Flats #giveaway: http://tinyurl.com/d4o4rgp #beerflats”.  Come back and let me know you've shared in an additional comment.
Last but not least, Daelia's Beer Flats and I would love if you'd follow us on Facebook too but we can't give you a credit for entry for that because it's now against their terms and conditions.  So, you'd follow us out of the kindness of your heart ;).  Follow Beer Flats.  Follow Christine's Kitchen Chronicles.

Deadline: Friday, August 17, 2012 at 11:59pm EST.

Eligibility and Winner: Sorry, this contest is only open to those in the Contiguous 48 United States and Canada.  The winner will be chosen at random using random.org and announced in a blog post by 12:00PM (noon) EST on Saturday, August 18, 2012.  To claim the prize, the winner must email me at christineskitchenchronicles@gmail.com.  If the winner does not respond within 48 hours of being announced, another winner will be selected.

Thanks for reading (and tell all your friends)!
Christine

Disclosure - This blog is a personal blog written and edited by Christine @ Christine's Kitchen Chronicles. The owner(s) of this blog was compensated with free products to provide an opinion on the products, services, websites and various other topics. Even though the owner(s) of this blog receives compensation for posts or advertisements, we always give our honest opinions, findings, beliefs, or experiences on those topics or products. The views and opinions expressed on this blog are purely the bloggers' own. Any product claim, statistic, quote or other representation about a product or service should be verified with the manufacturer, provider or party in question.

Wednesday, August 8, 2012

BLT Corn Salad Wrap

And so continues Emily and my Summer Seasonal Fruit and Veggies Extravaganza.  We followed our refreshing Watermelon Slush mocktails with another refreshing, barely cooked dish.  

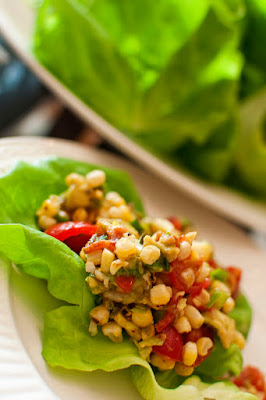
Emily and I must have been on the same wavelength because this recipe was on both of our radars.  I like how we often think alike when it comes to food  :).  Summer tomatoes and corn are no brainers to include in this theme and having the boys give the corn some charred flavor on the grill keeps things cool in the kitchen.  Add avocado and bacon then serve it in a lettuce leaf and you have yourself a deliciously fresh finger food!

On Thursday you get a bonus post for the week- another product review+giveaway!  Then, on Friday you get the main course from Emily and my Summer Seasonal Fruit and Veggie Extravaganza before we finish off with two desserts next week.

Can't get enough lettuce wraps?  Try this Chorizo and Sweet Potato Lettuce Wrap or Asian Lettuce Wrap!


BLT Corn Salad Wrap

BLT Corn Salad Wrap
Photo Credit: Emily H.

Yields: 5 cups of corn mixture

Ingredients
  • 3 ears of corn, shucked of their husks and silk
  • 1 cup cherry tomatoes, sliced in half
  • 1/2 cup chopped green onions
  • 1 avocado, diced
  • 3 sliced crisp cooked bacon, diced
  • juice of 1 lime
  • about 1 tablespoon olive oil
  • salt and pepper to taste
  • a good sprinkling of chili powder and smokey paprika
  • butter lettuce or iceberg lettuce leaves
  • hot sauce and sour cream for topping
Directions
  1. Over a gas burner or grill, char raw shucked corn.  Rotate corn until cob is charred on all sides.  Allow corn to cool before slicing corn kernels from the cob.
  2. Add corn kernels to a medium bowl.  Add sliced cherry tomatoes, green onion, diced avocado, and diced bacon.  Squeeze in lime juice.  Add olive oil, salt, pepper, and slices.  Stir to combine.  Taste and adjust seasoning as needed.
  3. Rinse and clean individual lettuce leaves.  Serve alongside a bowl of corn salad.  To serve, scoop corn salad into lettuce leaves, top with hot sauce, sour cream, fold up like a taco and enjoy!
Source: Joy the Baker

Photobucket
This recipe was a Tasty Treasure at Fantastical Sharing of Recipes!

Monday, August 6, 2012

Watermelon Slush

Hello my lovelies!  Remember my extremely talented friend Emily who guestposted this General Tso's Chicken, takes all our Dinner Club photos, and did a Apple Extravaganza bakefest with me last Fall?  Well she and her husband Scott came over recently so we could continue the tradition of the wives creating deliciousness in the kitchen while the husbands did...manly things like watching TV.  But unlike during the Fall, we minimized the use of the oven (because it was hot hot hot!), focused on a theme of using seasonal fruits and veggies, and put the boys to work by manning the grill.

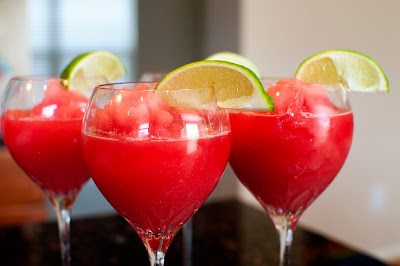
To kick off our Summer Fruit and Veggie Extravaganza, we started with this absolutely refreshing, totally natural and healthy watermelon slush.  The colors were gorgeously vibrant and it quenched our thirst on this hot July day.  It was a wonderful mocktail as is but we won't tell if you add a splash of vodka, tequila, or other favorite liquor to the mix ;).

Four more recipes and another awesome review+giveaway left to share in the next two weeks so stay tuned and keep coming back!

One Year Ago: 5 Minute (Healthy) Chunky Monkey "Ice Cream"
Two Years Ago: Raspberry White Chocolate Swirl Ice Cream
Three Years Ago: Grands! Taco Melts (AKA Homemade Hot Pockets)

Watermelon Slush

Watermelon Slush
Photo Credit: Emily H.
Yields: 4 servings (1 cup each)

Ingredients
  • 4 cups watermelon, seeded, diced, and frozen
  • 2 limes, juiced
  • 2 Tablespoons honey
  • 3/4 to 1 cup water
Directions
  1. Blend all ingredients in a blender until smooth.  Serve immediately.
Source: Prevention RD

Wednesday, August 1, 2012

Creamed Corn

This. Is. Bliss.  And, there's not much more that screams "summer" to me than sweet corn.  I'm saddened by the corn crop shortage this year and thus higher-than-normal pricing but if you can manage to get some good corn this year, you should give this recipe a try.

I used to eat and love the type of creamed corn that was swimming in butter or *gasp* even the stuff that comes from a can.  It wasn't until I tried this recipe that I realized creamed corn could be so much more.  This recipe opened my eyes to how creamed corn should taste.  And it was worth risking the possibility of running into an icky worm in the tip of my organically grown CSA corn to access its freshness at its very peak.

The sweet corn flavor shines through and the cream and butter play supporting roles.  It's not thick with creamy texture but rather, a subtle creamy flavor.  Fresh basil kicks it up a notch to gourmet territory.  Even if you have an aversion for the canned stuff, you just might fall in love with this fresh, homemade version.

One Year Ago: Bob's Mexican Stuffed Chicken

Creamed Corn


Ingredients

  • 8 ears of corn, husked
  • 2 Tbs butter, divided
  • 1/2 cup finely chopped Vidalia onion
  • 3/4 cup heavy cream
  • 1 tsp sugar
  • 2 Tbs minced fresh chives
  • 1 Tbs minced fresh basil
  • kosher salt and freshly ground black pepper
Directions

  1. Cut the tip off of each cob of corn, and stand in a shallow bowl.  Use a knife to remove the kernels by slicing downward.
  2. Over another bowl, use the back of a spoon scrape the kernels clean of the pulp.
  3. In a large skillet, melt 1 tablespoon of the butter.  Add the onion and cook until just softened, 3-4 minutes.  Add the corn kernels, pulp, and 3/4 cup water.  Bring to a boil.  Reduce the heat, cover, and simmer until the corn is tender, 10 to 15 minutes.  Add the cream and sugar, and bring to a simmer.  Cook until the cream has thickened, 4 to 6 minutes.  Use an immersion blender to puree part of the corn - just pick 5-6 spots in the pan to puree.  Add the remaining tablespoon of butter, the chives, and the basil.  Season with salt and pepper to taste, and serve.

Source: Adapted by and as seen on Pink Parsley from Martha Stewart