Sunday, January 31, 2010

Mexican Chicken Spaghetti

As you know I've recently started Jazzercising.  This past week my workout buddies and I decided to do an impromptu class which resulted in my scrambling to make something to eat for dinner quickly vs. what I had originally planned. 

I thought that I was clever in thinking to use a bunch of leftovers to create this Mexican inspired dish but then when I searched Google I realized it's been done before.  But...this is my version of it and for a last minute on-the-fly meal it was pretty darn good and on the table quickly!  I was surprised that I could just throw this together on my own and it didn't taste awful lol.  This in my eyes was a test of my cooking abilities progress.  I hope you enjoy it :).

Mexican Chicken Spaghetti
Printer-Friendly Version


Ingredients
  • 8 oz spaghetti noodles
  • 1 tsp olive oil
  • 1 tsp garlic, minced
  • 1/2 onion, diced
  • 1/2 green pepper, diced
  • 1-2 copycat chipotle chicken breasts, cubed (depending on how much chicken you want in this dish!)
  • 1 (14.5 oz) can diced tomatoes with jalepeno peppers (or Rotel tomatoes)
  • 1 tsp chili powder
  • 1 tsp cumin powder
  • Salt and pepper, to taste
  • 4 oz low-fat cream cheese
  • Shredded cheddar cheese
Directions
  1. Prepare spaghetti according to package directions, drain and set aside.
  2. While spaghetti noodles are cooking, heat oil in a saute pan over medium heat.  Add garlic, onions, and green pepper and cook until garlic is fragrant and onions are translucent. 
  3. Add chicken to pan then add canned tomato.  Season with chili powder, cumin, salt, and pepper.  Bring mixture to boil then reduce heat and allow to simmer for about 5 minutes.
  4. Remove sauce from heat and add cream cheese.  Stir until throughly incorporated and melted.
  5. Add cooked spaghetti noodles to sauce and mix together until noodles are coated. 
  6. Plate the pasta and then top with shredded cheddar cheese, if desired.  Serve hot.
Source: A Christine's Kitchen Chronicles Original

Thursday, January 28, 2010

Ham and Potato Soup

I was very pleased with how easy this recipe was and how delicious it turned out.  Chris gave it his stamp of approval and it warmed us up on a chilly winter night.  It was also not overly heavy but with enough substance so that I could go to my Jazzercise class an hour later.  (Leftovers reheated well, too!).  Speaking of Jazzercise, I've yet to find the balance between going to class, cooking goodies, and eating them without feeling sick when I'm jumping around.  Soups seem to work well so far so you may see more of that for awhile...

For my personal taste I felt the chicken buillion overpowered the ham (bought packaged pre-diced John Morell ham) and overall it was a bit too salty so I made some changes to the recipe by cutting down the buillion and removing the added salt.  In its place thought I added some shredded cheese to the soup base...because I love love love cheese!  I also used green pepper in place of the celery and of course added some garlic powder(!) as a matter of preference.

The way that the roux and milk mixture came together was also impressive.  So much so that I will consider using it for other cream based soup recipes that I try in the future.  It really added a smooth and comforting aspect to the soup!

Ham and Potato Soup
Printer-Friendly Version


Prep Time: 20 Min
Cook Time: 25 Min
Ready In: 45 Min
Yields: 8 Servings

Ingredients


  • 3 1/2 cups peeled and diced potatoes
  • 1/3 cup diced green peppers
  • 1/3 cup finely chopped onion
  • 3/4 cup diced cooked ham
  • 3 1/4 cups water
  • 4 teaspoons chicken bouillon granules
  • 1/2 teaspoon garlic powder
  • 1 teaspoon ground white or black pepper, or to taste
  • 5 tablespoons butter
  • 5 tablespoons all-purpose flour
  • 2 cups milk
  • 1/2 cup shredded cheddar cheese
  • Parsley
Directions
  1. Combine the potatoes, green pepper, onion, ham and water in a stockpot. Bring to a boil, then cook over medium heat until potatoes are tender, about 10 to 15 minutes. Stir in the chicken bouillon, garlic powder and pepper.
  2. In a separate saucepan, melt butter over medium-low heat. Whisk in flour with a fork, and cook, stirring constantly until thick, about 1 minute. Slowly add in milk and whisk until smooth. Continue stirring over medium-low heat until thick, 4 to 5 minutes.
  3. Stir the milk mixture into the stockpot and cook soup until heated through. Remove from heat and add shredded cheddar cheese.  Ladle into bowls and serve immediately, garnishing with additional shredded cheese and parsley, if desired.
Source: Modified from All Recipes

Tuesday, January 26, 2010

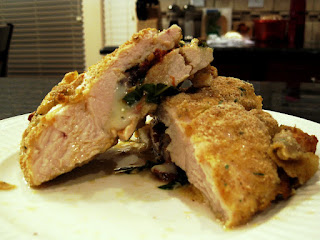
Italian Stuffed Chicken Breast

I had some leftover mozzarella cheese block leftover from the Baked Sausage Ziti and so I posted on The Nest What's Cooking Message Board to get some ideas on what to make out of it.  Now, if you don't realize this, many of the blogs that I have on my blog roll are from "Nesties" (ie: ladies on The Nest).  They are pretty much the cooking divas of the blog world and I know that my measly blog is a far cry from theirs!  But, the purpose of my blog is really just to challenge myself with new cooking techniques and recipes and sharing the recipes/adventures with my friends and family (and whoever else might be reading in this vast world wide web...).

This recipe is not from a Nestie but rather I took a suggestion for stuffed chicken and then googled for ideas.  I chose this recipe because I had all ingredients on hand and it looked simple enough to make on a weeknight.  Yes, a WEEKNIGHT recipe!  Don't we all need some of those :).  I love things that you can prep the night before if you want and then just throw in the oven when you get home from work.  Delicious, hot, healthy dinner...and it didn't come from a crockpot (nothing against those...they are also God's Gift for the working woman!).

I scaled the recipe down to 2 since there's just the 2 of us.  You can scale it as needed.  The original recipe called for a garlic spinach bed for the chicken to rest on but I opted to serve it with mashed potatoes and steamed carrots because I didn't have fresh spinach on hand.  You can checkout the original recipe if you're interested in the spinach. 

I decided to add a coat of flour before doing the egg wash because that was a technique that was used in the Chicken Parmesan that I thought worked really well.  I will also admit that I took a shortcut and skipped the quick frying step in the pan.  As a result, my coating was not as crispy and my chicken took a little longer to cook in the oven.  Which brings me to the next lesson I learned...using a fat chicken breast means the cook time will probably need increasing.  Mine was way fat and even with extra baking time which I thought would be enough resulted in a ever-so-slightly pink center.  Being starving and having already turned off the oven though, I zapped it in my microwave for a few seconds to finish the cooking.  This probably also affected the crispiness...

All-in-all I really loved the way that this chicken turned out.  I wish I could take better photos to truly convey the yumminess of this one.  It would be even more awesome if I didn't take the shortcuts that I did :).  Each bite bursts with flavor and the sun dried tomato, basil, and mozzarella blend together wonderfully.  The chicken was not dry or tough, either.  I would be comfortable serving this one to company.

Italian Stuffed Chicken Breast
Printer-Friendly Version


Ingredients
  • 2 boneless skinless chicken breasts (the thickest ones available)
  • 2 oz sun-dried tomatoes packed in oil, julienned
  • 4oz ball fresh mozzarella, coarse chopped (used low-moisture block mozzarella, chopped into 1/2" cubes)
  • 4 large leaves fresh basil, coarse chopped
  • 1 egg, scrambled
  • Flour
  • Sea Salt
  • Black Pepper
  • Italian Style Bread Crumbs
  • Olive Oil
Directions
  1. Preheat oven to 375F.
  2. Using a small knife, cut a pocket in each chicken breast (pocket should be the entire inside of the breast).
  3. In a large bowl, mix sun-dried tomatoes (with most of the oil), mozzarella, basil and a dash of sea salt.
  4. Stuff chicken with mixture.  Using toothpicks, close up the hole in the chicken breast.
  5. Coat the bottom of a frying pan with Olive Oil and heat over medium-high heat.
  6. In a bowl, add flour and season with salt and pepper.
  7. Dip chicken in flour mixture then eggs and then coat with bread crumbs.  Fry in oil just long enough to brown the chicken (approx. 30 seconds per side).
  8. Arrange on a baking pan and place in oven to bake for 20-25 minutes. 
  9. Plate the chicken and remove toothpicks before serving.
*Note: If you're making this recipe in advance, complete steps 2-4 and then keep stuffed chicken breasts (without any coating) in the fridge until you're ready to cook.  Then when you're ready, preheat your oven and coat the chicken before cooking in frying pan and oven.

Source: Modified from Wholesale Italian Food (video instructions on website)

Sunday, January 24, 2010

Peanut Butter Whoopie Pies

My friends Kristen and Sig and I sometimes trade treats when we make them.  It's become a kind of tradition that we re-fill the tupperware container with a treat in return when the container is being given back.  A couple weeks ago Kristen made this really delicious peanut butter chocolate cookie bar things.  Chocolate and peanut butter are a classic combination and it's easy to see why.  The flavors just perfectly compliment each other!  It reminded me that I had bookmarked a peanut butter recipe that I'd been meaning to try so that's what I opted to make in return.

Whoopie pies are kind of a cross between a cookie and a cupcake.  They are 2 soft cake-like cookies that delicately sandwich a frosting filling.  You eat them with your hands like a cupcake or ice cream sandwich (or if you really want to, I guess you could use a fork). 

I didn't really want a HUGE batch of cookies so I ended up making a half batch and it was plenty.  I was a tiny bit short on peanut butter so it probably wasn't as peanut-buttery as the recipe intended.  My peanut butter was also reduced sugar so I ended up adding a small amount of extra powdered sugar to make up for it.  Delicious.

What I love most about whoopie pies is that the possibilities and combinations are endless!  If you like this one, also give the Pumpkin Whoopie Pies a try!  That one I personally loved even more than this (but I'm partial to those flavors more so than chocolate and PB :).  That post also has a little more history on why they're supposedly called "whoopie pies" if you're curious.

Peanut Butter Whoopie Pies
Printer-Friendly Version


Yields: About 20 fully assembled whoopie pies

Ingredients

For the pies:
  • 3 1/2 cups all-purpose flour
  • 1 1/2 cups unsweetened cocoa powder
  • 1 tablespoon baking soda
  • 1 teaspoon salt
  • 2 sticks unsalted butter, room temperature
  • 2 cups granulated sugar
  • 2 large eggs
  • 2 cups buttermilk, room temperature
  • 2 teaspoons pure vanilla extract
For the filling:
  • 1 1/3 cup creamy peanut butter
  • 1 cup (2 sticks) unsalted butter, softened
  • 1 1/2 cups confectioners’ sugar
  • Salt, to taste
Directions
  1. Preheat the oven to 400 degrees Fahrenheit. Line baking sheets with parchment paper.
  2. Sift together flour, cocoa powder, baking soda, and salt into a small bowl; set aside.
  3. Put butter and sugar into a large mixing bowl. Cream together using an electric mixer high speed until smooth, about 3 minutes, until the mixture is pale and fluffy.. Add eggs, buttermilk, and vanilla and beat until well combined. On low speed, slowly add the flour mixture and mix until just combined.
  4. Using a small ice cream scoop or a large spoon, scoop rounded 1 1/2 tablespoons of dough onto baking sheets lined with parchment paper, spacing 2 inches apart. Bake until set, about 8 minutes.  Let cool completely on wire racks.  Repeat until all the cookie dough is used up.
  5. While cookies are baking and cooling, put peanut butter and butter in a bowl. Add confectioners’ sugar; mix with electric mixer on low until combined. Raise speed to high, and mix until fluffy and smooth, about 3 minutes. Season with salt, if desired.
  6. Spread a rounded tablespoon of filling on the bottom of 1 cookie. Sandwich with another cookie. Repeat with remaining cookies and filling. Cookies can be refrigerated in single layers in airtight containers up to 3 days. Bring to room temperature before serving.
Source: Martha Stewart as seen on Smells Like Home

Saturday, January 23, 2010

Basic Pizza Dough

Everybody loves pizza.  What's awesome about pizza is the fact that you can make it a million different ways so it never gets boring.  Thin crust - pan crust; Red sauce - white or pesto sauce; Cheese purist - Load it up!  Let your imagination go wild!  For this pizza I did cubes of mozzarella from a block (leftover from Baked Sausage Ziti), red onions, green peppers, mushrooms (my half) and pepperoni (Chris' half) then a generous sprinkle of Pizza Seasoning.

I previously posted a recipe for Exquisite Pizza Sauce which is my base sauce recipe for a traditional pizza.  Now I'm going to share with you a tried and true Pizza Dough upon which you can use to make your pizza base.  The dough makes 2 large pizzas (takes up almost my whole pizza stone) and can be frozen so you always have some on hand.  I use my bread maker to make things easier but you can also use your mixer, food processor (this is something new I learned!) or do it the old-fashioned way by hand.

What I need to perfect is the ability to transfer the loaded pizza to the pre-heated pizza stone.  Any tips?  I think I need to use more corn meal on the bottom of the pizza next time so it slides off easier.  Or, maybe I should buy one of this pizza peel things.  This time I had to cook it on my pizza pan until it was solid enough to transfer to the pizza stone.  If you can, bake it on a pizza stone because it makes the crust MUCH more crispy!  It draws the moisture out of the pizza to provide a perfectly crunchy crust on the outside and chewy on the inside.

What are you favorite sauces and topping combinations?  Here's some that I have tried...
Basic Pizza Dough
Printer-Friendly Version


Yields: 2 large pizzas

Ingredients
  • ½ cup warm water (about 110°)
  • 1 envelope (2 ¼ tsp.) instant yeast
  • 1 ¼ cups water, at room temperature
  • 2 tbsp. extra-virgin olive oil
  • 4 cups (22 oz.) bread flour, plus more for dusting (used all-purpose)
  • 1 ½ tsp. salt
  • olive oil or non-stick cooking spray for greasing the bowl
Directions:

Using a bread machine:
  1. Add the ingredients to your bread machine in the order that your manufacturer suggests.  Press the dough cycle and machine knead bread and allow to rise.
  2. To bake, place a pizza stone in the lower third of the oven. Heat the oven to 500° for at least 30 minutes. Turn the dough out onto a lightly floured work surface. Divide the dough into two equal pieces. Form both pieces of dough into smooth, round balls and cover with a damp cloth. Let the dough relax for at least 10 minutes but no more than 30 minutes
  3. Working with one piece of dough and keeping the other covered, shape the dough and transfer to a pizza peel or round of parchment dusted with semolina or cornmeal. Top as desired. Slide the dough onto the pizza stone. Bake until the crust edges brown and cheese is golden brown in spots, about 8 to 12 minutes. Repeat with remaining ball of dough or freeze for later use.
Using a stand mixer:
  1. Measure the warm water into a 2-cup liquid measuring cup. Sprinkle in the yeast and let stand until the yeast dissolves and swells, about 5 minutes. Add the room temperature water and oil and stir to combine. 
  2. Place the flour and salt in the bowl of a stand mixer fitted with the paddle attachment. Briefly combine the dry ingredients at low speed. Slowly add the liquid ingredients and continue to mix at low speed until a cohesive mass forms. Stop the mixer and replace the paddle with the dough hook. Knead until the dough is smooth and elastic, about 5 minutes. Form the dough into a ball, put it in a deep oiled bowl, and cover with plastic wrap. Let rise until doubled in size, about 1 ½ to 2 hours. Press the dough to deflate it.
  3. To bake, place a pizza stone in the lower third of the oven. Heat the oven to 500° for at least 30 minutes. Turn the dough out onto a lightly floured work surface. Divide the dough into two equal pieces. Form both pieces of dough into smooth, round balls and cover with a damp cloth. Let the dough relax for at least 10 minutes but no more than 30 minutes
  4. Working with one piece of dough and keeping the other covered, shape the dough and transfer to a pizza peel or round of parchment dusted with semolina or cornmeal. Top as desired. Slide the dough onto the pizza stone. Bake until the crust edges brown and cheese is golden brown in spots, about 8 to 12 minutes. Repeat with remaining ball of dough or freeze for later use.
Source: adapted by Annie's Eats, originally from Baking Illustrated by the Editors of Cook’s Illustrated Magazine

Thursday, January 21, 2010

Corn and Avocado Salsa

I made this to accompany our Copycat Chipotle Chicken Burrito Bols and to use up the leftover avocado from when I made sushi for Dinner Club (yes, I'm that behind on posting recipes!). 

While it wasn't quite like Chipotle's corn salsa nor was it supposed to be, it tasted delicious and was a great chunky dip for our tortilla chips.  It's a nice change from your traditional tomato salsa and filled with fiber from the corn and black beans.  In fact, there aren't ANY tomatoes in this one!  Oh, and it has more CILANTRO.  Yum!  I actually forgot to buy a red pepper so there wasn't any in mine but I can imagine it would be awesome in this salsa. 

A couple of words of caution - maybe cut back a little bit on the lime if you're using a lot of this over the Cilantro Lime Rice because it was a bit too tart and limey for my tastes.  Or maybe I just use a lot of salsa... :).  Also, this makes a lot (about 1 quart or 4 cups).  So unless you're making this for a crowd, you may want to scale this recipe down.

Corn and Avocado Salsa
Printer-Friendly Version


Ingredients
  • 3 ears fresh corn, husks and silks removed (Used 15-oz can of corn, drained)
  • 1 can black beans, drained and rinsed
  • 2 avocados- peeled, pitted, and cubed
  • 1/4 large red onion, finely diced
  • 1 red bell pepper
  • 1 Tbsp garlic, minced
  • 1/2 Tbsp ground cumin
  • 1 tsp crushed red pepper flakes
  • ¼ cup chopped fresh cilantro
  • 1/3 cup red wine vinegar
  • 2 Tbsp olive oil
  • ¼ cup fresh lime juice (roughly 2 limes)
  • Salt and Black pepper, to taste
Directions

  1. Place the corn in a large pot with enough water to cover, and bring to a boil. Cook until kernels are tender but crisp, about 5 minutes. Drain, and cool in cold water. Use a knife to scrape kernels from the cobs.  Place kernels in a medium bowl.
  2. Stir in avocados, red onion, bell pepper, and garlic.   Add cumin, red pepper flakes, and cilantro.  Mix in vinegar, olive oil, and lime juice. Season with salt and pepper.
  3. Put mixture in refrigerator and allow flavors to meld for at least 30 minutes.
Source: All Recipes as seen on The Piggly Wiggly Blog

Wednesday, January 20, 2010

Copycat Chipotle Chicken Burrito Bols

I am a big Chipotle fan.  My order?  Barbacoa fajita burrito bol topped with lettuce, tomato salsa AND corn salsa, cheese, a dab of sour cream.  Absolutely divine (and full of calories...which is why it's so yummy)!  I also love their guacamole but holy moly they charge a lot for that stuff!

Imagine my surprise when I found a copycat recipe on Elly's blog.  Sadly,  I had difficulty finding dried ancho chilies at my Kroger (hmm...this seems like a common theme lately!).  So, I looked for approriate substitutes online and ended up using chili powder.  Not quite the same effect, I'm sure.  In the end, it tasted great but not quite the Chipotle I know and love.  I'm sure part of it was due to not using the correct pepper...and the other part is that I'm used to doing the barbacoa beef versus  the chicken.

I also made some Corn and Avocado Salsa (to be posted soon, I promise!) to try to mimic the corn salsa flavor that I get at Chipotle.

Copycat Chipotle Chicken Burrito Bols
Printer-Friendly Version


Yields: 4 Servings

Ingredients

For the Chicken
  • 2 oz. dried ancho chilies (Used about 2 Tablespoons chili powder)
  • 1 tsp. ground black pepper
  • 2 tsp. ground cumin
  • 2 tsp. dried oregano
  • 6 cloves garlic, coarsely chopped
  • 1/4 red onion, coarsely chopped
  • 3 Tbsp. canola oil
  • 4 chicken breasts
For the Cilantro-Lime Rice
  • 1 cup rice, uncooked
  • Water
  • 1 lime
  • 2 Tbsp. chopped cilantro
Additional Ingredients for Topping - Salsa, guacamole, shredded cheese, lettuce, tomatoes, etc.

Directions
  1. Soak the dried chilies overnight in water. Remove stems and seeds, and chop coarsely. Add all ingredients except chicken to a food processor or blender and puree until smooth.
  2. Rub the marinade into the chicken and marinate at least one hour, up to 24. Season the chicken with salt to taste.
  3. The next day, rinse the uncooked rice until the water is no longer milky.  Fill the rice cooker to the marker "1" and then cook. 
  4. While the rice is cooking, grill the chicken for about 5 minutes per side or until cooked through. Cut chicken into slices or cubes then set aside.
  5. After the rice has cooked, stir in the lime juice (add the zest if you want it more lime-y), cilantro, and a pinch of salt. Fluff with a fork.
  6. Assemble bols by putting a base of rice in a bowl.  Top with sliced chicken and toppings of your choice.
Source: Adapted and as seen on Elly says Opa! from Chipotle Fan

Turkey Pumpkin Meatloaf Muffins with Cranberry Glaze

After much anticipation, here is the other recipe that I made with my coveted can of pumpkin puree.  This recipe was healthy which is a plus and decent in flavor.  Where it threw me off was in the texture, which was a little mushy.  Too soft and it fell apart as I was removing it from the tin.  I like my meatloaf to be more...meaty.  So, in the future I'd decrease the amount pumpkin used in the recipe and/or add more ground turkey.

By the way, this is the second recipe in a couple weeks (see Sun-Dried Tomato Basil Parmesan Muffins) that has called something savory and baked in a muffin tin a "muffin" versus a "biscuit".  I guess it's more common than I thought!  I think if I were to name this particular recipe though I'd call it a mini-meatloaf...I still resist on the muffin naming convention!

Turkey Pumpkin Meatloaf Muffins with Cranberry Glaze
Printer-Friendly Version


Yields: 12 meatloaf muffins

Ingredients

For the meatloaf
  • 1 cup finely chopped onion
  • 1 8oz package mushrooms, chopped finely
  • 3 cloves of minced garlic
  • 1 lb 93% lean ground turkey breast
  • 1 cup pumpkin puree
  • 1 egg white
  • 1/3 cup rolled oats
  • 1 tsp each minced fresh thyme and rosemary
  • Freshly ground salt and pepper
  • 1 tbsp Worcestershire sauce
For the cranberry glaze*
  • 1 cup fresh cranberries
  • 1/4 cup sugar
  • 1/4 cup water
*Note: I couldn't find any fresh cranberries on my grocery trip so I bought a can of whole berry cranberry sauce and used that in place of the glaze.

Directions
  1. Preheat oven to 400F. Spray a standard 12-cup muffin tin with nonstick cooking spray.
  2. In a nonstick skillet over medium heat, cook the onions until softened, about 8 minutes. Add the mushrooms and garlic and cook for about 5 minutes more, until vegetables are tender. Add to a bowl with the turkey, pumpkin, egg white, oats, sage, salt & pepper. Toss gently to combine. Divide the mixture evenly among the muffin tin. Place in the oven, bake for 20 minutes.
  3. Combine cranberries, sugar and water in a small saucepan. Bring to a boil and then simmer for 10-15 minutes. Spoon onto the meatloaf muffins, and bake for another 15 minutes. Remove from the oven and let rest for 5 minutes before serving.
Source: As adapated by and seen on Cara's Cravings from Ashlee's Pumpkin Meatloaf with Cranberry Topping

Monday, January 18, 2010

Amazingly Creamy Pumpkin Penne

As you may have heard around Thanksgiving 2009 there was a shortage of canned pumpkin due to moldy crop loss.  I didn't really think it was a big deal and found pumpkin when I needed it for my dishes...except for the one week where I SPECIFICALLY planned TWO meals that needed it.  Chris and I searched high and we searched low on the shelves of our local Kroger but there was absolutely NO PUMPKIN to be found!  I considered making my own pumpkin puree from a whole pumpkin but alas, there was no real pumpkin in January, either.

My Nest Message Board ladies suggested various places where I could look.  Some of them even offered to let me have a can from their stockpile (they were smart and stocked up!)...bless them and their kind hearts!  But it was the week of the dreaded snow storm and I did not want to deal with the crazies at the groceries and I didn't really want to take a can from someone unless I really needed to.  So, the pumpkin recipes were put on hold.

Thankfully the following week I found canned pumpkin...at the same Kroger that during the previous week had none.  I bought myself a couple cans...just in case.  I must say that it really is still hit or miss with the pumpkin at that store because when I went out today there was none...again.  So, if you haven't already and you want to use pumpkin for the rest of the year, you may just want to stock up when you can find some!

Anyway, I had this recipe bookmarked forever and it kept showing up in lots of blogs that I follow.  I used shrimp instead of sausage because that's what I had onhand.  The use of cottage cheese is clever and I like the creaminess it lends while still being low fat.  I just might need to try using it in other cream sauces.  The flavor of the sauce itself was not bad, but just not really Chris and my taste.  It's healthy, for sure...so if you think it might be your thing, definitely give it a try as most people give it rave reviews.

Look for the other pumpkin recipe, coming soon!

Amazingly Creamy Pumpkin Penne
Printer-Friendly Version


Ingredients
  • 4 oz penne pasta (used rotini)
  • 2 tsp olive oil
  • 1 small onion, thinly sliced
  • 2 cloves of garlic, minced
  • about 2T chopped fresh sage
  • 2 links cooked chicken sausage, sliced (used shrimp cocktail with tails removed)
  • 1/2 cup low fat cottage cheese
  • 1/2 cup pumpkin puree
  • 1/2 cup milk
  • pinch of nutmeg
  • 5oz torn spinach, thick stems removed (used some frozen spinach)
  • grated parmesan or pecorino romano cheese, optional
Directions

  1. Heat olive oil in a skillet over medium-low heat. Add onions and cook gently for about 10-15minutes, until softened and beginning to caramelize. Add garlic, sage, and chicken sausage; continue to saute.
  2. Meanwhile, cook pasta according to package directions.
  3. In a blender, combine combine pumpkin, cottage cheese, and milk. Blend until no lumps are present. Add to sausage mixture in skillet and continue to cook over low heat. Season to taste with salt and freshly ground pepper, and a pinch of nutmeg.
  4. Drain pasta and return to pot over low heat. Add sausage mixture and baby spinach, and toss together. Cover for a few minutes to let the spinach wilt. Serve with parmesan cheese, if desired.
Note: Since I used shrimp instead of sausage, I added the shrimp at the very end since it was already fully cooked.  I just wanted to heat it and avoid overcooking.


Source: Cara's Cravings

Sunday, January 17, 2010

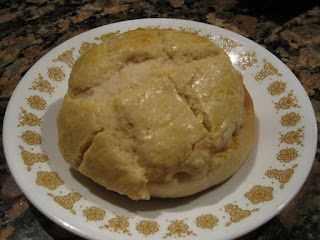
Chinese Bolo Bao with Nai Wong Filling ("Pineapple" Custard Bun)

If you have never had this delicious bun but don't think you can make it yourself, next time you're at a Chinese Dim Sum restaurant or Chinatown Bakery please please please try one!  Sadly I'm not sure if you can get these in Cincinnati...maybe at CAM or Uncle Yip's?

This is Chris' favorite bakery bun and everytime we go to New York he walks to the bakery to buy himself one for breakfast.  He's gotten to the point where the owners recognize him when we went to a restaurant (let's be honest, how many white kids go to the Chinese bakery anyway??).  He even orders the buns in Chinese by himself (I no longer have to go with him) and gets Grandma a newspaper, too.

The only way I can describe this is a sweet custard filled pastry with a sweety crunch topped bun.  The topping is so good that sometimes you could just eat that alone!  Often times when we try to order the bun it's not quite what we expect because sometimes the Bolo Bao ("Pineapple" Bun) is filled and sometimes it is not.  I couldn't quite find what I was looking for in a recipe on the internet so I had to combine two to make this delicious creation.  It was time consuming and I have no idea how the bakeries sell these for less than $1/piece.  It satisfies a craving but in the future, I'll just load up when I'm somewhere that has them because those Chinese chefs can make it better and faster than I can!  If you do decide to make them, maybe double or triple the recipe to make it worth your while :)

Overall I was extremely pleased with the way that this recipe turned out.  It was my first time trying a Chinese bun recipe and I was excited b/c it LOOKED like a bao!  My sister even thought when I brought them over that they came from a bakery.  The recipe as it was originally written was all in metric...so, I did the best I could to convert the units to the US System...which was hard!  I also found that the buns were not quite sweet enough and the color wasn't as yellow as the kind you buy so I adjusted the recipe accordingly.  It was nice because the dough could be made in my bread maker while I prepared other parts of the recipe and other items for Mom's Dinner.

By the way, it's called a "Pineapple" bun not because it has pineapple but because the topping looks like the skin of a pineapple.  I've also heard it called a Mexico bun...not because it's at all Mexican but the topping can sometimes look like a sombrero.

This dessert-like bun was part of the birthday dinner that I made for my mom. The other items that I made can be found in separate posts:
Chinese Bolo Bao with Nai Wong Filling ("Pineapple" Custard Bun)
Printer-Friendly Version


Yields: 12 buns

Ingredients

Dough:
  • 2 1/4 cup all-purpose flour
  • 4 tablespoons sugar
  • 1 1/2 teaspoons dry yeast
  • 1 medium egg
  • 2/3 cup water
  • 1/2 teaspoon salt
  • 2 Tablspoons milk powder
  • 3 Tablspoons butter
Nai Wong (Custard) Filling
  • 3/8 ounce custard powder*
  • 1 7/8 ounces wheat starch (tungmin flour)*
  • 1/2 cup sweetned condensed milk
  • 1/4 cup butter
  • 1 large egg, slightly beaten
*Notes: Used about 1 Tablespoon Vanilla Pudding Mix (NOT instant) and 1/4 cup corn starch

Topping
  • 6 Tablespoons butter
  • 1 egg
  • 1 g salt (a pinch)
  • 1 teaspoon vanilla extract
  • 2/3 cup powdered sugar
  • 1 Tablespoon milk powder
  • 1 1/4 cups all-purpose flour
  • Yellow food coloring
  • Another egg for egg wash
Directions
  1. Place the remaining of the dough ingredients in the bread machine according to the manufacturer’s recommendation.  Set to dough and start the machine. It takes about two hours for the dough cycle to complete.
  2. Meanwhile, prepare the topping.  Blend the butter and icing sugar together. Butter must be at room temperature. Add in salt, milk powder, vanilla, and food coloring, mix well.  Add beaten egg and mix well.  Mix in flour.  Put mixture in refrigerator if too sticky to handle.
  3. As the dough is rising and the topping is cooling, prepare the filling.  Combine custard powder (or vanilla pudding mix) and wheat starch (or corn starch) in a non-stock pan. Add in sweetened condensed milk, and stir mixture over low heat until mixed-- then add butter. Bring mixture to simmer to thicken while stirring constantly.  It should be like a paste-like consistency.  Remove mixture from stove and allow to cool slightly.  When mixture has cooled, add egg, stirring constantly. Divide dough into 12 portions, shaped into balls, cover with damp cloth, and set aside.
  4. When dough has risen, punch down and separate into 12 pieces.  If dough is too sticky to manipulate, add some more flour.  Using a lightly floured rolling pin on a lightly floured surface, roll the dough ball into a circle such that the edges are thinner than the center.  Add custard filling in the middle, and wrap to form a bun.  Pinch centers to seal and place on parchment paper lined baking pan, seam side up.  Repeat for the other buns.
  5. Remove topping from refrigerator and divide into 12 pieces.  Flatten topping dough with hands and gently place on top of bun.  Using a knife, score the topping 3 times vertically then 3 times horizontally.  Repeat for other buns and let dough rise for 40-50 minutes.
  6. Preheat oven to 325 degrees.
  7. After final rising, gently re-center topping if needed.  Gently brush egg wash over each bun.
  8. Bake for 10 minutes at 325 degrees.  Then, reduce temperature to 300 degrees and bake an additional 5 minutes.  Allow buns to fully cool before storing in air-tight containers.

Source: Slightly modified Bolo Bao from Chow Times and Nai Wong Filling from Recipezaar

Shrimp Scampi Bake

One of my favorite things to get at Red Lobster is their shrimp scampi.  There's something about shrimp swimming around in garlicy butter that is irresistable!  I had to make a mini-batch for Chris due to the use and extreme disdain of mustard in the recipe.  I was surprised by the use of this ingredient but it really gave the scampi a delicious zip!  Very easy and very good!  I served mine over angel hair pasta to make a complete meal.  I think in the future I'd add some halved cherry (or grape) tomatoes and some sliced steamed asparagus for color and inclusion of veggies.

This entree was part of the birthday dinner that I made for my mom.  The other items from this dinner menu can be found at their respective blog posts:
Shrimp Scampi Bake
Printer-Friendly Version


Prep Time: 15 Mins
Cook Time: 15 Mins
Ready In: 30 Mins
Yields: 6 Servings

Ingredients
  • 1/2 cup butter
  • 2 Tablespoons prepared Dijon mustard
  • 1 Tablespoon lemon juice
  • 1 Tablespoon garlic, minced
  • 1 Tablespoon fresh parsley, chopped
  • 2 pounds raw medium shrimp, shelled and deveined with tails attached*
*Note: Used medium fully cooked frozen cocktail shrimp with tails removed since I was serving it over pasta and making it easier to eat.  I watched the baking time until the shrimps curled slightly and the butter was melted.  I'd guess it was bout 8 minutes at 350 degrees.

Directions
  1. Preheat oven to 450 degrees
  2. In a small saucepan over medium heat, combine all ingredients except for shrimp.  When butter has melted and ingredients are fully combined, remove from heat.
  3. Arrange shrimp in a shallow baking dish then pour the butter sauce over the shrimp.
  4. Bake in preheated oven 12-15 minutes or until the shrimp are pink and opaque.
Source: Slightly modified from All Recipes

Sun-Dried Tomato, Basil, and Parmesan Muffins

I think I'd call this more of a biscuit rather than a muffin but the original recipe apparently thought it was a muffin.  Yes, it's baked in a muffin tin but to me, a muffin is sweet while a biscuit is savory.  This is definitely savory.

This bread was part of the birthday dinner that I made for my mom. The other items that I made can be found in separate posts:
Sun-Dried Tomato, Basil, and Parmesan Muffins
Printer-Friendly Version


Yields: 12 muffins

Ingredients
  • 2 cups all-purpose flour
  • 1 Tbsp baking powder
  • 1/2 tsp salt
  • Coarsely ground black pepper, to taste
  • 2 large eggs, room temp
  • 1 cup buttermilk, room temp
  • 6 Tbsp unsalted butter, melted and cooled
  • 3/4 cup “sun-ripened” tomatoes, chopped
  • 1/3 cup grated Parmigiano-Reggiano, plus additional 1-2 Tbsp for garnish
  • 1/4 cup fresh basil
Directions
  1. Preheat oven to 400F. Grease a 12-cup muffin pan or line with paper liners. Sift together the flour, baking powder, salt, and pepper into mixer bowl.
  2. Lightly beat eggs and add to mixer bowl. Add buttermilk, melted butter, tomatoes, basil, and Parmesan cheese. Mix on medium speed until just combined - do not overmix.
  3. Scoop the batter into the muffin pan, about 2/3 full. Sprinkle with remaining Parmesan cheese. Bake for 20 minutes, until well risen, golden brown, and firm to the touch.
  4. Let muffins cool 5 minutes in the pan before removing. Serve warm or cool completely and store covered for 3 days.
Source: Adapted from 1 Mix, 100 Muffins as seen on Confections of a Foodie Bride

Zuppa Toscana

Who needs Olive Garden when you can make this by yourself at home?!  This soup was extremely easy to make and tasted like the Zuppa Toscana you order at the restaurant but better.  Add some fresh garlic bread and a salad and you've got yourself a hot meal on a cold night!  (Or, if you're like me and eat soup year round, it might even be a hot night haha!).

I modified Joelen's original recipe because I felt it could use some more seasoning.  The spiciness was also a little more than I think this soup should have so I reduced the amount of cracked red pepper in my modified recipe.  You can always see her original recipe by clicking on the source link.

This soup was part of the birthday dinner that I made for my mom.  The other items that I made can be found in separate posts:
Zuppa Toscana
Printer-Friendly Version


Ingredients
  • 4 cans (8 cups) low sodium chicken broth
  • 1 lb italian sausage, removed from casings
  • 3 baking potatoes, scrubbed
  • 2 teaspoons garlic powder
  • 1 teaspoon onion powder
  • 1 teaspoon italian blend seasoning
  • 1 teaspoon red pepper flakes
  • salt and pepper to taste
  • 1 bunch fresh kale
  • 1/2 cup 2% condensed milk or half and half
Directions
  1. In a large dutch oven or large stockpot over high heat, add the chicken broth and bring to a boil.
  2. While the broth is coming up to a boil, prepare the potatoes by slicing in half lengthwise and then cutting each half into 1/2 inch cubes with the skin on. Set aside.
  3. With the italian sausage removed from the casings (or you could use bulk italian sausage too), crumble the sausage into the hot broth.  Add the potatoes to the pot, season with spices and cook until the potatoes are tender, about 15-20 minutes.  If desired, skim grease off the top at this time.
  4. As the potatoes soften, prepare the kale by cutting away the tough core and stem. Slice the leafy greens into slices and place in a bowl.
  5. Once the potatoes have softened up, remove from heat or turn the heat off. Stir in the kale (don't worry, it will cook down!) and condensed milk or half and half.  The heat of the soup will cook the kale without turning it brown.
  6. Serve hot.
Source: Modified from Joelen's Culinary Adventures

Sushi

Below are the basic ingredients for sushi.  You can then buy fillings of your choice to make various delicious rolls.  This was my first attempt at making rolls so they're not the prettiest but they held together for the most part and were very tasty :).

As I wasn't sure how adventures our group of Dinner Clubbers would be, I opted for all cooked (and inside out so you can't see the nori (seaweed) - out of sight, out of mind right?) maki rolls.  For my rolls, I made the standard California Roll and then did some Spicy Crab Rolls and just a few Shrimp Rolls.  If you do decide to go raw,  make sure you're buying sushi grade fish!

I highly suggest Sushi Day for inspiration and recipes...there's even some rolls with BACON! (Bacon Crunchy Shrimp Roll and Kristen Maki). 

Pioneer Woman has an awesome tutorial with really good pictures (very helpful if you're a visual person like I am!) on how to create your rolls.  There's also a few good recipes on there as well.


Mmmm...good thing Emily took pictures of my rolls because I forgot to!

Sushi Rice
Printer-Friendly Version


Prep Time: 30 minutes
Cook Time: 20 minutes
Yields: 8 cups cooked rice or about 16 rolls

Ingredients
  • 4 cups Short Grain/sushi Rice, uncooked
  • 1 cup Rice Wine Vinegar
  • ½ cups Sugar
  • ¼ cups Sake Or Mirin (a Japanese Rice Wine)
Note: Used seasoned rice wine vinegar instead of sushi su (vinegar + sugar + sake).

Instructions

“Rice Prep”
  1. Use short or medium-grain rice. It’s more starchy and round than the long-grain variety, which just won’t hold together well enough to support ingredients in sushi. Many stores now sell specifically-labeled “sushi rice”.
  2. Before you cook it, wash/rinse the rice until the water runs totally clear—about five or six times. If you don’t thoroughly rinse the rice, it’ll end up in a big, sticky ball. There’s enough internal starch in the rice for it to sufficiently hold together for sushi, so get all the stuff on the outside off by rinsing well.
  3. Use a rice cooker/steamer. Rice made on the stovetop will not work for sushi; it won’t be the right consistency. Rice cookers are widely available for as low as $12.
  4. Add the rinsed rice to the rice cooker with equal parts water, and follow the directions for the rice cooker. After it’s done, transfer the cooked rice to a large mixing bowl.
You’ll need 1 part sushi su for every 4 parts rice.

Sushi Su/Sushi Rice:
  1. Heat vinegar, sugar, and sake or mirin in a saucepan just to dissolve and combine. Allow to cool to room temperature. (Note: skipped this step as I just subbed pre-made seasoned rice wine vinegar)
  2. Cook rice according to rice cooker directions. Transfer to large mixing bowl.
  3. Pour su (vinegar mixture) over the rice, gently folding to incorporate.
  4. Let rice stand for 10 minutes, then fold again.
Rice should be shiny, not mushy and have a slightly tart/sweet taste. Cover with a warm, wet towel and keep warm.

Source: Cody the Sushi Chef as seen on Pioneer Woman

Spicy Mayonnaise
Printer-Friendly Version


Ingredients
  • ½ cup (low-fat) mayonnaise
  • 2 Tbsp Sriracha hot sauce
  • ¼ tsp roasted sesame oil
Directions
  1. Whisk the ingredients together until well blended.
  2. Store in fridge until ready to use.  Use in rolls or as a dipping/drizzled sauce.
 Source: Group Recipes
California Rolls
Printer-Friendly Version


Ingredients and Supplies
  • 1 piece Makisu (bamboo Rolling Mat)
  • Dark Green Nori (dried Seaweed)
  • Sushi Rice (recipe above)
  • Imitation Crab (round leg style)
  • Avocado, Thinly Sliced
  • Cucumber (Japanese, If Available), Thinly Sliced
  • Toasted Sesame Seeds
  • Soy sauce, for dipping
  • Wasabi, if desired (used prepared Wasabi in a tube that I bought at Kroger)
  • Ginger, if desired
Instructions

  1. First, in order to keep your rice from sticking to the Makisu and making a terrible mess, carefully wrap the Makisu in plastic cling wrap.
  2. To begin, fold the pieces of nori in half to split them. Nori is very delicate, so as soon as you press along the seam, it easily breaks in two. Next, lay the half-sheets of nori on the work surface and grab a handful (about a ½ cup) of sushi rice and cover one side of a half-sheet of nori with it. To do so, first set the rice on the end of the nori sheet closest to you. Then, working with your fingertips and/or knuckles, gently spread the rice over the surface of the nori.
  3. On California Rolls, the rice is typically on the outside – not the inside – so to begin, quickly flip the rice-coated sheet of nori so that the rice side is down. Carefully position it horizontally so it will roll lengthwise. Next, place a single row of the crab across the middle of the nori. Next, place slices of avocado end to end right against the crab. It’s best to use an avocado that’s ripe but still quite firm. Lastly, lay the very thin (slightly thicker than a matchstick) cucumber slices end-to-end right alongside the crab and avocado.
  4. To roll the sushi, carefully lift the edge of the mat closest to you, begin rolling the mat away from you, pressing it lightly to keep it firm. At this point, the end of the roll has been rolled upward, and your very light pressure is ensuring that they roll will remain nice and tight. Next, lift up the end of the rolling mat and pull it away from you, allowing the roll to roll the rest of the mat. Then carefully remove the roll from the mat and place it on a cutting board. Lay the mat over the top of the roll and exert gentle pressure once more to make sure it’s all secure.
  5. Next, hold the roll on the mat and sprinkle the top with toasted sesame seeds. Slice using a very sharp knife, first running the knife through a damp dishtowel with the blade facing away from you. Begin by slicing the roll exactly in half. Then set the two halves side-by-side to slice into individual pieces. This ensures that each piece will be a uniform size.
  6. Wrap in plastic cling and store in refrigerator until ready to serve.  Serve with soy sauce, wasabi, and pickled ginger, if desired.
Source: Pioneer Woman

For the Spicy Crab Rolls I just shredded some imitation crab and then mixed with the spicy mayonnaise.  Added some avocado and cucumber.  For the Shrimp Rolls I used cocktail shrimp (cut in half lengthwise), a dab of spicy mayo, carrots, and avocado.

Friday, January 15, 2010

Mmmm...BACON!!!

This isn't one recipe but OVER ONE HUNDRED recipes on how to use bacon in all things savory or sweet.  I saw this shared on my brother's friend's facebook and had to cross-share it with my Dinner Club friends.  We do a different theme every month and we often joke that one day, we should have a bacon themed dinner.  I'm pretty sure this blogpost is driving us one step closer to that...

Here's a little photo teaser...


Check out all the delicious recipes and photos for 100 Ways to Use a Strip of Bacon at the Endless Simmer.  Just try not to drool on your keyboard, okay?

PS: Taking requests on something to make with bacon.  Leave a comment!

Printer-Friendly Versions of Recipes!

Get excited because printer-friendly versions of recipes are being added to the blog! 

I realized that sometimes I have a tendency to ramble and sadly you probably don't at all care about my witty dialog.  You are here, after all, for the recipes.  So, please look for the links beneath the recipe title that says "Printer-Friendly Version" and it will open up a window where you can print JUST the recipe.  How's that for simplicity and saving trees?  You could be like me and just drag your entire laptop over to the kitchen when you're cooking (yes, this may be somewhat dangerous...) but if you absolutely must print a recipe out, now you can use less paper and feel pretty good about taking small steps to saving the world.

The Printer-Friendly Version will be offered on recipes ongoing and bare with me as I back-convert the older recipes.  Since this is a manual process, please let me know if you come across one that isn't working as expected.

I hope this makes your experience on my site better and please leave a comment if you have other ideas on things you'd like to see!

Thursday, January 14, 2010

Baked Sausage Ziti

A little backlogged again on posting recipes but here's one that I found to be truly delcious and comforting on a cold winter night.  This recipe takes a bit more effort but the use of two sauces makes for an extra saucy and cheesy delight.  No hard, dry pasta here!  I assembled the dish after work and then stored it in the fridge until I cooked it for dinner the next night.  I used part of another batch of Marinara Magnifica in lieu of the tomato sauce in this recipe.  Oh and the use of a mozzarella block insteaded of shredded (which turns rubbery) and fresh basil instead of dried?  Awesome!

Photo credit goes to Sara at The Piggly-Wiggly Blog since forgetful me forgot to take my own again.   I was just too excited to be eating it!

Other uses for Marinara Magnifica:
Baked Sausage Ziti
Printer-Friendly Version


Ingredients

  • 1 pound (16-oz) cottage cheese
  • 2 large eggs, lightly beaten
  • 3 ounces grated Parmesan cheese (about 1-1/2 cups), divided
  • 1 pound ziti
  • 2 Tbsp extra virgin olive oil
  • 1 lb spicy sausage roll
  • 1 medium onion, finely diced
  • 5 medium garlic cloves , minced
  • 28-oz can tomato sauce*
  • 14.5-oz can diced tomatoes*
  • 1 tsp dried oregano*
  • 1/2 cup plus 2 Tbsp chopped fresh basil leaves
  • 1 tsp sugar
  • Ground black pepper, to taste
  • 3/4 tsp cornstarch
  • 1 cup heavy cream
  • 8-oz low-moisture mozzarella cheese, cut into 1/4-inch pieces (about 1-1/2 cups)
*Note: Skipped making the tomato sauce and used about 5 cups Marinara Magnifica in place of these ingredients.

Directions
  1. Preheat oven to 350 degrees.
  2. In a medium bowl, whisk together cottage cheese, eggs, and 1 cup Parmesan; set aside.
  3. In a large pot, cook ziti until pasta begins to soften but is not yet cooked through, 5 minutes. UNDERCOOK THE PASTA!  Drain pasta and leave in colander.
  4. Meanwhile, heat oil, sausage, onion, and garlic in 12-inch skillet over medium heat until sausage is cooked and onions are soft and translucent.  Stir in tomato sauce, diced tomatoes, and oregano then simmer until thickened, about 10 minutes.*  Remove skillet from theat then stir in ½ cup basil and sugar.
  5. In a small bowl, stir together cornstarch and heavy cream.  Transfer to the pot which was used to cook the ziti and cook over medium heat. Bring to simmer and cook until thickened, 3-4 minutes.  Remove pot from heat and add cottage cheese mixture, 1 cup prepared tomato meat sauce, and ¾ cup mozzarella, then stir to combine. (Mozzarella cubes won't be melted.)
  6. Add pasta to pot and stir to coat thoroughly with sauce.
  7. Transfer pasta mixture to 13- by 9-inch baking dish and spread remaining tomato sauce evenly over pasta. Sprinkle remaining ¾ cup mozzarella and remaining 1/2 cup Parmesan over top. Cover baking dish tightly with foil (spray foil with cooking spray to prevent cheese from sticking) and bake for 30 minutes
  8. Remove foil and continue to cook until cheese is bubbling and beginning to brown, about 30 minutes longer.
  9. Cool for 20 minutes. Sprinkle with remaining 2 tablespoons basil and serve.
Source: Cook's Illustrated as adapated and seen on The Piggly Wiggly

Sunday, January 10, 2010

Light Oat Bread

We recently had a the White Death roll through and drop a good 6" or so of snow on us.  As such, the office was very empty and by the time lunch rolled around, most people had bailed.  My boss' boss told the remaining people to feel free to go home.  I was a bit torn since my commute is less than a mile (literally I drive across the street to get to/from work)...even if the weather were bad, I could walk if worse came to worst.  I ended up working for another hour then decided I'd go work from home (and ironically ended up working longer than I would have if I had stayed in the office...I was just way more productive here at home and got on a roll!).

Anyway, so since I was home,  I decided to dump some ingredients into our bread machine so that we'd have some nice fresh homemade bread for dinner.  This bread is AWESOME!!!  It has a nice crunchy crust and a tender inside (the picture below KINDA gives you an idea of its awesomeness but you really have to try it yourself!).  It tastes pretty much like white bread but with a hint of nuttiness (from the oats I guess) and the added nutrition of oatmeal.  Yah for adding whole wheats and not noticing it's there!  This will definitely be staple around here.

Note: For those without a bread machine, you can still make this bread.  It'll just take a little bit more work.  Use your standard bread making technique.  I've outlined directions below.

Light Oat Bread
Printer-Friendly Version


Prep Time: 5 minutes
Cook Time: 3 hours
Yields: 12 Servings (1 1/2 lb loaf)

Ingredients
  • 1 1/4 cups water
  • 2 tablespoons margarine
  • 1 teaspoon salt
  • 3 cups all-purpose flour
  • 1/2 cup rolled oats
  • 2 tablespoons brown sugar
  • 1 1/2 teaspoons active dry yeast
Directions

For Bread Machine: Add ingredients to bread machine pan in order recommended by your manufacturer. Use regular light setting.

For handmade:
  1. In a large mixing bowl, combine warm water, yeast, and brown sugar.  Stir until dissolved and allow to sit and get frothy.
  2. Mix dry ingredients into bowl. Knead until combined then cover with a damp cloth and let rise until doubled in volume.
  3. Punch dough down and then put into bread pan.  Let rise again. 
  4. While dough is rising, preheat oven to 350 degrees. 
  5. Bake for 35 minutes.  Slice and serve warm, with softened butter if desired.
Note: If you have leftovers like I did, you might want to restore the crisp crust and warm insides.  To refresh bread, place in oven at 350 degrees for several minutes.

Source: All Recipes

Herb Breaded Tilapia

For whatever reason I had a craving for fish and I remembered I had this recipe bookmarked for awhile now.  This recipe was nice as it was designed for 2 people (I almost always have to either scale things down or save lefteovers).  I was hesitant because the fish is pan fried and I never use more than say a Tablspoon of oil when I fry things.  This one called for a pan full of oil!  I went with it anyway and I'm glad I did because the end result was a crunchy crust with a beautifully flaky fish beneath.  Chris said it tasted like fish sticks...silly boy.  It's much more gourmet than that!  Worthy of sharing with company.

I forgot to get a picture this time so please enjoy Elly's for now.

Herb Breaded Tilapia
Printer-Friendly Version


Ingredients
  • 2 tilapia fillets
  • 2 Tbsp. flour
  • 1 egg
  • 1 lemon, divided
  • 1/3 cup bread crumbs
  • 2 Tbsp, fresh chopped parsley
  • 2 tsp. fresh chopped thyme
  • 1/4 tsp. garlic powder
Directions
  1. Season the tilapia with salt and pepper and then dredge in the flour, shaking off any excess.
  2. Lightly beat an egg in a small baking dish or bowl and mix in the juice of half the lemon. In another dish, combine the breadcrumbs, parsley, thyme, garlic powder, and salt and pepper to taste.
  3. Dip the floured tilapia first in the egg, and then into the breadcrumb mixture, coating evenly and pressing to adhere if necessary.
  4. Heat a nonstick skillet over medium heat, and add enough oil to coat the bottom of the pan. Once hot (if you flick a little piece of the breadcrumb mixture in there and it bubbles/sizzles, you’re good to go), add the tilapia. Cook for approximately 3 minutes per side, or until fish is cooked through and flakes with a fork.
  5. Cut the remaining half lemon into wedges and serve alongside the tilapia.
Source: Elly Says Opa!

Wednesday, January 6, 2010

Best of 2009

Following our wedding in 2008 I started posting to our personal friends/family website (Chronicles of the Chrises) the recipes that I was making.  The purpose was merely to share photo, news, and recipes with our friends and family and hopefully have them contribute some of their favorite recipes as well.  While the whole sharing back thing didn't seem to work out, people did tell me about how they tried the recipes I was posting and enjoyed them.  After some inspiration following various cooking blogs, I decided why not start my own on blogger so that the whole world can see "what's cooking" (the name of the tab in Chronicles of the Chrises). 

And thus, during the middle of November 2009 just before Thanksgiving, Christine's Kitchen Chronicles was born and I added all the other recipes (backdating them) from Chronicles of the Chrises.  I maintained the site but my husband Chris was not convinced that anyone in this big world wide web was looking at it.  So, at the beginning of December, Chris taught me how to use Google Analytics to track hits to my site. 

In the approximately ONE AND 1/2 MONTHS that I started the site and began tracking hits, there have been 395 unique visitors, 558 visits, and 1,137 page views to this website.  I've had visitors from the US, Canada, Germany, UK, Qatar (where is that anyway?!), Hungary, Spain, Isle of Man (again, where is that?!), Saudi Arabia, Singapore, Vietnam, and the Philippines!  For that, I thank you all and I hope that the site continues to gain readership (tell your friends!). 

Since it seems there ARE people out there (Google doesn't lie!) please leave me a message and talk to me.  What recipes have you tried from my site and enjoyed?  Did you have a personal favorite in 2009 not already listed here?  Is there a recipe you'd like to see me make?  Help me continue making this a better experience for you and help to prove to my husband that I truly do have readers out there!

As usual, inspiration has driven me to make a "Best of 2009" entry even though this wasn't a full year and we're already a full week into the new decade.  (By the way, do you say "Two thousand and ten" or "Twenty ten"?...I personally go for the latter).  Out of 69 recipes in 2009, you'll find reader and personal favorites below.  Better late than never, right?  ENJOY!


Top 2009 Reader Favorites*:


  1. Christmas Sandwich Cremes
  2. Iced Sugar Cookies+
  3. Assorted Truffles+**
  4. Spinach Sausage and Cheese Manicotti**
  5. Caramel Apple Cheesecake Pie+**

2009 Additional Personal Favorites:
  
  1. Loaded Baked Potato Soup
  2. Penne a la Vodka
  3. Hot Spinach Artichoke Dip
  4. Chicken Pot Pie
  5. Jamie's Minestrone
  6. Momma N's Chili
  7. Sweet Potato Souffle
  8. Honey Lime Grilled Chicken
  9. Pumpkin Whoopie Pies with Maple Cinnamon Cream Cheese Frosting
  10. Christine's Fried Rice
NOTES:
+Denotes original photography.  Please provide credit to Christine's Kitchen Chronicles if you choose to use any of these photos.  Many photo credits to their original respective owners from which these recipes were reposted.  I'm working on photographing my own food but some of these were posted before I truly understood food blog repost ettiquite.
* Based on Google analytics data beginning 12/6/09...so, to be fair, it's not a true best of this year but hopefully next year there will be better data!
** Denotes that these are also personal favorites

Monday, January 4, 2010

Clone of Cinnabon

Happy New Year!

I was thinking that there's the possibility that I should make healthy substitutions (ie: whole grains for refined, ground turkey for beef, even more low fat versions of items, etc.).  The thing is, I'm not sure how much it would last...especially the whole refined carbs thing.  I LOVE white bread and pasta....

At any rate, here's a nice unhealthy recipe for you.  In my defense, I actually made it in 2009 for Christmas Eve and am just now getting around to posting it due to festivities and going out of town.  It made a lovely Christmas Eve dessert (still have a few of them frozen for next time!) and made the house smell heavenly.  Not quite a Cinnabon (pretty sure they use even MORE butter and sugar than this recipe did!) but still darn good and I was excited to be putting my adopted bread maker (hand-me-down from the in-laws) to use!

If you don't want to wake up in the wee hours of the morning to prepare fresh cinnamon rolls, don't fret as reviews of this recipe say that you can prepare them in advance and just put them in the fridge (or freezer).  Pop them into the oven in the morning and voila - heaven.

Here's a picture of them "naked"...


....and then below you'll see one "dressed" :)

Personal and Unrelated Sidenote: I realized that we drove through/visited 8 states (1/6 th of the Continental US! Ohio, W. Virginia, Pennsylvania, New Jersey, New York, Rhode Island, Conneticut, and Massachussettes) within the last week on our adventures to NYC and Boston.  Talk about a lot of road time...phew!  No more cars or cold weather destinations for awhile, please!

Clone of a Cinnabon
Printer-Friendly Version


Prep Time: 20 Min
Cook Time: 15 Min
Ready In: 3 Hrs
Yields: 12 Servings

Ingredients
For the rolls
  • 1 cup warm milk (110 degrees F/45 degrees C)
  • 2 eggs, room temperature
  • 1/3 cup margarine, melted
  • 4 1/2 cups bread flour
  • 1 teaspoon salt
  • 1/2 cup white sugar
  • 2 1/2 teaspoons bread machine yeast
For the cinnamon sugar filling
  • 1 cup brown sugar, packed
  • 2 1/2 tablespoons ground cinnamon
  • 1/3 cup butter, softened
For the icing
  • 1 (3 ounce) package cream cheese, softened
  • 1/4 cup butter, softened
  • 1 1/2 cups confectioners' sugar
  • 1/2 teaspoon vanilla extract
  • 1/8 teaspoon salt
Directions
  1. Place ingredients in the pan of the bread machine in the order recommended by the manufacturer. Select dough cycle; press Start.
  2. After the dough has doubled in size turn it out onto a lightly floured surface, cover with a damp dish cloth and let rest for 10 minutes. In a small bowl, combine brown sugar and cinnamon.
  3. Roll dough into a 16x21 inch rectangle. Spread dough with 1/3 cup butter and sprinkle evenly with sugar/cinnamon mixture. Roll up dough and cut into 12 rolls. Place rolls in a lightly greased 9x13 inch baking pan. Cover and let rise until nearly doubled, about 30 minutes. Meanwhile, preheat oven to 400 degrees F (200 degrees C).
  4. Bake rolls in preheated oven until golden brown, about 15 minutes. While rolls are baking, beat together cream cheese, 1/4 cup butter, confectioners' sugar, vanilla extract and salt. Spread frosting on warm rolls before serving.
Source: All Recipes