Pages

Wednesday, October 31, 2012

Buca di Beppo's Spicy Chicken Rigatoni

Did you know that October was National Pasta Month?  Me neither and so here I am sneaking in this pasta dish just in the nick of time!

Pasta would have to be one of my favorite foods EVER.  I mean, what's not to love about this versatile dish?    It can be dressed up Italian or Asian or even with a Mexican flair.  You can make it in your oven like this Pierogi and Kielbasa Bake  or on your stovetop like this Stovetop Mac and Cheese.  I could eat pasta EVERY SINGLE DAY and not get bored.  When I was growing up I told my mom I preferred pasta to rice and she basically made me feel like the worst Asian person ever.  It's blasphemy to dislike rice!

I enjoy finding copy-cat recipes of restaurant favorites and this one comes from the family-style Italian chain, Buca di Beppo.  I had this dish at a recent work lunch and found it a nice remake of a previous dish that I got there, the Penne Rosa (pink sauce).  This new-to-me version, Spicy Chicken Rigatoni, was much improved by the addition of many flecks of crushed red pepper!  If you can't handle spicy foods, this probably isn't the dish for you...unless perhaps if you decrease the crushed red pepper in the dish but then it'd just be Chicken Rigatoni!  However, if you like spice and you like garlic, you'll love this dish.

It's so easy to make at home (Hello jarred sauces! And, if you're feeling extra lazy, hello pre-cooked chicken strips or rotisserie chicken, too!) and tastes just like the real thing so impress your date and save some money, too!

One Year Ago: Caramel Apple Cheesecake Bars, Apple Cinnamon Truffles, and Mini Triple Treat Cupcakes (A simple Halloween treat!)
Three Years Ago: Pumpkin Whoopie Pies

Buca di Beppo's Spicy Chicken Rigatoni


Ingredients

  • 1 lb rigatoni pasta, cooked
  • 2 chicken breasts, cooked and sliced
  • 1 tsp olive oil
  • 2 tsp butter
  • 1 Tbsp garlic, minced
  • 1/2 Tbsp crushed red pepper
  • 1/8 tsp salt
  • 1/8 tsp ground black pepper
  • 3/4 cup marinara sauce
  • 1/2 cup Alfredo sauce
  • 1/2 cup frozen peas
To garnish: 1/2 tsp crushed red pepper

Directions
  1. In a large skillet over medium-high heat, heat olive oil and butter.  Add garlic and crushed red pepper cooking until fragrant, about a minute.
  2. Add marinara and Alfredo sauces and peas. Then season with salt and pepper.  Heat until warmed.
  3. Stir in the cooked pasta and chicken breast slices.  If desired, garnish with additional crushed red pepper.
Source: Slightly modified from Bucca di Beppo at Home

Monday, October 29, 2012

Peanut Butter, Banana, and Nutella Bars

Sorry, I missed my posting on Friday.  Did anyone even notice?  Good.  Anyhow, remember months ago when I made Homemade Nutella?  I had so much of it that I hardly knew what to do with it all so began to collect recipes to help use up my stash.

Can you guess who picked this particular recipe?  I'll give you a hint: peanut butter.  That'd be my husband.  Although, I have to admit that lately, I've been digging his signature flavor, too.  The banana made these bars ultra moist and the flavor combination of peanut butter, banana, and chocolate is classic.

One Year Ago: Apple Cider Butter and Shrimp with Green Apple Chipotle Salsa
Three Years Ago: Turkey Bean Pumpkin Chili

Peanut Butter, Banana, and Nutella Bars


Peanut Butter, Banana, and Nutella Bars
Photo Credit: Emily H.
Ingredients

  • 6 Tbsp butter, melted
  • 1 cup dark brown sugar
  • 1 egg
  • 1 tsp vanilla extract
  • 1/4 tsp salt
  • 1 cup flour
  • 1/2 cup mashed bananas (about 1 banana)
  • 1/2 cup creamy peanut butter
  • 1/2 cup chopped hazelnuts
  • 1/4 cup Nutella chocolate hazelnut spread (I used my homemade Nutella!)

Directions

  1. Preheat oven to 350 degrees F.  Butter an 8x8 pan and set aside.
  2. Mix melted butter with brown sugar and beat until smooth.  Beat in egg and then vanilla.  Add salt and stir in flour.  Mix in bananas, peanut butter, and hazelnuts.  Pour into prepared pan.
  3. Melt the Nutella in the microwave for about 10-15 seconds.  Drop by the spoonfuls over the batter and then swirl with a knife.
  4. Bake for 20-25 minutes or until set in the middle.  Cool on a wire rack before cutting.

Source: The Spiffy Cookie

Wednesday, October 24, 2012

Buffalo Chicken Shepherd's Pie

I love traditional foods with a twist such as Chicken Parmesan Meatloaf and Chicken Marsala Risotto.  They make classic favorites into something new and exciting without completely offending those that enjoy routine. Here's another one of those types of recipes.

I knew the moment I saw it that it would be a winner.  And I was actually in so much of a hurry to dig into this dish that the only photo I got of it was on my iPhone!  Clearly you can see  where my priorities lie haha.  The cheesy mashed potatoes scream creamy comfort while the filling is flavored with tangy and spicy hot sauce.  It was even one of those dishes that tasted better the next day after it had been reheated.  I didn't have enough to freeze but I'm willing to bet it would do well as a freezer meal, too.

Since my husband is anti-blue cheese, I made his half with cheddar in both the mashed potatoes and topping.  Feel free to do the same or go all one type of cheese based on your family's preferences.

One Year Ago: Apple Cider Beignets with Butter-Rum Caramel Sauce
Two Years Ago: Who Loves Ya Baby Back?

Buffalo Chicken Shepherd's Pie


Ingredients

  • 1 Tbsp olive oil
  • 1 lb ground chicken
  • 4 celery ribs, diced
  • 4 carrots, peeled and diced
  • 1 onion, diced
  • 4 garlic cloves, minced
  • 1 pint cherry tomatoes, halved
  • 2 tsp smoked paprika
  • 1/4 cup chicken stock
  • 1 Tbsp tomato paste
  • 1/4 cup hot sauce (suggest Frank's Red Hot)
  • 4 cups mashed potatoes
  • 4 oz blue cheese, crumbled and divided (alternatively you can use cheddar or both)
  • Chives, chopped for garnishng
Directions
  1. Preheat oven to 375 degrees F.
  2. Heat oil over medium high heat in a large skillet.  Add the chicken and cook until browned.  Add the celery, onions and garlic.  Continue to cook, stirring occasionally until the vegetables are soft, about 8-10 minutes.  Add the tomatoes and paprika.  Deglaze the pan with the stock and add the tomato paste and hot sauce.  Stir to combine.  Allow to simmer for 10 minutes.
  3. Add half (2 oz) of the cheese and a few dashes of hot sauce to the mashed potatoes and mix well.
  4. Prepare a 9-inch pie plate (I found I had too much filling so used a large rectangular pyrex baking dish) by spraying with cooking spray.  Pour the chicken mixture into the prepared pan.  Spoon potatoes on top and sprinkle with remaining cheese.
  5. Bake for 25-30 minutes or until potatoes are golden and chicken mixture is bubbly.  Sprinkle with additional paprika and chopped chives.  Allow to cool for 5 minutes before serving.
Source: as seen on Fried Ice and Donut Holes from The Jey of Cooking

Monday, October 22, 2012

SRC: Gruyere and Bacon Stuffed French Toast

Breakfast continues to be the theme here on my blog today.  On Friday I shared a recipe for Cinnamon Sugar Baked Pumpkin Doughnuts.  Today, I'm sharing something with everyone's favorite breakfast meat treat...bacon!!!

But this isn't your run-of-the-mill side of bacon.  This bacon is coupled with smooth, melty Gruyere cheese.  And then they're both stuffed inside of thick french toast and topped with sweet sweet maple syrup.  Mmm.  Anyone else a sucker for the sweet and savory combination?  I'd never think to make a savory French toast but it worked and was AMAZING.  Seriously one of the best things I've eaten in a long time and was so simple!  I was in a rush that morning so I used pre-cooked bacon to speed things along.  Would have loved to have the bacon crispier as I bet the contrast of texture would only add more to this already delightful experience.


This wonderful creation comes from Lisa's blog, Authentic Suburban Gourmet.  She is so talented and I'm jealous that she lives in my favorite US city, San Francisco.  I envy her food photography and I went a little bookmark crazy when trying to decide what to make for this month's Secret Recipe Club because everything looked SO GOOD.  

To name a few other contenders:
As usual a special thank you to April of the blog Angel's Homestead, SRC ring leader and Debbi of the blog Debbi Does Dinner, our Group C Hostess!

One Year Ago: Apple Pie Cookies

Gruyere and Bacon Stuffed French Toast

Gruyere and Bacon Stuffed French Toast

Yields: 4 slices stuffed French toast

Ingredients
  • 4 slices good sourdough bread (cut about 1 1/4 inch thick)
  • 8 slices bacon, cooked until crispy and then crumbled
  • 1 cup Gruyere Cheese, grated
  • Cinnamon
  • 2 Tbsp butter
  • 2 eggs
  • 1 cup half & half (or whole or 2% milk)
  • 1 tsp Vanilla extract
  • Maple syrup
Directions
  1. Use a sharp knife to cut into the bottom of each slice of sourdough.  Slice to almost the end of the top and sides to create a pocket to stuff each slice.
  2. Once the bacon has cooled, combine it with the Gruyere cheese in a bowl.  Divide evenly among the four slices of bread and gently stuff each one.  Gently press each stuffed bread piece together to prevent the inside ingredients from escaping.
  3. Add the eggs, half & half, and vanilla together and whisk until gently combined.
  4. Use a large griddle to cook all of the French toast at the same time.  Heat griddle on medium and spread butter evenly across the surface.  
  5. Meanwhile, dip each stuffed bread into the egg mixture and place on the heated griddle.  Sprinkle with cinnamon.  Let cook over medium heat for about 5 minutes per side.  If necessary, reduce heat to prevent burning.
  6. Serve hot with your favorite maple syrup.  Take a bite, close your eyes and be amazed by all the contrasting flavors and textures!

Mac and Cheese Contest

[[10/23/11 UPDATE: RECIPE ENTRY PERIOD IS NOW CLOSED!  PLEASE CHECK BACK AS RECIPES ARE SHARED SO YOU CAN TRY TO WIN BY SHARING/COMMENTING!]]

Noodles noodles in my bowl.
Who is the mac and cheesiest on the whole?

This is my mission to find out and I proudly announce my first ever blog recipe contest featuring MAC AND CHEESE!

Without a doubt the ultimate comfort food for many people is Mac and Cheese.  While I'm sure we all grew up on the blue box of Kraft Macaroni and Cheese, our tastes have probably matured a bit since then.  Oh, who are we kidding?  The blue box is pretty darn good every once in awhile!  But, still nothing compared to "from scratch".

Mac and Cheese has grown up right along with us.  There is mac made with cheese I could never pronounce as a kid (and still struggle with today!).  There is mac and cheese with gourmet ingredients like lobster and truffle oil.  There is even mac and cheese that is deep fried (because well...you can deep fry everything). There's no doubt that it's a versatile dish that can go from simple and inexpensive to gourmet with a price tag to match.  And they're all equally delicious!  Some restaurants such as Keystone Bar and Grill even have an entire menu dedicated to the humble mac and cheese!

When I was pregnant with my little angel, it was the food that I craved the most.  So, I dedicate this contest to him (I believe it was a boy though we'll never know for sure) and look forward to having lots of cheesy, carby goodness to help get us all through the Winter blues.

How to Enter

How's this going to work, you ask?  It's simple and there are two great ways you can enter! 
  1. If you have a mac and cheese recipe that you love, just email it to me at christineskitchenchronicles@gmail.com.  I will accept the FIRST SEVEN (7) ENTRIES that I receive.

    You do not need to have a blog to enter nor does it have to be an original recipe.  However, I ask that you please cite the source so that due credit can be given.  It can be a classic, no frills recipe or it can be chock full of other goodies.  It can be stovetop or baked.  You submit it, I make it!
  2. Each time I share a Mac and Cheese recipe during the contest, SHARE MY POST using your favorite social media (such as your own blog, facebook, twitter, google+, pintrest, etc.) AND LEAVE A COMMENT with your email address (so I know how to contact you if you win!) and the link showing me that you shared.  You can do this once per recipe for a total of seven (7) entries.  
Sorry but open to US residents only, please.

Judging and Prizes

Over the next few months, I will make the submitted mac and cheese recipes and post both the recipe and our review of said recipe on my blog.  Friends and family take note - I will probably need your help in eating and taste testing these!  Once I am done trying all six recipes, I will pick a Mac and Cheese Champion.  You will receive your choice of ONE of the following two cookbooks: Mac & Cheese by Ellen Brown and Mac and Cheese, Please! by Laura Werlin.  The Mac and Cheese Champion gets first pick.

I'll keep a running log of all the post sharing comments and at the end of the contest, I'll pick a random winner using Random.org.  The randomly selected commenter will receive the other cookbook.

Both cookbooks are dedicated ENTIRELY to Mac and Cheese.  How's that for inspiration?  Huh?

Mac and Cheese, Please! by Laura Werlin

Thanks and looking forward to trying all of your delicious recipes!
Christine

Disclosure - This blog is a personal blog written and edited by Christine @ Christine's Kitchen Chronicles. The owner(s) of this blog was compensated with free products to provide an opinion on the products, services, websites and various other topics. Even though the owner(s) of this blog receives compensation for posts or advertisements, we always give our honest opinions, findings, beliefs, or experiences on those topics or products. The views and opinions expressed on this blog are purely the bloggers' own. Any product claim, statistic, quote or other representation about a product or service should be verified with the manufacturer, provider or party in question.

Friday, October 19, 2012

Recipe Swap: Cinnamon Sugar Baked Pumpkin Doughnuts

Who likes pumpkin?  I'm pretty sure it's everyone's favorite Fall treat!  And though Spring is my personal favorite season, there's something very charming about Fall as well.  Pumpkin, Apples, Spices, and Cider are just a few of my favorite flavors from this season.

For this edition of Blogger's Choice What's Cooking Recipe Swap, I received the blog So Tasty, So Yummy again!  Last time I got Katie's blog, I made Oven Baked Sriracha Chicken.  This time, I went seasonal and sweet...but still quite healthy!

I've only used my doughnut pan a few times and I'm realizing just now that this is actually the first baked doughnut that has made it to my blog.  Baked doughnuts rock because they're a real treat without much real guilt.  Sure they're not *exactly* the same as their fried counterpart but flavor for your calories is a nice balance.  These doughnuts were quite moist (love how pumpkin has that effect on baked goods!) and deliciously spiced.  While I enjoy cinnamon sugar dusted doughnuts, I hate the mess they make.  I always find myself eating them while standing over a sink or trash can to catch my mess!  Anyone else do this??  After I made them, I thought how wonderful they'd also be with something like a maple icing glaze or frosting.  Oh my!

One Year Ago: Coconut Basil Curry with Basil and Pecans
Three Years Ago: Christine's Fried Rice

Cinnamon Sugar Baked Pumpkin Doughnuts


Cinnamon Sugar Baked Pumpkin Doughnuts

Yields: 2 dozen mini- or 1 dozen full-sized doughnuts

Ingredients

For the Doughnuts
  • 1/2 tsp apple cider vinegar
  • 6 Tbsp milk
  • 1/2 cup fresh or canned pumpkin puree
  • 1/4 cup sugar
  • 3 Tbsp unsweetened applesauce
  • 2 Tbsp brown sugar
  • 2 Tbsp butter, melted
  • 2 tsp baking powder
  • 1/4 tsp baking powder
  • 1 tsp cinnamon
  • 1/2 tsp ginger
  • 1/4 tsp nutmeg
  • 1/2 tsp kosher salt
  • 1 1/2 cups flour
For Finishing
  • 1/2 cup powdered sugar
  • 1 tsp cinnamon
Directions
  1. Preheat oven to 350 degrees F.  Grease two mini doughnut pans or two regular sized doughnut pans using cooking spray.
  2. In a large bowl, whisk together vinegar, milk, pumpkin, sugar, applesauce, brown sugar (sift if clumpy), and melted butter.  Sift in the dry ingredients (baking powder, baking soda, spices, salt, and flours).  Mix until just combined.
  3. Spoon batter into a plastic bag and snip off the corner then pipe into the wells of the prepared doughnut pan.  Alternatively, spoon batter directly into the pan, about half full.
  4. Bake for 10-12 minutes or until they gently spring back when touched.  Cool in the pan for 10 minutes before carefully using a butter knife to remove doughnuts from the pan.
  5. Combine the powdered sugar and cinnamon in a ziplock bag.  Seal and toss to coat.  
  6. Transfer several cooled doughnuts at a time into the bag with the cinnamon sugar and shake until thoroughly coated.  Repeat with remaining doughnuts.
Source: So Tasty, So Yummy


Wednesday, October 17, 2012

Chocolate Peanut Butter Cup Cheesecake Cake

First, a HUGE thank you for everyone that came and read the story of our angel and/or lit candles on Monday.  Having nearly 700 people be touched by our story was beyond my expectations.  Your kind notes and photos validated to me that "coming out" was worth it and I read so many inspirational stories.  Thank you again for your love and support.

Back to recipe sharing.  I am SO shamefully behind on blogging again.  This has been sitting in "draft" mode for TWO MONTHS and I only know this because that's when my husband's birthday was and that was the occasion for this cake as you'll see below.


Chocolate Peanut Butter Cup Cheesecake Cake
Photo Credit: Emily H.
My husband is a peanut butter addict and every single year for his birthday, I give him several cake options to choose from.  Why I bother to include non-peanut butter options I'm never sure because inevitably, the more peanut butter in the recipe, the more likely he is to choose it!

Let's recap previous years, shall we?
  • Two Years Ago: Peanut Butter Fudge Cheesecake.  I thought this was decadent back then but in retrospect, this was quite tame!
  • One Year Ago: Peanut Butter Cup Chocolate Cheesecake.  This was basically a homemade version of his favorite Cheesecake Factory cheesecake.  It was absurd with its NINE layers of chocolate cake, cheesecake, peanut butter, caramel, ganache.  You name a rich and sinful ingredient and it was packed into this single cake.  Simply looking at it made you gain weight.
This year?  Originally after tasting last year's cake he told me that was the end-all-be-all-mother-of-all-cakes that he wanted to have each year for the rest of his life.  It was indeed a contender in this year's cake selections.  But then I think he felt bad at how labor intensive and caloric it was.  And so came this year's simplified version.  Peanut butter?  Check.  Peanut Butter Cups?  With modifications, check.  Chocolate?  Check.  Cheesecake layers (which I didn't realize was a criteria until recapping just now)?  Check.

What's laughable about this recipe was that as originally written, it "didn't have enough peanut butter".  So, I threw some peanut butter cups into the cheesecake layer and then spread straight peanut butter between the cheesecake and cake layers.  Suddenly, we were in business.

This cake had many of the same flavors as last year's cake but with much less effort.  It had peanut butter frosting instead of chocolate, which I think might have made it better for in my husband's eyes.  (Remember what I said about more peanut butter = better, right?)  It got the approval of all of our friends and the wait staff who couldn't believe it was homemade.  Win!

Here's the very happy Birthday Boy! Photo Credit: Emily H.
One Year Ago: Pan-Fried Okra
Three Years Ago: Chicken Pot Pie

Chocolate Peanut Butter Cup Cheesecake Cake
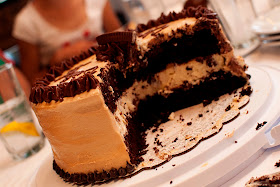
Chocolate Peanut Butter Cup Cheesecake Cake
Photo Credit: Emily H.
Ingredients

For the Cheesecake

  • 1 1/4 pounds (20 oz) cream cheese, room temperature
  • 3/4 cups sugar
  • 1/2 Tbsp vanilla extract
  • 1/4 tsp coarse salt
  • 2 large eggs
  • 1/2 cup sour cream
  • 8 peanut butter cups, roughly chopped
For the Cake:
  • Butter, for greasing the pans
  • 1 3/4 cups all-purpose flour, plus more for dusting the pans
  • 2 cups sugar
  • 3/4 cups good-quality cocoa powder
  • 2 tsp baking soda
  • 1 tsp baking powder
  • 1 tsp kosher salt
  • 1 cup buttermilk, shaken
  • 1/2 cup vegetable oil
  • 2 large eggs, room temperature
  • 1 tsp vanilla extract
  • 1 cup freshly brewed hot coffee
For the Frosting:
  • 8 oz cream cheese, softened
  • 3 cups powdered sugar
  • 3/4 tsp salt
  • 2 1/4 cups creamy peanut butter (not natural), divided
  • 1 tsp vanilla extract
  • 3/4 cup heavy cream
Directions

For the Cheesecake:
(Can be made in advance)
  1. Preheat oven to 325 degrees.  Set a kettle of water to boil.
  2. Using an electric mixer, beat cream cheese on medium speed until fluffy, scraping down the bowl as necessary.  Gradually add sugar, beating until fluffy.  Beat in vanilla extract and salt.  Beat in eggs, one at a time, scraping down the bowl after each addition.  Beat in sour cream.  Gently fold in chopped peanut butter cups.
  3. Cut parchment paper in a circle and line the bottom of a springform pan.  Wrap the bottom half of the pan in foil.  Pour in the cheesecake filling.  Place springform pan in a roasting pan.  Pour boiling water to come halfway up the sides of the springform.
  4. Bake until just set in the center, about 45 minutes.  Remove pan from water and allow to cool for 20 minutes.  Run a paring knife around the edge and let cool completely.  Cover and chill overnight.  Then, wrap in plastic wrap and freeze.
For the Cake:
  1. Preheat oven to 350 degrees.  Butter 2 9-inch round cake pans.  Line with parchment paper then butter and flour the pans.
  2. Sift together the flour, sugar, cocoa, baking soda, baking powder, and salt in the bowl of a mixer fitted with a paddle attachment.  Mix on low until combined.
  3. In another bowl, combine the buttermilk, oil, eggs, and vanilla.  
  4. With the mixer on low, slowly add the wet ingredients to the dry.  With the mixer still on low, add the coffee and stir just to combine.  Scrap the bottom of the bowl as necessary.
  5. Pour the batter into the prepared pans and bake for 35 to 40 minutes or until a cake tester comes out clean.  Cool in the pans for 30 minutes then turn them out on a cooling rack to finish cooling completely.
For the Frosting:
  1. Beat cream cheese and 1 1/2 cups peanut butter with a mixer on medium speed.    Reserve the remaining 3/4 cups peanut butter for assembly.  
  2. Add salt and then vanilla.  Alternating, add powdered sugar and heavy cream.  Use immediately or cover and refrigerate until needed.
To Assemble:
  1. Place one layer of cake on a cake stand or cardboard cake round.  
  2. Heat the remaining 3/4 cups of peanut butter in the microwave for about 30 seconds or until it gets melted and easy to spread.  Take 1/2 of the remaining peanut butter and spread it over the cake layer.
  3. Remove the cheesecake from the freezer, unwrap, and remove the metal bottom of the pan then peel off the parchment paper.  Place the cheesecake layer on top of the cake layer.  If necessary, wait approximately 10 minutes for the cheesecake to soften and trim it with a knife to ensure it is the same width as the cake layer.  Spread remaining peanut butter over the cheesecake layer.
  4. Place the top layer of the cake on top of the cheesecake.  Spread a thin layer of peanut butter frosting over the entire cake to form a crumb coat.  Be careful not to get any crumbs into your frosting bowl! 
  5. Refrigerate for 30 minutes then frost with remaining frosting.  Top with shaved chocolate, chocolate chips, peanut butter cups, or other decoration of your choosing.  Refrigerate until ready to serve.

Source: Slightly modified from Erin's Food Files as originally the Cheesecake adapted from Martha Stewart, Cake from Ina Garten "Beatty's Chocolate Cake" and Frosting from Martha Stewart

Monday, October 15, 2012

I Am The Face, I Am 1 In 4: National Pregnancy and Infant Loss Awareness Day


"A wife who loses a husband is called a widow. 
A husband who loses a wife is called a widower.
A child who loses his parents is called an orphan.
There is no word for a parent who loses a child.
That’s how awful the loss is."

 - Ronald Reagan


October 15th is National Pregnancy and Infant Loss Awareness Day.  Today I take a stance to help break the silence.  Instead of being able to share the wonderful news of Chris and my pregnancy, we've mourned in silence and with the support of a few close family and friends these past few months because I am the face of an early missed miscarriage.


On July 1, this summer began as the happiest of my life when I saw those two lines on the home pregnancy test appear and then just a short month later it ended as the worst when I saw our baby's tiny heart, which we saw flickering on the ultrasound monitor just a week prior, had stopped beating for no apparent reason.  These are key moments that have undoubtedly changed my life and view on life forever.

Pregnancy announcements on Facebook and in real life happen every day but for some reason, talking about a pregnancy loss is considered taboo.  People are starting to talk about cancer, domestic violence, suicide, and other uncomfortable topics so why is this any different?  This is not a taboo subject nor is it as rare as you'd think.  Miscarriage and Loss don't discriminate.  Pregnancy/infant loss happens every day to ALL kinds of women–young, old, black, white, thin, obese.  It happens to 2,000 US women EACH DAY or 700,000 in a year (1 in 4).

How can you help?

Please don't close your minds and hearts to those who have suffered child loss.  More often than not they may be keeping the news private because of this unfortunate taboo.  However, they're out there and I guarantee that you know at least one woman who has suffered a loss.  She may want to talk about her experience or she may not.  But the common desire whether a couple has opened up to you or not is that their baby's memory lives on.  There is no foot too small that it cannot leave an imprint on this world.  Also remember, the father and grandparents have lost, too.  Be considerate and think before you act or say things that could be considered hurtful.  A probably well-intentioned comment or picture can trigger memories and emotions that need to be masked which carries a huge emotional toll on that person. Sometimes, the simplest things you can do to help are non-verbal - A listening ear, a hug, a thought or prayer.  If you yourself have lost, know that you're not alone, too.

Another way you can help?  

I ask that you please light a candle for at least one hour on October 15th beginning at 7PM local time in remembrance of our angel, SH's angels, AP's angels, LW's angel, JK's angel, CO's angel, MF's angels, AS's angel, SF's angel, and all the other unspoken angel babies and infants taken too soon.  This will create a continuous wave of candlelight around the world for a full 24 hours.  It will allow us to remember and to start the conversation.

To read more about this day, please see Remembering our Babies, the official site for Pregnancy and Infant Loss Awareness.  Another good resource with survivor stories, badges, and status updates for both survivors and supporters if you choose to help spread the word on Facebook, Twitter, etc. is I Am The Face.  Last, I put together a list of resources and memorial items here.


Please feel free to share the memory of your angel (or someone else's angel that you know) in the comments below.

Wednesday, October 10, 2012

Toad in a Hole

Sharing of this recipe is long overdue since it was made at our Olympic themed dinner club back in October but I was waiting for the weather to turn cold and for people to start craving comfort foods again.

Why it is called "Toad in a Hole" was elusive to me but as I read about it, the best explanation that I could find was that the sausages look like little toads popping their heads/bodies out of a hole.  Perhaps with some stretch of the imagination that could be true...or perhaps the Brits were drinking a wee bit too much when they named this common British dish.

It incorporates pork sausages (aka bangers due to the popping sound that they make in the pan as they cook) in a crispy Yorkshire Pudding.  But how do you make it even better?  By wrapping the sausages in prosciutto and then topping the whole dish with deliciously rich, caramelized onion gravy.  Yikes, coronary material in the making and no wonder it tastes amazing!

I personally thought this made way too much gravy so would perhaps recommend halving the recipe for that.  Maybe you're supposed to have your Toads in a Hole swimming in gravy but I prefer just a light drizzle.

One Year Ago: Roasted Butternut Squash Soup

Toad in a Hole


Photo Credit: Emily H.

Yields: 6 servings

Ingredients

  • 4 Tbsp unsalted butter
  • 2 large yellow onions, sliced
  • 1 1/2 cups plus 1 Tbsp flour
  • 2 cups beef stock
  • 1/2 cup madeira wine
  • 1/2 tsp Worcestershire sauce
  • Kosher salt and freshly ground black pepper, to taste
  • 2 tsp dry mustard
  • 1 1/4 cups milk
  • 3 eggs, lightly beaten
  • 8 Tbsp rendered bacon fat (I didn't have enough bacon fat handy so used a combination of about 4 Tbsp bacon fat for flavor + 2 Tbsp vegetable oil + 2 Tbsp vegetable shortening)
  • 6 slices prosciutto
  • 6 large pork sausages (Bangers are best but I couldn't find them so would recommend something mild such as bratwurst)
Directions
  1. Make onion gravy: Heat butter in a 4-qt. saucepan over medium-low heat.  Add onions and cook until golden brown, about 40 minutes.  Stir in 1 Tbsp flour.  Add stock, wine, and Worcestershire.  Bring to a boil and then cook for 5 minutes.  Season with salt and pepper.  Set gravy aside.
  2. Heat oven to 425 degrees F.  Whisk remaining flour, mustard, and pepper together in a bowl.  Whisk in milk and eggs.  Let mixture rest for 15 minutes.  Pour 6 Tbsp bacon fat into a 9"x11" baking dish.  Heat in oven for 10 minutes.  (This heating of the fat in the pan is the key to getting a good puff to your pudding!)  In a 12" skillet over medium heat, heat up the remaining bacon fat.  Wrap 1 slice prosciutto around each sausage then place in skillet and brown all over, about 8 minutes.  Pour batter into the hot baking dish then arrange the wrapped sausages in the dish.  Bake until golden, about 25-30 minutes.  Serve with onion gravy.
Source: Saveur

Monday, October 8, 2012

Chicken Marsala Risotto

Hello, my name is Christine and I'm a food alcoholic.  I said it in my Southern Comfort (Drunken) Apple Pie post yesterday and I'll say it again.  I love booze in my food!

I also told my facebook fans on Friday when I made it that this meal that I'm about to share was easily one of the best I'd had in a long time.  And surprise surprise...it has booze in it!  I promised Jené and Whitney that I'd post it today so here I am taking their request.

Risotto is kind of a pain to make because you have to stir it constantly but the results always seem worth it to me.  My only other complaint is that it's usually doused in cream, cheese, and butter.  This recipe is different.  It carries nearly all of its fine flavor in the Marsala wine and uses only one tablespoon of butter (if you grill your chicken like I did), 1/4 cup cheese, and zero cream!  I told you alcohol makes food pack a flavor punch ;).

Nicole of Prevention RD says it yields 3 servings (4 if you serve with a salad and stretch it) but I found that it easily makes 4 servings all on its own.  Especially if you cut up your chicken breast into slices.  Since the meat is spread out, it tricks your mind into thinking you're eating more of it than you really are allowing you to stretch out the servings.  It's kind of similar to the trick of serving your meals on smaller plates.

Three Years Ago: (Sugary Sweet) Chili - My mother-in-law's recipe and how appropriate timing since this particular recipe won Nicole's 2nd Annual Chili Contest last year!  Check out her blog as she goes through eight chili entries in the 3rd annual contest.  Yep, I entered another recipe this year, too.

Chicken Marsala Risotto


Ingredients
  • 4 cups low-sodium chicken broth
  • 1 Tbsp unsalted butter*
  • 1 medium shallot, minced
  • 2 cloves garlic, minced
  • 1 Tbsp tomato paste
  • 1 cup Arborio rice
  • 1 cup Marsala wine, divided
  • 3 (4 oz) boneless, skinless chicken breasts
  • 2 cups mushrooms, sliced
  • 1/4 tsp kosher salt and fresh ground pepper
  • 1/4 cup (1 oz) Parmesan cheese, grated
  • 2 Tbsp fresh basil, cut chiffonade
*Note: I had my husband grill our chicken because it was still nice out but if you would like to prepare everything indoors and in a skillet, you'll want an additional 1 Tbsp of butter to cook the chicken.  The skillet method is also recommended for those that are cooking alone since you really can't leave risotto unattended!

Directions
  1. Heat the chicken broth in a medium saucepan until it simmers.  
  2. Melt 1 Tablespoon of butter in a large heavy-bottomed skillet or dutch oven over medium heat.  Add shallots and cook until soft, 2-3 minutes.  Add garlic and tomato paste and cook until fragrant, about 1 minute longer.  Add the Arborio rice and toast until opaque around the edges, 2-3 minutes.  Add 3/4 cup of Marsala wine and cook, stirring often, until absorbed, about 2-3 minutes.
  3. Stir in 1 cup of chicken broth and stir occasionally until almost absorbed, 5-8 minutes.  Working 1 ladle of broth at a time, continue to add broth and stirring often so that the rice doesn't stick to the bottom of the pan.  Add another ladle when the broth is almost completely absorbed.  After you have been cooking the risotto for 10 minutes, stir in the mushrooms.  At this time, have your significant other or cooking partner in crime preheat your grill to medium-high. Continue cooking the risotto, stirring constantly, until all of the broth is absorbed for a total of 20-25 minutes.
  4. Meanwhile, pound chicken breasts to desired thickness, about 1/2 inch.  Season with salt and pepper.
    To Grill: Grill until cooked through, about 12-15 minutes or until thermometer inserted into center of the meat registers 170 degrees. Remove to a plate and cover with foil until ready to serve.
    To Cook in Skillet: Heat additional Tablespoon of butter in a large skillet.  Pan fry the chicken until lightly browned on each side, about 3-4 minutes per side. Remove to a plate and cover with foil until ready to serve.
  5. Remove risotto from heat and stir in remaining 1/4 cup of Marsala wine, Parmesan cheese, and basil.  Cut chicken breasts into slices and top each risotto portion with the slices or if desired, serve topped with whole chicken breasts.  Serve immediately.
Source: Slightly adapted from Prevention RD

 
This recipe was shared on This Week's Cravings.  The hostess for this linky arty are: Tina from MOMS CRAZY COOKINGNicole from The Daily Dish and Kristi from Veggie Converter

Sunday, October 7, 2012

CCC: Southern Comfort (Drunken) Caramel Apple Pie

It's time for another Mom's Crazy Cooking Challenge and the theme is Apple Pie.  Each month participating bloggers go off and make something related to that theme.  Then on the 7th of each month everyone reveals their challenge recipe and the blog hop begins!

Though I may have used Granny Smith Apples in this pie but believe me when I say that this is NOT your Granny's apple pie recipe.  It's sweet like apple pie but with a bit of a naughty side.  The filling is rich with apples and caramel but that's not all, it's then made drunken with a good hit of Southern Comfort liqueur.  And while you're at it, why stop there?  In my homemade pie crusts, I also add a bit of vodka to make it oh-so-flaky (the theory is that the alcohol bakes off leaving behind pockets of airy goodness).

Now, I actually don't drink except on special occasions.  But, you might think that I'm a bit alcoholic...at least where cooking is concerned.  Penne a la Vodka?  Yes, please.  Brat Burgers with Drunken Onions?  Uh huh.  Stuffed Chicken Marsala and Chicken Marsala Risotto (to be posted Monday!)?  You betcha.  Adding a bit of red wine to my Minestrone Soup?  Flavor BAM!

This apple pie did not disappoint and if it weren't filled with butter and sugar, I'd be tempted to eat the whole pie myself.  It has all of my favorite things: a flaky, buttery crust; loads of tart apples...sweetened with (drunken) caramel...swoon!; and then a crumbly cinnamon sugar streussel topping studded with nuts.  The original recipe calls for toasting the nuts but I'm lazy and skip this...besides I think they toast just fine as they bake regularly with the rest of the pie.  Overall, this pie takes some effort but is totally worth it.

Southern Comfort (Drunken) Caramel Apple Pie

Regular apple pie just won't be the same any more...

One Year Ago: Brown Sugar Spice Cutout Cookies with Maple Icing

Photobucket

Past and Upcoming Challenges:


Southern Comfort (Drunken) Caramel Apple Pie


Yields: 8-10 servings

Ingredients

For the Crust
  • 2 cups all-purpose flour
  • 1/2 tsp salt
  • 2 Tbsp sugar
  • 2/3 cup (11 Tbsp) chilled unsalted butter, cut into small pieces
  • 1 Tbsp chilled vodka
  • 3-4 Tbsp ice water

For the Topping
  • 1/2 cup pecans, coarsely chopped
  • 1/3 cup sugar
  • 3 Tbsp dark brown sugar, packed
  • 1/2 tsp ground cinnamon
  • 1/4 tsp salt
  • 1/3 cup all-purpose flour
  • 1/3 cup (5 1/3 Tbsp) chilled unsalted butter, cut into small pieces

For the Filling
  • 5-6 medium-sized tart baking apples 
  • 1/2 cup (1 stick) unsalted butter
  • 3 Tbsp ground cinnamon
  • 1 cup sugar
  • 3/4 cup Southern Comfort liqueur
  • 1/2 cup heavy cream

Directions
  1. To Make the Crust: Using a food processor, pulse to combine the flour, salt and sugar. Add butter; pulse until the mixture looks crumbly. Add vodka and 3 tablespoons ice water, and pulse until the dough begins to form a ball. If it doesn’t come together, add the additional 1 tablespoon water, and pulse. Gently mold the dough into a disk,; wrap tightly in plastic wrap. Refrigerate for at least 1 hour.
  2. Wipe out the bowl of your food processor with a paper towel to get ready to make the topping.
  3. To Make the Topping: In a food processor, process both sugars, the cinnamon, salt and flour for about 1 minute. Add butter; pulse 10 to 15 times, until the mixture is crumbly. Stir in the pecan pieces. Refrigerate the topping, covered, in a a medium bowl until ready to use.
  4. Transfer the unwrapped pie dough to a lightly floured flat surface. Roll it into a 1/8-inch-thick circle large enough to cover the bottom and sides of a 9-inch deep-dish pie plate. To keep the dough from sticking, gently pick it up every once in a while and rotate it in place, adding more flour underneath if necessary.
  5. Wrap the dough lightly over the rolling pin, and set it in the ungreased pie plate. Press it into place, and crimp the outside edges with your finger or a fork.
  6. To Make the Filling: Preheat oven to 375 degrees F and place a pan in the lower rack to catch any pie filling overflow (Trust me, you'll thank me for this.). Peel, core and cut the apples into 1/4-inch-thick slices. Melt the butter in a large skillet over medium-high heat. When the butter starts to foam, add the apples and sauté for 5 to 8 minutes.
  7. Meanwhile, in a small bowl, stir together cinnamon and sugar. Sprinkle it on the apples, and reduce the heat under the skillet to medium-low. Simmer the apples for about 1 minute.
  8. Using a slotted spoon, transfer the apples from the skillet to a large baking sheet, and arrange them in a single layer. (If you heap them in a pile, the hot apples will steam and get soggy.)
  9. Pour the Southern Comfort into the butter-sugar mixture in the skillet. Simmer the mixture over medium heat at least 5 minutes, until the alcohol burns off. Add the cream, and continue cooking about 5 to 10 minutes, until the mixture is thick as pourable caramel. Return the apples to the skillet.
  10. Pour the apple filling into the unbaked pie crust, and sprinkle the topping evenly over the apples. Bake for 50 to 60 minutes, until the filling is bubbling and the topping is brown. Serve the pie warm or at room temperature with garnishes of your choice such as  ice cream, whipped cream or caramel sauce.
Source: Barely modified from Erza Pound Cake as originally from Rebecca Rather's The Pastry Queen


Saturday, October 6, 2012

One Lovely Blog Award Nominations

Remember Angelina from Whisks and Ruffles?  Well I'm honored to have received this One Lovely Blog Award from her and will proudly display it in my "virtual trophy case".


I've been doing this blogging thing for a really long time now but it's only recently that I really started investing a lot of time and energy into it.  Either way, it's nice to receive a little recognition sometimes :).  And so now,  I'm sharing the love (and following the rules of the award hehe)!

Award Criteria

To receive this award, the blogger must share the following with their readers:
  1. Thank the person who honored them with this award and post their links;
  2. Nominate 15 other blogs for this honor; and
  3. Tell readers seven things about themselves.

The Blogs I'd Like to Nominate Are (In alphabetical order because I just went through my extensive blog list in Google Reader!)...

  1. Apple a Day
  2. Beantown Baker
  3. Coffee and Cannolis
  4. Confections of a Foodie Bride
  5. Delicious Melicious
  6. Kayotic Kitchen
  7. Macaroni and Cheesecake
  8. Mother Thyme
  9. Pink Parsley
  10. Prevention RD
  11. Steak N Potatoes Kinda Gurl
  12. That Skinny Chick Can Bake
  13. The Teenage Taste
  14. The Way the Cookie Crumbles
  15. What's Cookin' Chicago

Seven Things About Me...

  1. If I could only eat ONE thing for the rest of my life, hands down it would be Skyline Chili 3-ways.  No, this is not something dirty nor perverted.  It's FOOD, people!  I'm a proud Cincinnatian through and through and jokingly...no seriously...say that this is one reason I could never move away from home.  It's a hometown favorite and so unique.  Though they sell cans and frozen versions and I've also tried to re-create this unique chili at home, it's really just not the same as stopping by your local chili parlor.

  2. I have traveled to six of the seven continents.  Only Africa is left outstanding and that would have been completed too had the Egyptians not rioted last year resulting in cancellation of our port-of-call.  According to my Where I've Been app, I've seen 28 countries or 12% of the world (blue) and so there's still lots left on my wishlist (green)!

  3. Speaking of travel, I'm addicted to cruising.  Specifically, I'm very loyal to Royal (Caribbean) where I've spent 45 nights of my life on one of their cruise ships.  That's not counting the additional nights spent cruising other lines - 7 nights when we once strayed to Norwegian Cruise Line and 10 nights aboard our Antarctic expedition ship (Clipper Adventurer with Quark) since that's the only way you can really see and experience the continent.  That's 62 days or OVER TWO MONTHS in total!  Yep, like I said.  Addicted.

    Here I am in my complementary bathrobe and sporting my cool pin having made PLATINUM status, baby!
  4. I'm a nationally-recognized award winning artist.  In high school, my art teacher submitted a mixed media piece of mine to the Scholastic Art and Writing Competition where it won a National Silver Award.  Also, like so many other Asian children, I played the piano and in elementary school, one of my compositions called "The Train" also won awards.  My artistic side is really in a past life as I joke that going into engineering school killed all creativity.  So now, I like to pretend I'm an artist when I take short painting classes such as this...

    Me with my painting of Toby that I created!
  5. I can play the piano upside down.  Okay, so it's only one or two songs but it got your attention, didn't it?  I saw it on Nickelodeon as a kid and decided to try it once.  It's now my stupid human trick :P.
  6. I've donated my hair to Pantene Beautiful Lengths 3 times.  Did you know it takes at least 6 ponytails to create a single wig?  And unlike Locks of Love, you only need 8 inches of hair to make a donation and all of it goes to the patients that really need it.

    Donated 12-inches of hair this time!
  7. One of my bucket list aspirations is to be issued as US Patent.  At my workplace, you get a beautiful plaque that shows the first page of your patent as recognition.  I'd love to invent something one day...
Thanks for reading and thanks again Angelina for this award!
Christine

One Year Ago: Pumpkin Pecan Loaf

Friday, October 5, 2012

Recipe Swap: Breakfast Skillet

I don't know if you've been following me on facebook and/or twitter or not lately but if you have, you'll notice that I'm border-line obsessed with my "new" (ie: hand-me-down inheritance) iPhone4 from my husband and posting instagram photos of my food.  Seriously I'm amazed at how this tiny little phone can take such fancy looking pictures!  I'll have to do a before and after on here sometime so you can see what I mean.

Today's post is a What's Cooking Recipe Swap and the theme is breakfast.  Long time followers of my blog would know that this is a favorite theme of mine.  In fact, "brinner" aka breakfast for dinner was one of my chosen Dinner Club themes in the past.  For this swap, I submitted the super decadent Chocolate Chip Cookie Dough Stuffed Cinnamon Rolls.  So, it was fitting that I received something equally sweet to start my day from Lynsey of Lynsey Lou's.

The recipe is called a "breakfast skillet" but really, it's like dessert for breakfast.  My husband smelled it cooking and said "Mmm that smells good!  It smells sweet!  Are you making dessert for dinner?!".  Truth be told it could have passed for dessert but was in fact our dinner.  We convinced ourselves that the sprinkling of apples and craisins (very Fall!) in the dish made it healthy and justified getting seconds...and thirds.  HA!  It was like cinnamon rolls with a fraction of the effort + FRUIT for added nutrition.  Win.

I should also probably call mine a Breakfast Dutch Oven because that's what I ended up making mine in.  I don't actually own a cast iron skillet so this was the closest cooking vessel that I had.  It worked out fine but a cast iron skillet is now on the wishlist.  I just love how nice they look in food photos :).

Thank you Lynsey for sharing this winning recipe with us!

One Year Ago: Spaghetti Pie

Breakfast Skillet


Ingredients

For the streusel topping
  • 1/4 cup sugar
  • 4 Tbsp unsalted butter
  • 1/2 to 1 Tbsp ground cinnamon
For the skillet cake
  • 12 oz can of buttermilk biscuits
  • 2 Tbsp butter
  • 2 Tbsp brown sugar
  • 1 cup fruit of your choice, fresh, dried, or frozen (I used craisins)
  • 1 small apple, thinly sliced
Directions
  1. Preheat oven to 350 degrees.
  2. In a small bowl, prepare the streusel topping by combining 4 tablespoons butter, sugar, and cinnamon by mashing together with a fork until well mixed.
  3. Place skillet over low-medium heat.  Add 2 tablespoons butter and brown sugar and stir until butter is melted and sugar is combined.  Remove skillet from heat.
  4. Line the bottom of the skillet with 1/4 of the apple slices.  Next, place the biscuits in a single layer on the pan.  Layer on 3/4 of the remaining apple slices and sprinkle 3/4 of your selected fruit over top of the biscuits.  Sprinkle the streusel topping over the fruit and biscuits.  Layer the remaining fruit over the streusel topping.
  5. Place prepared skillet into the oven and bake for 30-45 minutes, until the biscuits are cooked through and lightly browned and the streusel topping has melted.
 Source: As seen on and adapted by Lynsey Lou's from Paula Deen


Wednesday, October 3, 2012

California Roll Lettuce Roll-Ups

I love it when the stars seem to align between what I receive my CSA basket for the week and the things I have bookmarked to make.  My only regret is having had to wait this long to share this recipe with you since I had been traveling so much recently (food photo adventures have been shared on facebook!).  But, I'll call it a nod to my recent trip to Japan by sharing it now :).

What I loved about this recipe was how quickly you could put it together and how healthy it was.  If you love the flavor of California Rolls but don't want the hassle of creating actual sushi rolls, this is the way to go.  I could even see adding some chopped nori (seaweed sheets) to really get the full flavor experience.  And why stop there?  You could adapt this recipe as a vehicle to contain the flavors of any of your favorite sushi rolls!

One Year Ago: Homemade Girl Scout Samoa Cookies and Chicken, Blueberry, and Summer Squash Salad

California Roll Lettuce Roll-Ups


Yields: 4 servings (3 wraps each)

Ingredients

  • 1 cup dry rice
  • 2 Tbsp seasoned rice vinegar
  • 1 head (~12 leaves) Boston lettuce, leaves removed and washed
  • 1/2 English cucumber, seeded and cut into 1-inch matchsticks
  • 1/2 cup (about 2) carrots, shredded or cut into 1-inch matchsticks
  • 5 oz surimi (imitation crab meat), cut into 1-inch matchsticks
  • 1/2 avocado, diced
  • 3 Tbsp pickled ginger, chopped (optional)
  • 2 Tbsp low-sodium soy sauce
Directions
  1. Cook rice according to package directions.  Once cooked, stir in the vinegar and then set aside.
  2. Assemble the lettuce roll-ups by layering several tablespoons of rice in each lettuce leaf.  Then add 2-3 pieces of cucumber, carrot, crab, and avocado.  Top with pickled ginger if desired and finish with a dash of soy sauce.

Source: Adapted by and as seen on PreventionRD from Good Housekeeping