Below are the basic ingredients for sushi. You can then buy fillings of your choice to make various delicious rolls. This was my first attempt at making rolls so they're not the prettiest but they held together for the most part and were very tasty :).
As I wasn't sure how adventures our group of
Dinner Clubbers would be, I opted for all cooked (and inside out so you can't see the nori (seaweed) - out of sight, out of mind right?) maki rolls. For my rolls, I made the standard California Roll and then did some Spicy Crab Rolls and just a few Shrimp Rolls. If you do decide to go raw, make sure you're buying sushi grade fish!
I highly suggest
Sushi Day for inspiration and recipes...there's even some rolls with BACON! (
Bacon Crunchy Shrimp Roll and
Kristen Maki).
Pioneer Woman has an awesome tutorial with really good pictures (very helpful if you're a visual person like I am!) on how to create your rolls. There's also a few good recipes on there as well.
Mmmm...good thing Emily took pictures of my rolls because I forgot to!
Sushi Rice
Printer-Friendly Version
Prep Time: 30 minutes
Cook Time: 20 minutes
Yields: 8 cups cooked rice or about 16 rolls
Ingredients
- 4 cups Short Grain/sushi Rice, uncooked
- 1 cup Rice Wine Vinegar
- ½ cups Sugar
- ¼ cups Sake Or Mirin (a Japanese Rice Wine)
Note: Used seasoned rice wine vinegar instead of sushi su (vinegar + sugar + sake).
Instructions
“Rice Prep”
- Use short or medium-grain rice. It’s more starchy and round than the long-grain variety, which just won’t hold together well enough to support ingredients in sushi. Many stores now sell specifically-labeled “sushi rice”.
- Before you cook it, wash/rinse the rice until the water runs totally clear—about five or six times. If you don’t thoroughly rinse the rice, it’ll end up in a big, sticky ball. There’s enough internal starch in the rice for it to sufficiently hold together for sushi, so get all the stuff on the outside off by rinsing well.
- Use a rice cooker/steamer. Rice made on the stovetop will not work for sushi; it won’t be the right consistency. Rice cookers are widely available for as low as $12.
- Add the rinsed rice to the rice cooker with equal parts water, and follow the directions for the rice cooker. After it’s done, transfer the cooked rice to a large mixing bowl.
You’ll need 1 part sushi su for every 4 parts rice.
Sushi Su/Sushi Rice:
- Heat vinegar, sugar, and sake or mirin in a saucepan just to dissolve and combine. Allow to cool to room temperature. (Note: skipped this step as I just subbed pre-made seasoned rice wine vinegar)
- Cook rice according to rice cooker directions. Transfer to large mixing bowl.
- Pour su (vinegar mixture) over the rice, gently folding to incorporate.
- Let rice stand for 10 minutes, then fold again.
Rice should be shiny, not mushy and have a slightly tart/sweet taste. Cover with a warm, wet towel and keep warm.
Source: Cody the Sushi Chef as seen on
Pioneer Woman
Spicy Mayonnaise
Printer-Friendly Version
Ingredients
- ½ cup (low-fat) mayonnaise
- 2 Tbsp Sriracha hot sauce
- ¼ tsp roasted sesame oil
Directions
- Whisk the ingredients together until well blended.
- Store in fridge until ready to use. Use in rolls or as a dipping/drizzled sauce.
Source:
Group Recipes
California Rolls
Printer-Friendly Version
Ingredients and Supplies
- 1 piece Makisu (bamboo Rolling Mat)
- Dark Green Nori (dried Seaweed)
- Sushi Rice (recipe above)
- Imitation Crab (round leg style)
- Avocado, Thinly Sliced
- Cucumber (Japanese, If Available), Thinly Sliced
- Toasted Sesame Seeds
- Soy sauce, for dipping
- Wasabi, if desired (used prepared Wasabi in a tube that I bought at Kroger)
- Ginger, if desired
Instructions
- First, in order to keep your rice from sticking to the Makisu and making a terrible mess, carefully wrap the Makisu in plastic cling wrap.
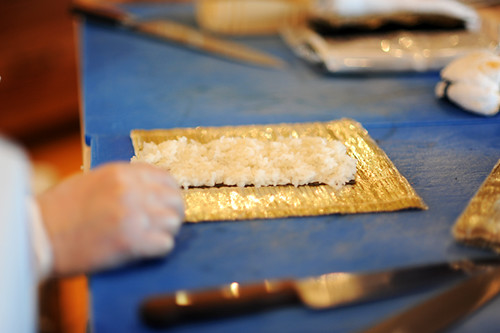
- To begin, fold the pieces of nori in half to split them. Nori is very delicate, so as soon as you press along the seam, it easily breaks in two. Next, lay the half-sheets of nori on the work surface and grab a handful (about a ½ cup) of sushi rice and cover one side of a half-sheet of nori with it. To do so, first set the rice on the end of the nori sheet closest to you. Then, working with your fingertips and/or knuckles, gently spread the rice over the surface of the nori.
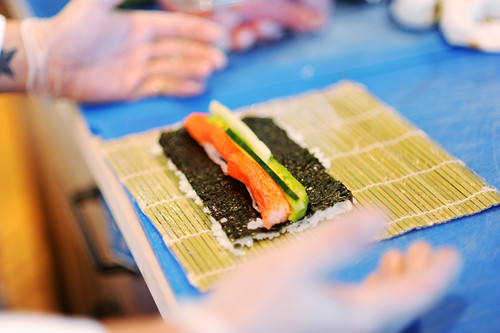
- On California Rolls, the rice is typically on the outside – not the inside – so to begin, quickly flip the rice-coated sheet of nori so that the rice side is down. Carefully position it horizontally so it will roll lengthwise. Next, place a single row of the crab across the middle of the nori. Next, place slices of avocado end to end right against the crab. It’s best to use an avocado that’s ripe but still quite firm. Lastly, lay the very thin (slightly thicker than a matchstick) cucumber slices end-to-end right alongside the crab and avocado.
- To roll the sushi, carefully lift the edge of the mat closest to you, begin rolling the mat away from you, pressing it lightly to keep it firm. At this point, the end of the roll has been rolled upward, and your very light pressure is ensuring that they roll will remain nice and tight. Next, lift up the end of the rolling mat and pull it away from you, allowing the roll to roll the rest of the mat. Then carefully remove the roll from the mat and place it on a cutting board. Lay the mat over the top of the roll and exert gentle pressure once more to make sure it’s all secure.
- Next, hold the roll on the mat and sprinkle the top with toasted sesame seeds. Slice using a very sharp knife, first running the knife through a damp dishtowel with the blade facing away from you. Begin by slicing the roll exactly in half. Then set the two halves side-by-side to slice into individual pieces. This ensures that each piece will be a uniform size.
- Wrap in plastic cling and store in refrigerator until ready to serve. Serve with soy sauce, wasabi, and pickled ginger, if desired.
Source:
Pioneer Woman
For the Spicy Crab Rolls I just shredded some imitation crab and then mixed with the spicy mayonnaise. Added some avocado and cucumber. For the Shrimp Rolls I used cocktail shrimp (cut in half lengthwise), a dab of spicy mayo, carrots, and avocado.