Thursday, March 31, 2011

2nd Blogiversary Giveaway: Autographed PW Cookbook!

Happy 2nd Blogiversary to me!  Well...okay...it's not quite my 2nd blogiversary quite yet.  But, I wanted to get this contest out there so that I can announce the winner on my 2nd blogiversary.  That way, we can celebrate together!  Mmm...okay...so the other real reason I'm doing it this way is because if I waited much longer, you'd have to wait until May when I got back from vacation to get your prize.  And that would stink.

This is my first blog giveaway so please bare with me as I learn my way through things!  Also, feel free to share your giveaway tips with me.  This includes what you'd like to see in future giveaways (provided this works out well).

Since I'm a little blog with a not so big readership I don't have sponsors like Ree the Pioneer Woman or even some of the bigger Nestie bloggers.  Heck, at this point in time I'm generating zero revenue through ads (such as Google or Food Buzz) so this blog is a pure labor of love and wanting to share my experiences with the world in hopes of being an inspiration.  Thus, this gift is coming out of my own pocketbook and given to you from the bottom of my heart to say thanks for reading :).

Speaking of the Pioneer Woman, she was the inspiration for this giveaway!  Ree came to Joseph Beth Booksellers in Cincinnati in February.  A girl on the Cincinnati Nest board posted an FYI and I rounded up my friend Emily to go with me to the Black Heels to Tractor Wheels book signing.  We got our line tickets about a month in advance so we were in the A Group for signing.  AWESOME because this meant we were one of the first 25 people to meet Ree that night!


Ree was very comical and cute as a doll in real life.  She kept saying how much she HATED speaking in front of crowds and was joking about how she was sweating profusely in her armpits the whole time so there would be no hugging during the meeting part of the evening.  She spoke to the (large!) group for about 30 minutes and took some Q&A before breaking to do the signing.  When it was our turn to meet Ree and have our books signed, I gave her a can of Skyline Chili (to share my favorite local food AND hopefully give her something to remember me by!) along with a handwritten note about my favorite recipes from her book, how she was a inspiration to me and included my blog address.  She was so sweet and asked all about my blog.  She even said maybe she'd visit sometime.  (Though, I'm not holding my breath!)

She graciously signed three of my books, including one for you!  This is an exclusive leather-bound edition of her best selling cookbook, Pioneer Woman Cooks.

 
Ree has autographed this book just for you, my special Christine's Kitchen Chronicles Readers!  (Wow that's a mouthful...I really need a pithier name...any suggestions?!)


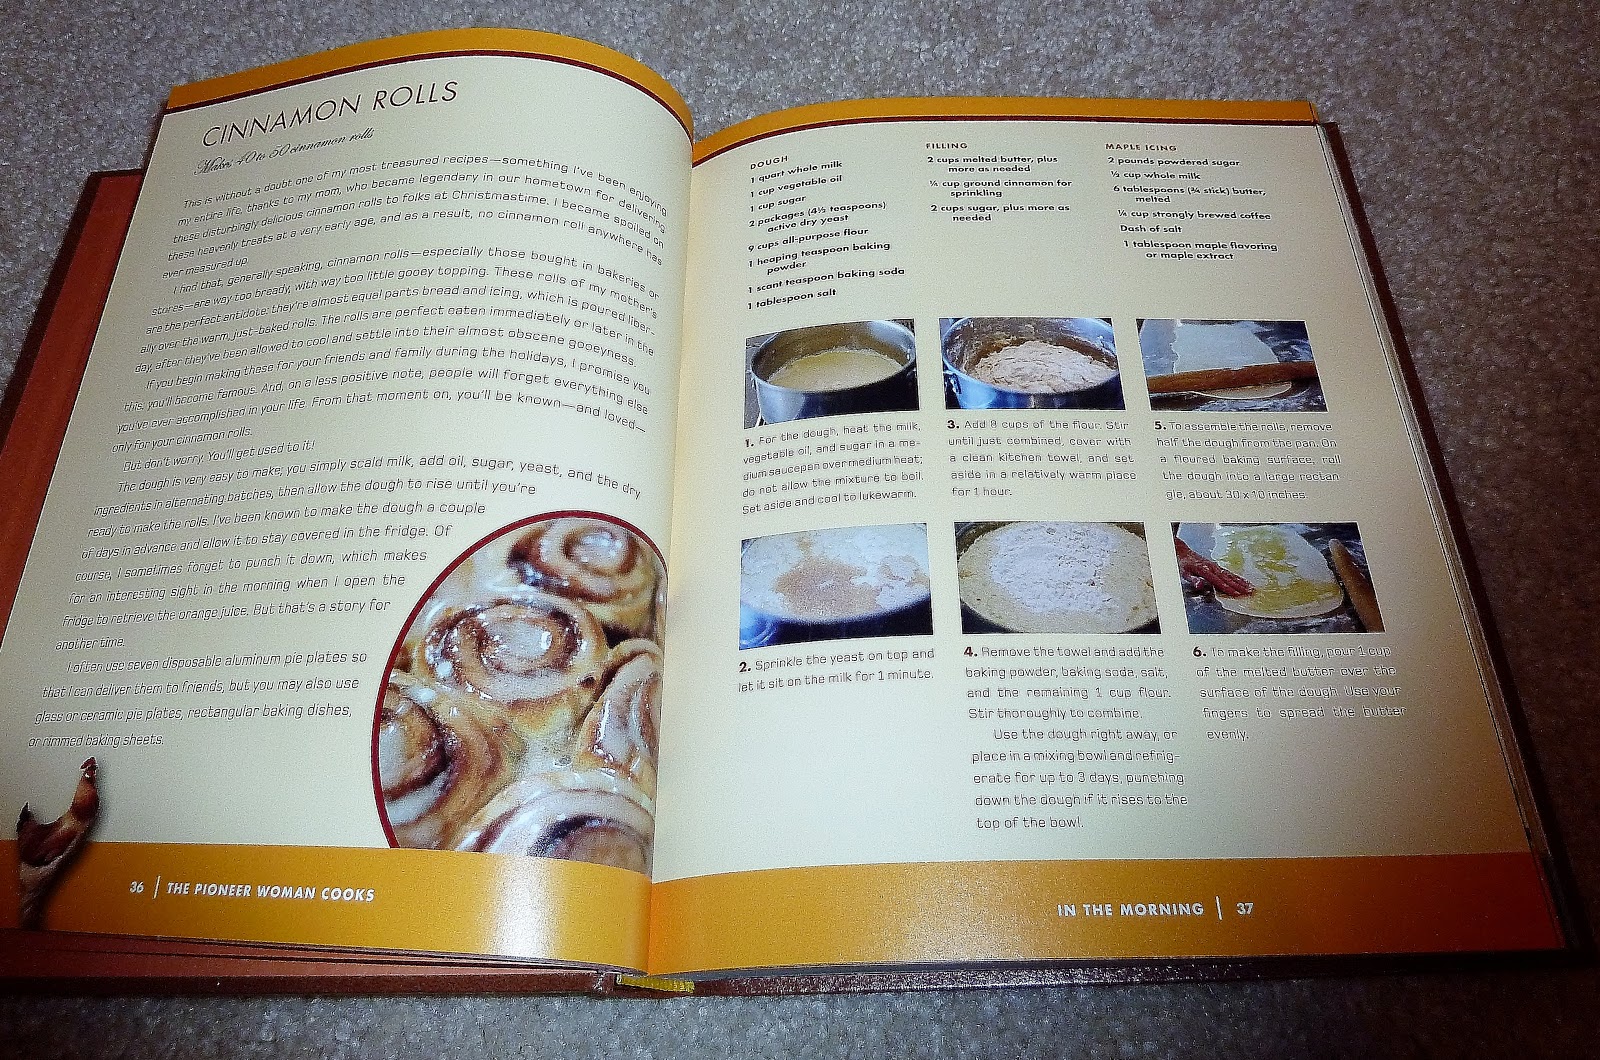
And just for a peek inside, here's one of my favorite recipes from the book.  These cinnamon rolls are to die for!  As Ree is always saying in her blog, don't worry about the amount of butter ;).  It may not be the prettiest example but each recipe has step-by-step photo instructions so it's great for the novice and visual cooks.  Interspersed throughout the book are also pictures and stories about her life on the ranch.


So you might be asking yourself, "How do I win myself this fabulous AUTOGRAPHED leather-bound special edition copy of the Best Seller book Pioneer Woman Cooks???".  My friends, keep on reading...and thank you again for your support!

How to Enter

To enter to win an AUTOGRAPHED copy of the Pioneer Woman Cooks, just answer the following question in the comments section of this post:

“Who inspires you to cook?”

Is it The Pioneer Woman?  Your mom or grandmother?  Or...maybe it's ME??  (Okay, seriously folks, if it's me, I'm very flattered but you won't increase your odds of winning by saying this haha!)

You can receive up to three additional entries to win by doing the following:
  1. Add me to your Google Reader, Facebook (Christine's Kitchen Chronicles) and/or Twitter (ChrissesKitchen).  Come back and let me know you've subscribed to any (or all) of these in an additional comment to score an extra entry.  (The additional comment part is really important!).  If you're already subscribed, let me know too so my loyal readers get credit!...I know there's at least 60 of you ;).
  2. Use the Share It feature on the right menu to share on Facebook.  Tell your friends "I entered to win an autographed copy of Pioneer Woman Cooks at @Christine's Kitchen Chronicles!  Click the link below to enter, too."  Come back and let me know you've shared in an additional comment.  (Again, commenting is important...I'm not a mind reader, folks!)
  3. Use the Share It feature on the right menu to share on Twitter.  Tweet the following about the giveaway: “RT @ChrissesKitchen: Cookbook Giveaway! Enter to win an autographed copy of Pioneer Woman Cooks: http://tinyurl.com/4hncgtn”.  Come back and let me know you've shared in an additional comment.
Deadline: Friday, April 8, 2011 at 11:59pm EST.

Eligibility and Winner: Sorry, open only to those in the Contiguous 48 United States (or shipping just might cost a fortune...).  The winner will be chosen at random using random.org and announced in a blog post by 12:00PM (noon) EST on Saturday, April 9, 2011.  To claim the prize, the winner must email me at christineskitchenchronicles@gmail.com.  If the winner does not respond within 24 hours of being announced, another winner will be selected.

Thanks for reading (and tell all your friends)!
Christine

Wednesday, March 30, 2011

Mini Whole Wheat Bagels

I have a new-found respect for bakers.  As Belle from Beauty and the Beast sang, "there goes the baker with his tray like always.  The same old bread and rolls to sell."  (yes, I'm a huge Disney nerd...I'm pretty sure I can sing every song from this and many other movies!)  Yeah you know, the kind of baker that wakes up in the wee hours of the morning to bake artisan breads so you can eat them fresh for breakfast?  Bless them.

I'm fortunate in that I've never had an issue with making yeasted breads.  This wasn't hard either but boy was it very time consuming!  At least most of the time is latent.  It requires planning the night before so that you can get the pre-doughs kneaded.  I'm not positive but I'm pretty sure this step is what allows the gluten in the wheat to be broken down some and that's what makes this taste like a refined white bagel yet still with the nutrition of whole wheat.  So smart!  Then, if you're hoping to serve it for breakfast, you best get up at the butt-crack-of-dawn to finish combining the pre-doughs (yeah, this was a THICK dough...I seriously thought my Kitchen Aid was going to die at one point from overworking so I shut it off!) and then shaping the bagels for rising.  But wait!  You're not done yet!  Once your little bagels are all puffy and cute (mine got so puffy they nearly lost their holes!), you have to boil them in baking soda water to get that chewy texture AND THEN bake them to get the characteristic crunch.  After all of that, you forget that carbs are bad for you and feast!  I'll say it once and I'll say it again, I LOVE carbs.  Oh heck...they're mini-sized AND whole wheat.  Go ahead and eat a couple.

Sooooo good!  Worth the effort when you want something a little extra special :).  If you happen to have leftovers and want to try something different than just cream cheese, try using the bagels for sandwiches or top them with tomato sauce, cheese, and your favorite toppings for a copy-cat Bagel Bite Pizza.  The latter is what I ended up doing for the Super Bowl and they were gone in a hurry!

Check another item off the 23 Things in 2011 List...woo hoo!  I can't wait to try other varieties of bagels.  My favorite at Panera is the Asiago Cheese Bagel with the Sun-dried Tomato Cream Cheese.  Who has a copy-cat recipe for that??

One Year Ago: Carrot Cake

Mini Whole Wheat Bagels

Mini Whole Wheat Bagels

Yields: 8 large or 12 mini bagels

Ingredients

Pre-dough 1:
  • 8 ounces whole wheat flour
  • 1/4 tsp instant yeast
  • 6 ounces (3/4 cup) water
Pre-dough 2:
  • 2 Tbsp barley malt syrup (or molasses)
  • 5 ounces water
  • 8 ounces whole wheat flour
  • 1/2 tsp salt
Final dough:
  • Both pre-doughs
  • 1 Tbsp water
  • 2 tsp yeast
  • 3/4 tsp salt
  • 7 Tbsp flour, plus more if necessary
  • 1 Tbsp baking soda (for boiling)
Directions
  1. In the bowl of a stand mixer fitted with the dough hook, mix all of the ingredients in Pre-dough 1 on medium-low speed until combined. Set aside for 5 minutes. Meanwhile, in a 1-cup measuring cup, stir together the barley malt syrup and the 5 ounces of water in Pre-dough 2. Set aside, stirring occasionally, until the barley malt syrup dissolves into the water. Return to Pre-dough 1 and knead on low speed for 1 minute. Transfer to a small bowl and cover with plastic wrap or a damp kitchen towel. Refrigerate overnight. Add the flour and salt for Pre-dough 2 to the empty mixer bowl; with the mixer on low speed, pour in the water-syrup mixture. Mix on medium-low just until combined. Cover the mixer bowl with plastic wrap or a damp kitchen towel and set aside at room temperature for at least 8 hours or overnight.
  2. The following day, transfer the refrigerated Pre-dough 1 to room temperature for a couple hours to warm slightly. When you’re ready to make the final dough, stir together the 1 tablespoon water and the yeast. In the bowl of a stand mixer fitted with the dough hook, mix both pre-doughs, the water and yeast, and the salt on low speed until combined. While the mixer is running, add in the flour, 1 tablespoon at a time, until it’s fully absorbed by the dough. Knead on low speed for 5-6 minutes, adding more flour or water if necessary to form a smooth, firm dough. It shouldn’t be sticky.
  3. Let the dough rise at room temperature until it increases to about 1 1/2 times its original size, 1-2 hours.
  4. Divide the dough into 8-12 pieces. Shape each piece into a smooth ball, then roll each piece into a rope about 3/4-inch thick (slightly thicker for larger bagels). Bring the ends of the rope together and roll them by placing your fingers inside the hole and gently rolling against a flat surface to seal. Set aside for about 20 minutes.
  5. Meanwhile, preheat the oven to 500 degrees, line a baking sheet with parchment paper or a silicone mat, and bring at least three inches of water to a boil in a large pot over high heat. Add 1 tablespoon baking soda, reduce the heat to medium-high and gently drop 2-4 bagels (as many as will fit without crowding) into the water. Boil for 1 minute, flipping the bagels halfway through.  If you can only fit one baking sheet, holding half a batch of bagels, in your oven at once, refrigerate the remaining unboiled bagels until the first pan is almost done baking, then boil and bake them.
  6. Place the boiled bagels on the prepared baking sheet.  Transfer the sheet to the oven, reduce the oven temperature to 450 degrees, and bake until the bagels are browned and feel hard, 13 minutes for small bagels and slightly longer for larger bagels. Cool completely before serving.
Source: Originally from Whole Grain Breads by Peter Reinhart as seen on Beantown Baker and The Way the Cookie Crumbles

Tuesday, March 29, 2011

Swedish Meatballs

This was a perfect meal for a cold night.  It's not at all healthy but hey, that's what makes it so delicious and so comforting.  Sweet, spicy, and creamy.  The flavor was wonderful!

I loved Joelen's tip about using a mini-muffin pan to bake the meatballs in a single large batch.  Sadly, I don't own a mini-muffin pan so decided to take my chances on just putting it on a rimmed cookie sheet.  Worked like a charm except that only the bottom (the part touching the pan) had a golden crust to it.  I'd imagine the same would be true even if I had used a muffin pan and they are covered in sauce anyway so who's looking.  This was a huge time saver and convenience so you can bet that I'll be using this method in other meatball applications :).

Now, I only had spaghetti noodles at the time but I think traditionally you'd serve this over more of an egg or broad flat noodle.  Good thing I have my giant 40 box stockpile of free pasta to work through so that next time I can do it right :P.  Yeah...remind me to tell you about that story sometime...

By the way...my 2nd blogiversary is coming up on April 9th!  I'm going to have my FIRST EVER give-away in honor of that so check back later this week for a post on how you can enter to win!

One Year Ago: The Easiest White Bean Chicken Chili


Swedish Meatballs
Printer-Friendly Version


Ingredients

For the meatballs:
  • 1 large egg
  • 1/4 cup half & half or heavy cream
  • 2 medium sized dinner rolls, torn into small pieces
  • 1/2 pound ground pork
  • 1 small onion, grated on large holes of box grater
  • 1/8 teaspoon freshly grated nutmeg
  • 1/8 teaspoon ground allspice
  • 1/8 teaspoon ground black pepper
  • 1 teaspoon packed brown sugar
  • 1 teaspoon table salt
  • 1 teaspoon baking powder
  • 1/2 pound ground beef (80-85% lean)
For the sauce:
  • 1 tablespoon unsalted butter
  • 1 tablespoon unbleached all purpose flour
  • 1 1/2 cups low sodium chicken broth
  • 1 tablespoon packed brown sugar
  • 1 cup caramelized mushrooms (optional)
  • 1/2 cup half & half or heavy cream (optional)
  • 2 teaspoons juice from 1 lemon 
Directions:
  1. Whisk egg and cream together in medium bowl. Stir in bread and set aside.
  2. Meanwhile, in stand mixer fitted with paddle attachment, beat pork, onion, nutmeg, allspice, pepper, brown sugar, salt, and baking powder on high speed until smooth and pale, about 2 minutes, scraping bowl as necessary. 
  3. Using fork, mash bread mixture until no large dry bread chunks remain; add mixture to mixer bowl and beat on high speed until smooth and homogeneous, about 1 minute, scraping bowl as necessary. 
  4. Add beef and mix on medium-low speed until just incorporated, about 30 seconds, scraping bowl as necessary. 
  5. Using a small or medium ice cream scoop, form  meatballs with wet hands and set aside; repeat with remaining mixture to form 25 to 30 meatballs.
  6. Spray a mini-muffin pan or rimmed cookie sheet with cooking spray.  Place individual meatballs into each muffin well or evenly space them on the cookie sheet.  Bake at 350 degrees for 15-20 minutes. Transfer browned meatballs to paper towel-lined plate and set aside.
  7. Heat a pan over medium-high heat and add butter. When foaming subsides, add flour and cook, whisking constantly, until flour is light brown, about 30 seconds. Slowly whisk in broth. Add brown sugar and caramelized mushrooms and bring to simmer. Reduce heat to medium and cook until sauce is reduced to about 1 cup, about 5 minutes. Stir in cream (if using) and return to simmer.
  8. Add meatballs to sauce and simmer, turning occasionally, until heated through, about 5 minutes. Stir in lemon juice, season with salt and pepper, and serve.
Source: As modified by and seen on Joelen's Culinary Adventures from Cook's Illustrated

Monday, March 21, 2011

Recipe Swap: Pierogi and Kielbasa Bake

My co-workers frequently ask me how I manage to work full time and cook the types of meals and treats that I do.  In this day and age, it seems so few actually take the time to make a home cooked meal anymore.  I'll admit in the past, I was one of those people.  I didn't have the slightest clue to how cook anything more than boxed mac n cheese or spaghetti with jarred sauce.  Oh, and if I was feeling really fancy, I'd brown some ground beef and that would be spaghetti with (still jarred) MEAT sauce!  Oooh fancy!

Enter my husband moving in with me and the need to feel domesticated.  On top of that add that I come from a family of cooks (Grandpa owned 2 restaurants and I had 3 aunts/uncles that also owned restaurants...the family that didn't own the restaurants cooked or waited on tables).  I was on the hunt to become a better cook.  This is when I stumbled upon The Nest and eventually, the What's Cooking message board (commonly referred to as simply "WC").  This place is a culinary-lovers dream.  A place for aspiring chefs, food photographers, and bloggers to share their creations with the world!

I'm inspired by the ladies on the WC message board.  They are part of the reason that I began blogging nearly twp years ago.  This is why when Sarah (oct11bride) of Taste of Home Cooking posted a call for people interested in participating in an "Easy Weeknight Meal" themed recipe swap I jumped right in.  The idea is simple.  You send an easy recipe that uses minimal ingredients and can be made in under and hour and then Sarah did some magical behind-the-scenes stuff to swap your recipe with someone else.  Then, you cook the recipe, write a review, and post it to the message board.  Cool!  I submitted a Chicken Bruschetta recipe (which hey, I made nearly 1 year ago to date!) and in return I received Melissa (bride2bnVA) from Lemons and Love's Pierogi and Kielbasa Bake recipe.

I'll have to admit that it was really warm today (a gorgeous 75 degrees! Helloooo first full day of Spring!) and so turning on the oven was the last thing I wanted to do but hey, all for the sake of a good meal, right?  Melissa doubled Cooking Light's original recipe but since it's just Chris and I, I scaled it back down.  To make myself feel more "Spring" and add some nutrition, I threw in some veggies that I had laying around in the fridge.  I didn't really want to open a whole (2 cup) can of chicken broth just to use 1/2 cup of it so instead I substituted a dry white Sauvignon Blanc wine.  And, because I love everything spicy and garlicy, I doubled the garlic and added a couple healthy dashes of cayenne pepper.  All these changes are reflected below.

This recipe was yummy and as promised, easy to create as a weeknight meal.  Okay...so I might have complicated it more than the version Melissa sent in the exchange but I still had dinner on the table in about 30 minutes so you can't say that's not fast!  It's a great base recipe that you can adjust to your personal tastes and make your own just like Melissa and I both did.  Muah, magnifico!

One Year Ago: Stuffed Shells and Look-Alike Hostess Cupcakes


Pierogi and Kielbasa Bake

Pierogi and Kielbasa Bake

Ingredients
  • 1 (16-ounce) packages frozen potato and cheese pierogies (such as Mrs. T's)
  • Cooking spray
  • 1/2 pound (8 oz) kielbasa, cut into small pieces
  • 2 garlic cloves, minced
  • Assorted veggies (used leftovers from my fridge - 1/4 red pepper, 1/4 green pepper, and a couple handfuls of frozen peas)
  • 4 ounces low-fat cream cheese (Neufchantel cheese)
  • 1/2 cup dry white wine (or fat-free, lower-sodium chicken broth)
  • 1/2 cup shredded sharp cheddar cheese
  • 1 diced roma tomato
  • 1/4 teaspoon freshly ground black pepper
  • A few shakes of cayenne pepper (optional)
Directions
  1. Preheat oven to 400°.
  2. Arrange the pierogies in an 11 x 7-inch glass baking dishes coated with cooking spray.
  3. In a saute pan over medium-high heat, add kielbasa and cook about 2-3 minutes, or until sausage begins to slightly brown.  Then, add garlic and fresh veggies (frozen can skip this step) and saute for a couple minutes longer. Add cream cheese, pepper, and cayenne pepper and cook for 1 minute or until cream cheese begins to melt, stirring frequently. Gradually add wine or chicken broth to pan, stirring with a whisk until smooth. Stir in tomatoes. 
  4. Remove pan from heat and spoon mixture over the pierogies.  If you have any frozen veggies, put those on top of the mixture and then top with 1/2 cup of shredded cheese. 
  5. Bake at 400° for 20 minutes or until bubbly and thoroughly heated.  Serve hot.
Source: Adapted from Lemons and Love who had adapted her version of the recipe from Cooking Light  

Wednesday, March 16, 2011

Handheld Breakfast Two Ways

And the award for Worst Blogger Award goes to...me.

Has it really been a month since I updated?  Shoot.  There goes my New Year's Resolution to try to update more frequently.  Somehow anytime I get a break in life (in this case going to New York City for a week long business trip) and/or begin intensely planning a vacation (c'mon, I'm going to Europe next month...don't tell me blogging would be at the top of your mind!) my blogging just goes by the wayside.  Don't get me wrong, I've still been cooking when I'm around...just not sharing the results with the world.  I've noticed that my web traffic and viewership have suffered as a result.  Drat!  How do the hard core bloggers do this so consistently?  Please share your tips!

So, as an apology, I am giving you a recipe two-for-one!  Honestly, it kind of works out in my favor because these two recipes were photographed together :D.  Remember that Quiche Lorraine that I made as part of my 23 Things in 2011 List?  These little handheld treats were also part of that same New Years Family Brunch.

The French Toast Cups with Sausage and Apples was definitely generally preferred over the Savory Muffins.  I mean what's not to love about sweet and salty combined into a single hand-held treat?  And for the cook, it's easy to increase the number of servings because the incremental work is minimal.  If I were to make that one again, though, I think I'd reduce the amount of butter in the apple and sausage mixture.  And, I found it made wayyyy more filling than was needed to fill my French toast cups so maybe reduce that by about half.  These changes are reflected below by simply doubling the french toast amounts and keeping the filling the same.  I also envision this as being a great concept for French Toast stuffed with more traditional cream cheese and fruit filling.  Yummo!

Our beagle Toby I think preferred the Muffins, though.  Of course, he kind of didn't have a choice.  One just kind of fell off of the cupcake tree (look, another purpose for those things!  Oh and thanks Mandy for buying this from my Secret Santa list!) when Mom was getting her serving.  Toby grabbed it in his mouth as soon as it hit the floor.  Thankfully he's good about giving up food when I tell him to so no damage done.

Do you like handheld breakfast treats?  These Bacon Egg and Toast Cups are sure to rock your world!

One Year Ago: Grasshopper Cookie Bars (perfectly green for St. Patty's Day!) and Peanut Butter Oatmeal Chocolate Chip Cookies (a trifecta of cookie classic goodness!)


French Toast Cups with Sausage and Apples
Yields: 12 Servings


Ingredients
For the French Toast Cups:
  • 12 slices of whole wheat bread
  • 6 eggs
  • 2 Tbs brown sugar
  • 1 tsp cinnamon
  • pinch nutmeg
For the Apple and Sausage Filling:
  • 1 cup diced apples
  • 1 cup (8 oz) breakfast sausage
  • 1/2 cup butter
  • 3 Tbs brown sugar
  • 1 tsp cinnamon
  • pinch nutmeg
  • 1/2 tsp vanilla extract
Directions
  1. Preheat oven to 400 degrees and butter a muffin pan. 
  2. Using a cookie cutter or wide rimmed glass, cut circles out of bread slices about 3 inches in diameter.  Whisk eggs and spices together.  Dredge bread circles in egg mixture and remove any excess egg
  3. Press bread circles into the muffin pan, bake in the oven for 12 - 15 minutes, until brown
  4. While bread is in the oven prepare breakfast sausage.  In another hot skillet melt butter, stir in brown sugar, cinnamon, nutmeg and vanilla.  Add apples to brown sugar mixture and cook until apples begin to soften and sugar mixture caramelizes.   Combine sausage and dripping with apples, stir.
  5. When french toast cups are done, allow to cool for a few mintues, remove from pan using a knife to separate from the pan.  Fill french toast cups with apple and sausage mixture, drizzle with maple syrup and serve.
Source: The Noshery 

Savory Breakfast Muffins
Printer-Friendly Version
Yields: 12 Muffins

Ingredients
  • 2 cups whole-wheat flour
  • 1 cup all-purpose flour
  • 1 tablespoon baking powder
  • 1/2 teaspoon baking soda
  • 1/2 teaspoon freshly ground pepper
  • 1/4 teaspoon salt
  • 2 eggs
  • 1 1/3 cups buttermilk
  • 3 tablespoons extra-virgin olive oil
  • 2 tablespoons butter, melted
  • 1 cup thinly sliced scallions, (about 1 bunch)
  • 3/4 cup diced Canadian bacon, (3 ounces)
  • 1/2 cup grated Cheddar cheese
  • 1/2 cup finely diced red bell pepper
Directions
  1. Preheat oven to 400°F. Coat 12 muffin cups with cooking spray.
  2. Combine whole-wheat flour, all-purpose flour, baking powder, baking soda, pepper and salt in a large bowl.
  3. Whisk eggs, buttermilk, oil and butter in a medium bowl. Fold in scallions, bacon, cheese and bell pepper. Make a well in the center of the dry ingredients. Add the wet ingredients and mix with a rubber spatula until just moistened. Scoop the batter into the prepared pan (the cups will be very full).
  4. Bake the muffins until the tops are golden brown, 20 to 22 minutes. Let cool in the pan for 5 minutes. Loosen the edges and turn the muffins out onto a wire rack to cool slightly before serving.
Make Ahead Tip:  Individually wrap in plastic and refrigerate for up to 3 days or freeze for up to 1 month. To reheat, remove plastic, wrap in a paper towel and microwave on High for 30 to 60 seconds.

Nutritional Information: (per muffin) 217 calories; 9 g fat ( 3 g sat , 4 g mono ); 50 mg cholesterol; 24 g carbohydrates; 9 g protein; 3 g fiber; 339 mg sodium; 113 mg potassium; Vitamin C (25% daily value), Fiber (13% dv).
  
Source: Eating Well, April/May 2005