Thursday, December 22, 2011

Cinnamon Roll Cookies

This cookie looks and tastes just like a cinnamon roll!  It made the house smell fantastic as it baked.  My husband was a little disappointed because they were crispier than he expected but that could be remedied by reducing the bake time or making the slices thicker.

Make this one to add a festive look to your holiday cookie platter!

Cinnamon Roll Cookies
Yields: 48 cookies
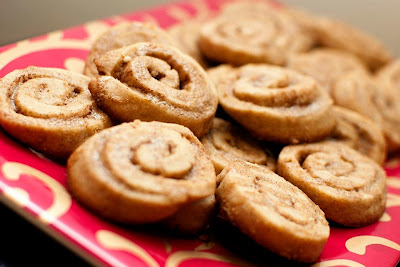
Cinnamon Roll Cookies
Photo Credit: Emily H.
For the cookies:
  • 1 cup (2 sticks) unsalted butter, softened
  • 1/2 cup brown sugar
  • 1/2 cup sugar
  • 2 eggs
  • 1 teaspoon vanilla
  • 2 teaspoons cinnamon
  • 3 cups flour
  • 2 teaspoons baking powder
  • 1 teaspoon salt

For the filling:
  • 1/4 cup (1/2 stick) unsalted butter, very soft
  • 1/4, plus 2 tablespoons packed brown sugar
  • 2 teaspoons cinnamon

For the icing:
  • 2 cups confectioners’ sugar
  • 2 tablespoons melted butter
  • 1/2 teaspoon instant espresso powder
  • 2 teaspoons vanilla
  • 2-4 tablespoons milk

Directions

  1. To make the cookies: In a medium bowl, combine the flour, cinnamon, baking powder, and salt; set aside.
  2. In a large bowl, or the bowl of a standing mixer, cream the butter and sugars together until light and fluffy. Add the eggs one at a time, and beat until just combined. Scrape the sides of the bowl, then add half of the flour mixture and mix until just combined. Add the remaining flour mixture and beat until thoroughly combined, scraping the bowl as needed. Scrape the dough into a ball in the center of the bowl, cover with plastic wrap, and chill in the freezer for 30 minutes, or the refrigerator for at least an hour.
  3. Once the dough is chilled, divide it into two equal halves. Place one half back in the bowl and put it back in the refrigerator for now. On a large piece of plastic wrap, pat the first half of the dough into a rectangle about nine inches by twelve inches, and about half an inch thick. Place half of butter on the dough and spread it all the way to the edges. Sprinkle half of the brown sugar evenly over the buttered dough and press the sugar into the dough. Finally, sprinkle half of the cinnamon evenly over the dough. Use the plastic wrap to tightly roll the dough into a log. Place the log in the freezer for 30 minutes or the refrigerator for at least an hour. Repeat with the remaining half of the dough and filling ingredients.
  4. Preheat the oven to 350 degrees. Line a baking sheet with Silpat mats or parchment paper.
  5. After the dough has chilled again, slice each log into half inch slices (about 24 per log). Place on the prepared baking sheets and bake for 10 to 12 minutes. Transfer to a wire cooling rack and allow to cool completely before icing.
  6. To make the icing: In a medium bowl, combine the butter and instant espresso powder. Add the confectioners’ sugar and vanilla and whisk until it just comes together. Next, add the milk, one tablespoon at a time until the desired consistency is reached. It should be thin enough to drizzle, but thicker than a glaze.
  7. With the cookies on a wire cooling rack set over parchment paper, drizzle the icing over the them with your whisk. Allow the cookies to set up for a few minutes before stacking or storing.

Source: Bakingdom as seen on Sing For Your Supper

Wednesday, December 21, 2011

Build Me Up Butterfinger Cup

This cookie was made at the request of my husband.  Apparently he follows the brand page for Butterfinger on facebook and occasionally he will post a photo and tag myself (and Emily, sometimes Jackie, too now!) requesting that we bake it for him.  We joke that we aren't his baking slaves...

Yet, look what I ended up making for him as one of my exchange cookies, anyway.  The name of the cookie is cute...and gets the Build Me Up Buttercup song stuck in my head everytime I read it.  Oh boy.  The cookie is baked in a mini-muffin tin and definitely has the texture of a muffin more-so than a cookie.  That's not to say it's not delicious and the eater is in for a surprise as they get a mouthful of surprise butterfinger!

Make this one for the sweet tooth in your life ;).


Build Me Up Butterfinger Cup
Yields: 24 cookies

Ingredients

  • 6 tablespoons unsalted butter
  • 3/4 cup packed brown sugar
  • 1/2 teaspoon vanilla extract 
  • 2 large eggs, room temperature
  • 3/4 teaspoon baking soda
  • 1/2 teaspoon baking powder
  • 1/4 teaspoon salt
  • 1 3/4 cups all purpose flour
  • 12 mini butterfingers, halved
  • Melted chocolate chips and butterscotch chips (I used caramel) for drizzling, optional
Directions

  1. Melt butter in a small saucepan over medium heat; cook for 2-3 minutes, whisking frequently, until butter foams and starts to brown. Remove butter from heat and pour into a large mixing bowl. Add brown sugar and extract, and mix using a mixer on medium speed for 2 minutes or until well incorporated and mixture is grainy. Beat in eggs until well combined - about 2 minutes. Reduce mixer speed to low and beat in baking soda, baking powder and salt until combined. Beat in flour until just combined.
  2. Freeze or refrigerate batter for 30 minutes or until well chilled. 
  3. Heat oven to 350 degrees F. Coat a (24 cup) mini muffin pan with cooking spray.
  4. Place 1/2 teaspoons of dough into bottom of cups. Press a Butterfinger half into the dough in each cup. Evenly top Butterfingers with remaining dough. Bake 12 minutes or until puffed and light golden brown.
  5. Cool 5 minutes before transferring cups to a wire rack to cool completely. Drizzle with melted chocolate and butterscotch (or caramel).

Source: Sugar Plum Blog

Sunday, December 18, 2011

Peanut Butter Cookie with Salted Peanut Caramel

Hello friends.  I'm sorry that I haven't blogged AT ALL this month.  It's been busy, to say the least.  Somehow, I still found time to participate in not one but two holiday cookie exchanges, though.  So, I figure I'll share the yummy cookie recipes with you all this week.

This one was my favorite of the three that I made.  I'm a sucker for anything with caramel (and, I'll admit to cheating and making semi-homemade caramel in this case but left the original recipe intact in case you have more time than I did).  They're pretty, too.  A wonderful addition to any holiday spread!

Peanut Butter Cookie with Salted Peanut Caramel

Yields: 50 cookies


Peanut Butter Cookie with Salted Peanut Caramel
Photo credit: Emily H.
For the cookie dough
  • 8 tablespoons (115g) unsalted butter, at room temperature
  • 1/2 cup (120g) packed light brown sugar
  • 1/2 cup (100g) granulated sugar
  • 1 large egg, at room temperature
  • 1 teaspoon vanilla extract
  • 3/4 cup (200g) creamy salted peanut butter (see Note)
  • 1 3/4 cups (250g) flour
  • 1/2 teaspoon baking soda
  • 1/4 teaspoon salt
For the salted peanut caramel*
  • 1 cup (250ml) heavy cream
  • 1/2 cup (125ml) water
  • 1 cup (200g) granulated sugar
  • 1 tablespoon light corn syrup
  • 1/8 teaspoon coarse salt
  • 3/4 cup (100g) finely chopped roasted salted peanuts
*Note: If you're feeling lazy like me, just add a splash of cream (or milk) and pinch of salt to caramel candies  and melt those down.  Fill the thumbprint wells with the caramel mixture then top with chopped nuts.


Optional: 4 ounces bittersweet, semisweet, or milk chocolate, melted


Directions 
  1. Preheat the oven to 350F and line two baking sheets with parchment paper or silicone baking mats.
  2. With an electric mixer, or by hand, make the cookie dough by beating the butter, brown and granulated sugar until smooth. Beat in the egg and vanilla until well blended. If using an electric mixer, scrape down the sides of the bowl. Beat in the peanut butter.
  3. In a separate bowl, whisk or sift together the flour, baking soda, and salt. Gradually add the dry ingredients to the peanut butter mixture and stir until there are no patches of flour.
  4. Scoop up tablespoon-sized portions of the dough and roll each piece between your hands so they’re as smooth as possible so they don’t crack at the edges when performing the next step.
  5. Space them 1 1/2-inches (2 cm) apart on the baking sheets, then use the rounded end of a wooden spoon, or your thumb, to make a depression in each one. Don’t worry much if the sides crack; push them back together.
  6. Bake the cookies for 13-16 minutes, rotating the baking sheets midway during cooking, until they are light-golden brown and the edges barely start to darken. Remove from oven, and while they’re warm, press in to reinforce each depression with the end of the wooden spoon. Let cool completely.
  7. Make the salted peanut caramel by warming the cream in a saucepan or microwave, and setting it aside.
  8. Cook the water, 1 cup sugar, corn syrup, and salt to a caramel, gently swirling the pan only if necessary (to ensure it melt and cooks evenly) until it turns a nice golden brown. Remove from heat and immediately whisk in the hot cream in a slow, steady stream.
  9. Cool until warm and pourable, then add the chopped peanuts. Spoon some of the caramel into each cookie, letting it set for about an hour, if you want to drizzle them with chocolate.
Storage: Cookies will keep in an airtight container, at room temperature, for 3 to 4 days. The unbaked dough can be rolled into rounds and stored in a heavy-duty freezer bag in the refrigerator or freezer, until ready to bake.
Source: The Art and Soul of Baking by Cindy Mushet as adapted by and seen on David Lebowitz

Friday, December 2, 2011

Recipe Swap: Cranberry White Chocolate Almond Cookies

I brought these cookies to my family Thanksgiving and all but 3 lonely cookies were devoured despite having some fierce competition from pumpkin pie, oreo ice cream cake, thumbprint cookies, pumpkin rolls, and more.  I had not one person, but three different aunts/uncles that asked me for the recipe.  And now, I'm sharing them with you :).  These cookies burst with goodies...in fact, I might actually decrease the amount of chips in the future out of personal preference for a higher cookie to stuff ratio but left the directions as is for now.

Thanks again for A Taste of Home Cooking for hosting the swap (this edition was Thanksgiving Desserts)!  I'm not sure yet who got my post and I gave them two options so I'll come back and update this post later once I know.  I didn't tell you but I'm secretly floating somewhere in the Caribbean Sea as you're reading this right now.  Ahhh, sand between my toes and sun on my face :D.

Cranberry White Chocolate Almond Cookies

Ingredients
  • 3 cups all-purpose Flour
  • 1 teaspoon Baking Soda
  • 1 teaspoon Salt
  • 1 cup unsalted Butter, room temperature
  • 1 cup Brown Sugar
  • 2 whole large Eggs
  • 1 tablespoon Vanilla
  • 1 cup dried Cranberries
  • 1 cup White Chocolate Chips
  • 3/4 cup chopped Almonds
Directions
  1. Preheat oven to 350F degrees.
  2. Beat butter and sugar in a large mixing bowl until fluffy, about 2-3 minutes.  Beat in eggs, one at a time. Then add vanilla and mix.  Add dry ingredients until just blended.  Add cranberries, chocolate and almonds and incorporate into dough.
  3. Drop by the heaping Tablespoon onto an ungreased cookie sheet leaving 1 - 1.5 inches between each drop.
  4. Bake at 350F degrees for about 12 minutes or until lightly golden brown.
Source: As swapped by Jenna's Cooking Journey and slightly modified from Through the Bugs on my Windshield