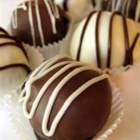
So far I have made this recipe using strawberry cake/vanilla frosting/white and milk chocolate coating for Valentine's Day and carrot cake/cream cheese frosting/white candy bark for Easter. My next adventure? I'm thinking possibly chocolate cake/chocolate frosting/mint chocolate coating...mmm...just like a thin mint!
Cake Balls(Source: Modified from All Recipes)
PREP TIME 40 Min
COOK TIME 1 Hr 20 Min
READY IN 2 Hrs
~60 servings (1" balls)
INGREDIENTS (Nutrition)
- 1 (18.25 ounce) package chocolate (or preferred variety) cake mix
- Up to 1 (16 ounce) container prepared chocolate (or preferred variety) frosting
- 1/2 package candy bark coating OR bag of chocolate chips (of preferred variety)
- Sprinkles to decorate (optional)
- Prepare the cake mix according to package directions using any of the recommended pan sizes. When cake is done, allow to cool for about 30 minutes.
- Place wax paper on a cookie sheet and place into freezer to chill.
- Put cake into a large bowl and blend in the frosting (start with 1/2 container and add more as needed; Use less for a more cake-like texture - it will still look a bit crumbly which I find ideal) using a mixer. Mix until well-blended.
- Melt chocolate coating in a glass bowl in the microwave, or in a metal bowl over a pan of simmering water, stirring occasionally until smooth.
- Remove cookie sheet from freezer. Use a melon baller, small scoop, or hands to form ~1" balls of the cake mixture. Roll balls to desired shape and place on cookie sheet. Place balls in freezer for ~30 minutes. If using toothpicks to dip, insert one toothpick per ball before placing into freezer.
- Dip the balls in chocolate using a toothpick or use spoon to get balls out of chocolate. Place on waxed paper and put in refridgerator to set. Referigerate until ready to serve.
- I have made the recipe with both a full can of frosting (per directions) and ~1/2 can. I prefer the more cake-like texture of the lesser amount of frosting. Suggest you start with 1/2 can and add more as needed to suit your tastes.
- Make sure cake has cooled a bit before mixing with frosting or it gets too gooey. Refridgerating mixture and/or adding less frosting helps with rolling if your mixture is too sticky.
- I put a wax paper lined baking sheet into the freezer ahead of time and pull it out when I'm ready to roll the balls. If you prefer to use toothpicks to dip (method similar to buckeyes), put them in now. Then put the tray of balls into the freezer for ~20-30 minutes.
- I use a glass measuring cup in a pot of water on the stove to melt my chocolate and keep it warm throughout the dipping process. If I had a double broiler, I'd use that :).If using chocolate chips you may want to thin it with oil. No need to thin the candy bark (coating) if you use that.
- When balls are sufficiently frozen, put into chocolate mixture. If using toothpick method, dip and remove using toothpick. Otherwise use spoon to get them out. Tap the spoon to remove excess chocolate and then let ball slide back down onto the chilled baking sheet. If you want to decorate with sprinkles, do it now while the chocolate is wet. Put balls in fridge until chocolate hardens. Keep refridgerated until ready to serve.
- If it doesn't turn out too pretty, no worries, it'll still taste delicious! Keep practicing and you'll get the hang of things :)
No comments:
Post a Comment