Saturday, October 31, 2009

Pumpkin Whoopie Pies

In keeping with my pumpkin theme for the week, I decided to make these sweet little hand held treats.  Not quite a cupcake, not quite a cookie, and not at all really a pie...but oh so delicious!  I follow many cooking blogs and whoopie pies of various varieties seemed to keep coming up.  I had to try my hand at them and they are yummy!

The legend is that the Amish women used to bake them and put them in their husband's lunch boxes.  When the men broke for lunch after a hard day of farming and opened their lunch box to find these treats, they were rumored to have yelled "whoopie!" out of excitement.  After eating these sweet little babies, I can see why!

On a separate note, I had posted about being excited about making "whoopie pies tonight" and apparently Billy's head was in the gutter :P.  For the record, these are whoopie PIES, not whoopie :).  Totally family friendly!

Pumpkin Whoopie Pies 
Printer-Friendly Version

Photo Credit: Erin's Food Files


Ingredients
  • 3 cups all-purpose flour
  • 1 teaspoon salt
  • 1 teaspoon baking powder
  • 1 teaspoon baking soda
  • 2 tablespoons ground cinnamon
  • 1 tablespoon ground ginger
  • 1 tablespoon ground cloves
  • 2 cups firmly packed dark-brown sugar
  • 1 cup vegetable oil
  • 3 cups pumpkin puree, chilled
  • 2 large eggs
  • 1 teaspoon pure vanilla extract
Directions:
  1. Make the cookies: Preheat oven to 350 degrees. Line two baking sheets with parchment paper, a nonstick baking mat, or grease well with butter; set aside.
  2. In a large bowl, whisk together flour, salt, baking powder, baking soda, cinnamon, ginger, and cloves; set aside. In another large bowl, whisk together brown sugar and oil until well combined. Add pumpkin puree and whisk until combined. Add eggs and vanilla and whisk until well combined. Sprinkle flour mixture over pumpkin mixture and whisk until fully incorporated.
  3. Using a small ice cream scoop with a release mechanism, drop heaping tablespoons of dough onto prepared baking sheets, about 1 inch apart. Transfer to oven and bake until cookies are just starting to crack on top and a toothpick inserted into the center of each cookie comes out clean, about 15 minutes. Let cool completely on pan.

Maple Cinnamon Cream Cheese Frosting 
As seen on Erin's Food Files, originally adapted from Baked

Ingredients
  • 3 cups powdered sugar
  • ½ cup unsalted butter, at room temperature
  • 8 ounces cream cheese, at room temperature
  • 3 TBSP maple syrup
  • 1 tsp vanilla
  • 1/2 tsp freshly ground cinnamon
Directions
  1. In the bowl of an electric mixer fitted with a paddle attachment, beat the butter until smooth with no visible lumps. Add the cream cheese an beat until combined.
  2. Add the powdered sugar, maple syrup and vanilla and beat until smooth. Add cinnamon. Be careful no to overbeat the filling, or it will lose structure.
To assemble: Turn half the cooled cookies upside down. Pipe filling (about a TBSP) onto that half. Place another cookie, flat side down, on top of the filling. Press down slightly so that the filling spread to the edges of the cookie. Repeat until all the cookies are used. Put the whoppie pies in the refrigerator for about 30 minutes to firm before serving.

Source: From Baked, as seen on Martha Stewart

Thursday, October 29, 2009

Turkey Bean Pumpkin Chili

I know what you're thinking...pumpkin in chili?!  I know, those were my exact thoughts, too.  But I saw this recipe in a blog that I follow and out of intrigue I bookmarked it.  In honor of Halloween, I decided now was the perfect time to give this one a shot and I'm glad that I did.  You can barely detect the pumpkin...I feel like it contributes a velvety texture and a boost of nutritition but under the radar!  Who doesn't like recipes with extra hidden veggies?!  Not to mention turkey chili has to be healthier than the typical beef versions...

I was hestitant at first to add the cinnamon but then I figured Skyline Chili is rumored to have cinnamon (and chocolate!) in it and I LOVE it so maybe it'd be good in this type of chili too (and makes sense with pumpkins, in my mind).  When I first did and tasted it I freaked out because it tasted so prominent and weird and I thought I had ruined my chili.  But by the end of the simmering time the spice flavor had mellowed and it added a nice note of complexity to the chili.  Delicious!

Turkey Bean Pumpkin Chili
Printer-Friendly Version


Photo Credit: Erin's Food Files


Ingredients
1 tablespoon vegetable oil
1 cup chopped onion
1/2 green bell pepper, chopped
1/2 yellow bell pepper, chopped
2 large cloves garlic, minced
1 pound ground turkey
2 14.5oz can diced tomatoes with jalepenos
1 14.5oz can red kidney beans, rinsed and drained
1 14.5oz can black beans, rinsed and drained
1/2 cup frozen corn
2 cups (1 14.5 ounce can) pumpkin puree
1 12oz can tomato juice OR 1 14.5oz can tomato sauce (optional)
1 1/2 tablespoons chili powder
1/2 tablespoon cumin
cayenne pepper to taste
3/4 teaspoon salt
1/2 teaspoon freshly ground black pepper
dash of cinnamon (optional)
fresh cilantro (optional)
shredded Cheddar cheese (optional)
sour cream (optional)

Directions
  1. Heat oil in a large skillet or Dutch oven over medium-high heat.
  2. Saute the onion, green bell pepper, yellow bell pepper, jalapeno, and garlic until tender, about 10 minutes. Make room in the center of the skillet, add turkey, and brown, about 10 minutes. Stir in tomatoes, beans, pumpkin, corn. Season with chili powder, cumin, pepper, salt, and cayenne.  If preferred, thin the chili with tomato juice or sauce and add a dash of cinnamon.
  3. Reduce heat and simmer at least 20 minutes. If preferred, stir in fresh cilantro and serve topped with Cheddar cheese and sour cream.
Source: Adapted from Erin's Food Files

Sunday, October 18, 2009

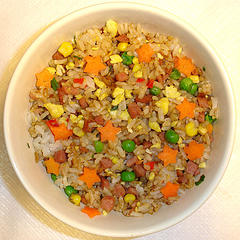
Christine's Fried Rice

I found another use for that leftover turkey.  I must admit (and hang my head in shame) that until this past week I have NEVER made fried rice before!  I know...what kind of Chinese person am I?!  But, I had tons of leftover refrigerated rice from our dinner party and also leftover turkey from another night's dinner and so a creative solution was born!  Everybody in the know knows that they key to great fried rice is that it's nice and cold/refrigerated so this was a perfect use!  I would have loved to use Momma L's recipe for fried rice but alas, most things like this (and most family Chinese food recipes in general) do not have written recipes.  And so I searched the internet for a point to begin and then found the inspiration from the inner Momma Louie in myself to create this original recipe.  I thought it turned out very good for my first attempt and I hope you enjoy it

Christine's Fried Rice
Printer-Friendly Version


INGREDIENTS
  • 2 c. white rice (uncooked)
  • 1/2 small onion, diced
  • 1 1/2 c. frozen mixed vegetables
  • 1 c. various cooked meat (ham, chicken, turkey, shrimp, etc.), diced 
  • 2 Tbsp. vegetable oil
  • 2 eggs (optional)
  • Oyster sauce, to taste (start with about 1 tsp.) 
  • Reduced sodium soy sauce, to taste
  • Seasoning salt, to taste
  • Garlic powder, to taste
  • Pepper, to taste 
  • Drizzle of sesame oil (optional)
DIRECTIONS
  1. Make rice in a rice cooker per your unit's directions then put in refrigerator until well cooled.  Day old rice works best! 
  2. In a small bowl, thaw frozen vegetables by adding some water.  Drain and set aside.
  3. Heat wok over high heat. Pour in oil, then stir in onions, mixed vegetables, and meat; cook until onions are translucent and meat is heated.
  4. If desired, crack in eggs, stirring quickly to scramble eggs with vegetables and meat.
  5. Stir in cooked cooled rice. Shake in oyster sauce, soy sauce, and seasonings tossing rice to coat.  Heat until rice is warmed.  Taste and adjust seasonings as necessary. 
  6. Drizzle with sesame oil if desired and toss again.  Serve hot.
Source: A Christine's Kitchen Chronicles original inspired by Momma L. and the internet